
Banana nut bread is a comforting homemade recipe, perfect for a sweet treat or a delightful snack. This easy guide helps you create moist, flavorful bread with ripe bananas and crunchy walnuts. Follow simple steps for a truly delicious result, whether for breakfast or an afternoon pick-me-up.
Key Takeaways
- Achieve moist banana nut bread using perfectly ripe bananas and proper mixing techniques.
- Understand the distinct roles of wet and dry ingredients in creating the ideal batter consistency.
- Learn the optimal oven temperature and baking time to ensure a beautifully cooked loaf.
- Gain valuable tips for cooling, serving, and effectively storing your fresh homemade bread.
Baking banana nut bread brings warmth. Ripe bananas are key. Mix carefully for soft texture. Enjoy the sweet, nutty aroma. A simple joy for any kitchen.
Get Ready to Bake Bread
Simple Recipe Overview
There’s nothing quite like the aroma of freshly baked banana nut bread wafting through your home. This homemade recipe offers a comforting embrace, blending the natural sweetness of ripe bananas with the satisfying crunch of walnuts. It’s a delightful sweet treat that serves as a perfect breakfast item, an afternoon pick-me-up, or a thoughtful gift for loved ones. Our goal is to guide you through easy steps, ensuring your baking adventure is enjoyable and yields a consistently moist bread loaf. You’ll learn the secrets to achieving that ideal texture and flavor that makes this classic a perennial favorite. We’ll cover everything from selecting the best ingredients to expert baking tips for a truly irresistible outcome. Prepare your kitchen for the wonderful process of creating this beloved quick bread. This recipe is designed to be straightforward, making it accessible for bakers of all skill levels to produce a perfectly baked loaf that everyone will adore. Enjoy a piece of this comforting snack with a cup of coffee or tea, truly making it a delightful experience.
Ingredients for Banana Nut Bread
What You Will Need
To create a truly exceptional banana nut bread, the quality of your ingredients matters. You’ll need a selection of pantry staples and, most importantly, very ripe bananas. For this delightful homemade recipe, gather items such as all-purpose flour, baking soda, salt, granulated sugar, eggs, melted butter, vanilla extract, and of course, your star ingredient: ripe bananas. The beauty of this quick bread lies in its straightforward component list, which contributes to its status as a consistently delicious and comforting snack. Ensuring you have all your ingredients measured and ready before you begin will make the baking process much smoother and more enjoyable. Think of it as preparing your canvas before painting a masterpiece. Having everything at hand prevents last-minute scrambling and allows you to focus on the pleasurable act of creating this wonderful sweet treat. This attention to detail is one of the crucial baking tips that can significantly improve your final product.
All-Purpose Flour Needed
The foundation of any great bread is its flour. For our banana nut bread, all-purpose flour is the go-to choice due to its balanced protein content, which provides the perfect structure without making the bread too dense. It helps achieve that desired moist bread texture, allowing the other ingredients to shine. While some recipes might call for specialized flours, all-purpose flour works beautifully for this homemade recipe, ensuring a tender crumb and a robust loaf. When measuring flour, always spoon it into your measuring cup and then level it off with a straight edge rather than scooping directly from the bag. This prevents compacting the flour, which can lead to a drier, tougher bread. Properly measured flour is one of the fundamental baking tips for any quick bread, contributing significantly to the bread’s overall lightness and softness. This careful approach to flour handling is an easy step that yields professional-quality results every time.
Preparing Wet Ingredients First
Mashing Ripe Bananas
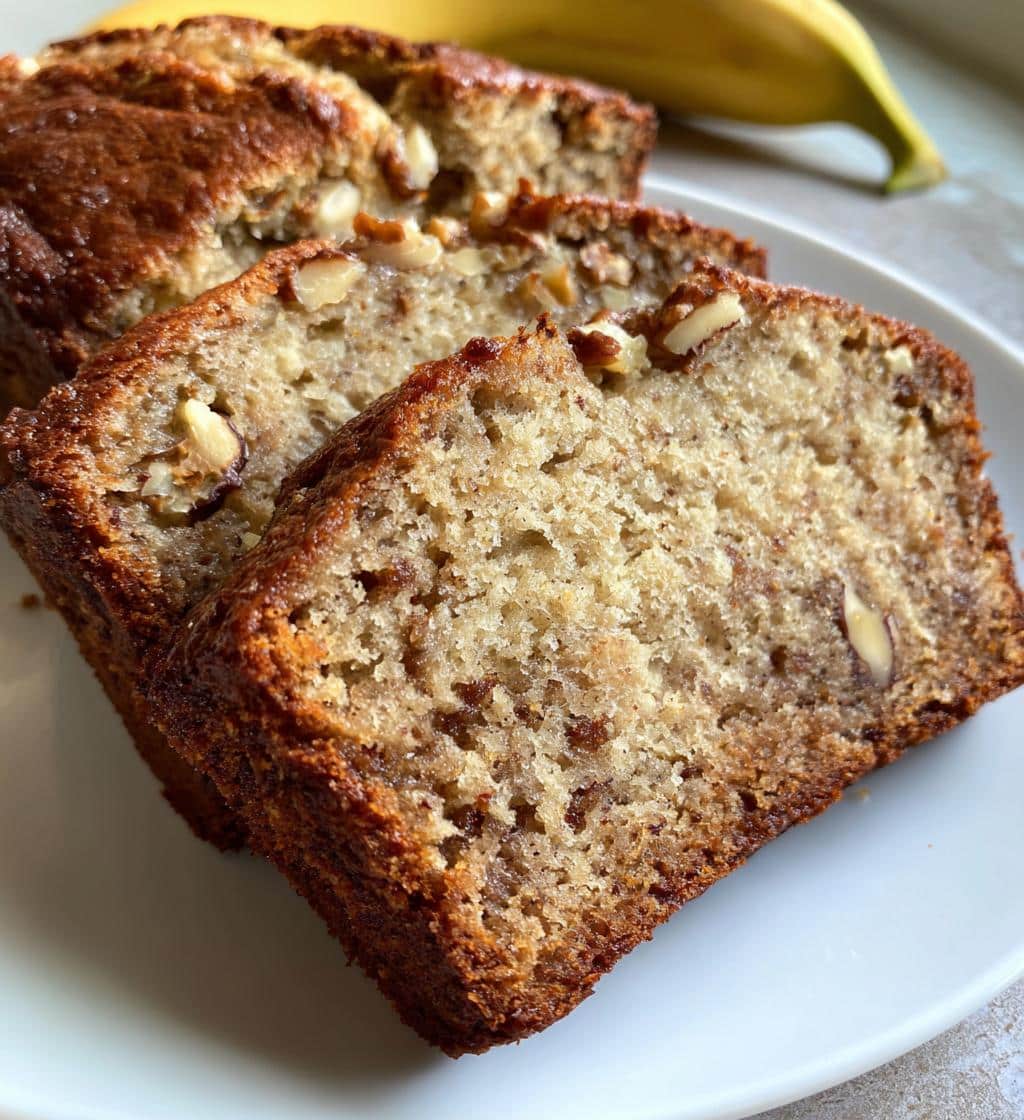
The key to truly flavorful and moist banana nut bread lies in using perfectly ripe bananas. Look for bananas that have developed plenty of brown spots, indicating their sugars are fully developed, intensifying their flavor and making them easier to mash. For this homemade recipe, you’ll need to thoroughly mash the ripe bananas. This can be done easily with a fork in a medium-sized bowl, aiming for a lumpy but mostly smooth consistency. The lumps add little pockets of banana flavor throughout the bread, contributing to its comforting snack appeal. The ripeness of the bananas is arguably the most critical factor for a naturally sweet and exceptionally moist bread. Don’t be afraid if they look "overripe" – those are the best for baking! Many other dessert recipes also benefit from carefully prepared fruit. This is a fundamental step that sets the stage for a truly delicious loaf.
Stirring in Melted Butter
Once your ripe bananas are mashed, the next crucial step in preparing the wet ingredients for your banana nut bread is to stir in the melted butter. Butter adds richness, flavor, and helps create that desirable moist bread texture. It’s important to melt the butter gently, then let it cool slightly before incorporating it into the banana mixture. Adding hot butter could inadvertently cook the eggs later, which we want to avoid for a smooth batter. After the butter, you’ll blend in other wet components like granulated sugar and vanilla extract, creating a harmonious base for your sweet treat. These additions contribute to the overall depth of flavor, ensuring every bite of your homemade bread is enjoyable. This careful layering of ingredients is part of the baking method that ensures a consistently excellent result. Consider exploring our Pinterest account for more visual inspiration on preparing ingredients.
Combining Dry Elements Together
Adding Baking Soda and Salt
While your wet ingredients are harmonizing, it’s time to prepare the dry components for your banana nut bread. In a separate large bowl, whisk together your all-purpose flour with leavening agents like baking soda and a pinch of salt. Baking soda is crucial for helping the bread rise and achieve a light, airy texture, especially when combined with the acidic ripe bananas. Salt, though often overlooked, plays a vital role in enhancing all the other flavors in the bread, preventing it from tasting flat. Ensure these dry ingredients are thoroughly whisked together; this is an easy step that evenly distributes the leavening and seasoning, ensuring a consistent rise and flavor throughout your loaf. This preliminary mixing prevents pockets of unmixed baking soda or salt, which can affect the final taste and texture of your moist bread. It’s a foundational technique in any homemade recipe.
Mixing in Sugar and Egg
Following the preparation of your dry elements, the process of bringing the remaining crucial ingredients together begins. Though often considered wet ingredients, the outline guides us to address the integration of sugar and egg in this stage of combination. After whisking your flour, baking soda, and salt, you might find some recipes instruct you to introduce a portion of the sugar with the dry ingredients to ensure even distribution. However, in most standard quick bread recipes, granulated sugar is typically creamed with butter or blended directly into the mashed banana mixture (which includes melted butter and sometimes eggs already). For the purpose of this outline, we consider this the point where these components are either added into the dry mix or are prepared to be folded in very soon. The eggs provide structure and moisture, while the sugar contributes to the overall sweetness and tenderness of the final banana nut bread. The careful incorporation of these elements ensures a well-balanced, sweet treat that embodies the essence of a comforting snack. Proper mixing is one of the critical baking tips to prevent a dense or crumbly loaf.
Folding in the Flour Mix
Gentle Flour Incorporation
Once your wet and dry mixtures are separately prepared, the magic of creating your banana nut bread batter truly begins. The key here is gentle flour incorporation. Add the dry ingredient mixture to the wet banana mixture gradually, mixing just until everything is combined. Overmixing is the enemy of moist bread, as it develops the gluten in the flour too much, leading to a tough and chewy texture. Use a spatula or wooden spoon and fold the ingredients together carefully, ensuring no streaks of dry flour remain. This is one of the most important baking tips for any quick bread, preserving its delicate crumb and ensuring a perfectly tender result. This careful approach makes all the difference in achieving that ideal, melt-in-your-mouth consistency that defines a truly delicious homemade loaf. Mastering this technique is an easy step to elevate your baking skills.
Chopped Walnuts for Flavor
With the flour gently incorporated, it’s time to add the star crunch: chopped walnuts for flavor and texture. Walnuts complement the sweet banana notes beautifully, adding a delightful crunch and a hint of earthy richness to your banana nut bread. You can toast the walnuts lightly before adding them to enhance their nutty flavor, though this is an optional step. Fold them into the batter until evenly distributed, being careful not to overmix. If walnuts aren’t your preference, feel free to substitute with pecans, chocolate chips, or even a mix of both. These additions turn a simple homemade recipe into a personalized sweet treat, adding character and depth to every slice. The inclusion of walnuts elevates this comforting snack, making it even more satisfying. This step truly embodies the “nut” in banana nut bread, making it a perfectly balanced flavor profile.
Baking Your Banana Nut Bread Loaf
Oven Temperature Setting
Proper oven temperature is paramount for a successful banana nut bread. Before you even think about pouring your batter, ensure your oven is preheated to the correct temperature, typically around 350°F (175°C). An accurately preheated oven ensures that the leavening agents activate properly from the start, leading to a consistent rise and an evenly baked loaf. Using an oven thermometer can help verify your oven’s accuracy, as many ovens can run hotter or colder than their display indicates. This attention to detail is a fundamental baking tip that prevents a dense middle or over-browned edges. A stable oven temperature is critical for achieving that perfectly risen, golden-brown crust and a thoroughly cooked, moist bread interior. This careful temperature management is an easy step to professional-looking results.
Greasing the Loaf Pan
To ensure your beautiful banana nut bread loaf releases effortlessly from the pan, proper preparation is essential. Before pouring in your batter, take the time to thoroughly grease the loaf pan. You can use butter, cooking spray, or even a light coating of vegetable oil. For an extra layer of protection against sticking, lightly flour the greased pan, tapping out any excess. This creates a non-stick surface that will make removing your finished sweet treat a breeze, preventing any frustrating sticking points. A well-prepared pan also contributes to an even crust development around the entire loaf. This simple yet crucial step ensures your homemade recipe looks as good as it tastes. A perfectly released loaf is always a satisfying sight in the kitchen, ready to be enjoyed as a comforting snack. This small effort makes a big difference in the final presentation and enjoyment of your baked goods, like our peanut butter brownie swirl cookies.
Timing Your Bake Perfectly
Checking for Doneness
One of the most common challenges in baking banana nut bread is knowing exactly when it’s done. Overbaking can lead to dry bread, while underbaking results in a gooey, raw center. The most reliable method for checking for doneness is the toothpick test. Insert a wooden toothpick into the center of the loaf. If it comes out clean or with a few moist crumbs attached, your bread is ready. If it comes out with wet batter, it needs more time. Keep an eye on the color of the crust; a deep golden brown usually indicates it’s almost there. This critical baking tip helps ensure your homemade recipe yields a consistently moist bread. Learning to trust your senses and this simple test will make you a more confident baker, always producing a perfectly baked loaf for a delicious and comforting snack.
Total Baking Time
The total baking time for banana nut bread typically ranges from 50 to 70 minutes, depending on your oven, the size of your loaf pan, and the moisture content of your batter. It’s always best to start checking for doneness around the 50-minute mark to prevent overbaking. If the top of your loaf is browning too quickly before the inside is fully cooked, you can loosely tent it with aluminum foil for the remainder of the baking time. This easy step protects the crust while allowing the interior to finish baking. Patience is a virtue in baking, especially with banana bread. Trust the process and your toothpick test. A perfectly timed bake results in a golden-brown exterior and a tender, moist bread interior, truly making this sweet treat a highlight from your kitchen. You’ll be proud to serve this perfect loaf. For more delicious dinner ideas, check out our creamy chicken alfredo lasagna rolls.
Cooling and Serving Bread
Allowing Bread to Cool
Once your beautiful banana nut bread emerges from the oven, resist the urge to slice into it immediately. Allowing bread to cool is a crucial, often overlooked step that significantly impacts its texture and flavor. First, let the loaf cool in its pan on a wire rack for about 10-15 minutes. This allows the bread to firm up slightly and continue cooking gently from its residual heat. After this initial cooling period, carefully remove the bread from the pan and place it directly on the wire rack to cool completely. This prevents the bottom from becoming soggy due to trapped steam. A fully cooled loaf will slice much more cleanly, and its flavors will have a chance to fully develop. This patient approach is one of the top baking tips for achieving that perfect moist bread texture, ensuring your homemade recipe is a truly delicious comforting snack. This final step is an easy step towards perfection.
Nutrition of Banana Nut Bread Slice
Calories Per Serving
While banana nut bread is undeniably a delicious sweet treat, many are curious about its nutritional profile. A typical slice of homemade banana nut bread can vary in calories per serving, generally ranging from 200 to 300 calories, depending on the recipe’s specific ingredients and portion size. Factors like the amount of sugar, butter, and nuts (especially if additional chocolate chips are included) will influence the calorie count. The presence of ripe bananas contributes natural sugars, while walnuts add healthy fats. Understanding these general figures can help in mindful enjoyment of this comforting snack. It’s an easy step to check calorie information if you are tracking your intake. Remember, homemade versions often allow for some control over ingredients to potentially adjust calorie content.
Protein and Fiber Content
Beyond the calorie count, banana nut bread also offers beneficial protein and fiber content, making it more than just a simple sweet treat. The eggs used in the homemade recipe contribute a significant amount of protein, which is essential for muscle repair and satiety. Walnuts are also a good source of plant-based protein, healthy fats, and dietary fiber. Meanwhile, the ripe bananas themselves are excellent sources of dietary fiber, which aids digestion and can help regulate blood sugar levels. This combination of fiber and protein helps make a slice of moist bread a more satisfying and nutritious choice compared to some other baked goods. It’s a comforting snack that delivers more than just great taste, especially when enjoyed in moderation. These nutritional aspects are great baking tips for balancing indulgence with health benefits.
Essential Banana Nut Bread Tips
Best Banana Ripeness
For the truly delicious and moist bread characteristic of banana nut bread, the best banana ripeness is absolutely crucial. Aim for bananas that are heavily spotted with brown or even completely black. At this stage, the starches in the bananas have converted into sugars, making them incredibly sweet and easy to mash, and imparting a deep, concentrated banana flavor to your homemade recipe. Underripe bananas will result in less flavor and a denser texture. If your bananas aren’t ripe enough, you can speed up the process by placing them in a paper bag with an apple or baking them at a low temperature (around 300°F/150°C) for 15-30 minutes until their skins turn black. This is an invaluable one of our baking tips that guarantees superior flavor for your sweet treat.
Storing Leftovers Safely
Even though this quick bread is so tempting, you might have some leftovers. Knowing how to store leftovers safely is key to maintaining the deliciousness and freshness of your banana nut bread. Once completely cooled, wrap the loaf tightly in plastic wrap, then place it in an airtight container or a heavy-duty freezer bag. Stored at room temperature, it will stay fresh for about 2-3 days. For longer storage, refrigerate it for up to a week. Proper storage helps preserve the moist bread texture and prevents it from drying out. This easy step ensures that you can enjoy your comforting snack for longer. For more daily updates and tips, follow us on Instagram.
Storing Your Banana Nut Bread
Airtight Container Use
To preserve the incredible flavor and moisture of your homemade banana nut bread, proper storage is vital. After the loaf has cooled completely to room temperature, wrap it tightly in plastic wrap, then place it inside an airtight container use. This dual layer of protection is one of the best baking tips to prevent air from drying out your precious moist bread. Stored this way, at room temperature, your delicious loaf will remain fresh and enjoyable for 2-3 days. For slightly longer keeping, you can place the airtight container in the refrigerator, where the bread can last up to a week. Always ensure the bread is fully cooled before wrapping, as trapping warmth can create condensation, leading to a soggy texture or even mold. This easy step ensures that every slice remains as delightful as the first.
Freezing for Later
Banana nut bread is an excellent candidate for freezing, allowing you to enjoy this sweet treat well beyond its fresh-baked lifespan. To freeze for later, ensure the cooled loaf is wrapped very tightly in several layers of plastic wrap, followed by a layer of aluminum foil. This prevents freezer burn and locks in the moisture. You can freeze the entire loaf or slice it first for individual portions, which makes thawing incredibly convenient. Frozen banana nut bread can maintain its quality for up to 3-4 months. When ready to enjoy, simply thaw at room temperature. For a quick refresh, you can warm a slice in the microwave or a toaster oven. This method is a fantastic way to always have a comforting snack on hand, making your homemade recipe a true kitchen hero. This is an efficient way to manage your baking and always have a delightful treat ready.
Quick Times for This Recipe
Fast Preparation Time
One of the many appealing aspects of this homemade recipe for banana nut bread is its remarkably fast preparation time. With all your ingredients measured and ready, the actual mixing process typically takes no more than 15-20 minutes. This makes it a perfect choice for those days when you crave a delicious sweet treat but are short on time. The easy steps involved mean you can quickly combine your wet and dry ingredients, gently fold in the walnuts, and have your batter ready for the oven in under half an hour. This efficiency, combined with the delightful outcome, firmly establishes banana nut bread as a go-to quick bread recipe. You’ll be surprised how quickly you can transition from gathering ingredients to placing a pan of potential deliciousness into your oven.
Total Time to Enjoy
From start to finish, the total time to enjoy your warm, fragrant banana nut bread is surprisingly reasonable. Factoring in the fast preparation time of 15-20 minutes, plus a baking time of approximately 50-70 minutes, and then allowing for a crucial cooling period of at least 30 minutes (or more for complete cooling), you’re looking at about 1.5 to 2 hours. This quick turnaround for such a satisfying and delicious homemade recipe makes it an ideal project for a weekend morning or a cozy afternoon. The reward for your minimal effort is a beautifully risen, moist bread loaf that fills your home with an inviting aroma and offers a truly comforting snack. This efficient process, combining simple steps with great results, ensures you won’t have to wait long to savor every bite of this perfect banana nut bread.