
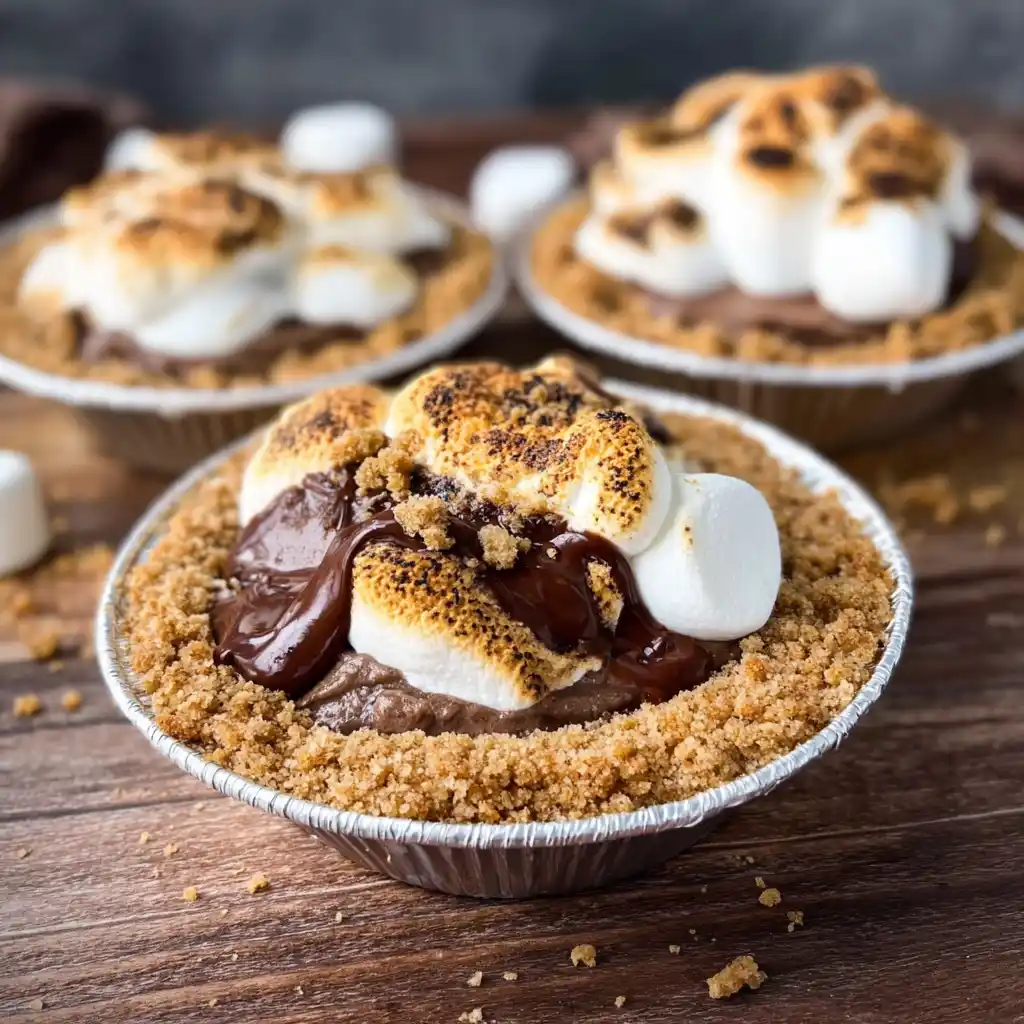
Mini S’mores Pies are the perfect bite-sized dessert, offering all the classic campfire flavors without the campfire. This easy baking recipe brings together a buttery graham cracker crust, a rich chocolate filling, and perfectly toasted marshmallows, creating a truly irresistible treat for any occasion.
Key Takeaways
- Prepare homemade graham cracker crust for superior flavor and texture.
- Melt chocolate chips with heavy cream for a smooth, decadent filling.
- Achieve golden-brown marshmallows under a broiler or with a kitchen torch.
- Proper cooling time is crucial for pies to set perfectly before serving.
- Experiment with different chocolate types and toppings for fun variations.
These tiny treats are simple to make. They bring joy with every bite. Perfect for parties or family fun. Quick to prepare, delightful to eat. A sweet, gooey pleasure awaits.
Get Ready for Mini S’mores Pies
Preparing homemade mini s’mores pies is a delightful culinary adventure that promises to bring smiles to everyone. This recipe simplifies the beloved campfire classic into an elegant, individual dessert perfect for gatherings, potlucks, or a special family treat. Imagine the rich aroma filling your kitchen as you combine simple ingredients to create something truly magical. The process is straightforward, ensuring even novice bakers can achieve spectacular results. We’ll walk through each step, from crust to topping, ensuring your mini pies are a resounding success. Get ready to impress your friends and family with these charming, gooey, and utterly delicious sweet treats.
What You’ll Need to Begin
Before diving into the fun of baking, it’s always wise to gather all your necessary tools and ingredients. For these mini s’mores pies, you’ll need a mini muffin tin (or several, if you’re making a big batch), paper liners or non-stick spray, mixing bowls, measuring cups and spoons, and a sturdy spoon or spatula for pressing the crust. Having everything prepped and ready on your counter will make the baking process smooth and enjoyable. Think of it as setting the stage for your culinary masterpiece. Don’t forget an oven and perhaps a broiler for that perfect marshmallow toast!
Quick Look at Total Time
One of the best aspects of these mini s’mores pies is their relatively quick preparation time. While there are a few distinct stages—crust, filling, and topping—none of them are overly complicated or time-consuming. Expect to spend approximately 20-30 minutes on active prep, with baking and cooling taking a bit longer. The baking itself is short, just enough to set the crust and toast the marshmallows. The majority of the waiting time involves cooling, which is essential for the pies to set properly. Planning ahead allows for ample cooling, ensuring your pies are picture-perfect and easy to handle when it’s time to serve. These delicious mini desserts are worth every moment!
Ingredients for The Best Mini S’mores Pie
Creating truly exceptional mini s’mores pies starts with selecting the right ingredients. Each component plays a vital role in achieving that perfect balance of crunchy, creamy, and gooey textures that make s’mores so irresistible. Using quality ingredients ensures a richer flavor and a more satisfying experience. Don’t be tempted to cut corners; a little extra attention to ingredient choice can elevate your homemade s’mores pies from good to absolutely outstanding. This section details what you’ll need for each layer, promising a symphony of flavors in every bite.
For Your Cracker Crust
The foundation of any great s’mores pie is a robust and flavorful graham cracker crust. You’ll need graham crackers, of course, crushed into fine crumbs. The finer the crumbs, the more compact and stable your crust will be. Alongside the crumbs, you’ll need melted unsalted butter, which acts as the binding agent, and a touch of granulated sugar to enhance the sweetness and aid in caramelization during baking. Some recipes might also include a pinch of salt to balance the flavors. Fresh, quality graham crackers make a noticeable difference in the final taste and texture of your crust, providing that signature nutty, sweet base.
Rich Chocolate Filling Needs
The chocolate layer is arguably the heart of your mini s’mores pies. For a truly rich and smooth filling, you’ll want high-quality semi-sweet chocolate chips or chopped chocolate bars. The better the chocolate, the more decadent your filling will taste. Heavy cream is essential for creating that silky, melt-in-your-mouth texture when combined with the chocolate. A tiny bit of vanilla extract can enhance the chocolate’s depth, and a pinch of salt can bring out all the flavors. If you’re a chocolate connoisseur, consider using a blend of dark and milk chocolate for added complexity. You could even explore variations with different chocolate types, much like how one might experiment with a peanut butter brownie swirl cookies recipe.
Marshmallow Topping Choices
No s’mores is complete without the iconic marshmallow topping. For mini s’mores pies, you have a couple of excellent options. Miniature marshmallows are often the easiest to work with, as they melt and toast evenly across the small surface of each pie. Alternatively, you can use larger marshmallows, cutting them into smaller pieces or placing one whole marshmallow on top, which creates a more dramatic, puffed-up effect. Whichever size you choose, ensure they are fresh for the best texture and toastability. A perfectly golden-brown, gooey marshmallow is the crowning glory of your mini s’mores pie, providing that satisfying stretch and sweet finish.
Crafting Your Graham Cracker Crust
The graham cracker crust is the unsung hero of your mini s’mores pies, providing a delightful crunch and a subtly sweet base that perfectly complements the rich chocolate and gooey marshmallow layers. A well-made crust is firm enough to hold its shape yet tender when bitten into. Achieving this balance requires careful attention to the consistency of your crumbs and the method of pressing them into your tins. This section will guide you through the process, ensuring your crust forms a sturdy and delicious foundation for your delectable dessert.
Mixing Crumbs and Melted Butter
To start, you’ll need to finely crush your graham crackers. A food processor works wonders for this, yielding consistent, fine crumbs in mere seconds. If you don’t have a food processor, place the crackers in a zip-top bag and crush them with a rolling pin until very fine. Once your crumbs are ready, transfer them to a medium mixing bowl. Pour in your melted unsalted butter and granulated sugar, then stir until the crumbs are thoroughly moistened. The mixture should resemble wet sand and hold together when pressed between your fingers. This ensures the crust will bind properly and won’t crumble apart when baked. The key is even distribution of the butter, which coats each crumb and helps create that wonderful texture.
Pressing into Mini Tins
Once your crumb mixture is ready, it’s time to press it into your mini muffin tins. If you’re using paper liners, place them in the tin first. Otherwise, ensure your tin is well-greased or non-stick. Take about a tablespoon or so of the crumb mixture and place it into the bottom of each mini muffin cup. Now, comes the important part: pressing firmly. Use the back of a spoon, your fingertips, or a small tart tamper to compact the crumbs tightly into an even layer at the bottom of each cup. The firmer you press, the more cohesive your crust will be. This step is crucial for preventing the crust from breaking apart when you remove the pies later. A solid, well-packed crust is the secret to perfectly portioned mini s’mores pies.
Baking the Crust to Perfection
Baking the graham cracker crust is a quick but essential step that transforms the raw crumb mixture into a golden, fragrant, and slightly crisp base. This pre-baking, or blind baking, helps to set the crust, preventing it from becoming soggy once the chocolate filling is added. It also enhances the nutty flavor of the graham crackers and adds a delightful depth to the overall s’mores experience. Paying close attention to oven temperature and baking time will ensure your crusts are perfectly baked, providing a sturdy and delicious foundation for your mini pies. This stage is relatively brief but plays a significant role in the success of the final dessert.
Oven Temperature Setup
Preheating your oven to the correct temperature is the first crucial step. For graham cracker crusts, a moderate temperature, usually around 350°F (175°C), is ideal. This temperature is hot enough to bake the crust quickly without burning it. Make sure your oven has reached the set temperature before placing the muffin tin inside; an accurate temperature ensures even baking and prevents the crust from being undercooked or over-browned. Use an oven thermometer if you suspect your oven’s thermostat isn’t entirely accurate. Consistency in temperature is key to achieving that perfect golden hue and a firm, crumbly texture. Precision in baking, even for a simple crust, yields superior results.
Watching for Golden Edges
Once your mini muffin tin is in the preheated oven, keep a watchful eye on the crusts. They typically only need to bake for about 8-10 minutes. The goal is not to cook them completely through, but rather to firm them up and develop a light golden-brown color around the edges. This slight browning indicates that the butter and sugar have caramelized, locking in the structure and flavor. Avoid overbaking, as this can make the crust dry and brittle. As soon as you see those delicate golden edges, remove the tin from the oven. Let the baked crusts cool in the tin for a few minutes before moving on to the next step, as they will be quite fragile when hot. This brief rest allows them to set further and become easier to handle.
Creating Smooth Chocolate Filling
The chocolate filling is the decadent heart of your mini s’mores pies, offering a rich, velvety contrast to the crisp graham cracker crust and the airy marshmallow topping. Achieving a perfectly smooth and glossy chocolate ganache is simpler than it sounds and requires just a few key steps. The quality of your chocolate will truly shine through here, so opt for good-quality chips or a chopped bar for the best results. This luxurious layer is what truly elevates these mini pies, making them feel like a gourmet treat despite their simple origins. Get ready to indulge in pure chocolate bliss.
Melting Chips with Heavy Cream
The secret to a silky smooth chocolate filling lies in creating a ganache. Start by placing your chosen chocolate chips or finely chopped chocolate into a heatproof bowl. In a separate saucepan, gently heat heavy cream over medium heat until it just begins to simmer around the edges – do not let it boil vigorously. Once hot, pour the heavy cream directly over the chocolate in the bowl. Let it sit undisturbed for about 5 minutes; this allows the residual heat from the cream to melt the chocolate chips slowly and evenly. After 5 minutes, gently whisk the mixture starting from the center and working your way outwards until it’s completely smooth, glossy, and uniform. The result should be a rich, pourable ganache that smells incredible. For other delightful dessert ideas, consider exploring recipes like quick Italian cream cake, which also features decadent fillings.
Pouring into Baked Crusts
Once your chocolate ganache is perfectly smooth, it’s time to fill your cooled graham cracker crusts. Carefully spoon or pour the chocolate filling into each baked mini crust, filling them about two-thirds of the way full. You don’t want to overfill them, as there still needs to be room for the marshmallow topping. The chocolate will naturally settle and create an even layer. Work efficiently but gently to avoid disturbing the crust. The contrast between the warm, smooth chocolate and the firm, slightly cool crust begins to build the complex layers of flavor and texture that make these mini s’mores pies so special. This step ensures every bite is infused with rich chocolate goodness.
Topping with Gooey Mini Marshmallows
The marshmallow topping is the playful, iconic element that completes your mini s’mores pies, bringing that signature gooey sweetness and delightfully toasted texture. It’s the final flourish that transforms a simple chocolate tart into a true s’mores experience. The choice of marshmallow size and how you apply them can subtly change the look and feel of your finished pies, allowing for a touch of personalization. This stage is where the visual appeal really comes together, promising a visually appetizing dessert that’s just as fun to look at as it is to eat. Get ready for that irresistible golden-brown perfection.
Sprinkling Marshmallows Evenly
Once your chocolate filling has been poured into the crusts, it’s time for the marshmallows. For a classic look and even melting, sprinkling miniature marshmallows evenly over the chocolate filling is the most common approach. Aim for a generous layer that covers the chocolate completely but doesn’t overflow the crust. The mini marshmallows will expand slightly as they toast, so leave a little room for them to puff up. An even distribution ensures that every bite of your mini s’mores pie will have that perfect balance of chocolate and gooey marshmallow. This also makes the toasting process more consistent, preventing some areas from burning while others remain untoasted.
Opting for Larger Marshmallows
If you prefer a more dramatic, puffed-up effect, or simply love a thicker layer of marshmallow, consider using larger marshmallows. You can either cut standard-sized marshmallows into smaller pieces (quarters or halves, depending on the size of your mini pies) or, if your tins are large enough, place one whole marshmallow on top of each pie. If using whole marshmallows, a gentle press might help them adhere to the chocolate filling. The larger pieces will create a more substantial, cloud-like topping when toasted, offering a more intensely gooey center. This choice gives your mini s’mores pies a more rustic, campfire-inspired appearance and texture, a delightful variation on the classic. For more delightful sweet ideas, visit Carina Recipes Desserts section.
Baking The Best Mini S’mores Pie
The final baking stage for your mini s’mores pies is arguably the most exciting part, as it’s when the marshmallows transform into that iconic golden, bubbly, and slightly charred topping we all know and love. This step is quick and requires vigilance, as marshmallows can go from perfectly toasted to burnt in a matter of seconds. Whether you use your oven’s broiler or a kitchen torch, the goal is to achieve a beautiful caramelized finish that adds another layer of flavor and texture. This brief moment in the oven truly brings the s’mores experience to life, making your mini pies irresistible.
Marshmallows Turn Golden Brown
The magic happens when the heat hits the marshmallows. Place your mini muffin tin under a preheated broiler (usually on high, with the oven rack positioned a few inches from the heat source) or use a kitchen torch. The heat will cause the marshmallows to puff up, soften, and slowly turn a beautiful golden-brown color. Some edges might even get a delightful char, mimicking the campfire experience. The key is to achieve that toasted exterior while keeping the inside wonderfully gooey. This transformation is what gives s’mores their distinctive flavor and texture, marrying the sugary sweetness with a hint of smoky caramelization. It’s a spectacular visual and aromatic display.
Keeping a Careful Eye
This is where your close attention is paramount. Marshmallows toast very quickly, and they can burn in an instant if left unattended. If using a broiler, do not walk away from the oven. Stand by the oven door and watch continuously. The moment you see the desired golden-brown color and slight puffiness, pull the tin out immediately. If using a kitchen torch, you have more control, but still work methodically and quickly. Aim for even toasting across all marshmallows. A slight char adds character, but burnt marshmallows will taste bitter. This careful watch ensures that each of your mini s’mores pies has that perfectly toasted, gooey topping that makes them so delightful. For more cooking tips, explore the main course section on Carina Recipes.
Cooling and Serving Your Pies
After the excitement of toasting the marshmallows, the final, crucial step is allowing your mini s’mores pies to cool properly. This might seem like an impatient wait, but it’s absolutely vital for the pies to set, allowing the chocolate filling to firm up and the crust to become stable. Rushing this stage can lead to a messy presentation and a less enjoyable texture. Once perfectly set, these individual treats are ready to be gently removed from their tins and served, promising a delightful and easy-to-handle dessert that’s sure to be a hit. Patience truly pays off in the end, delivering a perfect bite every time.
Allowing Pies to Set
Once your mini s’mores pies are out of the oven with their perfectly toasted marshmallows, resist the urge to immediately dig in. The chocolate filling will be very warm and liquid, and the crust will be delicate. Allow the pies to cool in the muffin tin on a wire rack for at least 30 minutes to an hour at room temperature. For optimal setting and firmness, especially if your kitchen is warm, you can transfer them to the refrigerator for an additional 30 minutes. This cooling period allows the chocolate ganache to firm up to a rich, fudgy consistency, making the pies much easier to handle and preventing them from falling apart when removed. The wait is worth it for a perfectly structured treat.
Gently Removing from Tins
After sufficient cooling and setting, it’s time to gently remove your mini s’mores pies from the tins. If you used paper liners, simply lift them out. If you didn’t use liners, carefully run a thin knife or offset spatula around the edge of each pie to loosen it from the tin. Then, gently pry each pie out, being careful not to damage the delicate crust or the marshmallow topping. You might find it easiest to use a small spoon to lift them. Place the removed pies on a serving platter. Their individual size makes them perfect for easy serving and enjoyment, providing a beautiful presentation for any gathering. Sharing these delightful creations is the best part!
Tips for Your Best S’mores Pie
Even though mini s’mores pies are relatively simple to make, a few insider tips can elevate your baking from good to truly exceptional. These little nuggets of advice focus on enhancing flavor, improving texture, and ensuring a smooth baking process. Mastering these techniques will not only result in more delicious pies but also boost your confidence in the kitchen. From the consistency of your crust to the nuances of your chocolate, paying attention to these details will help you consistently produce the best mini s’mores pies possible, making every batch a resounding success.
Fine Crumb Crust Secret
The secret to a perfectly firm and well-structured graham cracker crust lies in the fineness of your crumbs. Coarsely crushed crackers will result in a crumbly crust that struggles to hold its shape. For the best results, use a food processor to blitz your graham crackers until they resemble fine sand. This fine consistency allows the melted butter to bind them more effectively, creating a compact and stable base that won’t fall apart when you remove the pies from the tin. A fine crumb also contributes to a smoother texture, offering a more pleasant mouthfeel that complements the creamy filling and gooey topping. This small step makes a big difference in the overall quality of your pie.
Why Cooling is Important
While the aroma of freshly baked s’mores pies can be incredibly tempting, patience during the cooling phase is paramount. Proper cooling allows the chocolate ganache to firm up and set completely. If you try to remove or eat the pies while the chocolate is still warm and liquid, you’ll end up with a messy, collapsed treat. The crust also needs time to fully set and become sturdy. Cooling ensures that each mini pie maintains its individual structure and provides that satisfying contrast between the set chocolate and the slightly chewy marshmallow. Just like a creamy baked mac and cheese needs time to set, so do these pies.
Experiment with Chocolate Flavors
Don’t be afraid to venture beyond traditional semi-sweet chocolate. The chocolate filling is a fantastic canvas for flavor experimentation. Try using dark chocolate for a more intense, less sweet pie, or milk chocolate for a milder, creamier profile that children often adore. White chocolate can also be used, perhaps with a hint of vanilla or almond extract. You could even swirl in some caramel or peanut butter into the chocolate ganache for an added layer of complexity. Different chocolate flavors can significantly alter the overall character of your mini s’mores pies, making each batch a unique and exciting culinary creation. Let your taste buds be your guide!
Fun Variations for Mini S’mores Pies
While the classic mini s’mores pie is undeniably delicious, there’s always room to get creative and customize these delightful treats. Variations can add new layers of flavor, texture, and visual appeal, making them even more exciting for different palates or occasions. Don’t feel limited by the traditional recipe; embrace your inner culinary explorer and experiment with different additions and substitutions. These small changes can transform your familiar s’mores pies into entirely new dessert experiences, perfect for keeping things fresh and surprising your guests. The possibilities are truly endless when it comes to sweet innovation.
Adding Peanut Butter or Nuts
For those who love a nutty twist, incorporating peanut butter or chopped nuts can take your mini s’mores pies to the next level. You can swirl a tablespoon of creamy peanut butter into your warm chocolate ganache for a rich peanut butter-chocolate filling, or simply spread a thin layer of peanut butter on the crust before adding the chocolate. Alternatively, finely chopped roasted peanuts, almonds, or pecans can be mixed into the graham cracker crust for added crunch and flavor. A sprinkle of chopped nuts on top of the chocolate filling before adding marshmallows also works wonderfully. These additions introduce a delightful savory contrast and an extra layer of texture that enhances the overall experience.
Try Different Flavored Marshmallows
Beyond traditional vanilla marshmallows, many fun flavored varieties are available that can entirely change the profile of your s’mores pies. Look for chocolate, strawberry, or even caramel-flavored marshmallows in your local grocery store. Imagine a mini s’mores pie with a chocolate crust, dark chocolate filling, and a toasted caramel marshmallow on top – absolutely divine! Seasonal flavors like pumpkin spice marshmallows could also make for a festive autumn treat. This simple swap allows for endless creative combinations, catering to different taste preferences and holiday themes. A quick visit to Wikipedia’s S’more page might even give you more inspiration for variations.
Make Ahead and Store These Pies
One of the fantastic advantages of mini s’mores pies is their adaptability for make-ahead preparation and convenient storage. This flexibility makes them an ideal dessert for parties, picnics, or simply ensuring you always have a sweet treat on hand. Planning allows you to spread out the baking process, reducing stress on the day of an event. Proper storage methods are key to maintaining their freshness, flavor, and texture for as long as possible. With these tips, you can enjoy the delightful taste of homemade mini s’mores pies without feeling rushed, making your baking experience truly enjoyable and efficient.
Preparing Pies in Advance
You can definitely prepare mini s’mores pies in advance, which is excellent for entertaining. You can bake the graham cracker crusts and let them cool completely, then store them in an airtight container at room temperature for up to two days. The chocolate ganache can also be made ahead of time and stored in the refrigerator; gently reheat it over a double boiler or in the microwave (stirring frequently) until smooth and pourable before filling the crusts. For the best results, assemble and toast the marshmallows on the day of serving to ensure they are perfectly gooey and fresh. This staged approach allows for maximum flexibility and minimizes last-minute stress. For more recipe ideas, check out Carina Recipes on Pinterest or Instagram.
Keeping Leftovers Fresh
Should you be so lucky as to have any leftovers, storing your mini s’mores pies properly will help maintain their deliciousness. Place the cooled pies in an airtight container. They can be stored at room temperature for up to 1-2 days, though the marshmallows might lose a bit of their crispness and become slightly chewier. For longer storage, refrigerate them for up to 3-4 days. While the marshmallows will firm up in the fridge, you can gently warm them in a microwave for a few seconds or use a kitchen torch to re-toast them slightly before serving. This revives the gooey texture and brings back some of that freshly made appeal, ensuring every leftover bite is just as enjoyable as the first. Learning about ingredients like graham crackers can also help in understanding storage needs.
Enjoy The Best Mini S’mores Pie
Finally, the moment has arrived to savor the fruits of your labor! Enjoying the best mini s’mores pie is about more than just eating a dessert; it’s about indulging in a moment of pure, nostalgic bliss. These little treats are designed to be a delightful experience, from their charming appearance to their perfect blend of textures and flavors. Whether you’re sharing them with loved ones or treating yourself, take a moment to appreciate the crunchy crust, the rich chocolate, and the wonderfully gooey, toasted marshmallow topping. They are a celebration in every bite, promising sweet satisfaction that lingers long after the last crumb is gone.
Garnish for Extra Delight
While mini s’mores pies are visually appealing on their own, a simple garnish can add an extra touch of elegance and flavor. Consider a light dusting of cocoa powder for a sophisticated look, or a drizzle of chocolate fudge or caramel sauce for added richness. A few chocolate shavings sprinkled on top also work wonderfully. For a fresh contrast, a small sprig of mint or a single raspberry placed alongside the pie can add a pop of color and a subtle fruity note. These small additions aren’t just for aesthetics; they can subtly enhance the flavor profile and make your mini s’mores pies feel even more special and thoughtfully prepared. Garnishing adds that final flourish of perfection.
Pair with Vanilla Ice Cream
To truly elevate the serving experience of your mini s’mores pies, consider pairing them with a scoop of classic vanilla ice cream. The cool, creamy texture of the ice cream provides a delightful contrast to the warm, gooey marshmallow and rich chocolate, creating a dessert experience that is truly unforgettable. The simple vanilla flavor won’t overpower the distinct s’mores taste but will instead complement and enhance it. This pairing turns a wonderful individual dessert into a small, luxurious sundae. It’s the perfect way to enjoy these sweet treats, offering a harmonious blend of temperatures and textures that will surely impress and delight anyone lucky enough to partake.