
Swirl Bouncy Balls You Can Make with Borax offer a fantastic activity for all ages. Crafting these vibrant, glowing toys provides a creative outlet and a fascinating science project. Learn how to combine simple ingredients into dazzling, bouncy creations that light up in the dark, ensuring hours of playful enjoyment for kids and adults alike.
Key Takeaways
- Create amazing homemade bouncy balls with a unique swirl effect.
- Achieve a captivating glow-in-the-dark feature using tonic water and non-toxic paint.
- Utilize common household items for an easy and engaging craft project.
- Learn simple techniques for coloring, shaping, and drying your bouncy creations.
- Prioritize safety by using appropriate materials for family-friendly playtime fun.
Making bouncy balls is simple. Kids love these colorful creations. The glow effect adds magic. It’s a fun, safe project. Enjoy creative playtime at home.
Making Swirl Bouncy Balls You Can Make with Borax
Creating your own bouncy balls at home is a rewarding and fun project. While traditional bouncy balls might use various polymers, our recipe focuses on easily accessible household ingredients to achieve a fantastic result, including the potential for a borax-free core recipe with an exciting glow effect. This activity is perfect for engaging children in science education through hands-on experimentation, making it one of the best homemade snacks of activity for a rainy afternoon. The magic lies in the combination of simple components that interact to form a pliable, resilient toy.
Understanding Your Recipe Needs
Before diving into the fun of crafting, it’s crucial to understand the components that make up these playful toys. Our approach leans into creating a malleable, moldable mixture that hardens into a bouncy sphere. The goal is a resilient, non-toxic toy that promises hours of entertainment. This recipe is designed to be straightforward, making it an excellent easy craft for families. Keep in mind that while some bouncy ball recipes involve borax as a setting agent, our core ball mixture focuses on other simple household items for a fantastic bounce, later enhanced with a non-toxic glow finish. Always double-check ingredient labels for safety, especially when crafting with children.
Essential Tools for Crafting
Gathering the right tools beforehand will streamline your crafting process and make the experience more enjoyable. You won’t need anything specialized, just common kitchen and craft items. Here’s a list to get you started:
- Mixing Bowls (small and medium)
- Measuring Spoons and Cups
- Stirring Utensils (spoons, craft sticks)
- Wax Paper or Parchment Paper (for a non-stick surface)
- Gloves (optional, for handling food coloring)
- Black Light (for testing the glow effect)
- Airtight Container (for storage)
Having these tools ready will ensure a smooth transition from mixing to shaping and eventually enjoying your vibrant creations.
Gathering Your Simple Ingredients
The beauty of these swirl bouncy balls lies in their simplicity. Most of the ingredients you’ll need are likely already in your pantry or easily found at any grocery store. We’re focusing on a recipe that creates a wonderfully tactile and bouncy result without relying on hard-to-find chemicals. This makes the project accessible and enjoyable for everyone, from young crafters to seasoned DIY enthusiasts. For other simple and delicious recipes, check out this creamy baked mac and cheese recipe for your next family dinner.
Cornstarch and Water Basics
The foundation of our bouncy ball mixture is a combination of cornstarch and water. This classic duo creates a non-Newtonian fluid, meaning it acts like a liquid when poured slowly but solidifies under pressure. It’s the same principle behind “oobleck” and is perfect for forming a moldable, yet ultimately firm, bouncy texture. For more information on cornstarch, you can visit its Wikipedia page. The ratio is key to achieving the desired consistency, allowing for easy shaping and a good bounce. You’ll want a paste that is thick but still workable, allowing you to incorporate other elements smoothly. Always measure precisely to ensure the best outcome for your bouncy ball base.
Tonic Water for Glowing Effect
For that extra special touch, tonic water is our secret ingredient for a natural glow. Tonic water contains quinine, which fluoresces under ultraviolet (UV) light, or what’s commonly known as a black light. This gives your bouncy balls an amazing, eerie glow in a darkened room, making playtime even more exciting. The amount of tonic water needs to be balanced carefully with the cornstarch to maintain the bouncy consistency while maximizing the fluorescent effect. This step adds a magical element, turning a simple craft into a captivating glow-in-the-dark toy that will mesmerize anyone who sees it.
The Initial Mixing Steps
Now that you have all your ingredients and tools ready, it’s time to start the magical process of bringing your bouncy balls to life. The initial mixing is critical for establishing the right consistency, which will dictate how well your balls form and, ultimately, how bouncy they become. Pay close attention to the texture as you combine the base ingredients. This early stage is where the transformation from separate components to a cohesive mixture truly begins, laying the groundwork for your colorful, swirling creations. It’s an enjoyable first step in a truly rewarding craft.
Creating the Thick Paste
Begin by combining your cornstarch and water in a medium-sized mixing bowl. Start with the cornstarch, then gradually add water, stirring continuously. You’re aiming for a thick, somewhat gooey paste. It should be firm enough to hold its shape when pressed but still slightly sticky. If it’s too runny, add a little more cornstarch. If it’s too stiff, add a tiny bit more water, a teaspoon at a time. The mixture should feel like a dense dough, easily kneadable. This thick paste is the foundation of your bouncy ball, so getting this consistency right is the first major step towards success. Ensure it’s thoroughly mixed with no dry pockets of cornstarch remaining.
Adding Special Glow and Sweeteners
This stage introduces the elements that truly make your bouncy balls unique: the subtle sweetness and, most excitingly, the glow. These additions transform a basic cornstarch mixture into a sensory delight, offering both a pleasant scent and a visual spectacle under the right conditions. The careful incorporation of these ingredients ensures that your homemade craft stands out, providing an extra layer of engagement and fun. It’s where the creative flair truly begins to shine through in your project, differentiating your balls from standard store-bought varieties.
Incorporating Sugar and Vanilla
To give your bouncy balls a delightful aroma and a slight stickiness that aids in shaping, gently fold in a tablespoon of sugar and a few drops of vanilla extract into your thick paste. The sugar helps bind the mixture further and adds a pleasing texture, while vanilla provides a sweet, inviting scent. This step not only enhances the sensory experience of playing with the balls but also helps with the overall malleability of the mixture, making it easier to work with. Mix until these ingredients are fully integrated, ensuring an even distribution of sweetness and fragrance throughout the paste.
Tonic Water for Special Glow
Now, for the magical glow! Gradually add the tonic water to your mixture. Remember, tonic water contains quinine, which reacts brilliantly under a black light. The amount you add should be just enough to make the mixture slightly more pliable without making it too wet or sticky. You want a consistency that’s easy to mold but still firm. Mix it in thoroughly, ensuring the quinine is evenly dispersed. This is the key step to getting those impressive glow-in-the-dark bouncy balls. For a vibrant visual, consider our Butterfinger Balls recipe for another fun, spherical treat!
Coloring Your Ball Mixture
Adding color is where your creativity truly comes alive. This is your chance to personalize your bouncy balls, creating vibrant, swirling patterns that are unique to each creation. The key is to work carefully and methodically to achieve distinct color separations that will twist and blend beautifully as you knead and shape. Don’t be afraid to experiment with different color combinations to produce visually stunning results. This stage is particularly exciting, as you begin to see your bouncy balls take on their individual personalities and aesthetic appeal.
Dividing and Adding Food Color
Once your base mixture is ready, divide it into several smaller portions, one for each color you plan to use. Place each portion into a separate small bowl or onto a piece of wax paper. Add a few drops of liquid food coloring to each portion. Start with a small amount; you can always add more if you want a deeper hue. Use a craft stick or wear gloves to gently fold and press the color into the mixture. The aim here is to incorporate the color without fully mixing it into a uniform shade just yet. You want distinct color pockets for the swirl effect.
Kneading for Even Colors
After adding the food coloring, it’s time to knead each colored portion individually. This step helps to distribute the color evenly throughout that specific portion of the mixture, ensuring a consistent hue. Knead until the color is vibrant and uniform. If you’re planning a swirl effect with multiple colors, keep the individual colored portions separate and distinct until the shaping stage. This careful kneading ensures that when you combine them later, you get beautiful, defined swirls rather than a muddy, mixed color. It’s a crucial step for achieving the aesthetic appeal of colorful culinary creations or craft projects.
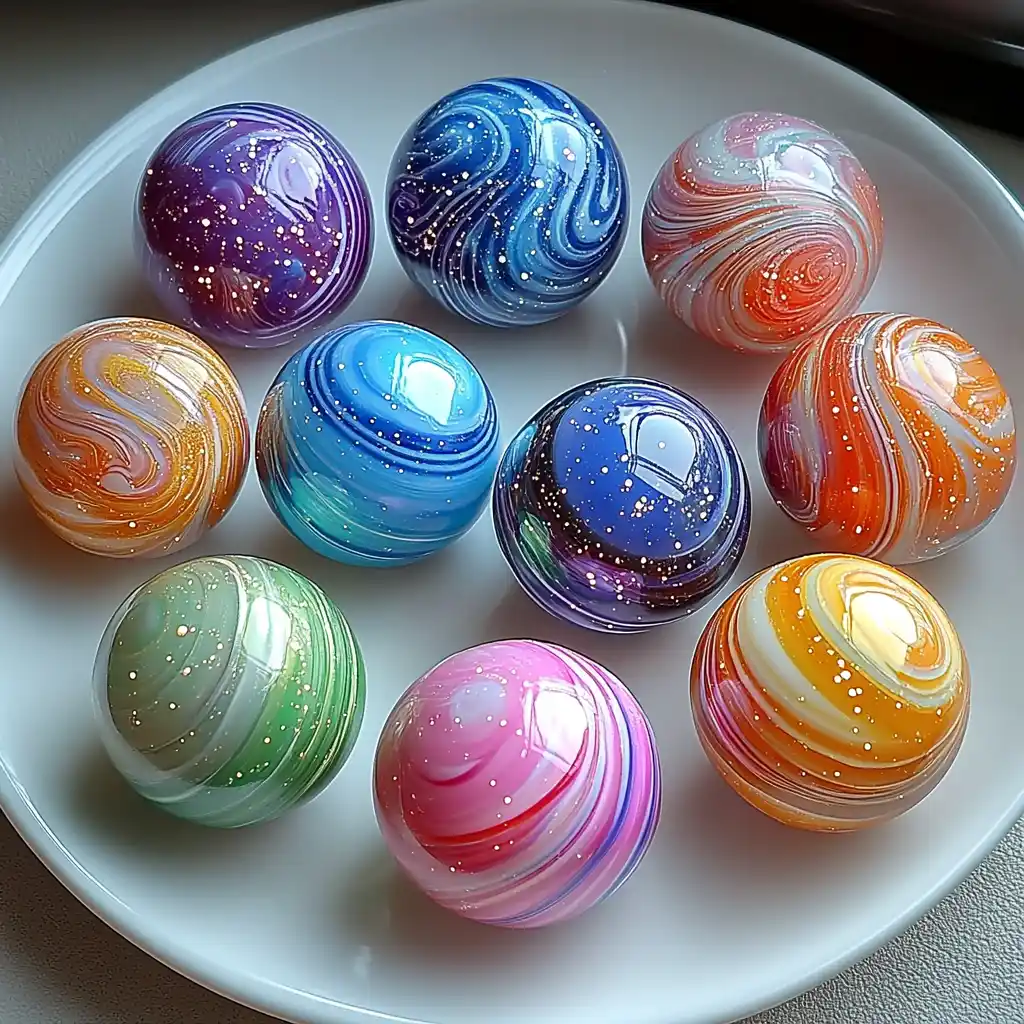
Shaping Perfect Swirl Bouncy Balls
With your colored mixtures prepared, the next exciting step is to bring them together and form your bouncy balls. This stage is where the “swirl” magic happens, transforming distinct colors into a captivating pattern. The goal is to create a compact, smooth sphere that will bounce effectively. Take your time to roll and press, ensuring there are no air bubbles and the ball is as round as possible. The precision here contributes significantly to both the aesthetic appeal and the functionality of your finished toy, making it a truly rewarding part of the DIY process.
Rolling Mixture into Small Spheres
To create the swirl effect, take small pieces from each of your colored portions and gently press them together into a single, multi-colored blob. Avoid over-mixing; you want the colors to remain somewhat separate. Then, carefully roll this multi-colored mixture between your palms, applying firm, even pressure, to form a tight, smooth sphere. The rolling motion will naturally create the beautiful swirl patterns as the colors subtly blend and twist. Aim for a diameter of 1 to 1.5 inches for a good bounce. Continue rolling until the ball is compact and round, free of cracks or loose bits. The tighter the ball, the better its bounce will be. For more fun DIY project ideas and delicious recipes, be sure to follow Carina Recipes on Instagram!
Applying the Glow-in-the-Dark Finish
While the tonic water gives an internal glow under a black light, adding a layer of non-toxic glow paint enhances the effect, making your bouncy balls truly spectacular. This external application boosts the luminosity and ensures a vivid, long-lasting glow, even after the internal quinine effect might fade slightly over time. This step truly brings the “glow-in-dark toys” aspect to the forefront, turning a simple craft into an enchanting plaything. Choose a quality, non-toxic paint to ensure safety, especially since these balls will be handled frequently during playtime.
Non-Toxic Paint Application
Once your shaped bouncy balls are ready, you can apply a thin, even layer of non-toxic glow-in-the-dark paint. This paint will provide a stronger, more visible glow. Use a small brush or your gloved finger to carefully coat the entire surface of each ball. Allow the first layer to dry completely before applying a second coat if desired for an even brighter glow. Ensure the paint is specifically labeled as “non-toxic” and safe for children’s crafts. This outer layer protects your bouncy ball and maximizes its glowing potential, creating a truly dazzling effect in the dark. For fascinating insights into how materials glow, explore the phosphor Wikipedia page.
Drying Your Swirl Bouncy Balls You Can Make with Borax
The drying process is a crucial, yet often overlooked, step in creating durable and long-lasting bouncy balls. It’s during this time that your soft, moldable mixture truly solidifies into a firm, resilient toy. Patience is key here; rushing the drying can result in balls that crack, lose their shape, or don’t bounce as well. Proper drying ensures that your hard work in mixing, coloring, and shaping culminates in a high-quality, fun-to-play-with product. This stage makes all the previous steps worthwhile, hardening your creation into a real bouncy ball.
How Long to Let Them Dry
After shaping and applying any glow paint, your bouncy balls need sufficient time to dry and harden. Place them on a piece of wax paper or parchment paper in a well-ventilated area, away from direct sunlight or excessive heat. The drying time can vary depending on the humidity and temperature of your environment, but typically, they need at least 24 to 48 hours to fully set. You’ll notice them becoming firmer and less sticky as they dry. It’s best to let them sit undisturbed for the recommended period to ensure they develop their full bounciness and durability. Gently rotate them every few hours to prevent flat spots.
Enjoying Your Swirl Bouncy Balls You Can Make with Borax
The moment has arrived! After all your careful crafting and patient waiting, it’s time to unleash the fun with your custom-made swirl bouncy balls. This is the payoff for your creative efforts, and watching them spring into action is incredibly satisfying. These homemade crafts aren’t just toys; they’re tangible results of a fun science project and a testament to your DIY spirit. Get ready to experience the joy of their unpredictable bounces and, of course, their spectacular glow when the lights go out. It’s time for some well-deserved playtime!
Bouncing in a Darkened Room
To fully appreciate the glow effect, take your newly dried bouncy balls into a darkened room. Their unique texture will provide an exciting, unpredictable bounce, perfect for imaginative play. The faint glow from the tonic water and glow paint will add an extra dimension of fun, creating a magical atmosphere. Kids will love chasing these glowing spheres around, making simple games incredibly exciting. This is where your homemade creative projects truly shine, providing unique entertainment that store-bought toys often can’t match. Enjoy the simple delight of watching your creations come to life in the dim light.
Black Light for Stronger Glow
For an even more dramatic and intense glow, use a black light. The quinine in the tonic water reacts strongly to UV light, making your bouncy balls fluoresce brilliantly. Point the black light at your bouncy balls in a dark room, and watch them burst with vibrant light. This stronger glow enhances the visual appeal and makes for an even more captivating playtime experience. It’s a fantastic way to demonstrate the scientific principles behind fluorescence and adds an impressive “wow” factor to your DIY glow-in-the-dark toys. Show them off to friends and family for maximum impact!
Storing Your Homemade Bouncy Balls
To ensure your handcrafted bouncy balls remain fresh, vibrant, and, well, bouncy for as long as possible, proper storage is essential. Neglecting this step can lead to them drying out, cracking, or losing their elasticity, diminishing all your hard work. By following a few simple storage guidelines, you can significantly extend the lifespan of your homemade creations, allowing for continued enjoyment over many play sessions. Think of it as preserving a precious piece of desserts – you want it to last!
Keeping Them Fresh and Bouncy
Once fully dried, store your bouncy balls in an airtight container at room temperature. This prevents them from drying out excessively and losing their bounce. You can also add a small piece of damp paper towel to the container to maintain a slight humidity, which can help prolong their elasticity. Avoid exposing them to extreme temperatures, either hot or cold, as this can affect their material integrity. With proper care, your homemade bouncy balls will provide lasting fun and continue to impress with their unique swirl and glow effects, ready for spontaneous play whenever you are.
Safety Notes for Playtime Fun
While making and playing with homemade bouncy balls is a fantastic activity, safety should always be your top priority, especially when children are involved. By taking a few simple precautions, you can ensure that the entire experience remains enjoyable and worry-free. Emphasizing non-toxic materials is key, as is supervising younger children during both the crafting and playing stages. These considerations help create a secure environment for all participants, allowing everyone to focus on the fun without any underlying concerns about potential hazards.
Using Non-Toxic Glow Paint
It’s absolutely critical to use only non-toxic glow-in-the-dark paint. Children often put toys in their mouths, and even if they don’t, contact with skin is inevitable. Always check the product label to ensure it is certified non-toxic and safe for children’s crafts. If the outline’s title “Swirl Bouncy Balls You Can Make with Borax” led you to consider borax, remember that borax itself should be handled with care and is not intended for ingestion. Our recipe for the ball’s core avoids borax in favor of safer, food-grade ingredients, making it a preferable choice for safe crafts for kids. Reinforce safety instructions with kids, such as not putting the balls in their mouths and washing hands after play.
More About Swirl Bouncy Balls You Can Make with Borax
The world of homemade bouncy balls is rich with possibilities for customization and creative exploration. While this recipe provides a fantastic starting point for creating glow-in-the-dark swirl balls, you can always experiment further. Consider adding glitter to your mixture for extra sparkle, or using different scents. The core principles of combining simple ingredients to create complex reactions make this project a wonderful entry into basic chemistry and physics for young minds. It’s a craft that combines artistic expression with scientific discovery, proving that main course projects can also be fun and educational.
This hands-on activity not only yields a fun toy but also fosters problem-solving skills and encourages imaginative play. By understanding the ingredients and their interactions, crafters can gain a deeper appreciation for the materials around them. Whether you’re looking for a unique birthday party activity, a science fair project, or just a way to spend quality time with family, making swirl bouncy balls is an excellent choice. Share your creations and tips online! Join our community on Pinterest for more inspiration and craft ideas.
