
Homemade pickled pepper relish is a vibrant, tangy condiment that adds a burst of flavor to many dishes. Learning to make this savory topping allows for ultimate customization and freshness. Our simple recipe guides you through creating a delicious batch, perfect for enhancing your culinary creations at home, making it a truly rewarding kitchen project.
Key Takeaways
- Make your own vibrant pepper relish easily from scratch.
- Customize flavor profiles by adjusting heat and sweetness to your preference.
- Proper storage techniques ensure extended freshness and safety.
- Enjoy a versatile, tangy condiment that pairs well with countless meals.
Making your own relish is simple. Fresh ingredients burst with flavor. It’s a truly rewarding kitchen project. Enhance your meals with this homemade delight. Enjoy the tangy goodness.
What is this Tangy Relish?
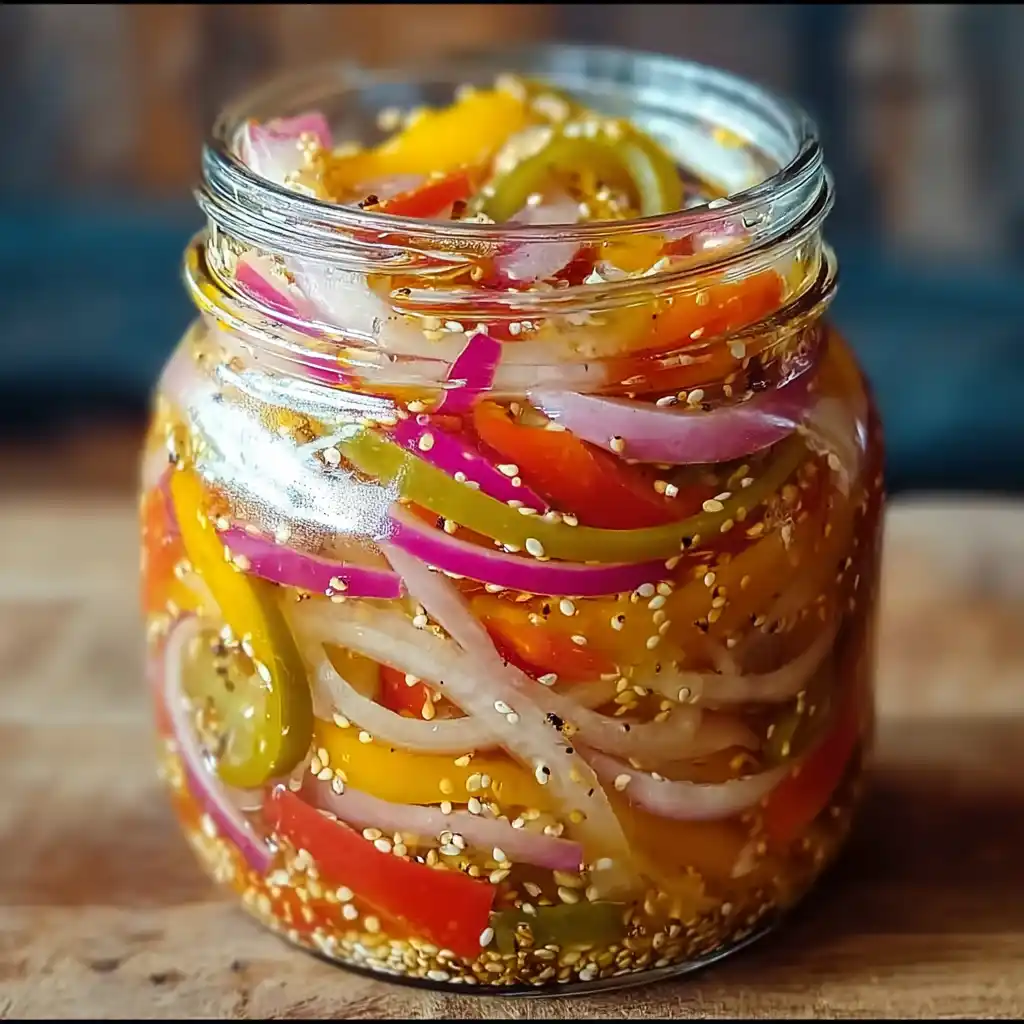
This tangy relish, often referred to as pickled pepper relish, is a delightful condiment made from finely chopped or minced vegetables, primarily peppers and onions, that are cooked in a sweet and sour pickling liquid. Its characteristic tang comes from vinegar, balanced with sugar, and often enhanced with various spices. Unlike a chunky salsa, relish has a smoother, more uniform texture, and its flavor profile is intensely concentrated due to the pickling process. It serves as a versatile accompaniment, adding a bright, zesty kick to everything from hot dogs and burgers to eggs and sandwiches. Many cultures have their own versions, each bringing unique ingredients and spices to create distinct flavor experiences. Our homemade relish focuses on fresh peppers, offering a wonderful balance of sweet, sour, and a hint of spice that will quickly become a favorite in your kitchen.
Why Make Pickled Pepper Relish?
Making your own pickled pepper relish offers numerous advantages over store-bought alternatives. Firstly, you gain complete control over the ingredients, ensuring freshness and avoiding artificial preservatives or excessive sodium. This means you can choose organic produce, adjust the sugar content to your liking, and even select your preferred types of peppers for a customized heat level. The vibrant flavors of a homemade batch are incomparable; the peppers and onions retain more of their natural essence when prepared fresh and simmered in your own pickling brine. Beyond taste, the process itself is incredibly rewarding. It allows you to preserve seasonal bounty, turning an abundance of fresh vegetables into a delightful condiment that can be enjoyed for months. It’s also an economical choice, often costing less than specialty relishes found in stores. Plus, a jar of homemade pepper relish makes a thoughtful and impressive gift for friends and family, showcasing your culinary skills and care. For more homemade ideas, check out our sauces and condiments category.
Gather Your Relish Ingredients
To create a truly exceptional homemade relish, selecting the right ingredients is paramount. Each component plays a crucial role in developing the complex flavor profile and desirable texture. You’ll need a careful balance of fresh produce, a potent pickling liquid, and a selection of aromatic spices to bring it all together. Always aim for the freshest ingredients available to ensure the best possible outcome for your tangy condiment.
Fresh Peppers and Onions
The stars of your pepper relish are, naturally, the peppers and onions. For a vibrant, balanced flavor, we recommend a mix of bell peppers (red, yellow, orange for sweetness and color) and a milder hot pepper like jalapeños or poblanos for a gentle kick. If you prefer a spicier relish, consider adding a few habaneros or serranos, adjusting to your heat preference. Ensure all peppers are firm, brightly colored, and free of blemishes. For onions, yellow or white onions work best, offering a crisp texture and pungent flavor that mellows beautifully during the pickling process. You’ll need approximately equal parts peppers and onions by volume once chopped. Typically, about 4-5 large bell peppers and 2-3 medium onions will yield a good batch of relish. Freshness here truly makes a difference in the final taste and texture of your homemade relish.
Essential Pickling Liquid
The pickling liquid is the heart of your relish, responsible for its tangy flavor and preservative qualities. A good quality vinegar is non-negotiable; white distilled vinegar or apple cider vinegar (for a slightly fruitier note) are excellent choices due to their acidity. You’ll also need granulated sugar to balance the tartness of the vinegar and enhance the flavor of the peppers. Salt, preferably pickling or canning salt, is crucial for preserving and bringing out the vegetable flavors; avoid iodized salt, which can darken the relish. Water will help create the right consistency for your brine. Beyond these basics, consider adding spices like mustard seeds, celery seeds, turmeric (for color and subtle flavor), or even a pinch of red pepper flakes for an extra layer of warmth. These spices infuse the relish with depth and complexity, creating a truly memorable tangy condiment.
Quick Prep for Your Relish
Efficient preparation is key to a smooth relish-making process. Start by thoroughly washing all your peppers and onions under cool running water. For the peppers, this means removing the stems, cutting them in half, and carefully scooping out all the seeds and white membranes. The membranes contain most of the capsaicin, so removing them helps control the heat level. Next, peel and quarter your onions. Once cleaned, both the peppers and onions need to be finely chopped. A food processor can make this task incredibly quick and uniform, but ensure you don’t over-process them into a paste; you want small, distinct pieces for that classic relish texture. If chopping by hand, aim for pieces no larger than 1/4 inch. Some recipes call for salting the chopped vegetables and letting them sit for an hour to draw out excess moisture, which can lead to a crisper relish. While optional for this quick version, it’s a technique worth noting. Always practice proper knife safety and consider wearing gloves when handling hotter peppers to prevent skin irritation.
Cooking Your Pepper and Onion Relish
The cooking process for your pepper and onion relish is where all the distinct flavors meld together and the vegetables soften to the perfect consistency. It’s a relatively straightforward process, but attention to timing and temperature is important to achieve that ideal balance of tang, sweetness, and texture that defines a great homemade relish. Be sure to use a large, non-reactive pot, such as stainless steel or enamel-coated, to prevent any metallic flavors from leaching into your delicate pickling liquid.
Simmering the Relish Mixture
Once your peppers and onions are prepped, combine them in your large pot with the prepared pickling liquid (vinegar, sugar, water, salt, and spices). Bring the mixture to a boil over medium-high heat, stirring occasionally to dissolve the sugar and salt completely. Once it reaches a rolling boil, reduce the heat to a gentle simmer. This is where the magic happens. Allow the relish to simmer uncovered for approximately 25-35 minutes, or until the vegetables are tender and the liquid has significantly reduced and thickened. The goal is for the relish to have a slightly syrupy consistency, not watery. Stir periodically to prevent sticking and ensure even cooking. Taste and adjust seasonings if necessary, though the flavor will intensify as it cools. This step is crucial for developing the rich, tangy condiment you desire.
Cooling Down the Relish
After the simmering process is complete and your relish has reached the desired consistency, remove the pot from the heat. Allow the relish to cool slightly in the pot for about 15-20 minutes before transferring it to jars. As it cools, the relish will continue to thicken slightly, and the flavors will deepen. It’s important not to seal the jars while the relish is still piping hot, as this can create too much pressure and potentially compromise the seal or the jar itself. Once transferred to jars, let the relish cool completely at room temperature before refrigerating. This gradual cooling helps the flavors fully develop and integrate, resulting in a more harmonious and delicious homemade relish. This slow cooling also contributes to the safety and quality of your pickled vegetables.
Storing Your Homemade Relish
Proper storage is just as important as the preparation itself to ensure your homemade pepper relish remains fresh, safe, and delicious for as long as possible. Given its pickled nature, relish has a good shelf life, but understanding the best practices for jarring and refrigeration will help you enjoy your tangy condiment for weeks, or even months, to come. This attention to detail safeguards your hard work and allows you to savor the vibrant flavors whenever you wish. For another delicious dish, try our Crispy Parmesan Chicken.
Choosing the Right Jars
Selecting the correct jars is crucial for storing your homemade relish. Opt for clean, sterilized glass jars with tight-fitting lids. Mason jars, specifically designed for canning and preserving, are an excellent choice due to their durability and reliable sealing mechanisms. Before filling, ensure your jars and lids (bands and new flats) are sterilized. You can achieve this by washing them thoroughly in hot, soapy water, rinsing well, and then submerging them in boiling water for at least 10 minutes. Alternatively, a dishwasher on a hot sanitize cycle can be used. Allow them to air dry or use tongs to place them on a clean towel. Filling hot relish into hot, sterilized jars reduces thermal shock and helps create a vacuum seal if you plan to process them further, although for simple refrigerated relish, sterilization is still key for hygiene. Clean jars prevent spoilage and maintain the quality of your pickled vegetables.
Refrigeration and Shelf Life
Once your homemade relish has cooled completely in its sterilized jars, it must be stored in the refrigerator. Unlike professionally canned goods that are shelf-stable, this quick relish recipe relies on refrigeration for preservation after opening or if not processed using traditional canning methods. When stored properly in airtight jars in the refrigerator, your pepper relish can last for up to 3-4 weeks, and sometimes even longer, depending on the acidity and sugar content. Always check for any signs of spoilage, such as unusual odors, mold, or discoloration, before consuming. If you notice any, it’s best to discard the batch. Labeling your jars with the date of preparation can help you keep track of their freshness. Enjoying your homemade relish within this timeframe ensures you get the best flavor and quality from your tangy condiment.
Serve Your Tangy Pickled Relish
The beauty of homemade pickled pepper relish lies in its incredible versatility. Its bright, tangy, and slightly sweet flavor profile makes it a fantastic accompaniment to a wide array of dishes, instantly elevating simple meals to something special. Once you’ve perfected your batch, you’ll find countless opportunities to incorporate this flavorful topping into your daily cooking. From breakfast to dinner, this tangy condiment adds a burst of excitement. You can also get more recipe ideas from Carina Recipes on Pinterest and Instagram.
Best Pairing Ideas
Pepper relish truly shines when paired with hearty, savory foods. It’s a classic topping for hot dogs, sausages, and burgers, adding a refreshing counterpoint to rich meats. Imagine it on a juicy grilled burger, or nestled into a bun with a perfectly cooked bratwurst. But its uses extend far beyond the grill. Try a spoonful on scrambled eggs or an omelet for a vibrant breakfast. It makes a wonderful spread for sandwiches and wraps, complementing ingredients like turkey, ham, or even a simple cheese sandwich. For a creative appetizer, mix it into cream cheese for a dip, or serve it alongside crackers and soft cheeses. It can also liven up a chicken and rice bowl or be served as a side condiment with roasted chicken or pork chops. The acidity cuts through fattiness, making every bite more enjoyable. This homemade relish is a game-changer for enhancing many meals.
Customize Your Relish Flavor
One of the greatest advantages of making homemade relish is the freedom to customize the flavor profile exactly to your liking. Whether you prefer a fiery kick or a mellow sweetness, you have complete control over the ingredients. This allows you to experiment with different combinations and fine-tune the balance of tastes, transforming a basic pepper relish recipe into your signature tangy condiment. Don’t be afraid to adjust the ratios to create a truly personalized flavorful topping.
Make it Spicier
If you crave more heat in your homemade relish, there are several ways to turn up the spice. The simplest method is to incorporate hotter peppers into your initial ingredient mix. Beyond jalapeños, consider adding serrano peppers for a medium kick, or a few habaneros if you’re feeling adventurous and want a serious level of heat. Remember to handle hotter peppers with gloves to avoid skin irritation. Alternatively, you can leave more of the seeds and membranes in your selected peppers, as these parts contain the highest concentration of capsaicin. For an even more immediate boost of heat after cooking, stir in a teaspoon or two of red pepper flakes, cayenne pepper, or a dash of your favorite hot sauce. Start small and taste as you go, ensuring you achieve the perfect level of spice without overpowering the other delicious flavors of your pepper relish. For another savory and spicy meal, consider our Fiery Dragon Chicken.
Adjusting Sweetness
The sweetness in pepper relish plays a crucial role in balancing the tartness of the vinegar and complementing the heat of the peppers. Adjusting this element allows you to cater to your palate, whether you prefer a sweeter relish, a more tart one, or something perfectly in between. The basic recipe will call for a certain amount of granulated sugar, but feel free to modify it. If you want a sweeter relish, add an extra tablespoon or two of sugar during the simmering process, tasting as it dissolves to reach your desired level. For a less sweet, more vinegary relish, reduce the sugar content by the same amount. You can also experiment with different sweeteners; brown sugar can add a deeper, molasses-like note, while a touch of honey or maple syrup could introduce unique aromatic undertones. Always make adjustments while the relish is still warm, as flavors are more pronounced when hot. This flexibility ensures your homemade relish is perfectly tailored to your taste.
Relish Making Time Breakdown
Understanding the time commitment involved can help you plan your relish-making session efficiently. While the actual cooking time is relatively short, the preparation steps require a bit of focus. Here’s a general breakdown to help you schedule your project:
- Ingredient Gathering: 5-10 minutes (assuming you have most items on hand)
- Washing and Chopping Peppers and Onions: 20-30 minutes (if using a food processor, this can be significantly faster, around 10-15 minutes).
- Preparing Pickling Liquid: 5 minutes (mixing vinegar, sugar, water, spices).
- Simmering the Relish Mixture: 25-35 minutes (until vegetables are tender and liquid has thickened).
- Cooling and Jarring: 30-60 minutes (initial cool down in pot, then complete cooling in jars before refrigeration).
In total, you can expect the entire process, from start to finish, to take approximately 1.5 to 2 hours. This includes active prep and cooking, plus passive cooling time. It’s a manageable project that yields a rewarding batch of flavorful, tangy condiment.
Tips for Perfect Relish
Achieving a consistently excellent batch of homemade pepper relish involves a few key considerations that can elevate your results. Beyond just following the recipe, paying attention to these details will ensure your tangy condiment has the ideal texture, flavor, and shelf life every time. These thoughtful steps will help you create a truly memorable flavorful topping.
- Uniform Chopping: Strive for evenly sized pieces of peppers and onions. This ensures they cook at the same rate and contributes to a pleasing, consistent texture in the final relish. Over-processing in a food processor can lead to a mushy texture.
- Balance Flavors Carefully: Taste your pickling liquid before adding the vegetables. Adjust sugar and vinegar to your preference. Remember that the flavors will intensify as the relish cooks and cools, so don’t over-season initially.
- Don’t Rush the Simmer: Allow adequate time for the relish to simmer and reduce. This not only softens the vegetables but also thickens the liquid, creating that desirable jam-like consistency. Patience here is key for a well-bodied relish.
- Sterilize Jars Properly: If you plan to store your relish for more than a few days, ensure all jars and lids are meticulously sterilized. This prevents spoilage and extends the shelf life of your homemade relish.
- Allow to Mellow: While delicious immediately, pepper relish often tastes even better after a few days in the refrigerator. This allows the flavors to fully meld and deepen, resulting in a more harmonious and complex tangy condiment.
- Avoid Over-Crowning: When simmering, ensure your pot is large enough to allow for evaporation. An overcrowded pot will steam the vegetables rather than cook them, leading to a less vibrant relish.
Learn more about the history and varieties of relish on Wikipedia to inspire further customizations.
Benefits of Homemade Relish
Beyond the simple satisfaction of creating something delicious from scratch, making your own homemade relish comes with a host of practical and personal benefits. This delightful process offers more than just a flavorful topping; it’s an investment in quality, control, and culinary joy. The advantages extend from your pantry to your palate, making it a truly worthwhile endeavor for any home cook. Homemade pickled vegetables offer unparalleled freshness.
- Unmatched Freshness and Flavor: Homemade relish uses fresh ingredients, resulting in a vibrant taste superior to most store-bought options. You control the quality of every pepper and onion.
- No Artificial Additives: Say goodbye to preservatives, artificial colors, and unwanted chemicals found in many commercial condiments. You know exactly what goes into your jar.
- Customizable to Your Taste: Adjust the sweetness, heat, and spice blend to create a relish that perfectly suits your personal preferences. This level of customization is impossible with pre-made versions.
- Cost-Effective: Especially when ingredients are in season, making relish at home can be significantly cheaper than buying gourmet brands, allowing you to enjoy a premium product for less.
- Preserves Seasonal Bounty: It’s an excellent way to use up excess garden produce or capitalize on farmers’ market finds, extending the enjoyment of seasonal vegetables. Understand the science behind pickling on Wikipedia.
- Sense of Accomplishment: There’s immense satisfaction in serving a dish complemented by a condiment you created yourself. It adds a personal touch to any meal, like our cheesy chicken and rice casserole.
Enjoy Your Delicious Pepper Relish!
Now that you’ve journeyed through the steps of crafting your own homemade pepper relish, it’s time for the most rewarding part: enjoying your delicious creation! This tangy condiment, born from fresh ingredients and a little love, is ready to brighten up your meals and impress your family and friends. Whether slathered on a hot dog, spooned over eggs, or incorporated into a more complex dish, its vibrant flavor will undoubtedly become a staple in your kitchen. So, open a jar, take a bite, and savor the unique satisfaction that comes from making something wonderful with your own hands. Happy cooking and even happier eating!