
Bacon cheeseburger burritos bring together two beloved comfort foods into one incredible dish. This guide simplifies creating a savory, satisfying meal for any day of the week, combining rich beef, crispy bacon, and melty cheese for a truly delicious experience.
Key Takeaways
- Perfectly brown ground beef for a flavorful core.
- Achieve crispy bacon for crucial texture and taste.
- Learn optimal techniques for assembling and sealing burritos.
- Whip up a quick, creamy cheese sauce for drizzling.
- Discover how to customize and store your burritos for convenience.
Crafting these burritos is simpler than you think. Enjoy the process. Each bite offers a taste of home. Delicious flavors await you. Share this joy.
Best Burritos Recipe: Dish Basics
Crafting the best burritos recipe at home is an incredibly rewarding experience, especially when you infuse them with the beloved flavors of a bacon cheeseburger. This recipe transforms classic burger components into a handheld, customizable delight. Perfect for family dinners or a fun weekend meal, these burritos are hearty and satisfying, appealing to all ages. Understanding the fundamental steps ensures a smooth cooking process and a delicious outcome. From the initial preparation to the final golden seal, each stage contributes to the overall success of your bacon cheeseburger burritos.
Prep, Cook, and Total Time
The beauty of this bacon cheeseburger burrito recipe lies in its relatively straightforward timeline, making it an excellent choice for a weeknight dinner or a relaxed weekend cooking project. You can expect the prep work to take around 20-25 minutes, involving tasks like chopping onions, mincing garlic, and gathering all your ingredients. The active cooking time, which includes browning the beef, crisping the bacon, and assembling the burritos, will typically run for about 30-40 minutes. This brings your total estimated time from start to finish to approximately 50-65 minutes. While there are a few components, they come together efficiently, allowing you to enjoy a homemade, restaurant-quality meal without spending hours in the kitchen.
Servings and What to Expect
This versatile recipe typically yields 6-8 generous burritos, making it ideal for feeding a family or having leftovers for lunch the next day. The size and heartiness of each burrito mean that one per person is often more than enough for a satisfying meal. When you bite into one of these bacon cheeseburger burritos, you can expect a delightful explosion of flavors and textures. The savory, well-seasoned ground beef forms the core, complemented by the irresistible crunch and smoky taste of crispy bacon. Melted cheese, often blended into a creamy sauce, adds a luscious richness, while fresh vegetables like diced tomatoes or shredded lettuce provide a refreshing counterpoint. Each burrito is designed to be a complete, well-balanced meal, delivering the comforting essence of a cheeseburger wrapped in a warm tortilla.
Ingredients for Bacon Cheeseburger Flavor
Achieving that authentic bacon cheeseburger flavor in your burritos starts with selecting the right ingredients. The key is to source fresh, high-quality components that will stand out in every bite. This recipe focuses on creating a harmonious blend of meaty richness, salty crunch, and creamy indulgence, all packed within a soft tortilla. Careful selection of your beef, cheese, and fresh produce will make a significant difference in the final taste and texture of your homemade burritos. Think about balance: the richness of the meat, the sharpness of the cheese, and the freshness of the vegetables.
Meat and Dairy Needs
For the hearty foundation of your bacon cheeseburger burritos, you’ll need 1 pound of lean ground beef, preferably 80/20 for the best flavor balance without excessive grease. The beef provides the primary “cheeseburger” taste. Don’t forget 6-8 slices of thick-cut bacon, which will be cooked until perfectly crispy, contributing both texture and a crucial smoky, salty dimension. When it comes to dairy, a generous amount of shredded cheddar cheese or a cheddar-Monterey Jack blend is essential for the filling and the creamy sauce. You’ll also need sour cream and a splash of milk (whole or 2%) to create the luscious cheese sauce that will beautifully complement the savory fillings.
Fresh Produce and Seasonings
Beyond the meat and dairy, fresh produce and well-chosen seasonings are vital for elevating the bacon cheeseburger burritos. A medium yellow onion, finely diced, and 2-3 cloves of garlic, minced, will form an aromatic base for the ground beef. For seasoning the beef, a packet of your favorite taco seasoning (or a homemade blend of chili powder, cumin, paprika, onion powder, and garlic powder) is perfect, adding depth and a Tex-Mex twist. Crucially, a tablespoon of Worcestershire sauce will deepen the umami flavor of the beef, mimicking the savory notes found in a classic burger patty. Don’t forget fresh toppings like shredded lettuce, diced tomatoes, or sliced pickles, which can be added right before serving for a refreshing crunch. Fresh parsley or cilantro can also add a vibrant finish.
Cooking Savory Ground Beef Filling
The ground beef filling is the heart of your bacon cheeseburger burritos, so giving it proper attention during cooking is crucial. A well-seasoned and deeply browned beef provides the core savory flavor that defines this dish. Rushing this step can lead to a bland or greasy result, undermining the effort put into the other components. Focusing on browning, searing, and seasoning will ensure your beef filling is juicy, flavorful, and perfectly complements the other ingredients. This section will guide you through creating a rich, savory base that truly sings. For another delicious ground meat option, consider exploring our recipe for ground turkey and peppers, which offers a lighter alternative.
Browning Beef with Taco Seasoning
Start by heating a large skillet over medium-high heat. Add 1 pound of lean ground beef, breaking it apart with a spoon. Cook until the beef is fully browned, ensuring no pink remains. This typically takes about 5-7 minutes. Once browned, carefully drain any excess grease from the skillet to prevent your burritos from becoming oily. Next, return the beef to the pan and stir in the diced yellow onion and minced garlic, cooking for an additional 2-3 minutes until the vegetables soften and become fragrant. Then, sprinkle in your chosen taco seasoning, mixing it thoroughly to coat the beef evenly. Cook for another minute, allowing the spices to toast and release their full aroma.
Searing for Added Umami Depth
After browning and seasoning, take a moment to enhance the umami depth of your ground beef. While the beef is still in the pan, gently press it down with the back of your spoon or a spatula, allowing some parts to develop a slightly darker, caramelized crust. Let it sit undisturbed for 1-2 minutes, creating a subtle sear. This process is similar to how a burger patty develops a crust on the grill, concentrating its savory flavors. This extra step isn’t about re-browning but about creating those rich, complex notes that elevate the beef from simply cooked to truly savory. It adds an extra layer of flavor that mimics the grilled quality of a cheeseburger.
Adding Worcestershire for Flavor
To further amplify the deep, savory “cheeseburger” essence, stir in 1 tablespoon of Worcestershire sauce into the seasoned ground beef. Worcestershire sauce is a secret weapon in many beef-based recipes, known for its ability to add a tangy, savory, and slightly sweet punch that enhances the natural flavor of the meat. Mix it well, ensuring it’s evenly distributed throughout the beef. Continue to cook for another 1-2 minutes, allowing the sauce to meld with the other ingredients and slightly reduce. This final flavor booster ties all the savory elements together, creating a robust and incredibly delicious filling that is undeniably reminiscent of a classic bacon cheeseburger. This mixture will be the flavorful core of your burritos.
Crisping Bacon for Perfect Texture
Crispy bacon is a non-negotiable component of any truly great bacon cheeseburger, and the same holds true for these burritos. The textural contrast it provides against the soft tortilla and savory beef filling is essential for a satisfying bite. Getting the bacon perfectly crisp, but not burnt, requires a bit of attention and the right technique. Avoid overly chewy or soggy bacon; it detracts from the overall experience. This section focuses on achieving that ideal golden-brown crunch, preparing it to be chopped and incorporated seamlessly into your best burritos. For more details on this beloved ingredient, explore the Wikipedia page on Bacon.
Cooking Bacon Until Golden
Start with 6-8 slices of thick-cut bacon. Lay the bacon strips in a single layer in a cold skillet (cast iron or a heavy-bottomed pan works best) over medium heat. Beginning with a cold pan allows the fat to render slowly and evenly, resulting in crispier bacon. Cook for about 8-12 minutes, flipping the strips occasionally with tongs. Keep a close eye on the bacon, as it can go from perfectly golden to burnt very quickly. You’re looking for a rich, golden-brown color and a firm, brittle texture. Avoid overcrowding the pan; if necessary, cook the bacon in batches to ensure even crisping.
Draining Excess Grease
Once your bacon has reached that ideal golden crispness, it’s crucial to remove it from the skillet and properly drain any excess grease. Transfer the cooked bacon slices to a plate lined with several layers of paper towels. The paper towels will absorb the rendered fat, preventing the bacon from becoming greasy or soggy as it cools. Allow the bacon to rest on the paper towels for a few minutes. This step is essential not just for texture, but also for ensuring that the bacon doesn’t make your burritos oily or weigh down the other ingredients.
Chopping for Best Burritos
After the bacon has cooled slightly and is thoroughly drained, it’s time to prepare it for your burritos. Using a sharp knife, carefully chop the crispy bacon into small, bite-sized pieces. Aim for uniform pieces, roughly ¼ to ½ inch in size. Smaller pieces ensure that every bite of your burrito gets a taste of that delicious bacon crunch, and they distribute more evenly within the filling. Avoid chopping it too finely, as you want to retain some of that satisfying texture. Once chopped, set the bacon aside; it will be added to the burritos during assembly, adding that crucial smoky flavor and irresistible crunch.
Assembling Your Loaded Burritos
Assembling the burritos is where all your delicious components come together. This step requires a bit of technique to ensure your burritos are tightly rolled, perfectly filled, and hold together when cooked. The order and placement of ingredients are key to a balanced bite and a secure wrap. Don’t rush this part; a well-assembled burrito is less likely to spill its contents and will crisp up more evenly. You’re building a compact, flavorful package, so attention to detail here will pay off immensely when you take that first satisfying bite.
Laying Out Tortillas
Start by laying your large flour tortillas (10-12 inches) flat on a clean, dry surface, such as a cutting board or counter. It’s helpful to warm your tortillas slightly beforehand, as this makes them much more pliable and less likely to crack when rolling. You can warm them individually in a dry skillet over medium heat for 15-20 seconds per side, or stack them and microwave for 30 seconds wrapped in a damp paper towel. Warming ensures that they stretch easily around the generous filling. Having them ready and flexible is the first step to successful burrito assembly.
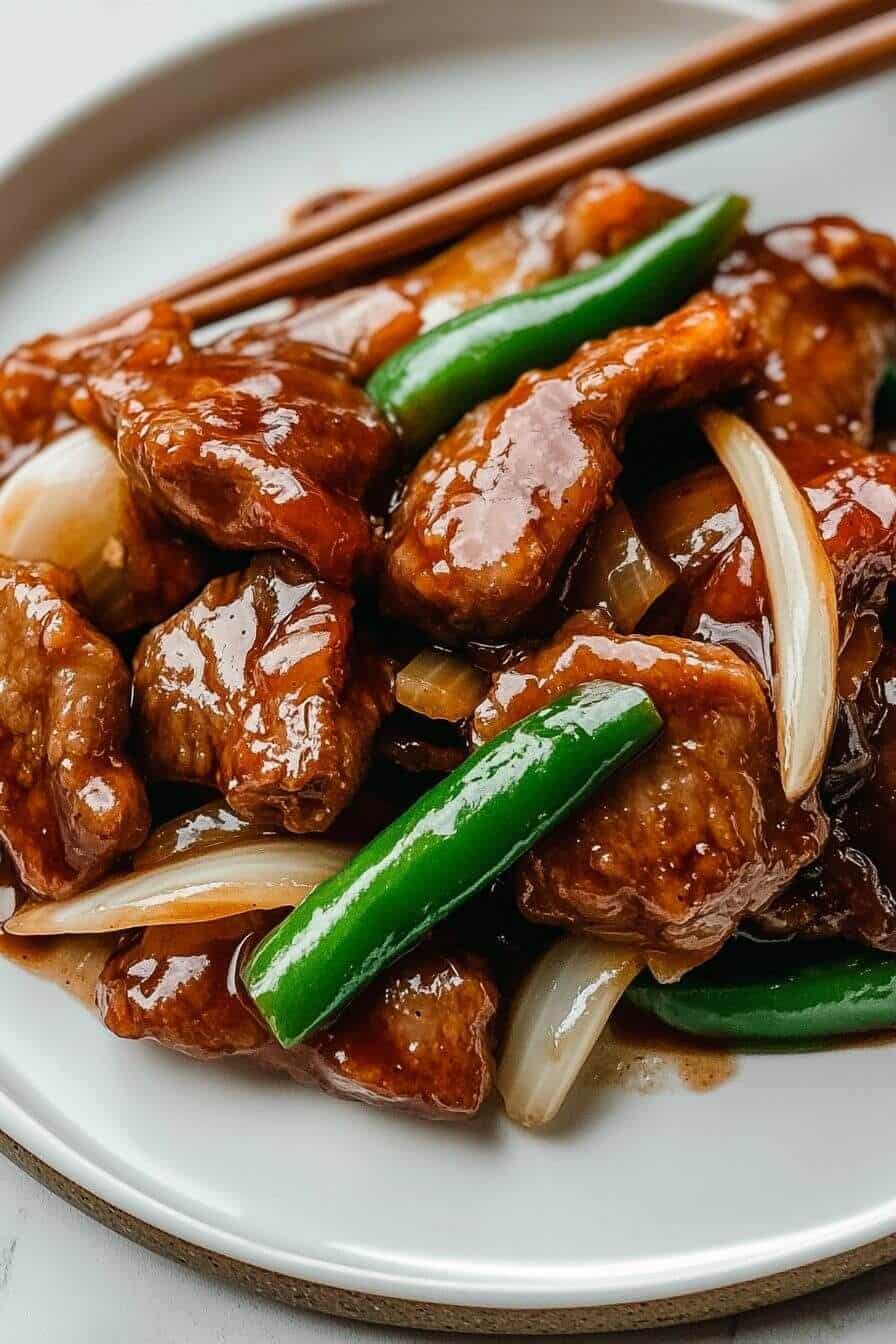
Filling with Beef, Bacon, Veggies
Once your tortillas are warm, begin layering the fillings. Start by spreading a spoonful or two of your savory ground beef filling horizontally across the center of each tortilla, leaving about 2-3 inches clear on the top and bottom edges, and generous space on the sides. Next, sprinkle a portion of your crispy chopped bacon over the beef. If you’re adding any fresh vegetables like shredded lettuce, diced tomatoes, or finely chopped pickles, now is the time to add them on top of the meat and bacon. Be mindful not to overfill, as this will make rolling difficult and could lead to messy burritos. A good rule of thumb is to use about ½ to ¾ cup of total filling per burrito.
Adding Cheese and Rolling Tight
After adding your beef, bacon, and veggies, sprinkle a generous amount of shredded cheddar or a cheese blend over the filling. This cheese will melt beautifully when the burrito is heated, helping to bind the ingredients together. To roll, fold the left and right sides of the tortilla inward over the filling. Then, starting from the bottom edge closest to you, tightly roll the tortilla upwards, tucking in the filling as you go. Keep the roll firm and snug to create a compact burrito. The goal is a tight, cylindrical shape that will hold its form during cooking. Place the rolled burritos seam-side down on a plate while you assemble the rest, preparing them for the next cooking stage.
Sealing Burritos for Golden Finish
The final step before serving your bacon cheeseburger burritos is to give them a beautiful golden finish and to seal them securely. This pan-frying or griddling technique not only adds a desirable crisp texture to the tortilla but also helps to melt the cheese inside, further binding the filling and preventing it from falling out. A well-sealed and golden-brown burrito is a hallmark of quality, promising a delightful crunch with every bite. This step also warms the entire burrito through, ensuring a consistent temperature from the first bite to the last. Take your time here to achieve that perfect exterior.
Heating Burritos Seam-Side Down
To seal your burritos effectively and achieve a perfect golden-brown exterior, heat a large skillet or griddle over medium heat. You can add a very light brush of oil or a small pat of butter to the pan, but often, the residual oils from the bacon or beef are enough, especially if using a non-stick surface. Carefully place the assembled burritos into the hot pan, ensuring the seam-side is facing down. This crucial step uses the heat of the pan to “glue” the seam shut, preventing the burrito from unraveling during subsequent cooking or handling. Don’t overcrowd the pan; cook in batches if necessary, allowing each burrito enough space.
Cooking Until Golden Brown
Once the burritos are placed seam-side down, cook them for approximately 3-4 minutes, or until that seam is securely sealed and the tortilla has developed a beautiful golden-brown color and a slight crispness. The direct heat helps to toast the tortilla, adding a desirable textural contrast. After the seam is sealed, carefully flip the burritos to cook on their other sides. Continue cooking for another 2-3 minutes per side, rotating them until all sides are evenly golden brown and lightly crispy. This process also ensures the internal filling is thoroughly heated and the cheese inside is melted and gooey, making for a truly satisfying experience.
Resting Before Slicing
After the burritos have achieved their golden-brown finish and are heated through, it’s tempting to cut right into them. However, it’s best to resist and allow them to rest for 2-3 minutes on a cutting board or plate. This brief resting period is important for a couple of reasons. Firstly, it allows the internal temperatures to equalize, ensuring every part of the filling is perfectly warm. Secondly, and perhaps more importantly, it allows the juices within the filling to redistribute and settle, which prevents them from spilling out when you slice the burrito. Resting also gives the melted cheese a moment to firm up slightly, further binding the ingredients, making for cleaner cuts and a more enjoyable eating experience.
Making the Creamy Cheese Sauce
No bacon cheeseburger experience is complete without a rich, creamy cheese element, and these burritos are no exception. While melted cheese within the burrito is great, a drizzled cheese sauce takes it to the next level. This simple sauce adds an extra layer of indulgence and moisture, perfectly complementing the savory beef and crispy bacon. It’s quick to prepare and makes a significant impact on the overall dish, transforming a great burrito into an extraordinary one. The key is to achieve a smooth, lump-free consistency that coats beautifully.
Combining Sour Cream and Milk
To create the base for your creamy cheese sauce, start by combining ½ cup of sour cream with ¼ cup of milk (whole or 2% works best for richness). Whisk these two ingredients together in a small saucepan over low heat. The milk helps to thin the sour cream, making it a more pourable consistency for the sauce, while the sour cream provides a tangy richness that cuts through the savory flavors of the burrito. Ensure the mixture is smooth and well combined before proceeding. Keep the heat low to prevent the sour cream from curdling, as gentle warmth is key here. For more information on this versatile dairy product, check out the Wikipedia page on Sour Cream.
Melting Cheese into Smooth Sauce
Once your sour cream and milk mixture is gently warm, gradually add 1 cup of shredded cheddar cheese (or your preferred blend) to the saucepan, stirring continuously. Add the cheese in small handfuls, allowing each addition to melt and incorporate fully before adding more. This gradual process helps to prevent the cheese from clumping and ensures a smooth, velvety sauce. Continue to stir until all the cheese has melted and the sauce is thick, creamy, and uniform in texture. Season with a pinch of salt and pepper to taste. Remove from heat as soon as it’s smooth to prevent it from becoming too thick or oily.
Drizzling Over Warm Burritos
The final, irresistible touch is to generously drizzle the warm, creamy cheese sauce over your freshly cooked bacon cheeseburger burritos. You can either drizzle it directly onto the entire burrito before serving, or you can serve the sauce on the side for dipping. The warmth of the sauce complements the warm burritos, and its rich, tangy flavor enhances all the other components. The vibrant yellow of the cheddar sauce also adds a lovely visual appeal. Don’t be shy with the sauce; it’s designed to be a luxurious addition, making each bite even more delectable and tying the “cheeseburger” theme together perfectly.
Customize Your Best Burritos Recipe
One of the greatest joys of making homemade burritos is the freedom to customize them to your exact preferences. While the bacon cheeseburger concept is fantastic, there are countless ways to tweak this recipe to suit different tastes, dietary needs, or simply to use up ingredients you have on hand. Don’t be afraid to experiment with different proteins, add a kick of spice, or incorporate more vegetables for added nutrition and texture. This flexibility ensures that your best burritos recipe can be a recurring favorite without ever feeling repetitive. For a different dinner idea with chicken, consider our easy honey garlic chicken recipe.
Swapping Meat for Lighter Options
If you’re looking for a lighter take on these burritos, swapping out the ground beef is an excellent option. Ground turkey or ground chicken can be used as a direct substitute, providing a leaner protein source while still absorbing the savory seasonings beautifully. Simply cook them in the same manner as the ground beef, ensuring they are fully browned and seasoned. You could also shred cooked chicken breast or thigh meat, mixed with a little taco seasoning, for a different texture. These lighter alternatives make the burritos less calorically dense without sacrificing much of the delicious flavor, especially when paired with crispy bacon and creamy cheese sauce.
Adding Spice with Jalapenos
For those who love a bit of heat, incorporating jalapenos is a fantastic way to add a spicy kick to your bacon cheeseburger burritos. You can use fresh jalapenos, thinly sliced or finely diced, and add them to the ground beef mixture while it’s cooking. If you prefer a milder spice with a tangy note, pickled jalapenos work wonderfully; simply chop them and add them to the filling during assembly, or offer them as a topping. For an even more intense heat, a dash of cayenne pepper or a pinch of red pepper flakes can be mixed into the beef seasoning. Adjust the amount to your preferred spice level, ensuring a pleasant warmth rather than an overwhelming burn.
Including Beans or Corn
To add more substance, fiber, and flavor, consider including black beans or corn in your burrito filling. A can of drained and rinsed black beans, added to the ground beef mixture, provides a hearty, earthy element and boosts protein. Similarly, a can of drained corn, or frozen corn thawed, adds a touch of sweetness and a satisfying pop of texture. These additions also help to stretch the meal further, making it more economical and filling. Mix them into the beef mixture after it’s fully cooked, allowing them to warm through. Both black beans and corn complement the bacon cheeseburger flavors perfectly, creating an even more robust and satisfying burrito experience.
Making Burritos Ahead: Storage Tips
Bacon cheeseburger burritos are excellent for meal prepping, allowing you to enjoy a delicious, homemade meal with minimal effort during busy weeknights. Preparing them in advance requires proper storage to maintain freshness and prevent food spoilage. Whether you plan to eat them within a few days or want to stock your freezer for future meals, understanding the best storage practices is key. This section provides practical advice on refrigerating, freezing, and reheating your burritos, ensuring they taste just as good as when they were first made.
Preparing and Refrigerating
If you plan to enjoy your bacon cheeseburger burritos within 3-4 days, refrigeration is the way to go. Prepare and assemble the burritos as usual, but do not pan-fry them. Instead, individually wrap each uncooked burrito tightly in plastic wrap, then place them in an airtight container or a large resealable bag. This double layer of protection helps prevent them from drying out or absorbing other odors from the refrigerator. When ready to eat, unwrap a burrito and follow the sealing instructions (heating seam-side down in a skillet) until golden brown and heated through. You can also microwave them for a quicker option, though they won’t achieve the crispy exterior.
Freezing for Longer Storage
For longer storage, these burritos are perfect for freezing. Assemble the burritos but again, do not pan-fry them. Individually wrap each uncooked burrito tightly in plastic wrap, then wrap again in aluminum foil. This dual wrapping is crucial for preventing freezer burn. Place the foil-wrapped burritos into a freezer-safe bag or container, removing as much air as possible. Label with the date. Burritos can be stored in the freezer for up to 2-3 months. This method is ideal for quick, homemade meals whenever you need them, offering convenience without sacrificing flavor or quality. Having a stash of these in the freezer can be a lifesaver on busy days.
Reheating Instructions
Reheating your prepared burritos ensures a warm and delicious meal.
- From Refrigerated (Uncooked): Unwrap the burrito and heat in a lightly oiled skillet over medium heat, seam-side down, until golden brown and heated through (about 5-7 minutes per side).
- From Refrigerated (Cooked): You can re-crisp them in a skillet, or microwave for 1-2 minutes until hot.
- From Frozen (Uncooked): Remove the foil and plastic wrap. You can bake them directly from frozen in an oven preheated to 375°F (190°C) for 30-40 minutes, or until heated through and golden. For crispier results, finish in a hot skillet for a few minutes. Alternatively, microwave for 3-5 minutes, flipping halfway, then pan-fry for crispness.
Always ensure the internal temperature reaches 165°F (74°C) for food safety. The creamy cheese sauce can be made fresh or reheated gently on the stovetop if stored separately.
Serve Your Bacon Cheeseburger Burritos
Serving your freshly made bacon cheeseburger burritos is the moment to truly enjoy your culinary creation. While they are a complete meal on their own, pairing them with complementary sides and garnishes can elevate the dining experience. Think about balancing the rich, savory flavors of the burrito with fresh, bright, or tangy accompaniments. Presentation also plays a role; a little extra effort in garnishing can make your meal even more appealing. This section provides ideas to round out your meal and make it truly memorable, whether for a casual dinner or a fun gathering.
Pairing with Guacamole or Salsa
Classic Mexican-inspired sides like guacamole and salsa are perfect partners for bacon cheeseburger burritos. The creamy, rich avocado in guacamole provides a wonderful counterpoint to the savory beef and cheese, adding healthy fats and a smooth texture. A fresh, zesty salsa, whether mild or spicy, introduces a burst of acidity and freshness that brightens the entire dish. You can serve both on the side for dipping, allowing everyone to customize their bite. Consider a chunky tomato salsa, a vibrant pico de gallo, or even a smoky corn salsa to add variety and enhance the overall flavor profile.
Enjoying with Salad or Chips
For a complete and satisfying meal, consider serving your burritos alongside a light salad or some crunchy tortilla chips. A simple green salad with a vinaigrette dressing can offer a refreshing, crisp contrast to the hearty burritos. The acidity of the dressing will cut through the richness of the cheese and meat. Alternatively, a bowl of crispy tortilla chips, perhaps with an extra dollop of salsa or guacamole, adds a satisfying crunch and makes for a fun, casual meal. You could also serve them with seasoned potato wedges or sweet potato fries to lean into the “cheeseburger” theme even further. For more visual inspiration, visit Carina Recipes on Pinterest or Carina Recipes on Instagram for plating ideas.
Garnish for Extra Appeal
A simple garnish can significantly enhance the visual appeal and even add a final layer of flavor to your bacon cheeseburger burritos. A sprinkle of freshly chopped cilantro or parsley not only adds a pop of vibrant green color but also introduces a fresh herbaceous note. A dollop of extra sour cream or a dash of hot sauce can be added directly on top for those who desire more creaminess or heat. For a true cheeseburger feel, a few thin slices of green onion or a sprinkle of toasted sesame seeds (mimicking a burger bun) can be a creative touch. These small additions make the burritos look professionally prepared and invite diners to dig in.
Vegetarian Twist for Burrito Lovers
Even if you’re a fan of the bacon cheeseburger burritos, it’s great to have vegetarian options for guests or simply for a meatless meal. The core concept of a flavorful filling wrapped in a tortilla is highly adaptable. Creating a vegetarian twist means focusing on robust vegetable combinations and plant-based proteins that can stand up to rich sauces and seasonings. This section offers ideas to create equally delicious and satisfying burritos without meat, proving that “best burritos” can encompass a wide range of preferences. For more main course ideas, explore our full main course category or try a delightful spinach feta quesadillas recipe.
Using Sautéed Vegetables
For a vibrant vegetarian filling, sauté a medley of colorful vegetables. Start with a base of diced onions and garlic, then add finely chopped bell peppers (red, yellow, or green), zucchini, mushrooms, and even finely shredded carrots. Cook them until tender-crisp, seasoning generously with taco seasoning, cumin, chili powder, and a dash of smoked paprika for depth. You can also add a splash of vegetable broth or a spoonful of tomato paste to create a richer, more cohesive sauce for the vegetables. This vegetable mix provides plenty of flavor, texture, and nutrients, making a hearty and satisfying filling that doesn’t feel like a compromise.
Black Beans or Lentils Options
To provide a substantial protein source in your vegetarian burritos, black beans or lentils are excellent choices.
- Black Beans: Rinse and drain a can of black beans, then simmer them with a little onion, garlic, a splash of water or vegetable broth, and taco seasoning. Mash a portion of the beans slightly to create a creamier texture that helps bind the filling, leaving some whole for textural contrast.
- Lentils: Cook green or brown lentils according to package directions until tender. Drain well, then sauté with diced onions, bell peppers, and plenty of spices like cumin, coriander, and chili powder. A little tomato paste can enhance the richness, mimicking the savory depth of ground meat.
Both options offer a fantastic foundation for your vegetarian burritos, providing fiber and protein that make the meal truly filling. Combine them with the sautéed vegetables and cheese for a complete and flavorful experience.
Extra Tips for Tasty Burritos
Crafting the perfect burrito often comes down to a few key techniques and considerations that can significantly impact the final result. These extra tips are designed to help you avoid common pitfalls and ensure your bacon cheeseburger burritos are consistently delicious, easy to handle, and visually appealing. From preparing your tortillas correctly to understanding how much filling is just right, these insights will elevate your burrito-making skills, making every batch a resounding success. Pay attention to these small details for a truly memorable meal.
Warming Tortillas for Pliability
One of the most critical steps for successful burrito rolling is warming your tortillas. Cold or room-temperature tortillas are stiff and prone to cracking when folded, making it difficult to create a tight, secure wrap. Warming tortillas for pliability is essential. You can heat them individually in a dry skillet over medium heat for about 15-20 seconds per side until they are soft and flexible. Alternatively, stack them, wrap in a damp paper towel, and microwave for 30-45 seconds. This slight warmth softens the gluten, allowing the tortilla to stretch and conform to the filling without tearing, ensuring a neatly wrapped burrito that holds its shape.
Don’t Overfill Your Burrito
While it’s tempting to load your burrito with as much delicious filling as possible, don’t overfill your burrito. This is a common mistake that leads to messy, difficult-to-roll burritos that are prone to bursting open during assembly or cooking. Aim for about ½ to ¾ cup of total filling for a large (10-12 inch) flour tortilla. This amount allows you enough space to fold in the sides and roll the burrito tightly without undue stress on the tortilla. A well-proportioned burrito is much easier to eat, holds its shape better, and ensures every bite has a balanced ratio of ingredients.
Experiment with Cheese Types
While cheddar cheese is classic for a “cheeseburger” flavor, don’t be afraid to experiment with cheese types to find your perfect blend. Monterey Jack or Colby Jack melt beautifully and offer a milder, creamier flavor than sharp cheddar. For a bit of a kick, pepper jack cheese can add a pleasant, subtle heat to your filling. A blend of cheeses, such as cheddar and Monterey Jack, often provides the best of both worlds—great flavor and excellent meltability. You can use different cheeses in the filling and in the creamy sauce, tailoring the cheese profile to your preference and adding another layer of customization to your best burritos recipe.