
Royal Purple Velvet Cake is a truly enchanting dessert that captivates both the eyes and the palate. This recipe will guide you through creating a stunning, moist cake with a signature vibrant hue. Paired with a luscious cream cheese frosting, it’s ideal for making any celebration memorable. Prepare to impress your guests with this elegant homemade treat.
Key Takeaways
- Achieve a stunning, vibrant purple velvet cake with clear, step-by-step instructions.
- Understand the importance of room temperature ingredients for a perfectly soft texture.
- Learn how to make a classic tangy cream cheese frosting that complements the cake.
- Get practical tips for baking, cooling, decorating, and storing your delicious dessert.
Velvet cakes offer unique flavor. Their rich, tender crumb delights. A touch of acidity balances sweetness. This recipe brings vibrant elegance. It’s a truly special treat.
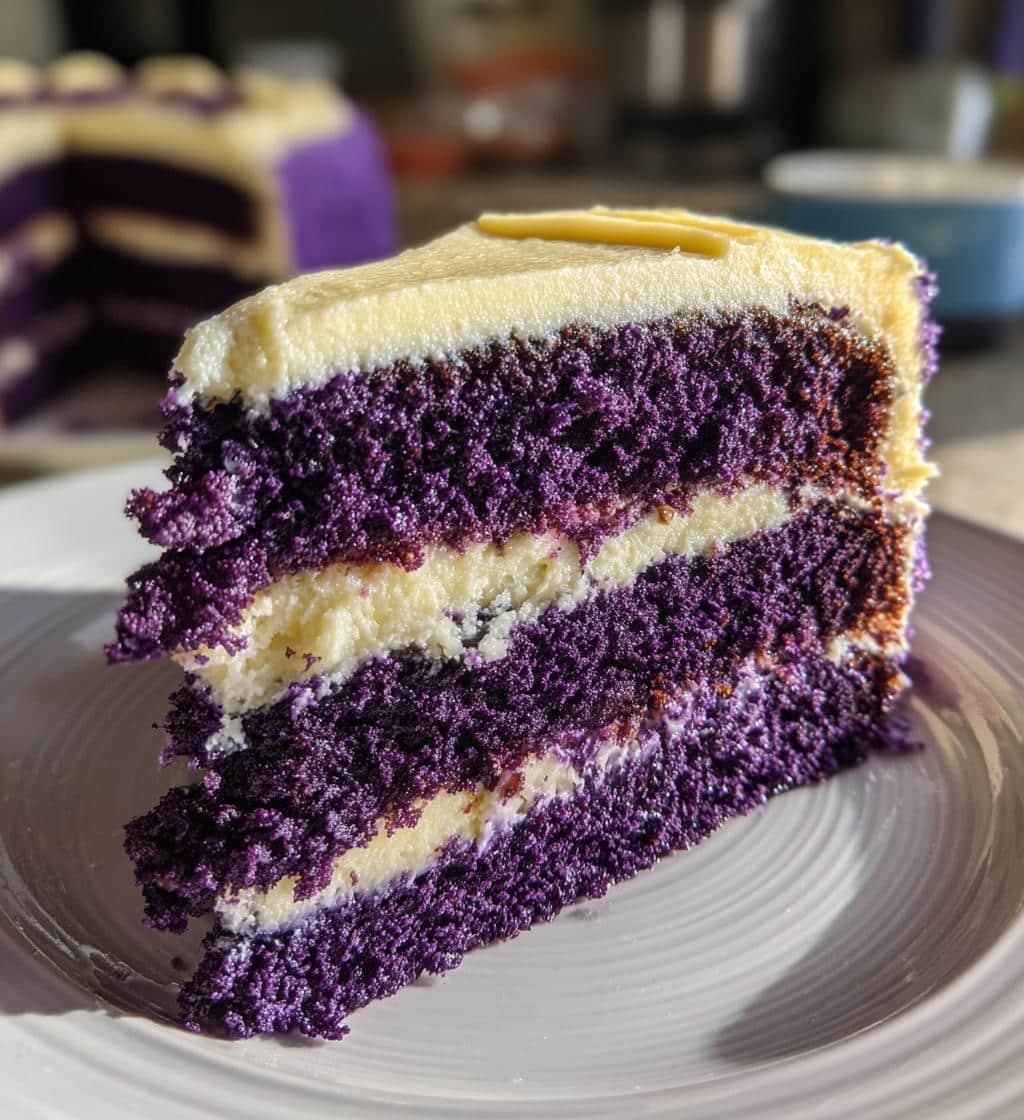
Experience the Royal Purple Velvet Cake
Why Bake This Stunning Dessert?
Baking the Royal Purple Velvet Cake offers more than just a delicious treat; it’s an opportunity to create a visually striking centerpiece that is sure to draw gasps of delight. This isn’t just any cake; it’s a statement. Perfect for birthdays, anniversaries, or any special occasions, its unique vibrant color and luxurious texture make it an unforgettable addition to your dessert table. The process itself is rewarding, transforming simple ingredients into a truly majestic rich dessert that showcases your baking prowess. Imagine the joy of serving a cake that looks as incredible as it tastes, leaving a lasting impression on everyone who tries a slice.
What Makes This Cake Special?
What sets the Royal Purple Velvet Cake apart is its combination of a beautiful, deep purple hue and an incredibly moist, tender crumb. Unlike typical cakes, velvet cakes have a distinct texture due to the inclusion of buttermilk and a touch of cocoa powder, which reacts with baking soda to create a fine, soft texture. This vibrant color isn’t just for show; it enhances the entire experience, making each bite feel indulgent and unique. The subtle tang from the buttermilk perfectly balances the sweetness, creating a complex flavor profile that complements the traditional cream cheese frosting. It’s a sophisticated twist on a classic, offering both novelty and comfort in every slice, truly making it a special and memorable homemade cake.
Gather Ingredients for Royal Purple Cake
Essential Items for Velvet Baking
To create your stunning Royal Purple Velvet Cake, gathering the correct baking ingredients is key. You’ll need all-purpose flour, granulated sugar, unsweetened cocoa powder (natural, not Dutch-processed, to react with the baking soda), baking soda, and salt for your dry mixture. For the wet components, ensure you have vegetable oil (or another neutral oil), large eggs, vanilla extract, and crucial buttermilk. The buttermilk contributes to the tender crumb, a key characteristic of velvet cakes. Finally, for that signature hue, gel food coloring is a must. Gel colors are highly concentrated, ensuring a deep, vibrant color without adding excess liquid to your batter, which could alter the texture of your soft cake. Make sure all your measuring tools are accurate for the best results.
Room Temperature Matters for Batter
One of the most important baking tips for any velvet cake recipe is to use room temperature ingredients. This applies specifically to your eggs and buttermilk. When ingredients are at room temperature, they emulsify more easily, creating a smoother, more uniform batter. Cold ingredients, especially eggs and buttermilk, can cause the batter to curdle or separate, leading to a dense or inconsistent texture in your final cake. Taking eggs and buttermilk out of the refrigerator at least 30 minutes to an hour before you begin baking allows them to warm up gently, ensuring they blend seamlessly into your mix. This simple step vastly improves the overall soft texture and rise of your Royal Purple Velvet Cake, guaranteeing a much more appealing and professional-looking finished product. It’s a small detail that makes a big difference for your homemade cake.
Preparing Pans for Baking Success
Preheat Oven to 350°F (175°C)
Before you even think about mixing your Royal Purple Velvet Cake batter, the very first step in ensuring baking success is to properly preheat your oven. Set your oven to 350°F (175°C) and allow it sufficient time to reach and stabilize at this temperature. An oven that is not fully preheated can lead to uneven baking, where the outside cooks too quickly while the inside remains undercooked, or a cake that doesn’t rise properly. A consistent temperature from the moment your cake pans enter the oven promotes a stable structure and even caramelization, contributing to the beautiful soft texture and desired rise of your layers. Patience in preheating will be rewarded with perfectly baked cake layers.
Grease and Flour Cake Pans Well
Properly preparing your cake pans is just as critical as preheating the oven. For this Royal Purple Velvet Cake recipe, you will typically need two 8-inch or 9-inch round cake pans. To prevent your delicate cake layers from sticking, start by generously greasing the insides of your pans with butter, shortening, or a non-stick baking spray. Ensure you cover every crevice, especially the corners and bottom. After greasing, lightly dust the pans with all-purpose flour, tapping out any excess. The flour creates a barrier between the cake batter and the pan, allowing for easy release once baked and cooled. For an extra layer of protection, you can also line the bottoms of your pans with parchment paper cut to size before greasing and flouring. This meticulous preparation guarantees that your beautiful homemade cake layers will slide out effortlessly, preserving their perfect shape.
Mixing the Royal Purple Batter
Combine Dry Ingredients in Bowl
Starting with the dry ingredients is a fundamental step in many dessert recipes, and the Royal Purple Velvet Cake is no exception. In a large bowl, whisk together your all-purpose flour, granulated sugar, cocoa powder, baking soda, and salt. Whisking ensures that all the ingredients are evenly distributed, breaking up any lumps and ensuring that the leavening agents (baking soda and cocoa) are uniformly spread throughout the mixture. This initial step is vital for a consistent texture and rise in your finished cake layers. A well-combined dry mix sets the stage for a perfectly balanced and flavored cake, preventing pockets of unmixed ingredients.
Blend Sugar, Oil, Eggs, Buttermilk
Next, in a separate, even larger bowl, begin to combine your wet ingredients. Start by whisking the vegetable oil and granulated sugar together until they are well integrated and slightly lighter in color. Then, beat in the large eggs one at a time, ensuring each egg is fully incorporated before adding the next. This creates a strong emulsion, contributing to the moistness and tender crumb of the cake. Finally, gently stir in the room temperature buttermilk and vanilla extract. The buttermilk is key to the “velvet” texture and subtle tang of this rich dessert. This careful blending ensures a smooth and cohesive base for your vibrant color cake batter.
Slowly Add Dry to Wet Mix
The final stage of mixing your Royal Purple Velvet Cake batter involves combining the dry and wet ingredients. Gradually add the dry ingredient mixture to the wet ingredient mixture, mixing on low speed with an electric mixer or by hand with a whisk or spatula. Mix just until combined, being careful not to overmix. Overmixing can develop the gluten in the flour too much, leading to a dense, tough cake rather than the desired soft texture of a velvet cake. A few small lumps are perfectly acceptable and will likely disappear during baking. This precise step in the recipe instructions helps maintain the delicate balance required for a truly exceptional homemade cake, focusing on proper texture above all else.
Stir in Vibrant Purple Color
Use Gel Food Coloring for Hue
Achieving the signature vibrant color of your Royal Purple Velvet Cake is one of the most exciting steps! For the best results, always opt for gel food coloring over liquid food coloring. Gel colors are highly concentrated, meaning you’ll need less to achieve a deep, rich purple hue without altering the consistency of your batter. Liquid food coloring can thin out your batter, potentially leading to a less desirable soft texture. Start with a small amount, adding a few drops at a time, and mix thoroughly after each addition until you reach your desired shade. Remember, the color will slightly deepen during baking, so aim for a slightly lighter purple in the batter than your final desired look. For truly striking results, understanding the science behind food coloring can be beneficial.
Ensure Color Is Well Combined
Once you’ve added the gel food coloring, it’s crucial to ensure that the color is evenly distributed throughout the entire batter. Mix gently but thoroughly, scraping down the sides and bottom of the bowl to catch any streaks of uncolored batter. You want a uniform, consistent purple from top to bottom. This attention to detail will prevent splotches or uneven coloration in your baked cake layers, contributing to the overall stunning presentation of your party cake. A perfectly colored batter guarantees that every slice of your Royal Purple Velvet Cake will be a visual delight, matching its delicious taste. This step is key to making this dessert truly stand out.
Baking Your Perfect Velvet Cake
Divide Batter Evenly into Pans
For a beautifully balanced Royal Purple Velvet Cake with even cake layers, it’s essential to divide the batter as equally as possible between your prepared pans. You can achieve this by using a kitchen scale to weigh the batter in each pan, or by simply eyeballing it carefully. Even distribution ensures that both layers bake at a similar rate and reach the same height, making them easier to stack and frost later. Uneven layers can lead to a lopsided cake and require extra trimming, which can reduce the overall soft texture. Gentle pouring of the batter into the center of each pan, allowing it to spread naturally, will also help maintain an even surface. This small but critical step is a key baking tip for any successful layered cake.
Check for Doneness with Toothpick
Baking times can vary slightly depending on your oven and the specific pans you use, so knowing how to check for doneness is crucial. For your Royal Purple Velvet Cake, generally, the cake layers will bake for about 25-30 minutes. To test if they are ready, insert a clean toothpick into the center of one of the cakes. If the toothpick comes out clean or with only a few moist crumbs attached, your cake is done. If it comes out with wet batter, continue baking for a few more minutes and retest. Avoid opening the oven door too frequently during the baking process, as this can cause the cakes to fall. Overbaking can lead to a dry cake, so watch carefully to ensure your sweet treat retains its signature moist, soft texture. This precision helps in creating a truly delicious dessert.
Cooling Cakes for Best Frosting
Cool Completely on Wire Rack
After your Royal Purple Velvet Cake layers emerge from the oven, resist the urge to frost them immediately. Proper cooling is a critical step for a successful layered cake. Allow the cakes to cool in their pans on a wire rack for about 10-15 minutes. This initial cooling period allows the cakes to firm up slightly, making them less prone to breaking when handled. After this time, carefully invert the cakes onto the wire rack to cool completely. The wire rack ensures air circulates all around the cake, preventing condensation and soggy bottoms. This thorough cooling is paramount for your homemade cake to achieve its best structure and flavor, preparing it perfectly for the next step of cake decorating.
Prevent Frosting from Melting Off
The most important reason to cool your cake layers completely—and we mean completely—is to prevent your delicate cream cheese frosting from melting or sliding off. Even slightly warm cake layers can cause the frosting to soften and become runny, leading to a messy and unappealing finish. A fully cooled cake provides a firm, stable base for your frosting, allowing it to set beautifully and hold its shape. If you’re short on time, you can even place the cooled cake layers in the refrigerator for about 20-30 minutes to ensure they are thoroughly chilled before frosting. This proactive step ensures your Royal Purple Velvet Cake maintains its stunning appearance and delicious integrity, showcasing the vibrant color and smooth finish you worked so hard to achieve. This is a crucial baking tip for any layered dessert.
Frosting Your Royal Purple Velvet Cake
Pair with Tangy Cream Cheese
The perfect partner for the rich, moist Royal Purple Velvet Cake is a classic tangy cream cheese frosting. The slight tartness of cream cheese perfectly balances the sweetness of the cake, creating a harmonious flavor profile that is both decadent and refreshing. A good cream cheese frosting should be smooth, creamy, and spreadable, made with softened cream cheese, unsalted butter, powdered sugar, and a hint of vanilla extract. Ensuring your cream cheese and butter are at room temperature is crucial for a lump-free, silky frosting. This pairing isn’t just traditional; it’s culinary perfection, enhancing the overall delicious dessert experience and complementing the cake’s vibrant color beautifully. For more delightful dessert ideas, consider exploring our Peanut Butter Brownie Swirl Cookies.
Apply Thin Crumb Coat First
For a professional-looking finish on your Royal Purple Velvet Cake, always begin with a thin crumb coat. A crumb coat is a very thin layer of frosting applied to the cooled cake layers, designed to trap any loose crumbs. Spread a small amount of frosting evenly over the top and sides of the cake. Don’t worry about perfection at this stage; the goal is simply to seal in those stray crumbs. Once applied, refrigerate the cake for 15-30 minutes to allow the crumb coat to set and firm up. This step is invaluable for cake decorating, as it creates a smooth, crumb-free surface for your final layer of frosting. The result is a clean, polished appearance that highlights the stunning purple velvet cake, making it truly picture-perfect for any party cake or special occasions.
Storing Your Delicious Cake Properly
Refrigerate Leftovers for Five Days
To keep your Royal Purple Velvet Cake fresh and delightful, proper storage is key, especially given its cream cheese frosting. Any leftover slices or the entire homemade cake should be stored in an airtight container in the refrigerator. The cream cheese frosting, in particular, requires refrigeration to maintain its freshness and safety. Stored this way, your cake will remain moist and flavorful for up to five days. It’s best to let refrigerated slices come to room temperature for about 15-20 minutes before serving to fully appreciate the soft texture and rich dessert flavors. This simple practice ensures that every subsequent slice is as enjoyable as the first, making it a great recipe for future enjoyment.
Freeze Slices for Longer Enjoyment
If you anticipate having more cake than you can eat within five days, or if you simply want to enjoy a slice of your Royal Purple Velvet Cake another time, freezing is an excellent option. For best results, slice the cake into individual servings. Wrap each slice tightly in plastic wrap, then an additional layer of aluminum foil to protect it from freezer burn. Place the wrapped slices in a freezer-safe bag or container. This method allows you to store your delicious dessert for up to 2-3 months. When you’re ready to indulge, simply remove a slice from the freezer and follow the thawing instructions to bring it back to its original glory. This smart storage ensures your sweet treat is always ready when cravings strike.
Serving Your Royal Purple Delight
Thaw Frozen Cake Gently Overnight
When you’re ready to enjoy a frozen slice of your Royal Purple Velvet Cake, the key to retaining its soft texture and delicious flavor is a gentle thaw. The best method is to transfer the individually wrapped slices from the freezer to the refrigerator overnight. This slow thawing process prevents large ice crystals from forming, which can degrade the cake’s texture. Avoid thawing at room temperature too quickly, as this can make the frosting runny and the cake layers potentially dry out. A gradual thaw ensures that the cake remains moist and the cream cheese frosting regains its creamy consistency, ready to be enjoyed as a perfect rich dessert. This simple step preserves the quality of your party cake for future enjoyment.
Warm a Slice for Extra Comfort
While delicious chilled or at room temperature, sometimes a slightly warmed slice of Royal Purple Velvet Cake can offer an extra layer of comfort, especially during colder months. After thawing, or even with a fresh slice, you can gently warm it in the microwave for about 10-15 seconds. Be careful not to overheat, as this can melt the frosting and alter the delicate texture of the cake. A warm slice enhances the flavors, making the cake feel even more indulgent and the frosting incredibly luscious. This thoughtful serving suggestion elevates the experience of this sweet treat, making it an even more satisfying conclusion to any meal or a delightful afternoon pick-me-up. It’s a fantastic way to enjoy your vibrant color homemade cake.
Nutrition Facts for Each Slice
Understand Calories and Macronutrient Details
While the Royal Purple Velvet Cake is undeniably a delicious dessert and a delightful sweet treat for special occasions, many individuals appreciate understanding its nutritional contribution. A typical slice will contain calories primarily from carbohydrates (sugar and flour), fats (oil, butter, and cream cheese), and a smaller amount of protein (eggs, buttermilk, and cream cheese). Given its rich ingredients and generous frosting, it is generally considered an indulgent item. Understanding these macronutrient details can help you fit this vibrant color cake into your dietary preferences, allowing for mindful enjoyment.
Detailed Information Per Serving
Due to variations in ingredients, pan sizes, and frosting amounts, precise nutrition facts for each slice of your homemade Royal Purple Velvet Cake can vary. However, generally, a serving would typically contain a significant amount of calories, with notable percentages of daily values for total fat and carbohydrates. Dietary fiber and protein would be present in smaller quantities. For more detailed and accurate information, you would need to calculate based on the specific brands and quantities of ingredients used in your velvet cake recipe. While not usually the primary focus for a party cake, being aware of these details helps in making informed choices for your family and guests. Remember, moderation is key when enjoying such a rich dessert.
Tips for Royal Purple Velvet Cake
Don’t Overmix Batter for Airiness
One of the most crucial baking tips for achieving that signature soft texture in your Royal Purple Velvet Cake is to avoid overmixing the batter. Once you combine the wet and dry ingredients, mix just until they are incorporated and no streaks of dry flour remain. Overmixing develops the gluten in the flour too much, leading to a tough, dense cake that lacks the delicate crumb velvet cakes are known for. A light hand ensures your cake stays moist, tender, and airy. These principles apply to many baking projects, including our delicious Snickerdoodle Cobbler. Always remember, less is often more when it comes to mixing cake batter.
Ensure All Ingredients Are Room Temp
We cannot stress enough the importance of using room temperature ingredients, especially for your eggs, butter (if used in frosting), and buttermilk. Cold ingredients do not emulsify properly, which can lead to a lumpy batter and a denser, less uniform cake. Room temperature ingredients blend together smoothly, creating a more stable emulsion that results in a lighter, more consistent soft texture for your Royal Purple Velvet Cake. Plan ahead by taking these ingredients out of the refrigerator at least 30 minutes to an hour before you begin baking. This simple step is a game-changer for any baking project, ensuring your homemade cake is as perfect as possible. For more inspiration and visual delights, follow us on Pinterest and don’t forget to share your creations and connect with us on Instagram! You can find many more delightful options in our desserts category.