
The Oreo Brookies recipe creates a truly decadent dessert experience. This simple yet impressive layered sweet combines rich brownie, a creamy Oreo crunch, and soft cookie dough. It’s an easy homemade dessert treat perfect for sharing or enjoying solo, offering multiple textures and flavors in every single bite.
Key Takeaways
- Oreo Brookies are a hybrid dessert combining brownie, Oreo, and cookie dough for a unique flavor profile.
- The recipe involves layering distinct components to create a visually appealing and texturally diverse treat.
- Proper preparation, baking, and cooling are crucial for achieving the perfect consistency and clean slices.
- Simple pro tips allow for easy customization and enhancement of this already delightful homemade dessert.
Enjoy creating this amazing dessert. It is surprisingly simple to make. Layers of flavor await your taste. Share this delightful treat easily. Everyone will surely love each bite.
Oreo Brookies Recipe: What Are They?
The Oreo Brookies recipe is a celebration of confectionary creativity, bringing together three beloved treats into one spectacular creation. At its heart, this dessert is a harmonious blend of a fudgy brownie, a crunchy and creamy Oreo cookie layer, and a soft, sweet chocolate chip cookie dough. It’s a true hybrid dessert, offering a complexity of flavors and textures that ensures every bite is an exciting journey for your taste buds. Imagine the deep, rich cocoa notes of a brownie, complemented by the distinctive crunch and sweet cream of an Oreo, all softened by the familiar comfort of a chocolate chip cookie. This combination makes for a truly unique and irresistible dessert treat that stands out from typical baked goods.
A Perfect Hybrid Dessert Treat
A perfect hybrid dessert treat, Oreo Brookies transcend the ordinary by offering an innovative approach to sweets. This layered marvel doesn’t just stack ingredients; it carefully balances them to create a cohesive eating experience. Each component retains its individual character—the chewiness of the brownie, the snap of the Oreo, the melt-in-your-mouth quality of the cookie dough—while contributing to a greater, unified whole. The concept of brookies, a portmanteau of brownie and cookie, is elevated further by the inclusion of the iconic Oreo, adding a signature flavor and textural contrast that has made this recipe a popular choice for bakers looking for something extraordinary yet approachable. It’s a testament to how simple ingredients, thoughtfully combined, can yield truly remarkable results, making it a stellar addition to any dessert spread, perhaps even alongside a delicate desserts collection.
The Ultimate Layered Sweet
When we talk about the ultimate layered sweet, Oreo Brookies undoubtedly come to mind. This confection boasts distinct strata that not only look impressive but also deliver a sequential taste experience. You start with a robust brownie layer, providing a dense, chocolaty foundation. Nestled atop this is the distinct Oreo layer, offering its characteristic vanilla cream and chocolate cookie crunch. Capping it all is the soft and yielding cookie dough layer, which bakes to a golden perfection, adding a delicate chewiness. The strategic placement of these layers ensures that no single flavor overpowers another, allowing each to shine while contributing to the overall decadent symphony. It’s more than just a dessert; it’s an architectural marvel in baking, resulting in slices that are as visually appealing as they are delicious, offering a satisfying depth with every mouthful. For those who appreciate the art of layering, much like a classic brownie itself, this recipe is a must-try.
Gather Ingredients for Oreo Brookies
Creating these delightful Oreo Brookies begins with assembling the right components. Success in baking often hinges on having all your ingredients measured and ready before you start, a practice known as “mise en place.” For this particular easy recipe, you’ll be working with a combination of pantry staples and a few special additions that truly define the brookie experience. While the list might seem extensive at first glance due to the multiple layers, each ingredient plays a crucial role in delivering the complex flavors and textures that make this layered sweet so irresistible. From the richness of butter to the delightful crunch of chocolate chips and Oreos, every item contributes to the overall magic. Always opt for fresh, high-quality ingredients to ensure the best possible outcome for your homemade dessert.
Wet Ingredients You’ll Need
The wet ingredients form the liquid base and bind the dry components together, contributing significantly to the texture and moisture of both the brownie and cookie dough layers. For this recipe, you’ll need unsalted butter, softened to room temperature, which is crucial for achieving a smooth, creamy batter. Granulated sugar and brown sugar are vital for sweetness and moisture, with brown sugar adding a deeper, caramel-like note and chewiness. Large eggs act as binders and add richness, while a good quality vanilla extract enhances all the sweet flavors. Sometimes, a touch of milk or heavy cream might be included in cookie dough recipes, but for our specific layers, these core wet ingredients are key to developing the rich, decadent texture of the brownie foundation and the soft, chewy cookie dough layer that complements the iconic Oreo crunch.
Dry Ingredients You’ll Need
The dry ingredients provide structure and foundational flavor. You’ll require all-purpose flour, which is the primary building block for both the brownie and cookie dough. Make sure to measure it correctly, either by weight or by the spoon-and-level method, to avoid a dense or dry result. Unsweetened cocoa powder is essential for the brownie layer, delivering that deep, intense chocolate flavor. A pinch of baking soda acts as a leavening agent, giving the layers a slight lift, while salt balances the sweetness and brings out the other flavors. For the delightful cookie dough layer, you’ll also incorporate an ample amount of chocolate chips, which melt into pockets of gooey goodness during baking, adding an extra dimension of sweetness and texture that pairs beautifully with the fudgy brownie and crispy Oreo layers.
The Special Layer Elements
Beyond the basic wet and dry components, the true stars of this Oreo Brookies recipe are the special ingredients that define its layered character. Foremost among these are the Oreo cookies themselves. You’ll need a significant number of these iconic sandwich cookies, which will be crushed or broken to create the distinctive Oreo layer. This layer provides a delightful textural contrast with its crisp cookie and creamy filling, cutting through the richness of the brownie and cookie dough. Additionally, a package of pre-made (or homemade if you’re ambitious) chocolate chip cookie dough is required. This dough forms the middle layer, adding a soft, chewy element that transforms the traditional brookie concept into a triple-layered sensation. These elements are what elevate this dessert from a simple brownie or cookie to a complex and utterly satisfying sweet indulgence, ensuring every bite is packed with diverse flavors and textures.
Preparing Your Baking Essentials
Before you even begin mixing ingredients for your Oreo Brookies recipe, setting up your baking workspace and preparing your equipment is paramount. This foundational step ensures a smooth, efficient baking process and helps guarantee the best possible outcome for your homemade dessert. Overlooking these initial preparations can lead to uneven baking, sticking, or a less-than-perfect appearance for your delectable layered sweet. Taking a few moments to properly prepare your oven and baking pan will save you frustration later and contribute significantly to the overall success of this enticing dessert treat. It’s all part of the thoughtful approach to baking that yields truly exceptional results, similar to the precision needed for a perfect baking project.
Preheat Oven to 350°F
The very first step in preparing for baking is to preheat your oven to 350°F (175°C). This isn’t just a suggestion; it’s a critical instruction that impacts the entire baking process. A properly preheated oven ensures that your brookies begin baking at the correct temperature from the moment they enter, leading to consistent rise and even cooking. If you place your pan into a cold or partially preheated oven, the batter will take longer to reach the desired temperature, potentially causing the edges to dry out before the center is cooked, or resulting in a dense, uneven texture. Allow your oven ample time to reach and stabilize at 350°F, usually about 15-20 minutes after it signals that it’s preheated, before inserting your brookies. This simple step is a key baking tip for achieving that perfect, fudgy brownie layer and tender cookie dough.
Grease a 9×13 Inch Pan
Next, you’ll need to grease a 9×13 inch pan thoroughly. This standard baking pan size is ideal for accommodating the multiple layers of your Oreo Brookies and ensuring they bake evenly to a sufficient thickness. There are several ways to grease your pan: you can use butter or shortening, spreading a thin, even layer across the bottom and up the sides. For added non-stick insurance and easier removal, line the greased pan with parchment paper, leaving an overhang on the longer sides to create “slings.” This will allow you to easily lift the cooled brookies out of the pan before slicing. A well-greased and, ideally, parchment-lined pan is crucial to prevent your brookies from sticking, ensuring that your beautiful layered sweet can be removed cleanly and cut into perfect squares without any hassle, making serving an absolute breeze.
Crafting the Rich Brownie Batter
The foundation of your Oreo Brookies recipe lies in a rich, fudgy brownie batter. This isn’t just any brownie; it needs to be robust enough to support the subsequent layers while delivering an intensely chocolaty flavor. Achieving the perfect brownie texture—chewy edges, fudgy center—starts with careful preparation of the wet and dry ingredients. The steps for crafting this essential brownie layer are straightforward but require attention to detail to ensure a smooth, well-incorporated batter. This base provides a comforting and familiar counterpoint to the unique textures of the Oreo layer and the soft cookie dough, making it a critical component of this exceptional homemade dessert. Just like when making peanut butter brownie swirl cookies, quality ingredients matter.
Cream Butter with Both Sugars
Begin by combining the softened unsalted butter with both the granulated sugar and brown sugar in a large mixing bowl. Using an electric mixer, beat these ingredients together on medium speed until the mixture is light, fluffy, and pale in color, usually taking about 2-3 minutes. This process, known as creaming, is vital as it incorporates air into the mixture, which contributes to the brownie’s texture and tenderness. The sugars dissolve into the butter, creating a smooth, emulsified base that will prevent a grainy texture in your final product. The brown sugar adds a depth of flavor and moisture, while the granulated sugar contributes to the crispness of the brownie’s top crust. This initial step sets the stage for a truly decadent and moist brownie layer, ensuring a rich foundation for your layered masterpiece.
Whisk in Eggs and Vanilla
Once the butter and sugars are perfectly creamed, it’s time to incorporate the eggs and vanilla extract. Add the eggs one at a time, beating well after each addition until fully combined. This staggered approach helps to emulsify the eggs into the mixture, preventing the batter from curdling and ensuring a smooth, uniform consistency. The eggs not only act as a binder, holding the ingredients together, but also contribute to the richness, moisture, and overall structure of the brownie. After the eggs are incorporated, stir in the vanilla extract. A good quality vanilla extract enhances the chocolate flavor of the brownie, adding a warm, aromatic depth that makes a significant difference in the final taste of this dessert treat. This combination ensures a luxurious and flavorful base for your brookies.
Fold in Chocolate Chips
Finally, to complete the rich brownie batter, gently fold in your chosen amount of chocolate chips. While you might already have a strong cocoa flavor from the cocoa powder, the chocolate chips add pockets of melted, gooey chocolate throughout the brownie layer, intensifying the chocolate experience. Use a spatula to gently fold them in, ensuring they are evenly distributed without overmixing the batter. Overmixing can develop the gluten in the flour, leading to a tougher brownie rather than the desired fudgy texture. These chocolate chips will melt beautifully during baking, creating a luscious texture within your brownie layer. This final addition makes the brownie base even more irresistible, complementing the upcoming Oreo and cookie dough layers perfectly in this indulgent sweet indulgence.
The First Layer: Brownie Foundation
With your rich brownie batter ready, it’s time to lay the cornerstone of your Oreo Brookies: the brownie foundation. This initial layer is critical, not just for flavor, but also for providing a stable base upon which the subsequent layers will be built. Carefully spoon about half of your freshly prepared brownie batter into the greased and parchment-lined 9×13 inch baking pan. Use an offset spatula or the back of a spoon to gently spread the batter evenly across the bottom of the pan, extending it all the way to the edges. It’s important to achieve a relatively uniform thickness in this first layer, as an uneven base can lead to inconsistent baking and an unbalanced structure in the finished product. Take your time to ensure it’s perfectly smooth and flat. This brownie layer will bake up fudgy and dense, creating the comforting, chocolaty core that grounds the entire dessert. It’s the perfect starting point for your multi-textured layered sweet, providing that signature rich taste and satisfying chewiness that brownie lovers adore. This thoughtful application ensures that every slice will contain a balanced portion of this delightful foundation, ready to mingle with the upcoming layers of crunch and chew.
Adding the Iconic Oreo Layer
Once the foundational brownie layer is spread, it’s time for the star of the show: the iconic Oreo layer. This is where the Oreo Brookies recipe truly comes to life, introducing a delightful crunch and that unmistakable vanilla cream flavor that contrasts beautifully with the rich brownie. To prepare this layer, you’ll need a generous amount of Oreo cookies. You can either crush them coarsely by placing them in a Ziploc bag and using a rolling pin, or you can separate the wafers from the cream and chop them, distributing both elements. For a more visually appealing and texturally dynamic layer, many prefer to roughly chop the Oreos, ensuring a mix of larger chunks and smaller crumbs. This variety adds complexity to each bite. Carefully sprinkle or arrange your prepared Oreos evenly over the brownie batter in the pan. Don’t press them down too firmly; simply ensure they form a relatively consistent layer across the surface. This Oreo layer will soften slightly during baking but will retain much of its satisfying crunch, adding a textural pop and a burst of classic cookie flavor. It’s a crucial element that distinguishes this sweet indulgence from other layered desserts, making it uniquely “Oreo.” You can learn more about the history of this beloved cookie on Wikipedia’s Oreo page, and see visual inspiration on our Instagram.
Spreading Sweet Cookie Dough Next
Following the crunchy delight of the Oreo layer, the next step in crafting your Oreo Brookies recipe is to introduce the soft and sweet cookie dough. This cookie dough layer provides another fantastic textural contrast, baking into a tender, chewy component that beautifully complements the fudgy brownie and the crisp Oreos. You can use your favorite homemade chocolate chip cookie dough recipe, or for convenience, a high-quality store-bought ready-to-bake cookie dough works perfectly. If using pre-made dough, allow it to come to room temperature slightly so it’s easier to work with. The challenge here is to spread the cookie dough evenly over the delicate Oreo layer without disturbing it too much. The best technique is to take small dollops of cookie dough and gently flatten them between your palms before carefully placing them side-by-side over the Oreos. Once the entire surface is covered, use a lightly floured offset spatula or your fingertips to gently press and spread the dough into an even layer, taking care not to push down too hard on the Oreos beneath. This creates a continuous, soft layer that, once baked, will be studded with delightful chocolate chips, adding another dimension of texture and flavor to this already irresistible dessert treat. This cookie dough layer is essential for the “brookie” identity, ensuring a perfect trifecta of textures.
Topping with Remaining Brownie Batter
After carefully layering the brownie foundation, the iconic Oreo crunch, and the sweet cookie dough, the final architectural step in your Oreo Brookies recipe is to top everything with the remaining brownie batter. This top layer will encase the delightful middle sections, providing a seamless finish and contributing to the overall fudgy texture of the brookies. This step requires a gentle touch to ensure the layers beneath remain intact and evenly distributed. Take the reserved brownie batter and, similar to spreading the cookie dough, spoon small dollops evenly over the entire surface of the cookie dough layer. Once the dollops are placed, use the back of a spoon or an offset spatula to gently and carefully spread the batter to cover all the underlying layers. Work slowly from the center outwards, allowing the batter to naturally fill the gaps and create a smooth, continuous top. The goal is to achieve an even coating without pressing down too hard, which could compress the Oreo and cookie dough layers. This final brownie layer will bake to a beautiful, slightly crackled top, characteristic of a perfect brownie, sealing in all the sweet goodness. It not only completes the visual appeal of this layered sweet but also ensures that the first bite offers that rich, chocolaty flavor that introduces the delightful surprises within.
Baking Your 7 Layers of Sweet Indulgence
The moment has arrived to transform your carefully constructed layers into a unified, irresistible sweet indulgence. Baking is where the magic truly happens, melding the distinct textures and flavors into a cohesive whole. Achieving the perfect bake for your Oreo Brookies requires precision and observation, as you’re dealing with multiple components that cook at slightly different rates. Don’t rush this process; patience will be rewarded with a perfectly set, fudgy, and chewy dessert. The aroma filling your kitchen will be an early indicator of the deliciousness to come. Remember, ovens can vary, so consider this a set of crucial baking tips to ensure your homemade dessert reaches its full potential, delighting everyone with its complex simplicity and rich flavors, a true testament to the joy of an easy recipe. Follow these guidelines closely for ideal results.
Bake for 30-35 Minutes
Place your prepared pan into the preheated 350°F (175°C) oven and bake for 30-35 minutes. The baking time can vary slightly depending on your oven’s calibration and the exact thickness of your layers. During this time, the brownie batter will set, the cookie dough will bake to a soft, chewy consistency, and the Oreos will soften slightly while retaining some of their crunch. Keep an eye on the edges of the brookies; they should appear set and slightly pulled away from the sides of the pan. The center might still look a little soft or gooey, which is perfectly fine for a fudgy brownie texture. Avoid overbaking, as this can lead to dry brownies and tough cookie dough. The goal is a delicate balance where all components are cooked through but remain moist and tender, creating an ideal texture for this layered sweet. Trust your senses and use the visual cues as your primary guide.
Check with a Toothpick
To confirm doneness, check with a toothpick. After the initial 30 minutes, insert a toothpick into the center of the brookies. For a perfectly fudgy brownie, you want the toothpick to come out with moist crumbs attached, but not wet batter. If the toothpick comes out completely clean, your brookies might be slightly overbaked, leading to a drier texture. If it comes out with significant wet batter, continue baking in 5-minute increments, checking each time, until you achieve the desired moist crumb. Remember that residual heat in the pan will continue to cook the brookies slightly even after they are removed from the oven, so it’s better to err on the side of slightly underbaked for that ultimate fudgy center. This simple toothpick test is a reliable baking tip to ensure your homemade dessert has the ideal texture throughout all its delicious layers.
Cooling and Slicing Oreo Brookies
Patience is truly a virtue when it comes to serving your incredible Oreo Brookies. While the tempting aroma filling your kitchen might make you want to dig in immediately, proper cooling is an absolutely critical step that cannot be skipped. Rushing this stage will compromise the structure of your layered sweet, making it difficult to cut clean squares and potentially resulting in a crumbly mess. The various layers—fudgy brownie, crunchy Oreo, and soft cookie dough—need time to set and firm up completely. This cooling period allows the flavors to meld and the textures to become perfectly stable, leading to that Instagram-worthy slice that showcases all your hard work. Think of it as the final, gentle embrace for your delicious dessert treat, ensuring its presentation matches its exquisite taste.
Let Them Cool Completely
Once your Oreo Brookies are out of the oven, let them cool completely in the pan on a wire rack. This process can take anywhere from 2 to 4 hours, or even longer if your kitchen is warm. It’s imperative not to try to remove or slice them while they are still warm. As they cool, the fats in the butter and chocolate firm up, and the structure of both the brownie and cookie dough layers becomes stable. Attempting to cut them warm will result in uneven, messy slices where the layers separate or crumble. The warmth also makes the fudgy center too gooey to handle. A fully cooled brookie will lift out of the pan cleanly (especially if you used parchment paper slings) and hold its shape beautifully when sliced, showcasing the distinct tiers of this remarkable homemade dessert. Resist the urge; your patience will be greatly rewarded.
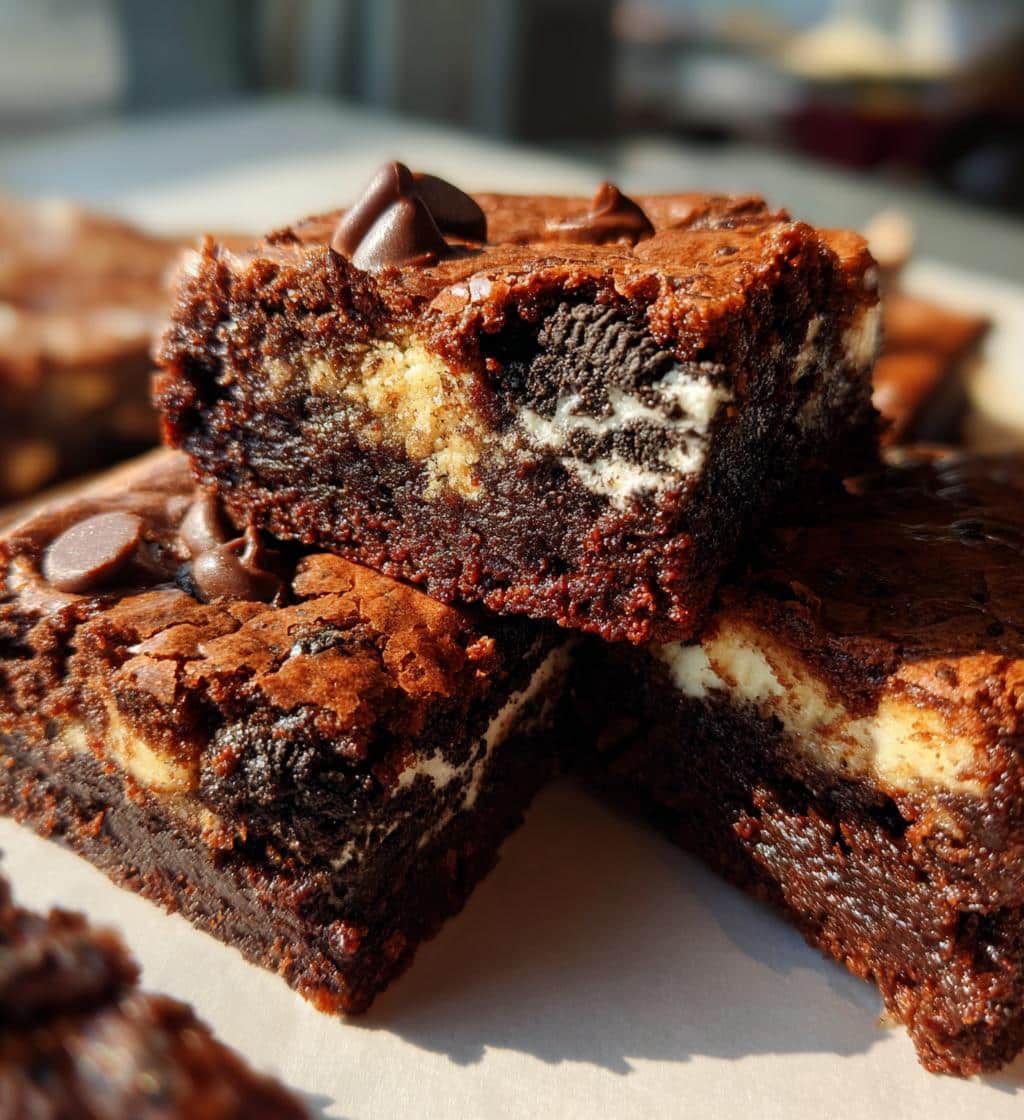
Cut Into Even Squares
After your Oreo Brookies have cooled completely, it’s time to cut into even squares. If you used parchment paper, use the overhangs to lift the entire slab of brookies out of the pan and onto a cutting board. For the cleanest cuts, use a sharp, non-serrated knife. Wipe the knife clean with a damp cloth after each slice to prevent crumbs from sticking and dragging through the subsequent cuts. You can decide on the size of your squares; 12 to 16 pieces is a common yield for a 9×13 inch pan, making them perfect for sharing. For perfectly straight lines, you might even use a ruler as a guide. The effort in cooling ensures that your knife will glide through the distinct brownie layer, Oreo layer, and cookie dough with ease, yielding picture-perfect portions of your decadent sweet indulgence. Each square will be a testament to your careful preparation.
Storing Your Sweet Indulgence Properly
After all the effort put into creating your magnificent Oreo Brookies recipe, ensuring they remain fresh and delicious is just as important as the baking process itself. Proper storage will preserve their texture and flavor, allowing you to enjoy this delightful layered sweet for days to come. Whether you’re planning to savor them over a few days or preparing them for a party, understanding the best storage methods is a key baking tip. This easy guide will help you keep your homemade dessert at its peak, ready for whenever a craving strikes. Don’t let your hard work go to waste; a little attention to storage will extend the enjoyment of every single dessert treat you bake.
Use an Airtight Container
To maintain the freshness and prevent your Oreo Brookies from drying out, always use an airtight container for storage. Exposure to air can quickly make brownies and cookies stale and hard. Place the completely cooled brookies in a single layer if possible, or separate layers with parchment paper to prevent them from sticking together. A plastic container with a tight-fitting lid or a glass container with a secure seal will work perfectly. Stored this way at room temperature, your sweet indulgence will remain deliciously fresh for up to 3-4 days. For longer storage, you can refrigerate them for up to a week, or even freeze them for up to 2-3 months. If freezing, wrap individual squares tightly in plastic wrap before placing them in the airtight container to prevent freezer burn and preserve their texture.
Serve Warm or at Room Temp
While your Oreo Brookies can be enjoyed directly from the container, for the most gratifying experience, serve warm or at room temp. The flavors of chocolate and vanilla, along with the textures of the brownie and cookie dough, truly shine when the brookies are allowed to reach a comfortable temperature. If you’ve stored them in the refrigerator or freezer, allow them to come to room temperature for at least 30 minutes to an hour. For a decadent, gooey experience, warm individual squares in the microwave for 10-20 seconds, just until the chocolate chips are melty and the brownie is slightly soft. This brief warming enhances the fudgy consistency of the brownie layer and makes the cookie dough wonderfully tender, bringing out the richness of this superb homemade dessert. Pair with a scoop of vanilla ice cream for an extra special treat.
Oreo Brookies Recipe: Pro Tips
While the standard Oreo Brookies recipe is undeniably delicious, there’s always room for personalization and enhancement to make this layered sweet truly your own. These pro tips offer simple yet effective ways to elevate your homemade dessert, catering to different tastes and preferences. Experimentation is part of the fun of baking, and these suggestions provide a springboard for creativity. Whether you’re looking for an extra textural element or a burst of complementary flavor, these ideas will help you customize your sweet indulgence, ensuring that every batch is as unique as it is scrumptious. Consider these creative baking tips to take your brookies to the next level, making them an even more memorable dessert treat for all who try them. Feel free to explore more baking ideas on our Pinterest page.
Add Nuts for Extra Crunch
For those who love an added textural dimension, add nuts for extra crunch to your Oreo Brookies. Chopped walnuts, pecans, or even almonds can be folded into the brownie batter along with the chocolate chips, or sprinkled over the cookie dough layer before the final brownie topping. The nutty flavor pairs exceptionally well with chocolate and adds a satisfying bite that complements the chewiness of the brownie, the softness of the cookie dough, and the unique crisp of the Oreo layer. Toasting the nuts lightly before adding them can enhance their flavor and aroma even further. This simple addition transforms the mouthfeel of your dessert treat, providing a pleasant contrast that elevates the complexity of each bite. It’s a fantastic way to introduce a classic element to this modern hybrid dessert, making it even more appealing to a wider audience.
Consider Different Toppings
Beyond the core recipe, consider different toppings to customize your Oreo Brookies and add an extra touch of flair. After the brookies have cooled slightly, you can drizzle them with melted white chocolate, milk chocolate, or even a caramel sauce for an artistic finish and an extra layer of sweetness. A dusting of powdered sugar can add an elegant touch, while a sprinkle of sea salt can beautifully contrast and enhance the sweet flavors, making the chocolate notes pop. For a festive touch, add sprinkles before the final bake. You could also swap out the type of chocolate chips in the cookie dough layer, using white chocolate or peanut butter chips for a different flavor profile, or even try using different flavored Oreos for the Oreo layer. These small adjustments can significantly alter the character of your homemade dessert, allowing for endless creative possibilities and ensuring your Oreo Brookies are always a fresh and exciting sweet indulgence.