
No Bake Chocolate Peanut Butter Oat Bars are the perfect solution for satisfying your sweet tooth without turning on the oven. These quick treats combine creamy peanut butter, rich chocolate, and hearty oats into a delightful easy dessert. Simple ingredients make them a family favorite for any occasion.
Key Takeaways
- Easily create delicious no-bake chocolate peanut butter oat bars.
- Uses simple pantry staples for a convenient, quick recipe.
- Enjoy a minimal prep time for these homemade treats.
- Customize with various additions or make them vegan-friendly.
- Store effectively in the fridge or freezer for lasting enjoyment.
Enjoy delicious, wholesome bars, so simple to make. No baking is needed, saving you time. Just mix and chill ingredients easily. A sweet, satisfying snack awaits everyone. Perfect anytime, for any craving.
No Bake Chocolate Peanut Butter Oat Bars
Quick and easy treats
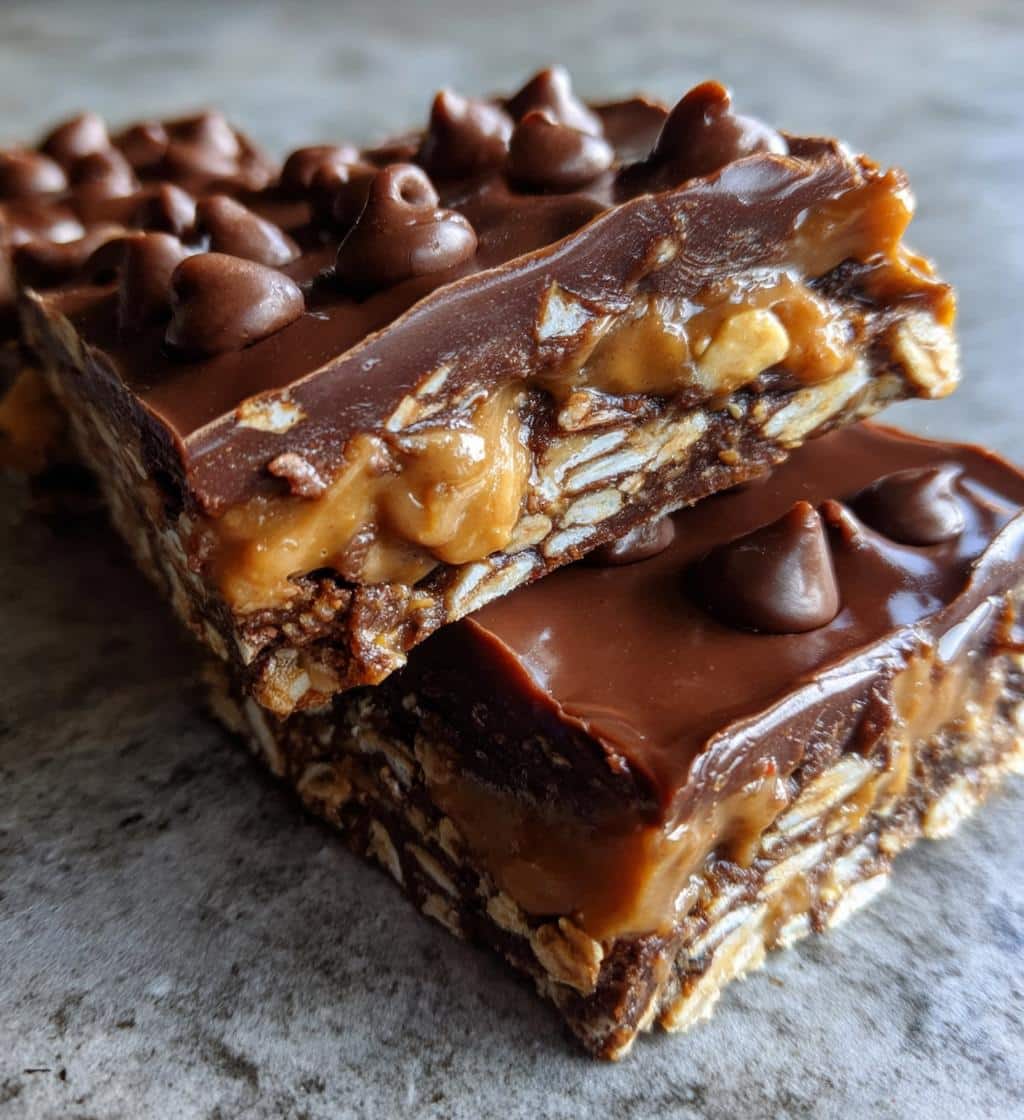
No Bake Chocolate Peanut Butter Oat Bars stand out as a truly remarkable creation for anyone seeking a swift and satisfying sweet fix. These bars are incredibly simple to prepare, requiring minimal effort and absolutely no oven time, making them a perfect solution for busy schedules or hot days when you want to avoid heating up your kitchen. Imagine sinking your teeth into a chewy, decadent treat that combines the irresistible flavors of rich chocolate and creamy peanut butter, all held together by wholesome oats. This particular dessert offers a delightful texture and a robust flavor profile that appeals to nearly everyone, from picky eaters to gourmet palates. It’s a fantastic alternative to more complex baked goods, providing instant gratification with outstanding results. If you’re looking for more delightful desserts, we have plenty of other options to explore, but these oat bars are in a league of their own for convenience.
Perfect for any occasion
Whether you’re planning a casual family gathering, a school lunchbox surprise, a quick after-dinner delight, or even a picnic, these no bake chocolate peanut butter oat bars fit seamlessly into any event. Their robust structure makes them easy to transport, and their universal appeal ensures they’ll be a hit. They’re also ideal for satisfying those sudden sweet cravings that strike mid-afternoon or late at night. Preparing a batch ahead of time means you always have a delicious, homemade snack readily available. They serve as a wonderful energy booster, a comforting indulgence, or simply a testament to the joy of simple, flavorful food. They are truly a family favorite that brings smiles every time they are served.
Why You Need These Blissful Bars
No oven required
The primary reason these blissful bars are a must-have in your recipe collection is their signature “no bake” characteristic. This feature alone solves a multitude of culinary challenges. Forget about preheating ovens, waiting for cooling racks, or worrying about uneven baking. This no-bake recipe simplifies the entire process, making it accessible to even the most novice of cooks. It’s a fantastic option for warmer climates or during summer months when turning on the oven feels like a monumental task. The simplicity means you can whip up a batch quickly without generating excess heat in your kitchen. If you’re curious about the broader world of desserts that don’t require an oven, you can learn more about no-bake desserts and their popularity.
Simple ingredients list
Another compelling reason to embrace these homemade bars is their incredibly simple ingredients list. You won’t find yourself hunting for exotic spices or obscure flours. Most of what you need—oats, peanut butter, sugar, butter, and chocolate chips—are likely already staples in your pantry. This not only makes the bars economical but also incredibly convenient. The straightforward nature of the components means less time spent at the grocery store and more time enjoying your delicious creation. Each ingredient plays a vital role in creating the perfect balance of flavor and chewy texture, making every bite a delight. This minimal ingredient approach ensures a stress-free baking (or rather, non-baking) experience from start to finish.
Ingredients for Your Oat Bar Bliss
Main pantry staples
Crafting these delectable no bake bars begins with a few main pantry staples you probably already have on hand. For the base, you’ll need rolled oats (not instant), which provide the essential structure and chewy texture. The creamy, nutty flavor comes from peanut butter – opting for a smooth variety works best for consistent mixing. To sweeten things up, granulated sugar and a touch of brown sugar add depth, while unsalted butter helps bind everything together and creates that rich mouthfeel. A splash of vanilla extract elevates the overall aroma and taste, and of course, a generous amount of chocolate chips (semi-sweet or milk) are crucial for that classic flavor combination. These ingredients come together effortlessly to create the foundation of your peanut butter oat bars.
Optional additions to try
While the classic recipe is perfect on its own, don’t hesitate to get creative with optional additions. To enhance the nutty flavor, consider adding a handful of chopped nuts like almonds, walnuts, or pecans for extra crunch. For a different type of sweetness, try stirring in dried fruits such as raisins, cranberries, or chopped dates. Coconut flakes can introduce a tropical twist, while a sprinkle of sea salt on top before chilling beautifully contrasts the sweetness. If you’re a fan of different chocolate varieties, white chocolate chips or dark chocolate chunks can easily be substituted or added alongside the semi-sweet ones. These small adjustments allow you to customize your no bake oat bars to suit your personal preferences, making each batch uniquely yours.
Follow 5 Steps to Oat Bar Bliss
Getting started quickly
Creating these quick treats is astonishingly straightforward, breaking down into just five simple steps that anyone can follow. The key to getting started quickly is to have all your ingredients measured and ready before you begin. This practice, known as mise en place, dramatically speeds up the process and ensures a smooth, enjoyable experience. The entire preparation process, from gathering ingredients to the final press into the pan, is designed for efficiency, meaning you can have these delicious homemade bars assembled in minutes. These bars prove that you don’t need hours in the kitchen to produce something truly special and satisfying for your sweet cravings, making them an ideal choice for spontaneous baking endeavors.
Prep time explained
You’ll be amazed at how little active prep time is actually involved in making these No Bake Chocolate Peanut Butter Oat Bars. Typically, the hands-on work takes no more than 15-20 minutes. This includes melting the butter and sugar, combining all the ingredients, and pressing the mixture firmly into your chosen dish. The longest part of the process is the chilling time, which is essential for the bars to set properly and develop their firm, chewy texture. While the chill time usually ranges from 1 to 2 hours, this is entirely passive, allowing you to focus on other tasks or simply relax. So, when we talk about a “quick” recipe, we truly mean a minimal commitment of your active time, perfect for a busy weekday or a relaxed weekend.
Mixing the Perfect Oat Bar Batter
Combining dry ingredients
Achieving the perfect consistency for your peanut butter oat bars starts with the careful combination of dry ingredients. In a large mixing bowl, combine the rolled oats and any optional dry additions you’ve chosen, such as chopped nuts or dried fruit. While some recipes suggest mixing sugars with dry ingredients, for these bars, the sugars will be incorporated with the wet components to ensure they fully dissolve and create a smooth, caramel-like base. Ensure the oats are evenly distributed, as this will provide a consistent texture throughout your finished bars. This initial step sets the stage for a well-balanced and uniformly delicious batch of homemade bars that will be enjoyed by everyone.
Adding wet ingredients
The next crucial step involves preparing and adding the wet ingredients. In a saucepan over medium heat, melt the unsalted butter. Once melted, stir in the granulated sugar, brown sugar, and a pinch of salt. Continue to cook, stirring constantly, until the sugars are completely dissolved and the mixture begins to bubble slightly. Remove from heat and immediately stir in the peanut butter and vanilla extract. Whisk until smooth and well combined. This warm, creamy mixture is the binding agent that will coat the oats beautifully. Pour this warm peanut butter mixture over your dry oats in the large bowl. Stir thoroughly with a sturdy spoon or spatula until all the oats are evenly coated, forming a thick, uniform “batter.”
Folding in chocolate chips
Once the oat mixture is thoroughly combined, it’s time for the final touch: the chocolate. Allow the mixture to cool for just a few minutes before adding the chocolate chips. If the mixture is too hot, the chocolate chips will melt too quickly, creating a muddy appearance rather than distinct pockets of chocolate goodness. Gently fold in your semi-sweet or milk chocolate chips until they are evenly distributed throughout the oat mixture. This step ensures that every bite of your no-bake recipe bar will have that delightful burst of chocolate flavor, perfectly complementing the rich peanut butter and oats. These bars offer a truly satisfying easy dessert experience.
Pressing and Chilling Your Bars
Lining the dish
Proper preparation of your baking dish is key to ensuring your No Bake Chocolate Peanut Butter Oat Bars come out perfectly and are easy to remove. Start by choosing an 8×8 or 9×9 inch square baking dish. Line the dish with parchment paper or foil, leaving an overhang on all sides. This overhang acts as “handles,” allowing you to easily lift the entire slab of set bars out of the dish later. Lightly grease the parchment paper or foil with a thin layer of butter or cooking spray to prevent any sticking, although the natural fats in the peanut butter oat bars mixture usually prevent major adhesion. This simple easy dessert step will make serving much simpler.
Evenly pressing mixture
Once your dish is lined, transfer the entire oat bar mixture into it. This is where a firm hand and a bit of patience come in handy. Use the back of a spoon, a spatula, or even your hands (lightly greased or covered with plastic wrap to prevent sticking) to evenly press the mixture into the dish. It’s crucial to press down very firmly and consistently across the entire surface. The goal is to compact the mixture as much as possible, eliminating any air pockets and creating a dense, solid slab. This firm pressing is vital for achieving bars that hold their shape well when cut and have that desired chewy texture. The more evenly and firmly you press, the better the final quick treats will be.
Chill time importance
After pressing, the final and most critical step is to chill your homemade bars. Cover the dish loosely with plastic wrap and refrigerate for at least 1 to 2 hours, or until the bars are completely firm. The chilling process allows the fats (from the butter and peanut butter) to solidify, binding all the ingredients together into a cohesive structure. Attempting to cut the bars before they are fully chilled will result in crumbly, messy pieces rather than clean, distinct squares. This passive waiting period is essential for the no-bake recipe to achieve its intended firm, sliceable form. Once properly chilled, the bars will be perfectly set and ready for serving. For more delightful recipes, consider exploring our Snickerdoodle Cobbler or even a decadent Quick Italian Cream Cake.
Serving Your Delicious Oat Bars
Clean cutting tips
Once your No Bake Chocolate Peanut Butter Oat Bars are perfectly chilled and firm, it’s time to cut them into servings. For the cleanest cuts, first lift the entire slab out of the baking dish using the parchment paper or foil overhang. Place the slab on a sturdy cutting board. Use a large, sharp knife, warming it under hot water and wiping it dry between each cut. This technique helps glide through the chocolate and peanut butter oat bars mixture without dragging or creating crumbles. Press down firmly and make one continuous cut rather than sawing back and forth. For uniform pieces, score the surface lightly first to plan your cuts, then slice into squares or rectangles. These quick treats are delightful when neatly presented.
Presentation ideas
While these easy dessert bars are delicious on their own, a little attention to presentation can make them even more appealing. For a simple yet elegant touch, arrange them on a platter dusted with a light sprinkle of cocoa powder or powdered sugar. You could also drizzle a little melted chocolate or warm peanut butter over the top just before serving. Garnish with a few extra chocolate chips, a sprinkle of sea salt, or even some mini Reese’s Pieces for added visual interest and flavor. For individual servings, consider placing each bar in a small cupcake liner. They also pair wonderfully with a glass of cold milk or a hot cup of coffee. Sharing your culinary creations on social media? Tag us on Instagram or check out our inspirations on Pinterest for more ideas!
Customizing Your No Bake Oat Bars
Swapping peanut butter
One of the beauties of this no-bake recipe is its flexibility, especially when it comes to the star ingredient: peanut butter. If you or someone you’re serving has a peanut allergy, or if you simply want to try a different flavor profile, swapping the peanut butter is incredibly easy. Almond butter, cashew butter, or even sunflower seed butter (SunButter) make excellent alternatives. Ensure that whichever spread you choose has a similar creamy consistency to traditional peanut butter for the best results. The slight flavor variations from these different nut or seed butters can totally transform your no bake oat bars into new and exciting quick treats, appealing to a wider range of tastes and dietary needs. Just be sure to check labels for added sugars or oils.
Vegan options available
Making these homemade bars vegan-friendly is also quite straightforward, ensuring that everyone can enjoy this easy dessert. The primary non-vegan ingredients are typically butter and sometimes the chocolate chips. To make them vegan, simply substitute the unsalted butter with a high-quality plant-based butter alternative. For the chocolate chips, look for brands that are specifically labeled as vegan, as many semi-sweet varieties are naturally dairy-free, but it’s always best to check. Ensure your chosen peanut butter is also free from animal products. With these simple swaps, you can create delicious peanut butter oat bars that are entirely plant-based without compromising on taste or chewy texture.
Adding extra crunch
For those who love an added textural dimension, incorporating extra crunch into your no bake chocolate peanut butter oat bars is a fantastic idea. Beyond nuts, consider mixing in crispy rice cereal, crushed pretzels, or even toasted coconut flakes. These additions provide a delightful contrast to the soft, chewy texture of the oats and the creamy peanut butter. For a more subtle crunch, a sprinkle of coarse sea salt on top before chilling will not only add texture but also enhance the flavors by providing a savory counterpoint to the sweetness. Experiment with different crunchy elements to find your perfect combination, making these quick treats even more irresistible and personalized.
Storing and Freezing Oat Bars
Refrigeration rules
Proper storage is crucial for maintaining the freshness and chewy texture of your No Bake Chocolate Peanut Butter Oat Bars. Once cut, store the bars in an airtight container in the refrigerator. Layer them with parchment paper between layers to prevent sticking, especially if the weather is warm. When properly stored in the fridge, these homemade bars will remain fresh and delicious for up to 1-2 weeks. While they might be tempting to leave on the counter, the creamy peanut butter and butter base can soften at room temperature, making them less firm and potentially messy. Keeping them chilled ensures they maintain their delightful consistency and prevents any unwanted melting of the chocolate.
Freezing for later
These quick treats are also excellent candidates for freezing, making them perfect for meal prepping snacks or ensuring you always have a stash of easy dessert on hand. To freeze, first cut the chilled bars into individual servings. Wrap each bar tightly in plastic wrap, then place them in an airtight freezer-safe container or a heavy-duty freezer bag. They can be stored in the freezer for up to 2-3 months without a significant loss of quality. When you’re ready to enjoy a frozen bar, simply take it out of the freezer and let it thaw at room temperature for about 15-30 minutes, or enjoy them straight from the freezer for a firmer, almost fudge-like consistency. This method ensures your family favorite dessert is always within reach.
No Bake Oat Bar Nutrition Facts
Calories per serving
Understanding the nutritional content of your homemade bars can help you enjoy them as part of a balanced diet. While exact calories per serving will vary based on specific ingredients, portion size, and any additions, a typical No Bake Chocolate Peanut Butter Oat Bar (cut into 12-16 servings from an 8×8 inch pan) might range from 180 to 250 calories. This estimate includes the oats, peanut butter, butter, sugars, and chocolate chips. These quick treats are energy-dense, making them a satisfying snack or a delightful easy dessert. For precise nutritional information, it’s recommended to use an online recipe calculator with your exact ingredient quantities.
Protein and fiber details
Despite being a sweet indulgence, these peanut butter oat bars offer some beneficial nutrients. The oats, a cornerstone of the recipe, are a good source of dietary fiber, contributing to digestive health and promoting a feeling of fullness. You can read more about the nutritional benefits of oats on Wikipedia. Peanut butter provides a decent amount of plant-based protein and healthy fats, which are essential for sustained energy and satiety. While not a healthy snack in the strictest sense for every diet, the combination of oats and peanut butter means these bars provide more than just empty calories. They offer a wholesome boost, making them a more substantial treat than many other sweet options. Depending on your portion, a bar could offer around 4-6 grams of protein and 2-3 grams of fiber, contributing to your daily intake.
Tips for Perfect No Bake Bars
Making clean cuts
Achieving aesthetically pleasing, clean cuts for your No Bake Chocolate Peanut Butter Oat Bars is entirely possible with a few simple techniques. As mentioned, ensuring the bars are completely chilled is the number one rule – this solidifies the mixture and prevents crumbling. Secondly, use a sharp, heavy knife. For ultra-clean edges, dip your knife in hot water and wipe it dry before each cut. This slight warmth helps melt through the chocolate and butter, resulting in a smooth slice. For perfectly even squares or rectangles, measure and score the surface lightly first to plan your cuts, then slice into squares or rectangles. Patience in this step will pay off with beautifully presented quick treats every time. Consider making these bars after enjoying a hearty Creamy Baked Mac and Cheese for a satisfying dessert.
Pressing without sticking
Pressing the sticky oat mixture into the pan can sometimes be a challenge, but there are tricks to avoid frustrating mess. First, always line your baking dish with parchment paper or foil, leaving an overhang, as this creates a non-stick barrier and handles for easy removal. To prevent the mixture from sticking to your hands or spatula, lightly grease them with butter or cooking spray, or even dampen them slightly with water. A piece of plastic wrap placed directly over the mixture before pressing also works wonders, allowing you to apply firm, even pressure without any direct contact. The goal is to compact the peanut butter oat bars mixture as densely as possible to ensure they hold their chewy texture and shape when set. A sturdy, flat-bottomed glass or a metal measuring cup can also be used to press down firmly and evenly across the entire surface.
Frequently Asked Oat Bar Questions
How long do they last?
These delicious no-bake recipe bars boast a decent shelf life, especially when stored correctly. When kept in an airtight container in the refrigerator, your No Bake Chocolate Peanut Butter Oat Bars will typically last for 1 to 2 weeks. The cool temperature helps maintain their firm chewy texture and prevents the ingredients from spoiling. If you’ve made a large batch or want to prepare them well in advance, they can also be frozen for up to 2-3 months. Just ensure they are individually wrapped and placed in a freezer-safe container to prevent freezer burn. This makes them a convenient easy dessert or healthy snack option to have on hand whenever a craving strikes.
Can I make them healthier?
Yes, you can absolutely adapt this family favorite recipe to be a healthy snack by making a few mindful adjustments. To reduce sugar content, you can decrease the amount of granulated and brown sugar, or even experiment with natural sweeteners like maple syrup or honey (though this might slightly alter the texture and require minor adjustments to the dry ingredients). For a boost in fiber and nutrients, consider adding flax seeds, chia seeds, or additional oats. Using a natural, unsweetened peanut butter with no added oils is also a great step. Opt for dark chocolate chips with a higher cacao percentage, which contain antioxidants and less sugar. While these bars are inherently a treat, these modifications can certainly nudge them towards a more health-conscious indulgence, allowing you to enjoy your peanut butter oat bars guilt-free.