
Homemade mint chocolate chip ice cream offers a refreshing escape from store-bought options. This guide provides an easy path to a sweet, cool treat. Experience the joy of crafting your favorite dessert. Enjoy vibrant flavor and delightful texture with minimal effort. It’s truly a rewarding kitchen adventure.
Key Takeaways
- Enjoy superior freshness and quality with simple ingredients.
- Follow easy, step-by-step instructions for a perfect batch.
- Customize peppermint and chocolate chip levels to your taste.
- Understand the total time commitment from start to serving.
- Proper storage ensures your ice cream stays delicious for weeks.
Making homemade ice cream is fun. You control all the ingredients. Fresh flavors are simply the best. It creates a wonderful experience. Your family will truly love it.
Why Make Homemade Mint Chocolate Chip Ice Cream?
Opting to make homemade mint chocolate chip ice cream brings several delightful advantages that factory-made versions simply can’t match. When you craft this popular dessert yourself, you gain complete control over the quality and freshness of every single ingredient. This means saying goodbye to artificial preservatives, unnecessary additives, and excessive sugars, allowing the natural, vibrant flavors to truly shine. The process itself is a rewarding culinary journey, transforming simple components into a luxurious treat that tastes incredibly fresh and authentic. Beyond the superior taste, there’s a unique satisfaction in serving something you’ve created from scratch, tailored precisely to your preferences. It’s not just about an ice cream; it’s about a wholesome, personalized dessert experience.
Enjoy Freshness and Quality
The freshness of homemade ice cream is unparalleled. Unlike commercial varieties that might sit in freezers for extended periods, your homemade batch goes from kitchen to cone (or bowl!) with minimal delay, preserving its peak flavor and creamy texture. You choose prime dairy products, fresh peppermint extract, and high-quality chocolate chips, ensuring a superior product. This attention to detail results in a dessert that feels luxurious and tastes exceptionally clean. The vibrant green color, often achieved with natural food coloring, mirrors the lively mint flavor, promising a truly refreshing experience. This commitment to fresh ingredients also means you can avoid common allergens or dietary restrictions found in many mass-produced ice creams, making it a safer and more enjoyable option for everyone.
Simple Ingredients, Great Taste
One of the most appealing aspects of creating homemade mint chocolate chip ice cream is the simplicity of the ingredient list. You don’t need obscure or hard-to-find items; just basic dairy, sugar, flavoring, and chocolate. This straightforward approach belies the incredible depth of flavor and creamy consistency you can achieve. Each ingredient plays a crucial role: the heavy cream provides richness, the milk lightens the base, sugar sweetens, peppermint extract delivers that signature cool mintiness, and chocolate chips add a delightful textural contrast and burst of flavor. This synergy of simple components results in a dessert that tastes far more complex and satisfying than its humble origins suggest. It’s a testament to how quality, unadulterated ingredients can create truly memorable culinary delights, much like a perfectly prepared creamy baked mac and cheese.
Gather Ingredients for Mint Chocolate Chip Ice Cream
Before you begin the exciting journey of making your own mint chocolate chip ice cream, it’s crucial to have all your ingredients ready and measured. A well-prepared workspace makes the entire process smoother and more enjoyable, preventing any last-minute rushes or forgotten items. Think of it as mise en place for ice cream! The beauty of this recipe lies in its accessibility; most items are common pantry staples or easily found at your local grocery store. Taking a moment to gather everything ensures you can flow seamlessly from one step to the next, guaranteeing a perfect creamy consistency and vibrant flavor profile. This careful preparation is key to achieving that restaurant-quality dessert right in your home kitchen.
List of Needed Items
To create your luscious batch of homemade mint chocolate chip ice cream, you will need the following key ingredients:
- Heavy Cream: Approximately 2 cups, providing the rich, luxurious base for your ice cream.
- Whole Milk: Around 1 cup, to balance the creaminess and ensure a smooth texture.
- Granulated Sugar: About 3/4 cup, for sweetness. Adjust to your personal preference.
- Peppermint Extract: 1-2 teaspoons, depending on how strong you like your mint flavor.
- Green Food Coloring: A few drops (optional, but gives it the classic look).
- Mini Chocolate Chips: About 1 cup, these melt beautifully and distribute evenly.
- Pinch of Salt: Enhances all the other flavors.
Ensure all dairy products are cold before starting, as this helps with the churning process. Having everything at hand ensures you won’t pause during the crucial mixing phases, which is vital for achieving that desirable creamy texture.
Flavor and Color Essentials
The distinctive character of mint chocolate chip ice cream comes primarily from two key components: peppermint extract and green food coloring. The peppermint extract is where all the refreshing, cool flavor truly originates. It’s important to use high-quality extract for the best taste; remember, a little goes a long way, so start with 1 teaspoon and add more if you prefer a bolder mint. For the iconic green hue, a few drops of green food coloring are usually sufficient. While entirely optional, it visually cues the mint flavor and is part of the fun! If you prefer a natural approach, you can skip the food coloring, and the ice cream will be a lovely pale white color, still bursting with minty goodness. You could even experiment with natural colorants like a tiny bit of spinach powder, though this might slightly alter the flavor. For more about the history of artificial food coloring, check out its Wikipedia page.
Easy Steps to Delicious Ice Cream
Making homemade ice cream might seem daunting, but it’s surprisingly simple. The process is broken down into manageable steps, ensuring even novice home cooks can achieve professional-quality results. The key is patience, especially during the chilling and freezing phases. This section will guide you through the initial preparation, setting the stage for a truly delightful batch of mint chocolate chip ice cream. Each step is designed to be straightforward, emphasizing the “easy” in “easy steps to delicious ice cream.” You’ll find that the satisfaction of scooping your own freshly made dessert is well worth the minimal effort required.
Quick 15 Minute Preparation
The initial preparation for your mint chocolate chip ice cream base is remarkably quick, typically taking no more than 15 minutes. This speedy start is perfect for fitting into a busy schedule, allowing you to get the mixture ready for chilling without consuming too much of your time. Begin by gathering all your ingredients and measuring them out precisely. This step, known as mise en place, is crucial for efficiency. Next, combine the heavy cream, whole milk, and granulated sugar in a large bowl. Whisk these together until the sugar is fully dissolved. You can use a hand whisk or an electric mixer on low speed. This ensures a smooth base, free of any grainy texture from undissolved sugar. The goal here is a homogeneous mixture that’s ready for its flavoring agents. This swift preparation stage means you’re just moments away from a fantastic quick Italian cream cake alternative, but in ice cream form!
Mixing Your Perfect Mint Ice Cream Base
Creating the perfect mint ice cream base is where the magic truly begins. This stage involves carefully blending your core ingredients and infusing them with that characteristic refreshing flavor and appealing green hue. The goal is a smooth, well-combined mixture that will churn into a rich and creamy ice cream. Attention to detail here ensures consistency and flavor balance, avoiding any unevenness in taste or color. Remember, a great base is the foundation of a fantastic ice cream, so take your time to mix thoroughly and incorporate the flavors evenly. This part of the process is quick but vital, preparing your mixture for the essential chilling and churning steps ahead, ultimately leading to a delightful, smooth dessert.
Combine Cream, Milk, and Sugar
In a large bowl, whisk together the cold heavy cream, whole milk, and granulated sugar until the sugar has completely dissolved. This initial combination is critical for the overall texture of your ice cream. If the sugar isn’t fully dissolved, your ice cream could end up with a slightly grainy texture, which is certainly not ideal for a creamy treat. Using cold dairy products helps the mixture stay chilled, which is beneficial for later steps. You can gently warm a small portion of the milk with the sugar to help it dissolve, then combine it back with the cold cream and remaining milk, ensuring the entire mixture cools down again before proceeding. A hand mixer or a stand mixer with a whisk attachment can make this process even quicker and more efficient, ensuring a perfectly smooth canvas for your flavors.
Add Peppermint and Green Color
Once your cream, milk, and sugar mixture is smooth, it’s time to infuse it with the signature mint flavor and vibrant color. Add 1 teaspoon of peppermint extract to the base. Taste a small amount (optional, if you’re comfortable with raw dairy) and add another 1/2 to 1 teaspoon if you desire a stronger mint presence. Remember, the flavor can become more pronounced once chilled. Next, add a few drops of green food coloring. Start with 2-3 drops, mix well, and then add more if you want a deeper green. Continuously stir until the color is evenly distributed throughout the mixture. This step transforms your plain dairy base into the recognizable and appealing mint chocolate chip ice cream foundation. Ensure everything is thoroughly combined, creating a visually appealing and aromatically inviting base ready for the next crucial phase: chilling.
Chill and Churn for Creamy Goodness
The chilling and churning stages are perhaps the most critical for achieving that coveted creamy texture in your homemade mint chocolate chip ice cream. Proper chilling ensures the ice cream maker can work efficiently, transforming the liquid base into a soft, scoopable delight. Churning introduces air and breaks down ice crystals, preventing your ice cream from becoming a solid block of ice. This combination of patience and mechanical action is what sets truly great homemade ice cream apart. Don’t rush these steps; they are essential for developing the characteristic smoothness and richness that makes this dessert so irresistible. Embrace the wait, as it leads to ultimate satisfaction.
Refrigerate Mixture for Two Hours
After you’ve mixed your perfect mint ice cream base, it’s imperative to cover the bowl and refrigerate the mixture for at least two hours, though overnight is even better. This chilling period is crucial for several reasons. Firstly, it ensures the base is thoroughly cold, which significantly improves the efficiency of your ice cream maker. A colder base will churn faster and more effectively, resulting in a smoother, creamier ice cream with smaller ice crystals. Secondly, chilling allows the flavors to meld and deepen, particularly the peppermint extract, giving your ice cream a more harmonious taste profile. Don’t skip this step, as trying to churn a warm mixture will lead to an icy, unsatisfactory result. Patience now will pay off with a superior final product, just like waiting for a slow-cooked southern-style collard green and potato stew develops its flavor.
Use Your Ice Cream Maker
Once your mint ice cream base is thoroughly chilled, it’s time to introduce it to your ice cream maker. Make sure your ice cream maker’s bowl has been frozen for the recommended time (usually 12-24 hours) as per the manufacturer’s instructions. Pour the cold mixture into the frozen bowl, and then turn on your ice cream maker. The churning process typically takes 20-30 minutes, depending on your machine and the desired consistency. As it churns, the mixture will gradually thicken, expand slightly, and transform from a liquid into a soft-serve consistency. Avoid over-churning, as this can lead to a less creamy texture. The sound of the machine might change, indicating the mixture is thickening. For more on the mechanical aspects of such devices, consider checking the Wikipedia page on ice cream makers. Stop the machine when the ice cream resembles a very thick milkshake or soft serve. This is the perfect stage for adding your chocolate chips.
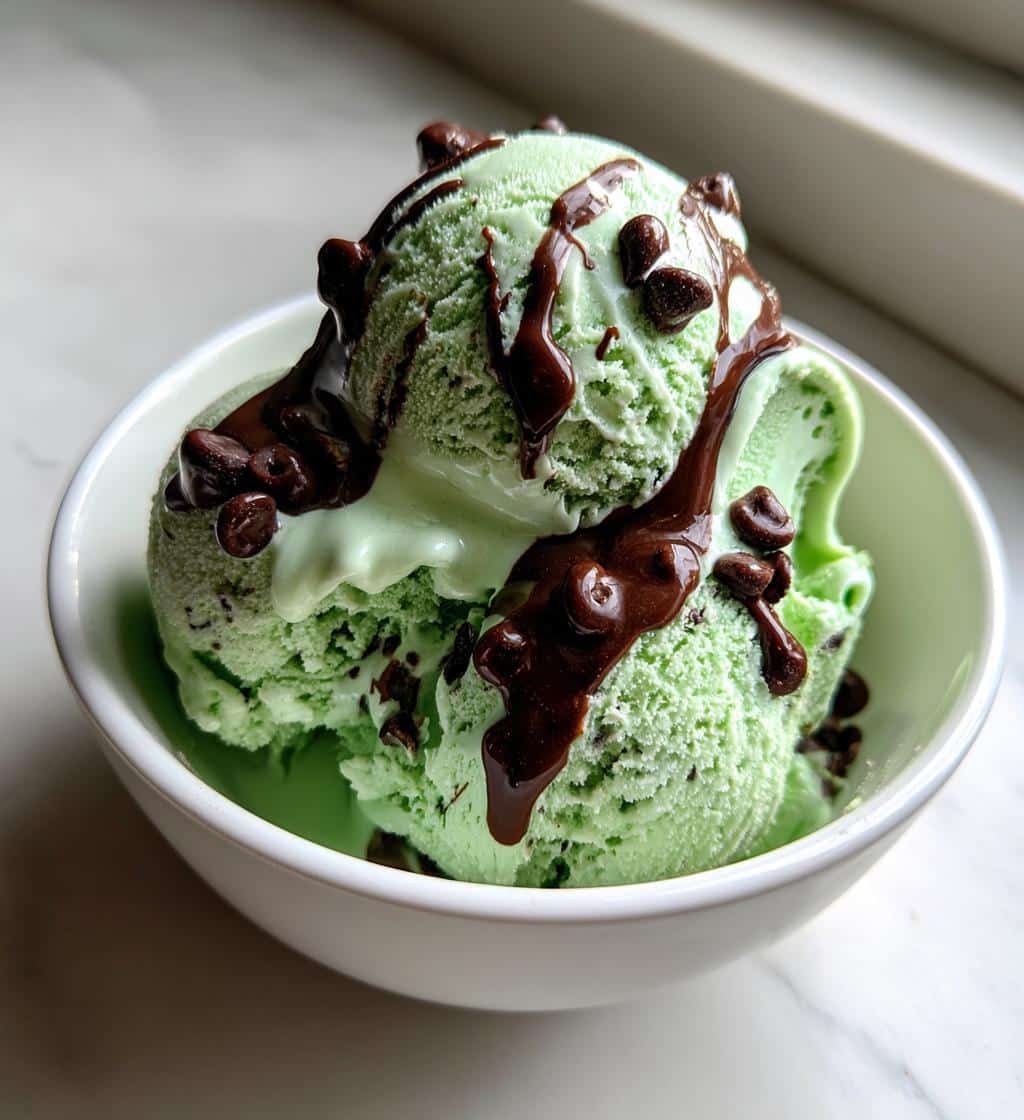
Add Chocolate Chips for Delight
The addition of chocolate chips is arguably the most anticipated part of making mint chocolate chip ice cream. These tiny morsels of rich chocolate provide a delightful contrast in texture and a burst of flavor that perfectly complements the cool, refreshing mint. The timing of their inclusion is important to ensure they are evenly distributed throughout the ice cream without sinking to the bottom or clumping together. This step elevates your creamy base into the classic, beloved dessert that everyone recognizes and adores. Get ready to transform a simple mint base into a textural and flavorful masterpiece.
Mix Chips During Last Minutes
To achieve the best distribution and texture, add your mini chocolate chips during the last 3-5 minutes of the churning process. Most ice cream makers have an opening at the top specifically designed for adding mix-ins while the machine is running. Gently pour the cup of mini chocolate chips into this opening. The churning paddles will naturally incorporate the chips throughout the thickening ice cream base. Adding them too early can sometimes result in the chips being broken down too much, especially if they are not mini-sized, or they might freeze too solid and become difficult to chew. Adding them too late might not allow them to distribute evenly. This sweet spot ensures the chocolate chips are perfectly suspended, offering a pleasant crunch in every creamy spoonful. For more visual inspiration, visit Carina Recipes on Pinterest and explore similar sweet creations.
Freeze for Ideal Serving Texture
After churning, your homemade mint chocolate chip ice cream will have a soft-serve consistency, which is delicious but not quite firm enough for traditional scooping. The final freezing stage is essential to achieve that ideal, scoopable texture we all love. This period allows the ice cream to firm up properly, preventing it from melting too quickly when served and concentrating its rich flavors. Patience here is truly a virtue, as rushing this step will result in a messy, overly soft dessert. Think of it as the final polish that brings your culinary creation to perfection, ensuring every spoonful is a delight from start to finish. Once firm, you’ll be able to easily scoop perfect portions.
Four Hours of Freezing Time
Once your ice cream has finished churning and the chocolate chips are mixed in, transfer the soft-serve consistency ice cream into an airtight container. A shallow, wide container often works best for even freezing. Press a piece of plastic wrap directly onto the surface of the ice cream before securing the lid. This prevents ice crystals from forming on top, keeping your ice cream wonderfully smooth. Place the container in the coldest part of your freezer for a minimum of four hours. For an even firmer consistency, overnight freezing is recommended. This extended freezing time allows the ice cream to harden sufficiently, making it perfectly scoopable and ready to enjoy. Do not try to rush this process by placing it in a colder freezer setting for less time, as this can affect the texture negatively. You want a gradual, even freeze for the best outcome.
Understand Total Time Commitment
Making homemade mint chocolate chip ice cream is an investment of time, but the majority of it is hands-off. Understanding the total time commitment upfront helps you plan your day and ensures you’re not rushing the crucial steps. While the active preparation is minimal, the chilling and freezing periods require patience. Knowing the full timeline allows you to anticipate when your delicious treat will be ready, making the wait feel less daunting. This section breaks down the entire process, from the moment you start mixing to the satisfying first scoop, giving you a clear picture of the journey to a perfect dessert. Being prepared for the full commitment makes the process much more enjoyable.
From Start to Serving
The total time required to make homemade mint chocolate chip ice cream, from the initial ingredient gathering to the final serving, is broken down as follows:
- Preparation (Active): 15 minutes. This includes gathering ingredients, mixing the base, and adding flavors and coloring.
- Chilling (Passive): 2-4 hours (or overnight for best results). This is crucial for flavor development and churning efficiency.
- Churning (Active): 20-30 minutes. The time your ice cream maker will be actively working.
- Freezing (Passive): 4 hours to overnight. This firms up the ice cream to a scoopable consistency.
Therefore, while your active involvement is less than an hour, the overall process spans approximately 6 to 12 hours. This extended timeline primarily consists of waiting for the chilling and freezing stages, making it an excellent weekend project or a treat you prepare in stages throughout the day. It’s a commitment that rewards you with superior quality and flavor, far surpassing store-bought options.
Serving Size and Nutrition Facts
When indulging in a delightful homemade treat like mint chocolate chip ice cream, it’s helpful to be aware of the serving size and general nutritional content. While homemade versions often boast fresher ingredients and fewer artificial additives, they still contain calories, sugar, and fat. Understanding these details allows you to enjoy your dessert responsibly as part of a balanced diet. This section provides an estimate of what you can expect from a standard serving, helping you make informed choices while still savoring every delicious spoonful. Remember, these are estimates and can vary based on specific ingredients and portion control.
Get Your 1/2 Cup Serving
A standard serving of ice cream is typically defined as 1/2 cup (about 4 fluid ounces or 65-70 grams). This portion size is a good reference point for managing your intake and understanding the nutritional values associated with each serving. While it might seem small, a half-cup of rich, homemade mint chocolate chip ice cream can be incredibly satisfying due to its density and intense flavor. Using a proper measuring scoop can help ensure consistent serving sizes, especially if you’re mindful of your dietary intake. For a truly luxurious experience, enjoy your 1/2 cup serving in a chilled bowl or a crisp waffle cone, savoring each cool, minty, chocolatey bite.
Calories and Sugar Content
Homemade mint chocolate chip ice cream, being a rich dessert, will naturally contain a fair amount of calories and sugar. A typical 1/2-cup serving can range from approximately 250-350 calories, depending on the fat content of your cream and the amount of sugar and chocolate chips used. The sugar content can vary, but generally, expect around 25-35 grams per serving. This primarily comes from the granulated sugar added to the base and the sugar present in the chocolate chips. While these numbers are estimates, they highlight that ice cream is a treat meant for enjoyment in moderation. Adjusting the sugar in your recipe can reduce this slightly, but it’s important for the ice cream’s texture and freezing point. Explore other meal ideas on Carina Recipes Instagram for balanced eating.
Other Key Nutrition Details
Beyond calories and sugar, a 1/2-cup serving of homemade mint chocolate chip ice cream also provides other nutritional components. You can expect about 15-25 grams of total fat, with a significant portion being saturated fat, primarily from the heavy cream. There will also be a small amount of protein, typically around 3-5 grams, from the dairy. Carbohydrates, largely from the sugar, will be the most dominant macronutrient. Additionally, dairy products contribute some calcium and other vitamins and minerals, though not in significant amounts for a single dessert serving. While delicious, homemade ice cream is best enjoyed as an occasional treat rather than a daily staple, fitting perfectly into a varied diet alongside more nutrient-dense meals like easy butter chicken recipe.
Customize Your Mint Chocolate Chip Ice Cream
One of the greatest joys of making homemade ice cream is the freedom to customize it exactly to your liking. Unlike store-bought options, you are the master of flavor and texture, able to fine-tune every aspect to create your perfect scoop. This adaptability ensures that your mint chocolate chip ice cream is not just good, but truly *yours*. Whether you prefer a subtle hint of mint or a bold, invigorating blast, or if you crave a sparse scattering of chips versus a dense chocolatey dream, the power is in your hands. This personalization elevates the entire experience, making each batch a unique reflection of your taste preferences, allowing for endless delicious possibilities.
Adjust Peppermint for Flavor
The intensity of the mint flavor is a highly personal preference, and with homemade ice cream, you have complete control. The recipe suggests 1-2 teaspoons of peppermint extract, but feel free to adjust this to your liking. For a milder, more subtle mint flavor that whispers rather than shouts, start with just 1 teaspoon. If you prefer a bolder, more refreshing mint sensation, increase the extract gradually by 1/4 teaspoon increments, tasting as you go. Remember that the flavor can deepen slightly after chilling and freezing, so err on the side of caution. You could even experiment with a combination of peppermint and a tiny touch of spearmint extract for a more complex mint profile, tailoring it perfectly to your palate.
Personalize with More Chips
Just like the mint flavor, the amount and type of chocolate chips can be customized to suit your desires. The recipe calls for 1 cup of mini chocolate chips, but don’t hesitate to add more if you’re a true chocolate lover – up to 1.5 cups can work wonderfully without overpowering the ice cream’s base. You can also experiment with different types of chocolate: dark chocolate chips for a more sophisticated bitterness, milk chocolate chips for extra sweetness, or even white chocolate chips for a unique twist. Consider adding chocolate chunks for larger bites of chocolatey goodness. For an extra layer of decadence, drizzle melted chocolate into the churned ice cream before freezing, creating a rich chocolate swirl. The possibilities are endless when personalizing this classic treat.
Storing Leftover Mint Chocolate Chip Ice Cream
Once you’ve enjoyed your initial servings of homemade mint chocolate chip ice cream, you’ll want to ensure any leftovers maintain their delicious flavor and creamy texture for as long as possible. Proper storage is key to preventing freezer burn and preserving the integrity of your hard work. By following a few simple guidelines, you can extend the life of your homemade treat, allowing you to savor its goodness for days or even weeks to come. This section provides practical advice on how to store your ice cream effectively, along with tips for making scooping effortless, so every future serving is as enjoyable as the first.
Use Airtight Containers
The most crucial step in storing homemade ice cream is using an airtight container. Exposure to air is the primary cause of freezer burn, which manifests as icy crystals and a degraded flavor and texture. Opt for freezer-safe containers with tight-fitting lids. Plastic containers designed specifically for ice cream or glass containers with airtight seals work best. Before securing the lid, press a layer of plastic wrap or parchment paper directly onto the surface of the ice cream. This creates an additional barrier against air, significantly reducing the risk of ice crystal formation and keeping your ice cream wonderfully smooth and creamy. Labeling the container with the date of creation is also a good practice for tracking freshness.
Store for Up to Two Weeks
While homemade ice cream is best enjoyed fresh, properly stored batches can last in the freezer for up to two weeks without a significant loss in quality. Beyond this period, while still safe to eat, you might notice a slight decline in texture as ice crystals can slowly form despite airtight storage. For optimal enjoyment, try to consume your batch within the first week. The absence of commercial stabilizers and preservatives in homemade ice cream means it won’t have the same extended shelf life as store-bought varieties, but its superior freshness more than compensates for this. Always ensure your freezer maintains a consistent, very cold temperature (0°F / -18°C or below) for the best storage conditions.
Tips for Easy Scooping
Even perfectly stored homemade ice cream can be quite firm directly out of the freezer. For easy scooping without bending your spoon, follow these simple tips: Allow the ice cream to sit at room temperature for 5-10 minutes before attempting to scoop. This brief softening period makes a significant difference. Alternatively, you can run your ice cream scoop under hot water for a few seconds before each scoop. The warm metal will glide through the frozen dessert much more easily, creating perfect, round scoops. For an even more impressive presentation, scoop your mint chocolate chip ice cream onto cones or into bowls, perhaps alongside a snickerdoodle cobbler, and garnish with an extra sprig of mint or a sprinkle of mini chocolate chips for an inviting finish. This makes serving a joy.
Enjoy Your Fresh Homemade Treat
After all your effort, patience, and meticulous preparation, the moment has finally arrived to savor your fresh, homemade mint chocolate chip ice cream. There’s an unparalleled satisfaction in scooping a vibrant green, chocolate-flecked dessert that you’ve crafted from scratch. Each spoonful offers a refreshing burst of cool peppermint perfectly balanced with the rich, sweet crunch of chocolate chips, all enveloped in a luxuriously creamy base. This isn’t just an ice cream; it’s a testament to the joy of home cooking and the reward of creating something truly special for yourself, your family, and your friends. So, take a moment, gather your loved ones, and delight in the incredible taste of your very own artisanal ice cream. It’s a simple pleasure that creates lasting memories.