
Mini Peanut Butter Cheesecakes are delightful sweet treats, perfect for any occasion. This easy recipe helps you create creamy, rich desserts that will impress everyone. Learn the simple steps to bake these crowd-pleasers, from the simple graham cracker crust to the luscious peanut butter filling and chocolate drizzle.
Key Takeaways
- Easily create delightful mini peanut butter cheesecakes.
- Master a simple graham cracker crust and creamy filling.
- Perfect for parties, gifts, or a sweet personal indulgence.
- Learn essential tools, ingredients, and storage tips.
Baking small desserts brings big smiles. These cheesecakes are simple to make. They offer rich flavor. A perfect little indulgence. Everyone loves mini treats.
Getting Started with Mini Cheesecakes
Embarking on the journey to create mini peanut butter cheesecakes is a rewarding experience for any baker, whether you’re a seasoned pro or just starting. These individual desserts are not only adorable but also pack a powerful punch of flavor that combines the classic pairing of peanut butter and chocolate. The convenience of their size makes them an ideal choice for various occasions, ensuring everyone gets their own perfect portion without any fuss. Preparing these delightful treats is a fantastic way to satisfy a sweet craving, practice your baking skills, and create something truly memorable. The process is straightforward, focusing on achievable steps that yield impressive results, making them an excellent project for a cozy afternoon in the kitchen.
Why Make These Sweet Treats?
The appeal of mini cheesecakes lies in their versatility and charm. They are perfectly portioned, which means less guilt and more enjoyment per bite. Unlike larger cheesecakes that require careful slicing and serving, these individual delights are ready to grab and savor. They are an absolute hit at parties, potlucks, and family gatherings, effortlessly elevating your dessert table. Furthermore, mini cheesecakes make fantastic edible gifts, beautifully packaged for friends, neighbors, or teachers. Their small size also allows for creative experimentation with toppings and presentations, ensuring each batch can be unique. Plus, who can resist the irresistible combination of rich cheesecake with creamy peanut butter? For more dessert inspiration, check out our peanut butter brownie swirl cookies, another crowd-pleaser.
Gather Ingredients for Success
Success in baking always begins with having all your ingredients measured and ready before you start. For these mini peanut butter cheesecakes, you’ll need a mix of pantry staples and a few fresh items. Key components include graham cracker crumbs for the crust, creamy peanut butter for the star flavor, and, of course, cream cheese for that signature cheesecake texture. Sugar, butter, vanilla extract, and eggs complete the essential lineup, ensuring a balanced and delectable outcome. Opting for good quality ingredients can significantly enhance the final taste and texture of your cheesecakes. Make sure your cream cheese is softened to room temperature for a smooth, lump-free filling, and choose a good-quality peanut butter for the best flavor payoff. This preparation step, often called “mise en place,” saves time and reduces stress during the baking process, setting you up for a delightful culinary adventure.
Simple Graham Cracker Crust
A great mini cheesecake starts with a fantastic crust, and for these peanut butter delights, a classic graham cracker base is simply perfect. It provides a delightful crunch that contrasts beautifully with the creamy filling, adding a necessary textural element to each bite. Creating this crust is one of the simplest steps in the entire recipe, requiring minimal effort but yielding maximum flavor. The subtle sweetness and slightly nutty flavor of graham crackers make them an ideal foundation for almost any cheesecake, especially when paired with the rich flavors of peanut butter and chocolate. This section will guide you through preparing the perfect crumb mixture and pressing it into your muffin tins, ensuring a sturdy and delicious base that holds up to the luscious filling. Achieving the right consistency is key for a crust that is neither too crumbly nor too hard, providing just the right amount of support and flavor.
Mixing Your Cheesecake Base
To create the perfect graham cracker crust, you’ll need finely crushed graham cracker crumbs, melted butter, and a touch of granulated sugar. Begin by crushing your graham crackers into fine crumbs. A food processor makes this task quick and easy, but you can also place them in a zip-top bag and crush them with a rolling pin for a more rustic approach. Once you have your crumbs, transfer them to a medium mixing bowl. Pour the melted unsalted butter over the crumbs, adding the granulated sugar. Stir everything together thoroughly until the crumbs are evenly moistened. The mixture should resemble wet sand and hold together when pressed. This ensures that your crust will be cohesive and firm once baked. This simple mixture forms the bedrock of your cheesecake experience, promising a flavorful contrast to the rich filling.
Baking the Mini Crusts Right
Once your graham cracker mixture is ready, it’s time to form the mini crusts. Line a 12-cup muffin tin with paper liners; this makes removing your cheesecakes incredibly easy. Distribute the graham cracker mixture evenly among the 12 liners, typically about 1 to 1.5 tablespoons per cup. Using the back of a spoon or a small, flat-bottomed glass, firmly press the crumbs into the bottom of each liner, creating a compact and even base. This firm packing is crucial for preventing the crusts from crumbling after baking. Once pressed, bake the crusts in a preheated oven for about 5-7 minutes. This brief baking time helps to set the crust and makes it nice and sturdy, giving it a slightly toasted flavor. Allow them to cool completely before adding the filling, as a cool crust prevents the cheesecake mixture from melting prematurely.
Creamy Peanut Butter Filling
The heart of these mini delights is undeniably the creamy peanut butter filling, a rich and velvety concoction that embodies the irresistible flavor of everyone’s favorite spread. This section dives into creating a filling that is perfectly balanced in sweetness and tang, with the unmistakable nutty aroma of peanut butter shining through. The key to a smooth, luscious filling lies in using softened cream cheese and well-incorporated ingredients. When executed correctly, the filling will be light yet decadent, providing a melt-in-your-mouth experience that complements the crunchy graham cracker crust and the forthcoming chocolate drizzle. We’ll explore the nuances of selecting the right peanut butter and the techniques for blending it seamlessly with other dairy components, ensuring your mini cheesecakes are nothing short of spectacular. This filling is what truly sets these treats apart, making them a standout dessert.
What Makes This Peanut Butter Filling
Our peanut butter filling stands out due to its harmonious blend of flavors and textures. It combines the tanginess of cream cheese with the rich, slightly salty profile of peanut butter, creating a complex yet incredibly satisfying taste. The addition of granulated sugar provides the perfect level of sweetness, while a touch of vanilla extract enhances all the other flavors. Using smooth, creamy peanut butter is essential for achieving the desired velvety texture; avoid chunky varieties unless you specifically desire a textured filling. The careful balance ensures that the peanut butter flavor is prominent but not overwhelming, allowing the classic cheesecake notes to still be enjoyed. This particular combination of ingredients results in a filling that is both comforting and sophisticated, appealing to a wide range of palates. Explore the history and uses of peanut butter on Wikipedia.
Whipping Up the Smooth Mixture
Creating this irresistible filling begins with ensuring your cream cheese is at room temperature. This is vital for achieving a smooth, lump-free batter. In a large mixing bowl, beat the softened cream cheese with a hand mixer until it’s light and fluffy. Gradually add the granulated sugar, continuing to beat until fully incorporated and the mixture is smooth. Next, add the creamy peanut butter and vanilla extract, beating on low speed until just combined. Be careful not to overmix at this stage, as too much air can cause cracks in the cheesecake during baking. Finally, beat in the eggs one at a time, mixing on low speed only until each egg is just incorporated. Scrape down the sides of the bowl as needed to ensure all ingredients are thoroughly mixed. The goal is a homogenous, creamy mixture that pours easily into the crusts, ready for baking into perfect mini delights.
Assembling Your Mini Delights
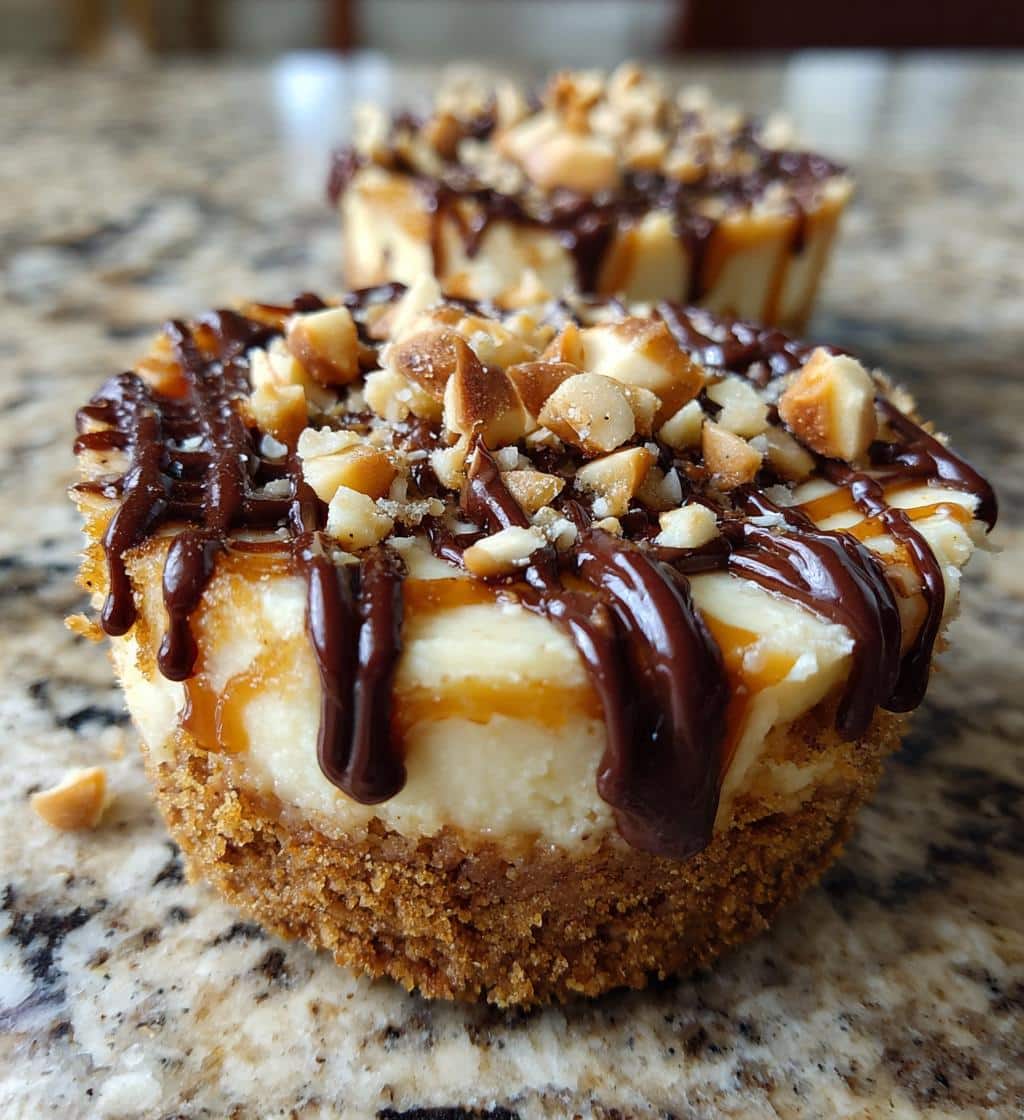
The assembly stage is where all your hard work comes together, transforming individual components into beautiful, cohesive mini cheesecakes. This part of the process is straightforward but requires a gentle hand and attention to detail to ensure each cheesecake looks as good as it tastes. Once your graham cracker crusts have cooled and your peanut butter filling is mixed to perfection, you’re ready to combine them. Proper filling techniques prevent messes and ensure an even distribution, leading to uniformly baked and attractive desserts. The final touch, a decadent chocolate drizzle, not only enhances the visual appeal but also adds another layer of flavor that perfectly complements the peanut butter. Taking your time during assembly will result in professional-looking treats that are sure to impress anyone who tries them. This careful crafting brings you closer to enjoying your homemade masterpieces.
Filling the Cooled Crusts
With your baked and cooled graham cracker crusts still nestled in their muffin tin liners, it’s time to add the creamy peanut butter filling. Carefully spoon the filling over each crust, aiming to fill each liner about two-thirds to three-quarters full. It’s important not to overfill, as the cheesecakes will puff up slightly during baking. A small ice cream scoop or a tablespoon works well for portioning, ensuring consistency across all your mini cheesecakes. Gently tap the muffin tin on your counter a few times to release any air bubbles and help the filling settle evenly. This step also ensures a smooth top surface for your cheesecakes. Once filled, your mini cheesecakes are ready for their brief stint in the oven, which will set the creamy filling and complete their transformation into delightful treats. Precision here ensures uniform baking and presentation.
Adding a Chocolate Drizzle Top
After your mini cheesecakes have baked and cooled, adding a chocolate drizzle is the perfect finishing touch. This step not only adds an extra layer of chocolatey goodness but also elevates their visual appeal, making them look even more irresistible. You can use melted chocolate chips (dark, milk, or semi-sweet) or a pre-made chocolate ganache. For melting, a microwave in 30-second intervals or a double boiler works best. Once the chocolate is smooth and fluid, transfer it to a piping bag with a tiny snip at the end, or simply use a spoon. Drizzle the chocolate decoratively over the top of each cooled mini cheesecake. You can create zigzags, spirals, or abstract patterns. Allow the chocolate to set before chilling the cheesecakes. This beautiful detail makes each mini cheesecake a tiny work of art.
Chilling for Perfect Mini Cheesecakes
The chilling process is perhaps the most crucial, yet often overlooked, step in creating perfect mini cheesecakes. While it requires patience, this period in the refrigerator allows the cheesecakes to fully set, firm up, and develop their rich, dense, and creamy texture. Skipping or rushing this step can result in soft, runny cheesecakes that lack the characteristic structure and mouthfeel. Chilling also intensifies the flavors, as the ingredients have time to meld together, enhancing the overall taste experience. Think of it as the final resting phase where all the components harmonize into a delicious symphony. This section emphasizes the importance of proper chilling times and offers tips for serving these sweet creations at their absolute best, ensuring every bite is a delightful experience. Patience is truly a virtue when it comes to cheesecake perfection.
How Long to Chill Cheesecakes
For mini cheesecakes, adequate chilling time is essential. Once your cheesecakes have cooled completely at room temperature after baking, they need to be refrigerated for a minimum of 3-4 hours. However, for the best results, chilling them overnight (8 hours or more) is highly recommended. This extended chilling period allows the cream cheese mixture to firm up properly, ensuring a smooth, sliceable (or in this case, perfectly edible) texture and preventing any structural collapse when handled or eaten. Place the muffin tin with the cheesecakes (or transfer them to an airtight container once fully cooled) directly into the refrigerator. Cover them loosely with plastic wrap to prevent them from absorbing any unwanted odors from the fridge. Resist the temptation to cut or serve them before they are fully chilled, as this could compromise their delicate structure and creamy consistency.
Serving Your Sweet Creations
Once your mini cheesecakes are perfectly chilled and firm, they are ready to be unveiled and enjoyed. Carefully remove them from the muffin tin by lifting the paper liners. If you plan to serve them immediately, you can simply place them on a platter. For an elegant presentation, consider removing the paper liners before serving, revealing the crisp graham cracker crust. Allow them to sit at room temperature for about 10-15 minutes before serving; this slightly softens the filling, making it even creamier and allowing the flavors to truly sing. You can garnish them with additional chocolate shavings, a dollop of whipped cream, or a sprinkle of crushed peanuts for extra flair. These mini treats are ideal for dessert tables, coffee breaks, or as a delightful end to any meal. Explore our desserts category for more sweet inspiration!
Ingredients for Mini Peanut Butter Cups
Having a clear and precise list of ingredients is the cornerstone of any successful baking endeavor, especially when creating something as specific and delightful as mini peanut butter cheesecakes. This section meticulously outlines every component you’ll need, breaking them down into easily accessible pantry staples and specific measurements. Understanding the role of each ingredient helps in troubleshooting and making minor adjustments if necessary, though sticking to the recipe is always recommended for first-time bakers. From the rich dairy products to the sweet and savory elements, each item plays a vital part in building the complex flavor profile and desirable texture of these treats. Preparing your ingredients in advance, measuring accurately, and ensuring they are at the correct temperature are all critical steps that contribute to a seamless baking experience and a truly delicious outcome.
Pantry Staples You Will Need
Many of the ingredients required for these mini peanut butter cheesecakes are likely already in your pantry or easily found at any grocery store. For the crust, you’ll need graham crackers (or pre-made crumbs), unsalted butter, and granulated sugar. The filling calls for full-fat cream cheese (ensure it’s softened), more granulated sugar, creamy peanut butter (avoid natural varieties that separate too much), large eggs, and vanilla extract. For the chocolate drizzle, you’ll need semi-sweet chocolate chips or your preferred chocolate bar. Having these items on hand ensures a smooth baking process without last-minute runs to the store. Always check expiration dates, especially for dairy products, to guarantee freshness and the best possible flavor for your finished cheesecakes. A well-stocked pantry is a baker’s best friend!
Specific Measurements for Each Part
Accurate measurements are non-negotiable in baking to achieve consistent and delicious results. Here’s a general guide for the specific quantities you’ll need (actual recipe measurements will vary slightly):
- For the Crust:
- 1 ½ cups (approximately 180g) graham cracker crumbs
- ¼ cup (56g) unsalted butter, melted
- 2 tablespoons granulated sugar
- For the Peanut Butter Filling:
- 16 oz (450g) full-fat cream cheese, softened
- ¾ cup (150g) granulated sugar
- ½ cup (128g) creamy peanut butter
- 2 large eggs
- 1 teaspoon vanilla extract
- For the Chocolate Drizzle:
- ½ cup (85g) semi-sweet chocolate chips
- 1 teaspoon coconut oil (optional, for smoother melting)
Following these measurements closely will help ensure the perfect texture and flavor balance for your mini cheesecakes, making them a consistently delightful sweet treat every time you bake them.
Essential Tools for Baking These
While the ingredients are the heart of any recipe, the right tools are the hands that bring it to life. For baking mini peanut butter cheesecakes, you don’t need a professional kitchen setup, but having a few essential items will make the process much smoother and more enjoyable. From preparing the crust to mixing the creamy filling and ensuring even baking, each tool plays a specific role in achieving perfect results. Investing in good quality, basic baking equipment is always a wise decision for any home cook looking to expand their repertoire of desserts. This section highlights the indispensable tools you’ll need, detailing why each one is important and how it contributes to the overall success of your mini cheesecake project. Proper tools streamline your efforts and boost your confidence in the kitchen.
Muffin Tins and Liners
The star tools for these mini cheesecakes are undoubtedly the muffin tin and paper liners. A standard 12-cup muffin tin is perfect for portioning and baking. Using paper liners is absolutely crucial; they ensure easy removal of the cheesecakes without sticking, maintaining their pristine shape and preventing any mess. Opt for good quality, grease-proof paper liners to prevent the butter from seeping through. Silicone muffin liners are also an excellent reusable option. Preparing your muffin tin with liners before you start mixing is a small step that saves a lot of hassle later on. If you don’t have paper liners, you can lightly grease and flour each muffin cup, but liners offer superior non-stick properties and convenience, especially for delicate desserts like cheesecakes. This simple setup makes baking and serving effortless.
Mixing Bowls and Hand Mixer
For combining your ingredients effectively, a set of sturdy mixing bowls and a reliable hand mixer are indispensable. You’ll need at least two mixing bowls: one for the graham cracker crust mixture and another, larger one for the cream cheese filling. Stainless steel or glass bowls are excellent choices as they are non-reactive and easy to clean. A hand mixer (or a stand mixer with the paddle attachment) is highly recommended for achieving the desired smooth and fluffy consistency of the cream cheese filling. While you can whisk by hand, a mixer makes the job much quicker, more efficient, and ensures all ingredients are thoroughly incorporated without lumps. Don’t forget basic measuring cups and spoons for accurate ingredient portions. These fundamental tools are the backbone of your baking process, enabling you to create wonderfully blended mixtures for your mini cheesecakes.
Quick Preparation Time Breakdown
Understanding the time commitment involved in any recipe is key to planning your baking session efficiently. These mini peanut butter cheesecakes, while requiring some hands-on effort, are structured in a way that minimizes active work by leveraging chilling time. This breakdown provides a realistic expectation of how long each phase will take, allowing you to seamlessly integrate baking into your schedule. Knowing which steps are active and which involve passive waiting helps in scheduling other tasks or simply enjoying a moment of relaxation while your desserts set. It’s a rewarding process where your patience during the chilling phase truly pays off with perfectly set and flavorful cheesecakes. This section aims to demystify the timeline, making the entire baking process feel manageable and enjoyable from start to finish.
Active Steps in Making Them
The active preparation time for these mini cheesecakes is surprisingly short, making them a great project even on busy days. You’ll spend approximately 15-20 minutes preparing the graham cracker crust, including crushing, mixing, and pressing it into the muffin liners. Baking the crusts takes another 5-7 minutes. The peanut butter filling preparation involves about 15-20 minutes of mixing, beating the cream cheese, sugar, peanut butter, and eggs until smooth. Spooning the filling into the crusts will take another 5-10 minutes. Finally, a short bake time for the cheesecakes themselves, typically around 15-20 minutes, is required. In total, your active, hands-on time in the kitchen will be around 40-55 minutes. This makes it an efficient recipe, perfect for a weekend afternoon or a special weeknight treat. For another quick dinner recipe to balance your day, consider our easy honey garlic chicken.
Mostly Waiting for Chill Time
While the active preparation is relatively quick, the bulk of the time for these mini cheesecakes is spent waiting. After baking, the cheesecakes need to cool completely at room temperature, which can take 30-60 minutes. The most significant chunk of time is dedicated to chilling them in the refrigerator. As discussed, this crucial step requires a minimum of 3-4 hours, with overnight chilling being ideal for the best texture and firmness. This waiting period is essential for the cheesecake to set properly, allowing the flavors to meld and the structure to solidify. It’s the perfect opportunity to relax, tackle other tasks, or prepare your garnishes. So, while you’ll be actively baking for less than an hour, plan ahead to accommodate the extensive chill time, ensuring your mini cheesecakes are perfectly set and ready for serving when you are.
Storing Leftover Mini Cheesecakes
One of the many benefits of mini cheesecakes, aside from their deliciousness, is their ease of storage. Should you find yourself with leftovers – though that’s a rare occurrence with these tempting treats – knowing how to properly store them ensures they remain fresh and delightful for days to come. Proper storage not only preserves their taste and texture but also maintains their safety, preventing spoilage. This section offers practical advice on keeping your mini cheesecakes in optimal condition within the refrigerator, along with tips for enjoying them later. Whether you’re planning to savor them over a few days or want to freeze a batch for future cravings, these guidelines will help you extend the life and deliciousness of your homemade desserts. Never let a good cheesecake go to waste!
Keeping Them Fresh in Fridge
To keep your leftover mini cheesecakes fresh, proper refrigeration is key. Once they are fully chilled and set, transfer them to an airtight container. If they are still in their paper liners, you can stack them gently with a piece of parchment paper between layers to prevent them from sticking together. Store the container in the refrigerator for up to 3-4 days. It’s important to keep them covered to prevent them from absorbing odors from other foods in your fridge and to maintain their moisture content. Avoid storing them uncovered, as the exposed cheesecake can dry out and develop a tougher texture. By following these simple storage tips, you can enjoy the delightful taste and creamy texture of your mini peanut butter cheesecakes for several days after baking.
Tips for Best Enjoyment Later
For the best enjoyment of your stored mini cheesecakes, consider these tips. While they are perfectly delicious straight from the fridge, allowing them to sit at room temperature for about 10-15 minutes before serving can enhance their creaminess and bring out their full flavor profile. The slight warming allows the fats in the cream cheese and peanut butter to soften, resulting in a more luxurious mouthfeel. If you’ve frozen any mini cheesecakes (which is possible for longer storage; wrap individually in plastic wrap then foil), thaw them in the refrigerator overnight before serving. You can also re-drizzle with a fresh touch of chocolate or add a new garnish if desired, to refresh their appearance and taste. These small touches ensure that even leftovers feel like a freshly made treat.
Creative Topping Ideas for Your Dish
While these mini peanut butter cheesecakes are absolutely delicious on their own, the joy of baking often comes from personalizing your creations. Toppings offer a fantastic opportunity to add extra texture, flavor, and visual appeal, transforming a great dessert into an extraordinary one. This section explores imaginative and delicious ideas to crown your mini cheesecakes, ranging from simple additions that enhance the existing flavor profile to more elaborate garnishes that introduce new dimensions. Experimenting with different toppings allows you to cater to various tastes and makes each batch unique. Whether you prefer a subtle accent or a decadent flourish, these creative suggestions will inspire you to elevate your mini cheesecakes to new heights, making them even more irresistible and picture-perfect. Show off your delicious creations and find more inspiration on our Pinterest page!
Crushed Peanuts for Texture
For an added layer of flavor and a satisfying crunch, a sprinkle of crushed peanuts is an excellent topping choice. The roasted, slightly salty notes of peanuts perfectly complement the sweet and creamy peanut butter filling, enhancing the overall peanut butter experience. You can use plain roasted peanuts, or even honey-roasted peanuts for an extra touch of sweetness. Simply chop them roughly or pulse them briefly in a food processor for a coarser texture. Sprinkle them generously over the chocolate drizzle before it sets, or just before serving. This simple addition introduces a delightful textural contrast that elevates each bite. Crushed peanuts also add a professional, finished look to your mini cheesecakes, making them even more appealing and truly special.
Extra Chocolate Shavings
Building on the existing chocolate drizzle, adding extra chocolate shavings is another simple yet elegant way to enhance your mini cheesecakes. This topping provides a beautiful visual appeal and an intensified chocolate flavor that pairs exquisitely with peanut butter. You can create chocolate shavings using a vegetable peeler on a block of chocolate (dark, milk, or white chocolate work well). Gently sprinkle the shavings over the top of each cheesecake, either on top of the unset chocolate drizzle or just before serving. The delicate curls of chocolate add a gourmet touch, making your mini cheesecakes look like they came straight from a patisserie. This extra touch of chocolate makes these treats even more irresistible and photo-worthy. Share your creations with us on Instagram!
Nutrition Facts for Each Serving
Understanding the nutritional content of what you eat is becoming increasingly important for many people. While these mini peanut butter cheesecakes are undeniably a treat, having a general idea of their nutritional contribution can help you enjoy them responsibly. This section provides a broad overview of the typical nutritional elements found in each serving, such as calories, sugar, fat, and protein. Please note that these are general estimates, as precise nutrition facts can vary significantly based on specific ingredient brands, exact measurements, and any additional toppings used. This information is intended to offer a helpful context, allowing you to make informed choices about incorporating these delightful desserts into your diet. Enjoying a homemade dessert like this occasionally is a wonderful way to satisfy sweet cravings while maintaining a balanced approach to eating.
Calories and Sugar Information
As expected with any sweet treat, mini peanut butter cheesecakes contain a notable amount of calories and sugar. Each serving (one mini cheesecake) can typically range from 250 to 350 calories, largely due to the cream cheese, peanut butter, and sugar content. The sugar content, coming from both the granulated sugar in the filling and crust, and naturally occurring sugars in the graham crackers and peanut butter, contributes significantly to the overall carbohydrate count. These cheesecakes are designed to be an indulgence, offering a rich and satisfying sweet experience. For those monitoring sugar intake, being mindful of portion sizes is key. Enjoying these delicious creations in moderation allows for a balanced approach to your dietary goals while still savoring a homemade delight.
Fat and Protein Content
Mini peanut butter cheesecakes are also quite rich in fat, primarily from the full-fat cream cheese, butter in the crust, and, of course, the peanut butter. Healthy fats are important, but these cheesecakes contain a mix of saturated and unsaturated fats. Each serving will likely have a significant amount of fat, contributing to the creamy texture and rich flavor. However, peanut butter also brings a decent amount of protein to the table. This makes the cheesecakes a slightly more substantial dessert compared to pure sugar confections. While not a primary source of protein, the peanut butter does offer a beneficial addition. The combination of fat and protein also contributes to a feeling of satiety, making one mini cheesecake a satisfying treat rather than needing multiple servings. They provide a delightful balance of indulgence and satisfaction.
Yield and Serving Suggestions
Understanding the yield of a recipe and how best to serve it helps you plan for events, portion control, or simply enjoying your homemade creations. These mini peanut butter cheesecakes are designed for convenience and versatility, making them suitable for a wide array of occasions. This section clarifies how many delightful treats you can expect from one batch and offers inspiring suggestions for presenting and sharing them. Whether you’re preparing for a large gathering, a small family treat, or thoughtful gifts, these cheesecakes fit the bill perfectly. Their individual size makes them inherently easy to manage and serve, minimizing fuss and maximizing enjoyment. Plan your next baking adventure with confidence, knowing exactly what to expect from your efforts.
How Many Mini Cheesecakes You Get
This recipe for mini peanut butter cheesecakes is typically designed to yield 12 individual servings. Using a standard 12-cup muffin tin ensures that you produce a full dozen of these delightful treats. This yield is perfect for a small gathering, a week’s worth of personal desserts, or for sharing with a few close friends and family members. If you need to cater to a larger crowd, you can easily double the recipe and bake two batches, or use two muffin tins simultaneously if your oven allows. The consistency in size and portioning makes these mini cheesecakes excellent for managing servings, ensuring everyone gets an equal, satisfying treat. Knowing the exact yield helps in planning your ingredients and your baking schedule effectively.
Perfect for Parties or Gifts
The individual nature and appealing presentation of mini peanut butter cheesecakes make them exceptionally well-suited for parties and as thoughtful homemade gifts. At parties, they eliminate the need for plates and forks (if you leave the liners on), making them a convenient finger food dessert. Their small size allows guests to sample other treats without feeling overly full. For gifts, simply place them in decorative cupcake boxes or small gift bags. They travel well and are always appreciated as a handmade token of affection. Consider pairing them with a small card detailing the ingredients for those with dietary concerns. Their charm and deliciousness guarantee they’ll be a hit in any setting, making them a go-to recipe for any occasion. For another amazing dessert idea, consider our vanilla bean crème brûlée cheesecake cupcakes.