
Japanese Katsu Bowls are a beloved comfort food, combining tender pork with a crisp panko crust. This recipe brings authentic flavors straight to your kitchen, making a delicious Katsu meal accessible for any weeknight. Enjoy creating this popular fried pork cutlet dish and serving it over warm rice for a hearty dinner.
Key Takeaways
- Achieve perfectly crispy pork katsu with the right breading and frying techniques.
- Gather simple ingredients for a delicious and authentic Japanese Katsu Bowl.
- Master the art of pounding pork for uniform thickness and even cooking.
- Serve your homemade katsu with classic Tonkatsu sauce for an unmatched flavor experience.
- Customize your Katsu Bowl with various tips, including adding cabbage or trying chicken katsu.
Making katsu at home is simpler than you think. Enjoy the delicious process. Your family will love these crispy pork cutlets. A satisfying meal awaits your plate. Cook with joy!
Make Japanese Katsu Bowls: A Crispy Delight
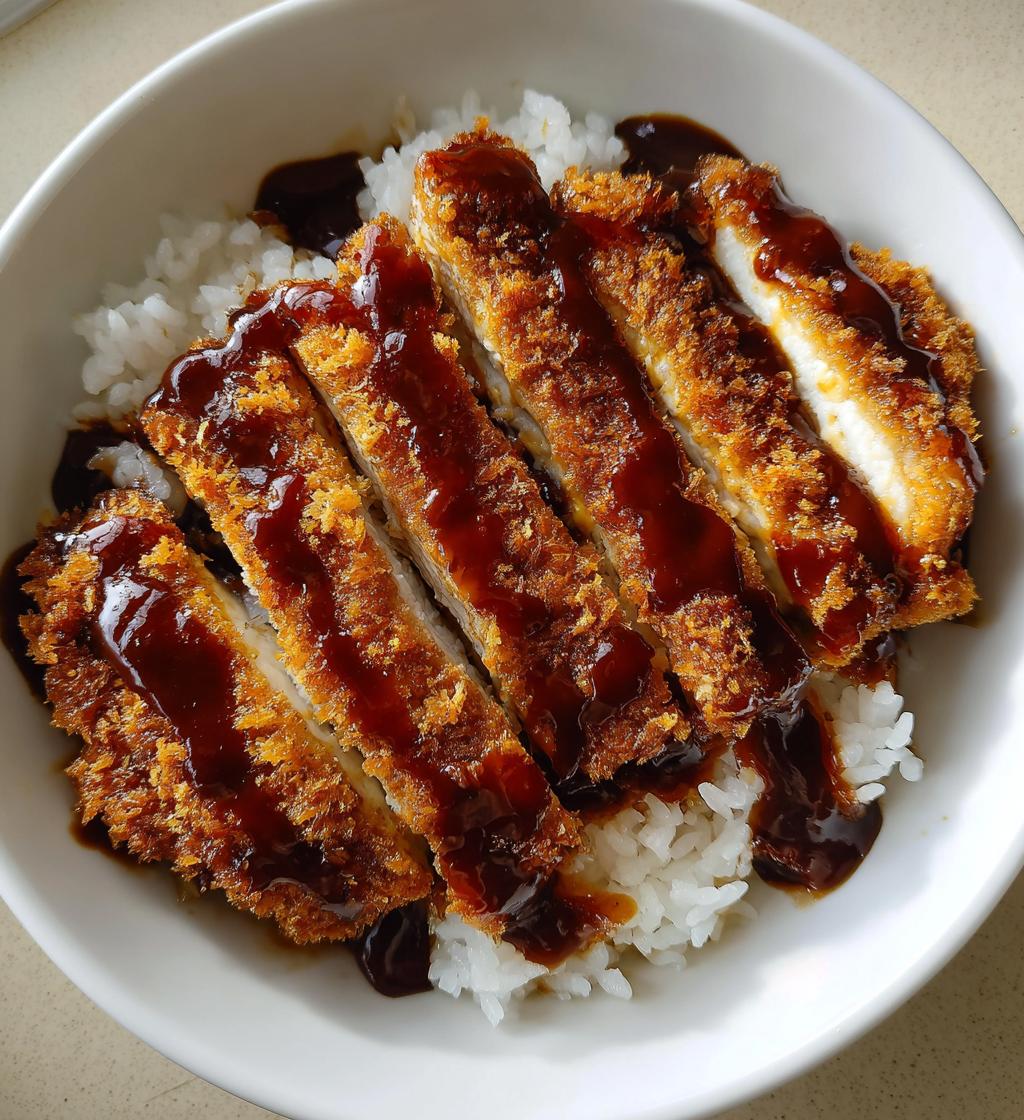
Japanese Katsu Bowls offer a symphony of textures and flavors, making them a consistently popular choice for a hearty meal. At its heart, a katsu bowl features a golden-brown, deep-fried pork cutlet, known as tonkatsu, served over a bed of fluffy white rice. The magic truly happens with the contrast between the unbelievably crispy exterior of the pork and its tender, juicy interior. This dish isn’t just about the pork; it’s a complete culinary experience, often enhanced by a drizzle of tangy-sweet Tonkatsu sauce and sometimes accompanied by fresh, thinly shredded cabbage.
Creating this satisfying meal at home allows you to control the quality of your ingredients and tailor the flavors to your preference. While it might seem intimidating to deep-fry at home, with the right techniques and a little confidence, you’ll be producing restaurant-quality Katsu Bowls in no time. The process involves a few key steps: preparing the pork, breading it meticulously with panko, frying it to perfection, and then assembling your bowl. Each step contributes to the final delicious outcome, promising a truly memorable homemade Katsu experience. If you enjoy creating flavorful main course dishes like this, explore other options such as Crispy Parmesan Chicken with a Rich Garlic Sauce for more culinary inspiration.
Enjoy Bold Flavors at Home
Bringing the bold, umami-rich flavors of a Japanese Katsu Bowl into your own kitchen is incredibly rewarding. The distinctive taste profile comes from several elements: the savory pork, the light and airy crunch of the panko breading, and the signature Tonkatsu sauce which acts as the perfect counterpoint. Unlike many fried dishes, Katsu’s appeal lies in its clean, crisp texture rather than a heavy, greasy feel, thanks to the unique properties of panko breadcrumbs. This makes it a fantastic option for a comforting yet invigorating meal.
Moreover, preparing Japanese Katsu Bowls from scratch gives you the opportunity to customize. Want a spicier kick? Add a dash of chili powder to your breading. Prefer a different protein? Chicken katsu is an excellent substitute, offering a lighter alternative without sacrificing flavor. The act of cooking katsu becomes a joyful process, transforming simple ingredients into a dish that truly excites the palate. It’s a fantastic way to introduce new cuisines to your family or simply enjoy a well-loved favorite in the comfort of your home. You can find more dinner recipes to expand your culinary repertoire.
Gather Ingredients for Your Katsu Bowls
Preparing delicious Japanese Katsu Bowls starts with having the right ingredients on hand. The beauty of this dish is its reliance on relatively simple components that, when combined, create something extraordinary. For the pork katsu itself, you’ll need boneless pork loin chops, preferably about 1/2 to 3/4 inch thick. Panko breadcrumbs are absolutely crucial here; their unique flaky texture is what gives katsu its signature crispiness, so don’t substitute regular breadcrumbs. You’ll also need all-purpose flour for dredging and eggs for creating an adhesive layer for the panko. Seasonings like salt and black pepper are essential for flavoring the pork before breading.
Beyond the katsu, consider the accompaniments that complete the bowl. Short-grain white rice is the traditional base, offering a neutral canvas for the rich pork and sauce. Tonkatsu sauce is non-negotiable for an authentic experience; you can buy it pre-made or easily whip up a homemade version using Worcestershire sauce, ketchup, soy sauce, and a touch of sugar. For a refreshing contrast, thinly shredded green cabbage is a classic side, providing a crisp texture and a slight bitterness that balances the richness of the fried pork. Having these items ready makes the cooking process smooth and enjoyable, leading to a perfectly balanced meal.
Simple Items for Delicious Cooking
The good news is that most of the items required for Japanese Katsu Bowls are likely staples in your pantry or readily available at any grocery store. You don’t need exotic ingredients to achieve an authentic taste. Start with good quality pork loin, as it’s the star of the show. When selecting panko, look for Japanese-style breadcrumbs; they are coarser and lighter than Western breadcrumbs, absorbing less oil and resulting in a much crispier coating. For the eggs, any large chicken eggs will do, and standard all-purpose flour works perfectly for the initial dredge. Don’t forget your cooking oil – a neutral-flavored oil with a high smoke point, like vegetable, canola, or grapeseed oil, is best for frying.
Even the Tonkatsu sauce can be simplified if you prefer. While store-bought options are convenient, a quick homemade version using common condiments can be just as satisfying. The key is to ensure all your ingredients are fresh and measured out before you begin the breading and frying process. This mise en place approach will make cooking more efficient and enjoyable. The simplicity of these ingredients underscores that delicious, bold flavors don’t necessarily require complex shopping lists. Just like a hearty Southern-style collard green and potato stew, sometimes the best dishes come from humble beginnings.
Pound Pork for Even Katsu Thickness
Achieving a uniformly cooked and tender pork katsu starts with proper preparation of the pork chops. Most pork loin chops, as purchased, will vary slightly in thickness, which can lead to uneven cooking—some parts might be overcooked and dry while others are still perfectly juicy. The solution is to pound the pork. This technique not only ensures an even thickness, promoting consistent cooking, but also helps tenderize the meat. By breaking down some of the muscle fibers, pounding makes the pork softer and more pleasant to eat.
To pound your pork, place a chop between two sheets of plastic wrap or inside a large freezer bag. This prevents the meat from tearing and keeps your work surface clean. Using a meat mallet, the flat side of a heavy pan, or even a rolling pin, gently but firmly pound the pork. Start from the center and work your way outwards, aiming for an even thickness of about 1/4 to 1/3 inch across the entire cutlet. Be careful not to pound too thin, as this can make the meat tough or cause it to fall apart during frying. This step is crucial for ensuring every bite of your crispy pork is tender and cooked just right, contributing significantly to the overall enjoyment of your Japanese Katsu Bowl.
Achieving Uniform Pork Chop Size
Beyond ensuring even thickness, pounding the pork also helps in achieving a more uniform size and shape for your katsu cutlets. When all your pork chops are roughly the same dimension, they will cook at the same rate, making the frying process more manageable and preventing some pieces from burning while others are still cooking. Uniformity also contributes to a more appealing presentation when serving your Katsu Bowls.
As you pound, pay attention to the edges and thicker parts of the pork. Often, the ends of a pork chop can be thicker than the middle. Focus your mallet strokes on these areas until the entire piece is flat. This might also slightly increase the surface area of the pork, allowing for more of that delicious panko breading. After pounding, season both sides of your pork cutlets generously with salt and freshly ground black pepper. This seasoning penetrates the meat before cooking, enhancing its natural flavors and ensuring that the inside of your katsu is just as delicious as the crispy exterior. Proper preparation at this stage lays the groundwork for truly authentic and delectable fried pork cutlets.
How to Bread Katsu Perfectly
The secret to incredibly crispy Japanese Katsu Bowls lies in the breading process, specifically using panko breadcrumbs. Panko, a Japanese breadcrumb, is made from crustless white bread that is coarsely ground into flaky slivers. This unique texture allows it to absorb less oil during frying and creates a much airier, crunchier coating than regular breadcrumbs. To perfectly bread your katsu, you’ll follow a three-step dredging process: flour, egg, and panko. Each step is vital for ensuring the breading adheres properly and achieves that coveted golden crispness.
First, prepare three shallow dishes or trays. In the first, place your all-purpose flour, seasoned with a pinch of salt and pepper. In the second, whisk a couple of eggs with a tablespoon of water or milk until well combined. In the third, spread out your panko breadcrumbs. Working with one pounded pork cutlet at a time, first dredge it thoroughly in the flour, shaking off any excess. The flour creates a dry surface for the egg to cling to. Next, dip the flour-dusted pork into the egg mixture, ensuring it’s fully coated, letting any excess drip off. Finally, place the egg-coated pork into the panko, pressing gently to make sure the breadcrumbs adhere firmly to every surface. This thorough coating is essential for the characteristic crunch of traditional Japanese Katsu. Repeat for all cutlets, then let them rest for a few minutes before frying to help the breading set.
Coating Pork with Panko Breadcrumbs
The panko breading stage is arguably the most crucial for achieving the perfect Katsu. When coating your pork with panko, don’t be shy; aim for a thick, even layer. Gently press the panko into the pork with your hands to ensure maximum adhesion. The more panko that sticks, the crispier and more satisfying your katsu will be. Avoid gaps or thin spots in the breading, as these areas can become soggy or burn during frying. After breading, it’s a good idea to lightly pat down the cutlets to further secure the crumbs.
Once all your pork cutlets are breaded, you can either fry them immediately or place them on a wire rack set over a baking sheet and refrigerate them for about 15-30 minutes. This resting period allows the breading to set even more firmly, reducing the chances of it falling off during frying. This technique is often used in professional kitchens and contributes significantly to a superior, extra-crispy result. Remember, the quality of your panko and the thoroughness of your breading process are key factors in creating a truly outstanding homemade Katsu. The crispiness is what truly sets this fried pork cutlet apart, making it a beloved comfort food globally, similar to how a schnitzel relies on its breading.
Frying Your Pork Katsu to Golden
Frying is where your carefully prepared pork cutlets transform into golden, crispy Katsu, ready for your Japanese Katsu Bowls. The key to successful frying is maintaining the correct oil temperature. If the oil isn’t hot enough, the katsu will absorb too much oil, resulting in a greasy product. If it’s too hot, the breading will burn before the pork is cooked through. A neutral-flavored oil with a high smoke point, such as vegetable, canola, or grapeseed oil, is ideal. Pour enough oil into a heavy-bottomed pot or deep skillet so that it’s about 1.5 to 2 inches deep, ensuring the katsu will be fully submerged or at least half-submerged for even cooking.
Heat the oil over medium-high heat until it reaches approximately 325-350°F (160-175°C). You can test the temperature by dropping a small pinch of panko into the oil; it should sizzle vigorously and turn golden within a few seconds. Carefully place one or two breaded pork cutlets into the hot oil, ensuring not to overcrowd the pan, as this can lower the oil temperature. Fry for about 2-3 minutes per side, or until the katsu is deeply golden brown and cooked through. The internal temperature of the pork should reach 145°F (63°C). Use tongs to carefully remove the katsu from the oil and place it on a wire rack set over a baking sheet to drain any excess oil. This helps maintain its crispiness. For more tips on achieving perfect results, check out our general guide on frying techniques.
Best Oil for Crispy Results
The choice of cooking oil plays a significant role in achieving the perfect crispy texture and preventing your Katsu from becoming greasy. As mentioned, a neutral-flavored oil with a high smoke point is crucial. Oils like vegetable, canola, sunflower, or grapeseed oil are excellent choices because they can withstand high temperatures without breaking down or imparting unwanted flavors to your food. Olive oil, particularly extra virgin, is generally not recommended for deep frying due to its lower smoke point and distinct flavor profile, which can overpower the delicate taste of the katsu.
Once you’ve selected your oil, ensure you use enough of it. Shallow frying might seem like a way to save oil, but it often leads to less even cooking and a less crispy result, as the katsu needs to be flipped, potentially disturbing the breading. Aim for enough oil to cover at least half of the katsu, if not fully submerge it. After frying, allow the Katsu to rest on a wire rack, not directly on paper towels. While paper towels absorb oil, they can also trap steam, making the bottom of the katsu soggy. A wire rack allows air to circulate around the entire piece, preserving that hard-earned crispness. Following these oil selection and draining tips will ensure your fried pork cutlets are not only golden and crispy but also light and incredibly flavorful.
Serve Japanese Katsu with Tonkatsu Sauce
The experience of enjoying Japanese Katsu Bowls is incomplete without the distinctive addition of Tonkatsu sauce. This rich, savory, and slightly sweet sauce is specifically designed to complement the crispy fried pork, cutting through its richness with a bright tang. Tonkatsu sauce is readily available in most Asian grocery stores or even large supermarkets, typically found in the international aisle. It’s characterized by its thick consistency and a complex flavor profile derived from a blend of fruits (like apples and prunes), vegetables (such as tomatoes and carrots), and a mix of spices, vinegar, and soy sauce. It offers a unique balance that elevates the fried pork cutlet from a simple fried dish to an iconic Japanese comfort food.
If you prefer to make your own Tonkatsu sauce, it’s surprisingly easy to whip up a satisfying version with common pantry ingredients. A simple homemade recipe often includes a base of ketchup and Worcestershire sauce, combined with a touch of soy sauce for umami, a bit of sugar or honey for sweetness, and sometimes a dash of Dijon mustard or ginger for an extra kick. Whisking these ingredients together until smooth creates a vibrant sauce that can be adjusted to your personal taste. Whether store-bought or homemade, the sauce is an indispensable component that brings all the elements of the Japanese Katsu Bowl together into a harmonious and delicious whole.
Drizzling Sauce on Katsu Bowls
The method of applying Tonkatsu sauce to your Japanese Katsu Bowls is a matter of personal preference, but typically it’s drizzled generously over the sliced katsu just before serving. After you’ve carefully sliced your crispy fried pork cutlet into easy-to-manage strips, arrange them artfully over a bed of warm rice. Then, take your Tonkatsu sauce and, using a spoon or a squeeze bottle, create appealing zig-zag patterns or parallel lines over the katsu. The visual appeal of the sauce contrasting with the golden pork adds to the overall enjoyment of the meal.
Some people prefer to serve the Tonkatsu sauce on the side, allowing each diner to add as much or as little as they like. This method also helps to preserve the crispiness of the katsu for longer, as direct contact with the sauce can gradually soften the breading. However, a light drizzle just before eating is usually enough to infuse flavor without sacrificing texture. Pair it with a fresh side of shredded cabbage, which acts as a palate cleanser, and you have a perfectly balanced and incredibly satisfying meal. This thoughtful presentation and saucing truly completes the homemade Katsu experience, making it a delicious Katsu bowl recipe that’s hard to resist. For similar comforting flavors, you might also enjoy our Easy Butter Chicken Recipe, which also relies on a flavorful sauce.
Serving Your Crispy Katsu Over Rice
The foundation of a classic Japanese Katsu Bowl is a generous bed of perfectly cooked white rice. Short-grain Japanese rice is traditionally preferred for its slightly sticky texture, which makes it easy to eat with chopsticks and provides a comforting, cohesive base for the other components. Cook your rice according to package directions, aiming for a fluffy yet slightly firm texture. While the katsu is the star, the quality of your rice greatly contributes to the overall enjoyment of the bowl.
Once your rice is ready and your katsu is fried and sliced, it’s time to assemble. Place a good portion of warm rice into a serving bowl. Arrange the sliced crispy katsu over the rice, allowing it to slightly overlap. This creates an inviting presentation. Don’t forget to add a side of thinly shredded cabbage, often served raw, which offers a refreshing crunch and a light, slightly bitter counterpoint to the rich, fried pork. Finally, drizzle generously with Tonkatsu sauce. The combination of warm rice, hot crispy pork, cool refreshing cabbage, and tangy sauce creates a delightful symphony of flavors and textures in every mouthful. This is what makes a homemade Katsu bowl such a satisfying meal.
Efficient Prep Time for Katsu Bowls
One of the appealing aspects of making Japanese Katsu Bowls is that, despite their gourmet appearance, they can be prepared with surprising efficiency. The prep time primarily involves pounding and breading the pork, which can be done in about 15-20 minutes for a batch of two to four cutlets. Gathering your ingredients and setting up your breading stations takes only a few minutes, especially if you have a well-organized kitchen. Preparing the rice can run concurrently with the pork preparation, further streamlining the process. If you opt for store-bought Tonkatsu sauce and pre-shredded cabbage, your prep time becomes even shorter.
To maximize efficiency, consider doing a few things in advance. You can pound the pork chops and even bread them a few hours before frying, storing them in the refrigerator on a wire rack uncovered, or lightly covered with plastic wrap, to help the breading adhere better. This allows you to simply pull them out and fry when you’re ready for dinner. Having all your accompaniments ready—rice cooked, cabbage shredded, and sauce nearby—will ensure a smooth transition from frying pan to dinner table. This quick dinner recipe is perfect for busy weeknights when you crave something special but don’t have hours to spend in the kitchen, proving that delicious Katsu at home is totally achievable. If you appreciate speed, check out our Chicken Bacon Ranch Tater Tot Casserole for another fast option.
Exact Cooking Time for Crispy Katsu
Achieving perfectly crispy and cooked-through Katsu requires attention to frying time and temperature. For pork cutlets pounded to approximately 1/4 to 1/3 inch thick, frying typically takes about 2 to 3 minutes per side. The goal is to reach a beautiful golden-brown color on the breading while ensuring the pork inside is cooked to a safe internal temperature of 145°F (63°C). Using a food thermometer is the most reliable way to confirm doneness and avoid overcooking, which can lead to dry pork.
It’s important to monitor the oil temperature throughout the frying process. Ideally, the oil should be maintained between 325-350°F (160-175°C). If the oil drops too low, the Katsu will soak up excess oil and become greasy. If it’s too high, the breading will burn before the pork is fully cooked. Fry in batches if necessary, allowing the oil to recover its temperature between additions. Once fried, transfer the Katsu to a wire rack. Resting for a minute or two helps the juices redistribute within the pork and allows any excess oil to drip away, further enhancing the crispy texture. This precision ensures every fried pork cutlet is a crispy delight.
Enjoy Japanese Katsu Bowls in 30 Minutes
It might sound ambitious to create a full Japanese Katsu Bowl dinner in just 30 minutes, but with efficient planning and concurrent cooking, it’s entirely possible. The key is to break down the tasks and execute them strategically. Start your rice first, as it often takes around 20 minutes to cook. While the rice is cooking, prepare your pork: pound the cutlets, set up your breading station (flour, egg, panko), and bread the pork. Simultaneously, heat your frying oil. As soon as the oil is hot, begin frying the katsu in batches. Each batch only takes a few minutes. While the last batch fries, quickly slice your cooked katsu and shred any cabbage you plan to use. By the time the rice is done and the last katsu is resting, you’re ready to assemble and serve.
This streamlined approach means you’re moving from one task to the next without significant downtime. Having your Tonkatsu sauce ready (either pre-bought or a quick homemade version) is also a time-saver. The satisfaction of putting together a hot, fresh, and incredibly tasty Japanese Katsu Bowl in such a short amount of time makes this recipe a fantastic option for a weeknight meal or when you’re craving quick comfort food. It’s a satisfying meal that proves bold flavors don’t always require a long wait.
Serving Bowls for Two People
When planning Japanese Katsu Bowls for two people, the recipe scales down beautifully. Typically, two medium-sized pork loin chops (about 6-8 ounces each) will be sufficient, yielding two generous servings of katsu. You’ll need about 1 cup of uncooked short-grain rice, which will expand to provide the perfect amount for two bowls. Adjust the quantities of flour, eggs, and panko accordingly, but it’s always better to have a little extra panko than not enough.
For serving, use appropriately sized individual bowls that can hold a good portion of rice, the sliced katsu, and a side of cabbage. This presentation style is part of the traditional Japanese dining experience, making each person’s bowl a complete and visually appealing meal. Don’t forget to have small dishes or a communal bottle of Tonkatsu sauce available for drizzling. Enjoying these delicious, homemade Katsu Bowls together is a wonderful way to share a flavorful and comforting meal, creating a restaurant-quality experience right in your own home.
Important Nutrition Facts for Katsu Bowls
Understanding the nutrition facts for Japanese Katsu Bowls can help you enjoy this delicious meal mindfully. A typical serving of pork katsu (a single breaded and fried pork cutlet) and rice can be calorie-dense, primarily due to the deep-frying process and the carbohydrates from the rice and breading. While specific values vary based on portion size, ingredients, and cooking oil, a homemade Katsu Bowl generally offers a significant amount of protein, which is excellent for muscle repair and satiety.
Pork loin itself is a good source of lean protein. However, the addition of flour, egg, and especially panko breadcrumbs, along with the oil absorbed during frying, adds to the calorie and fat content. To get a general idea, a single serving might contain anywhere from 400 to 700 calories, depending on the size of the pork and the amount of rice and oil used. It’s important to note that these are approximate figures, and healthier modifications, such as using an air fryer or baking, can reduce the fat and calorie count significantly. For a detailed nutritional breakdown of a specific recipe, it’s always best to use an online nutrition calculator with your exact ingredient quantities.
Calories, Protein, and Fat Info
Let’s break down the general nutritional components of a Japanese Katsu Bowl. Calories mostly come from the combination of carbohydrates (rice, panko), fats (cooking oil, some in pork), and protein. A typical serving can range from 450-650 calories. The high-heat frying process means that even if you use lean pork, the oil absorption will contribute significantly to the fat content. Protein is a strong point for Katsu Bowls. Pork loin is an excellent source, with a single serving providing 25-35 grams of protein, essential for energy and muscle maintenance. This makes it a very satisfying meal that keeps you full.
As for Fat, this is often the highest macronutrient in a traditional Katsu Bowl. Frying can add 15-30 grams of fat per serving, depending on how much oil is absorbed and the type of oil used. A portion of this will be saturated fat from the pork, but much will come from the cooking oil. Including fresh, shredded cabbage adds fiber and vitamins with very few calories, helping to balance the meal nutritionally. If you are mindful of fat intake, consider serving smaller portions, using leaner cuts of pork, or exploring alternative cooking methods like baking or air frying for your crispy pork cutlets. Understanding these elements helps in making informed dietary choices while still enjoying this delicious comfort food. For more about balanced meals, you can visit the Wikipedia page on Nutrition.
Helpful Tips for Japanese Katsu Bowls
Making Japanese Katsu Bowls at home is a rewarding experience, and a few expert tips can elevate your results from good to outstanding. One of the most common issues in frying is inconsistent cooking, which can be mitigated by careful preparation. Always ensure your oil is at the correct temperature—a thermometer is your best friend here. If you don’t have one, a small piece of panko should turn golden in about 5-10 seconds. Frying in batches is also crucial to prevent the oil temperature from dropping too much, which leads to soggy Katsu. After frying, a brief rest on a wire rack ensures optimal crispiness. Remember, these crispy pork cutlets are meant to be light and crunchy.
Another tip involves the Tonkatsu sauce. While store-bought is convenient, a homemade version can be tailored to your taste. Experiment with adding a touch of grated apple or garlic to your homemade sauce for extra depth. For presentation, slicing the katsu after frying, rather than before, preserves its juicy interior and crispy exterior until the last moment. Arranging it neatly over rice and cabbage makes for an appetizing bowl that looks as good as it tastes. These small adjustments can make a big difference in the quality and enjoyment of your homemade Katsu Bowls.
Adjusting Cooking for Pork Thickness
The thickness of your pork cutlets directly impacts the cooking time. While the general recommendation is to pound pork to 1/4 to 1/3 inch thick for uniform cooking and tender results, sometimes you might have slightly thicker or thinner cuts. If your pork is on the thicker side (e.g., 1/2 inch), you might need to fry for an additional minute or two per side, or reduce the oil temperature slightly (e.g., to 325°F/160°C) to allow the interior to cook thoroughly without burning the breading. Always rely on an instant-read meat thermometer to ensure the internal temperature reaches a safe 145°F (63°C). For thinner cutlets, reduce the frying time by about 30 seconds per side and keep the oil at the higher end of the recommended temperature range (350°F/175°C) to get them golden and crisp quickly without drying out.
Adding Crunch with Shredded Cabbage
Thinly shredded cabbage is a traditional and highly recommended accompaniment to Japanese Katsu Bowls for good reason. It provides a delightful textural contrast to the crispy fried pork and offers a refreshing, slightly bitter flavor that balances the richness of the katsu and the sweetness of the Tonkatsu sauce. To prepare, use a mandoline or a very sharp knife to shred green cabbage as thinly as possible. You can even soak the shredded cabbage in ice water for about 10-15 minutes, then drain and pat dry, to make it even crisper. Serve it fresh and raw alongside or under your katsu, allowing its natural crunch to cleanse the palate between bites of the hearty fried pork. It’s a simple addition that significantly enhances the overall experience of this comfort food.
Chicken Katsu as a Great Substitute
While pork Katsu (Tonkatsu) is the classic, chicken Katsu is a fantastic and popular substitute for those who prefer poultry or are looking for a slightly lighter option. The preparation method remains largely the same: pound boneless, skinless chicken breasts or thighs to an even thickness, bread them using the flour, egg, and panko method, and then fry until golden and cooked through. Chicken Katsu tends to cook a bit faster than pork, so adjust your frying time accordingly (typically 2-3 minutes per side for chicken breast, ensuring an internal temperature of 165°F/74°C). The resulting chicken katsu is just as crispy and delicious, pairing perfectly with Tonkatsu sauce and rice, making for an equally satisfying meal. For more culinary ideas, follow us on Pinterest and Instagram!