
Making Margherita pizza at home is a rewarding culinary adventure. This recipe provides clear instructions for a delicious Italian classic. You will learn to prepare dough, layer fresh toppings, and achieve a perfectly baked crust, bringing authentic taste to your kitchen.
Key Takeaways
- Craft an authentic Margherita pizza with simple steps.
- Ingredient quality is key for superior flavor.
- Proper baking technique ensures a golden crust.
- Enjoy a homemade Italian classic perfect for sharing.
Pizza making is a joy. Fresh ingredients truly shine. A classic Margherita is simple. It offers pure, delightful flavor. Share this joy.
Welcome to Perfect Margherita Pizza Making
Creating your own Margherita pizza at home is a delightful culinary experience that connects you directly with the heart of Italian cuisine. This article breaks down the process into easy-to-follow steps, ensuring that even first-time pizza makers can achieve a truly delicious result. Forget complicated restaurant menus; your kitchen is about to become your favorite pizzeria. We aim to empower you with the knowledge and confidence to bake a pizza that rivals any authentic Italian creation, making it a memorable meal for friends and family.
Why This Pizza Classic?
The Margherita pizza stands as a testament to the power of simplicity. Its origins in Naples, Italy, are steeped in history, rumored to have been created to honor Queen Margherita of Savoy. The three colors of its toppings—red tomato, white mozzarella, and green basil—beautifully represent the Italian flag. It’s a pure, unadulterated flavor profile where each ingredient shines. Learning to master this classic is an excellent foundation for any aspiring pizza maker, offering a deep understanding of balance and quality in cooking.
Quick and Easy Overview
Our method for Margherita pizza focuses on efficiency without compromising on taste. We’ll start by gathering minimal, high-quality ingredients, move through the simple steps of dough preparation, topping application, and finally, the crucial baking process. The goal is to provide a recipe that fits into a busy schedule but still delivers an incredibly satisfying outcome. You’ll be surprised at how straightforward it is to achieve such a refined and popular dish.
What You Will Learn
This comprehensive guide will teach you everything from selecting the best flour for your dough to understanding oven temperatures, ensuring a golden crust and perfectly melted cheese. You’ll gain insights into ingredient selection, practical dough handling, and precise topping arrangement. By the end, you’ll not only have a delectable Margherita pizza to enjoy but also the skills to adapt and experiment with other main course recipes. We’ll also cover useful tips for enhancing flavor and understanding the nutritional aspects of your homemade creation.
Gather Ingredients for Margherita Pizza
The secret to a truly spectacular Margherita pizza lies not in complex techniques, but in the quality and freshness of its ingredients. Think fewer items, but better ones. This philosophy elevates the simple combination of dough, tomato, cheese, and basil into an unforgettable culinary experience. Taking the time to select fresh, vibrant components is arguably the most crucial step in achieving an authentic Italian taste. It ensures every bite is bursting with pure flavor.
Dough and Tomato Base
For the dough, a good quality pizza dough (store-bought or homemade) is paramount. Look for one made with 00 flour if possible, as it yields a wonderfully chewy yet crisp crust. For the tomato base, shun anything with added sugars or preservatives. Opt for San Marzano tomatoes, either canned whole and crushed by hand, or a high-quality passata. These tomatoes are celebrated for their balanced sweetness and low acidity, providing the perfect foundation for your pizza. A simple pizza sauce requires only these tomatoes, a pinch of salt, and perhaps a touch of olive oil.
Fresh Cheese and Herbs
The cheese component is unequivocally fresh mozzarella. Avoid the pre-shredded, low-moisture varieties, as they won’t melt correctly or provide the creamy texture you desire. Instead, seek out fresh buffalo mozzarella or fresh fior di latte, typically packed in water. Drain it well and pat dry before slicing to prevent a watery pizza. As for herbs, fresh basil is non-negotiable. Its vibrant, peppery aroma and flavor truly complete the Margherita profile. Add it after baking to preserve its delicate qualities.
Simple Seasoning Needs
Seasoning for Margherita pizza is minimalistic, allowing the natural flavors of the main ingredients to shine. You’ll primarily need sea salt and freshly ground black pepper. A good quality extra virgin olive oil is also vital, used for drizzling over the finished pizza to add richness and a slight fruity note. Some recipes might suggest a tiny hint of dried oregano, but traditionally, Margherita relies on basil for its herbaceous kick. Remember, less is often more when it comes to seasoning this classic dish.
Essential Tools for Your Pizza
While the ingredients are key, having the right tools can significantly enhance your pizza-making journey and ensure professional-quality results. You don’t need a full commercial kitchen setup, but a few specific items will make a world of difference in achieving that perfectly cooked crust and evenly distributed heat. These tools are often affordable and will serve you well for many future pizza nights, becoming indispensable companions in your culinary adventures.
Oven Temperature Setting
Achieving the right oven temperature is absolutely critical for a successful pizza. Pizza ovens typically reach extremely high temperatures, far exceeding a standard home oven. However, we can simulate this environment. You’ll want to preheat your oven to its highest possible setting, usually around 475°F (245°C) to 550°F (290°C). This intense heat ensures that the crust cooks quickly, becoming crisp on the outside and wonderfully chewy within, preventing a soggy base. Proper preheating is just as important as the temperature itself, allowing your baking surface to get scorching hot.
Baking Sheet or Stone
To transfer that intense heat efficiently to your pizza dough, you’ll need a suitable baking surface. A pizza stone or a pizza steel is highly recommended. These materials retain heat exceptionally well, mimicking the floor of a brick oven. Place your stone or steel in the oven while it preheats. If you don’t have one, a heavy-duty baking sheet can work, though the crust might not be as crispy. Alternatively, an inverted cast-iron pan can also be used. For an easy dinner, you might also like to check out this Crispy Parmesan Chicken with a Rich Garlic Sauce which utilizes a similar high-heat baking concept.
How to Make the Dough Ready
Preparing the pizza dough is a crucial step that sets the stage for your Margherita masterpiece. Properly handled dough will yield a light, airy, and crispy crust, while poorly managed dough can result in a dense or tough base. This section focuses on the simple yet effective techniques to get your dough perfectly shaped and ready for its delicious toppings. Remember, patience is key when working with dough, allowing its natural elasticity to guide your hands.
Flour Your Work Surface
Before you even touch the dough, generously flour your clean work surface. This prevents the dough from sticking, making it much easier to handle and shape. Use all-purpose flour or semolina flour, which adds a nice textural element. Don’t be shy with the flour; a well-dusted surface ensures the dough moves freely. You’ll also want to lightly flour your hands to prevent any stubborn sticking, making the rolling process smoother and less frustrating. This initial step is often overlooked but contributes significantly to a successful crust.
Roll Out Dough Thinly
Take your dough ball (ensure it’s at room temperature for easier handling) and begin to gently stretch or roll it out. The goal is a thin, even circle, roughly 10-12 inches in diameter for a single serving. You can use a rolling pin, but many prefer to stretch the dough by hand, working from the center outwards, leaving a slightly thicker edge for the crust. This manual stretching helps maintain the air bubbles created during fermentation, resulting in a more airy crust. Aim for a thickness that allows some light to pass through when held up. If the dough resists, let it rest for a few minutes before trying again.
Transfer to Baking Pan
Once your dough is rolled or stretched to the desired size and thinness, carefully transfer it to your prepared baking pan, pizza peel dusted with semolina, or directly onto your preheated pizza stone. If using a peel, ensure it’s well-floured to prevent sticking when sliding into the oven. Gently lay the dough down, trying to maintain its circular shape. If using a baking sheet, you might want to line it with parchment paper for easier cleanup. This step requires a delicate touch to avoid tearing the thin dough, but with practice, it becomes second nature.
Spreading Tomato Sauce Perfectly
The tomato sauce on a Margherita pizza is more than just a topping; it’s a foundational layer that provides moisture, tang, and the vibrant red color that signifies its Italian heritage. Achieving an even spread is crucial, as it impacts not only the flavor distribution but also the texture of the final baked pizza. Too much sauce can lead to a soggy crust, while too little might leave your pizza dry and lacking in essential flavor. Balance is truly the key here.
Even Layer is Key
Using the back of a spoon or a small ladle, spread the tomato sauce evenly over the dough. Start from the center and work your way outwards, leaving a clear border of about half an inch to an inch around the edge. This border will become your delightful, puffy crust. Don’t overload the pizza with sauce; a thin, consistent layer is all that’s needed to impart that fresh tomato flavor without making the base watery. Think of it as a subtle wash of color and taste, rather than a thick blanket. This careful application ensures every bite has the right balance of crust, sauce, cheese, and basil, embodying the simplicity that makes Margherita so beloved.
Arranging Mozzarella for Best Taste
The mozzarella on a Margherita pizza is more than just cheese; it’s a creamy, slightly salty element that beautifully contrasts with the tangy tomato and fresh basil. Proper arrangement of the cheese is vital for achieving that iconic melt and flavor distribution. Using fresh mozzarella, especially buffalo mozzarella or fior di latte, makes all the difference compared to its processed counterparts. Its unique texture and mild flavor are what truly define an authentic Margherita. Let’s ensure your cheese layer contributes perfectly to the overall taste and appearance.
Sliced Cheese Placement
After draining and patting your fresh mozzarella dry, slice it into thin rounds or tear it into small, irregular pieces. Avoid dicing it too small, as it might melt away too quickly. Distribute these pieces evenly over the tomato sauce. The goal is to have cheese in most bites, but not to completely cover the entire surface, allowing the red of the tomato and the green of the basil to peek through. This aesthetic balance is part of the pizza’s charm, reflecting the colors of the Italian flag. Do not overcrowd; a moderate amount ensures perfect melting without weighing down the crust. For another delicious cheesy dish, try this Creamy Baked Mac and Cheese.
Drizzle Olive Oil Lightly
Once your mozzarella is artfully placed, a light drizzle of good quality extra virgin olive oil over the top is highly recommended. This step adds a wonderful richness and depth of flavor, enhancing the overall profile of the pizza. The oil also helps in the melting process of the mozzarella and contributes to the golden browning of the crust. Be mindful not to overdo it; a delicate thread of oil is sufficient to impart its benefits without making the pizza greasy. This final touch before baking prepares your pizza for its delicious transformation in the oven.
7 Steps to Bake Your Pizza
Baking your Margherita pizza is the culmination of all your careful preparation. It’s where the individual ingredients merge into a harmonious, flavorful whole. Precision in temperature and timing is key to achieving that perfect balance of a crispy crust, bubbly cheese, and warm, juicy tomatoes. Follow these steps closely to ensure your homemade pizza emerges from the oven looking and tasting absolutely magnificent, ready to be enjoyed.
Preheat Oven First
This cannot be stressed enough: preheat your oven to its highest setting (typically 475-550°F or 245-290°C) for at least 30-60 minutes with your pizza stone or baking steel inside. A screaming hot oven is crucial for creating that desirable crisp crust. If you place your pizza into a cold or insufficiently preheated oven, the dough will cook slowly, becoming dense and soggy instead of light and airy. Patience here will be rewarded with superior texture.
Add Salt to Taste
Before placing the pizza in the oven, a final touch of sea salt can enhance the flavors. Lightly sprinkle a pinch of flaky sea salt over the toppings. This step brightens the taste of the tomato and cheese, bringing out their natural sweetness and savoriness. Be cautious not to over-salt, as the cheese and sauce already have some inherent saltiness. This small addition makes a significant difference in the overall flavor profile, ensuring a well-seasoned pizza.
Follow Baking Time
Carefully slide your pizza onto the preheated stone or baking sheet. Bake for approximately 8-12 minutes, though baking times can vary significantly based on your oven’s specific heat and the thickness of your dough. Keep a close eye on your pizza, especially during the last few minutes. The crust should be golden brown, the cheese should be melted and bubbling, and there might be some beautiful charring on the edges. Resist the urge to open the oven door too frequently, as this can cause temperature fluctuations that hinder proper baking. For another quick and easy dinner, consider making Easy Butter Chicken Recipe.
Baking Time for Golden Crust
The few minutes your Margherita pizza spends in the oven are transformative. This is where the magic happens, turning simple ingredients into a piping hot, fragrant meal. Mastering the baking time is essential for achieving the perfect texture – a crust that is crispy on the outside, tender on the inside, and toppings that are perfectly cooked without being overdone. Every oven is different, so learning to “read” your pizza is a valuable skill.
Watch for Doneness
During the baking process, keep a close watch on your pizza. The edges of the crust are your primary indicator. They should begin to puff up and turn a rich, golden brown. You might also notice some leopard-spotting, which are delicious slightly charred bubbles, a sign of high heat and good crust development. The mozzarella should be completely melted and bubbly, perhaps with a few caramelized spots where it’s had direct contact with the heat. The tomato sauce will look slightly reduced and darker in color. If one side is browning faster, carefully rotate the pizza halfway through the baking time.
Crust Should Be Golden
The ideal Margherita pizza crust is uniformly golden brown, with a satisfying crunch when you slice into it. It should not be pale or doughy, nor should it be burnt to a crisp. A beautifully golden crust indicates that the starches have caramelized properly, developing complex flavors. This perfect balance ensures that the crust acts as a sturdy yet delicious base for the delicate toppings. Once you achieve this golden hue, your pizza is ready to be removed from the oven and moved onto the next, refreshing step.
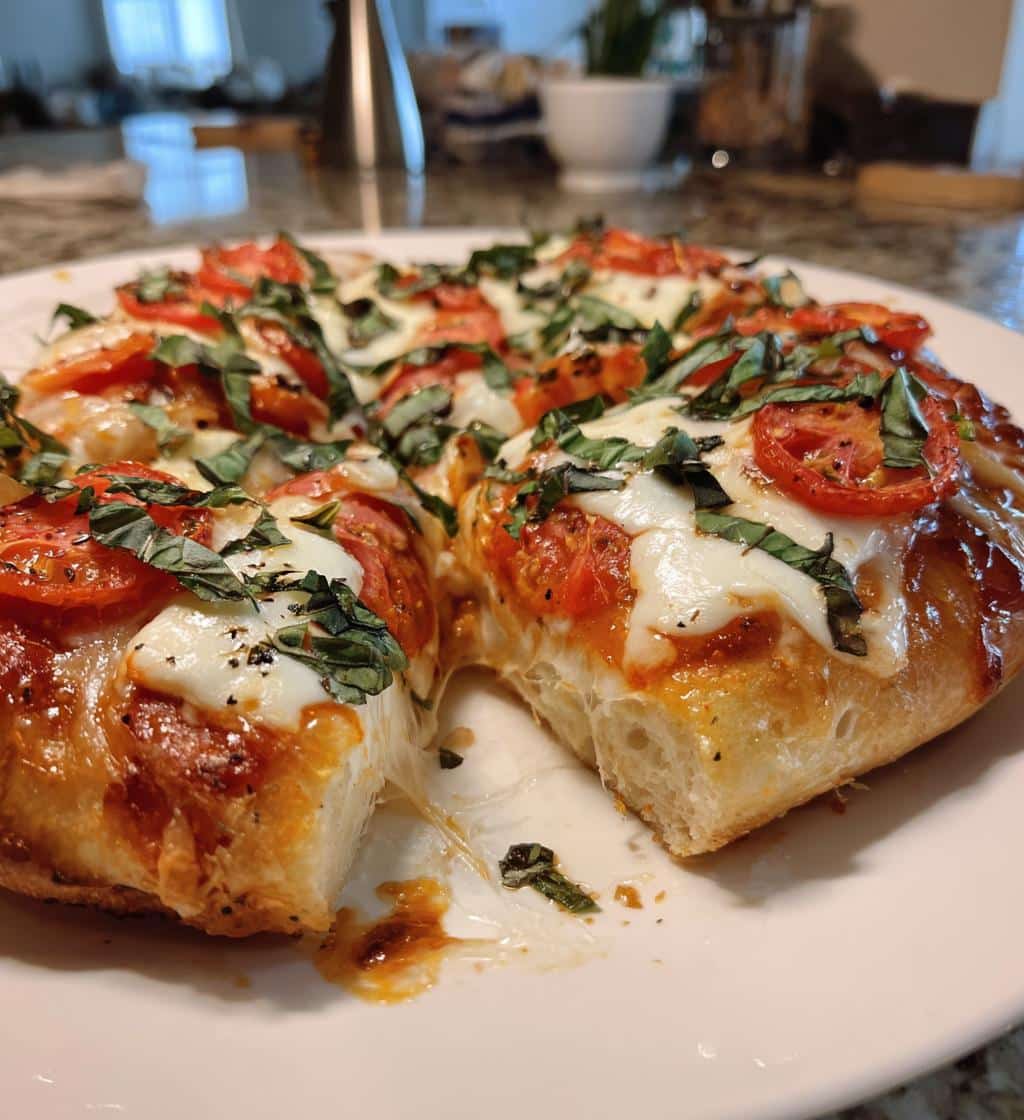
Finishing with Fresh Basil Leaves
The final touch for any authentic Margherita pizza is the addition of fresh basil leaves. This isn’t just for decoration; the basil provides a burst of fresh, peppery aroma and a vibrant green color that truly completes the dish. Adding it at the right moment is crucial to preserve its delicate flavor and prevent it from wilting or turning black under the intense heat of the oven. This last step elevates the pizza from delicious to truly exceptional.
Top After Baking
Once your pizza emerges from the oven, piping hot with a golden crust and bubbling mozzarella, it’s time for the basil. Immediately scatter fresh basil leaves over the entire surface. The residual heat from the pizza will gently warm the basil, releasing its fragrant oils without cooking it down. You can leave the leaves whole or tear them by hand for a more rustic look. This method ensures the basil retains its bright green color and fresh, aromatic punch, which is a hallmark of a classic Margherita. This small detail significantly impacts the sensory experience of the pizza.
Slice and Serve Hot
After adding the basil, let the pizza rest for just a minute or two. This brief pause allows the cheese to set slightly, making it easier to slice without everything sliding off. Use a sharp pizza cutter to slice your Margherita into wedges. Serve immediately while it’s still hot and the cheese is beautifully gooey. The combination of the hot, crispy crust, tangy tomato, creamy mozzarella, and fragrant fresh basil is a symphony of flavors and textures that is best enjoyed fresh from the oven. For more culinary inspiration, visit Carina Recipes on Pinterest.
Tips for a Flavorful Margherita Pizza
While the Margherita pizza is celebrated for its simplicity, there are always ways to subtly enhance its inherent deliciousness. These tips focus on maximizing the natural flavors of each component, ensuring that every bite is as vibrant and satisfying as possible. Small adjustments can make a big difference in elevating your homemade pizza to truly gourmet levels, impressing both yourself and your guests with its depth of taste.
Use Fresh Ingredients
This cannot be overstated. The less you process, the more the natural flavors of the produce shine. Opt for fresh mozzarella, not the pre-shredded kind. Use ripe, juicy San Marzano tomatoes, crushed by hand for texture, rather than a pre-made sauce with added sugars. Fresh basil from your garden or a local market will always surpass dried alternatives. The vibrancy of truly fresh ingredients is the cornerstone of an exceptional Margherita, allowing the inherent quality of each item to contribute to a superior taste profile. It’s the difference between a good pizza and a memorable one.
Consider Adding Oregano
While traditional Neapolitan Margherita strictly adheres to basil, some variations and personal preferences include a sprinkle of dried oregano. If you enjoy a slightly more herbaceous and robust flavor, a small pinch of dried oregano sprinkled over the tomato sauce (before the mozzarella) can add another layer of aromatic complexity. Be mindful not to overpower the delicate balance. A little goes a long way. This addition can provide a wonderful counterpoint to the sweet tomatoes and creamy cheese, offering a subtly different yet equally delicious take on the classic. You can also find more delicious ideas on Carina Recipes Instagram.
Understanding Pizza Nutrition Facts
When you enjoy a homemade Margherita pizza, it’s natural to wonder about its nutritional contribution. While often perceived as an indulgence, a carefully prepared Margherita with fresh, whole ingredients can be a surprisingly balanced meal. Understanding its nutritional values allows you to appreciate it not just as a delicious treat, but also as part of a varied diet. This section aims to provide a general overview, as exact figures can vary widely based on portion size and specific ingredient choices.
Calories Per Serving
The caloric content of a Margherita pizza can vary based on the size of the pizza, the thickness of the crust, and the amount of cheese and oil used. On average, a serving (typically a quarter or a third of a 10-12 inch pizza) might range from 300 to 450 calories. This makes it a reasonable option for a meal, especially when compared to other main course dishes. Focusing on a thin crust and moderate cheese portions can help manage the calorie count while still enjoying the full flavor profile of this Italian classic. Adjusting your serving size is also an effective way to manage intake.
Key Nutritional Values
A Margherita pizza provides several key nutrients. The dough offers carbohydrates for energy, while fresh mozzarella contributes protein and calcium, essential for bone health. Tomatoes are a good source of vitamins C and K, as well as antioxidants like lycopene. Olive oil provides healthy monounsaturated fats. While it contains some saturated fat from the cheese and varying amounts of sodium, choosing fresh ingredients and controlling portions can help balance these aspects. It’s a meal that delivers both satisfaction and a range of beneficial components, especially when made with care and high-quality components.
Enjoy Your Homemade Margherita Pizza
After all your careful work, from gathering ingredients to perfectly baking your pie, the best part is finally here: savoring your homemade Margherita pizza. This dish is more than just food; it’s an experience, a celebration of simple flavors and a testament to the joy of cooking. Share it, relish it, and take pride in what you’ve created. There’s nothing quite like the taste of a fresh, hot pizza straight from your own oven, especially one crafted with love and attention to detail.
Serves Two Easily
A standard 10-12 inch Margherita pizza is often perfect for two people to share, making it an ideal meal for a cozy dinner date or a relaxed evening at home. The rich flavors and satisfying textures ensure that each person feels comfortably full without being overly stuffed. If you’re planning a larger gathering, consider making multiple pizzas or pairing it with a simple salad to round out the meal. It’s designed for sharing, encouraging conversation and connection over delicious food.
Perfect for Sharing
The communal nature of pizza makes it inherently perfect for sharing. Lay it out, let everyone grab a slice, and enjoy the collective experience. Its universal appeal makes it a fantastic choice for any occasion, from casual weeknights to celebratory gatherings. The simplicity of Margherita means it pairs well with a variety of beverages, from a crisp white wine to a classic soda. So, invite someone over, put on some music, and delight in the shared pleasure of your perfectly crafted, authentic homemade Margherita pizza. Enjoy every single bite!