
Recreate this easy school pizza recipe to bring back those beloved cafeteria lunch memories. This homemade pizza recipe is a simple, satisfying way to enjoy a classic comfort food. With a flavorful crust, seasoned ground beef, and melty cheese, it’s a perfect family dinner that’s surprisingly easy to make.
Key Takeaways
- Enjoy a classic, homemade school pizza with simple ingredients.
- Follow clear steps for dough, sauce, and assembly for best results.
- Perfect for family dinners, meal prepping, and nostalgic cravings.
- Tips for storing leftovers and customizing toppings are included.
School pizza is a simple pleasure. It evokes happy lunch break memories. Now you can make it at home. It’s easier than you think. Your family will truly love it.
Recreate This Easy School Pizza Recipe
Bringing the taste of childhood cafeteria lunches right into your kitchen is easier than you think with this fantastic homemade school pizza recipe. There’s something undeniably comforting and nostalgic about those rectangular slices of pizza, and now you can recreate that exact experience for your family. This recipe is designed to be straightforward, using readily available ingredients, ensuring a delicious and satisfying meal that will transport you back to simpler times. It’s a wonderful option for a fun weekend cooking project or a comforting weeknight dinner.
We’ve structured this recipe to break down each step, from preparing the dough to assembling and baking, making it accessible for cooks of all skill levels. Get ready to impress your family and friends with a dish that combines simplicity with incredible flavor, rivaling any store-bought alternative. This classic school pizza is not just a meal; it’s a trip down memory lane, offering a taste of tradition and warmth with every bite. If you’re looking for more comforting dinner ideas, explore our other recipes.
Prep Time: 25 Minutes
The active preparation time for this school pizza recipe is surprisingly short. You’ll spend about 25 minutes actively mixing ingredients, shaping the dough, and assembling your pizza. This includes creating the simple sauce and browning the ground beef. The efficiency of this recipe makes it an ideal candidate for busy evenings when you crave a homemade meal without spending hours in the kitchen. Having your ingredients measured out beforehand will streamline this process even further.
Cook Time: 20 Minutes
Once assembled, your school pizza bakes quickly in a hot oven, typically requiring only 20 minutes. This fast cook time means you won’t have to wait long to enjoy your delicious creation, delivering hot, cheesy, and perfectly cooked pizza in under half an hour. The quick cooking also helps achieve that desirable crispy crust and bubbly, golden cheese that is characteristic of the classic cafeteria style pizza.
Serves 8 Pizza Slices
This recipe yields a generous amount, typically cutting into 8 substantial rectangular slices, much like the ones you remember from your school days. It’s perfect for feeding a family or a small group, with enough to go around. Each slice offers a satisfying portion of crust, savory beef, and melted cheese. For larger gatherings, consider doubling the recipe to ensure everyone gets to enjoy this beloved nostalgic treat.
Gathering Ingredients for School Pizza
Creating this easy school pizza recipe starts with assembling the right ingredients. The beauty of this dish lies in its simplicity and the use of common pantry staples. You won’t need any exotic or hard-to-find items, just fresh, quality components that come together to form that distinct, beloved flavor profile. Having everything ready before you start cooking makes the process smooth and enjoyable, ensuring you can focus on the fun of assembly rather than searching for ingredients.
The combination of a tender, yet sturdy crust, a subtly sweet and savory tomato sauce, and a topping of perfectly seasoned ground beef and melty cheese is what truly defines this cafeteria-style classic. Don’t underestimate the impact of simple ingredients when they are thoughtfully combined. For a broader understanding of this popular dish, you can always check out the Wikipedia page on pizza.
Dough Essentials You Need
The foundation of any great pizza is its dough, and for our school pizza, we’re aiming for a sturdy yet tender crust that can hold up to the generous toppings. You’ll need all-purpose flour, active dry yeast, warm water (not hot, to activate the yeast properly), a touch of sugar to feed the yeast, salt for flavor, and olive oil for richness and a golden crust. These basic ingredients will create a dough that’s easy to work with and delivers that classic, slightly chewy texture you remember.
Flavorful Sauce Components
The sauce is where much of the classic school pizza flavor comes from. Our recipe calls for a simple yet incredibly flavorful combination of canned crushed tomatoes (or tomato sauce for a smoother consistency), a pinch of sugar to balance the acidity, dried oregano and basil for aromatic depth, garlic powder for a savory kick, and a little salt and pepper to taste. This minimalist approach allows the natural sweetness of the tomatoes to shine through, creating a robust base without overwhelming the other components.
Meat and Cheese for Topping
For the quintessential school pizza experience, lean ground beef is the star topping. It’s browned and seasoned to perfection, adding a savory, hearty element to each slice. Alongside the beef, shredded mozzarella cheese is indispensable. Mozzarella melts beautifully, creating that irresistible gooey, stretchy texture and a rich, creamy flavor. Some recipes might also include a sprinkle of cheddar or provolone for added complexity, but pure mozzarella captures the authentic cafeteria feel. Ensure your ground beef is well-drained for the best results.
Making Dough for Your School Pizza
Crafting the dough for your school pizza is a surprisingly simple and rewarding process. Don’t be intimidated if you’re new to baking; this recipe is designed to be user-friendly, yielding a reliable and delicious crust every time. The key is to pay attention to the temperature of your water and allow the yeast sufficient time to activate. A good dough provides the perfect canvas for your flavorful sauce and toppings, making all the difference in achieving that authentic cafeteria taste. This foundational step is crucial for an enjoyable baking experience.
Combining Dry Ingredients
In a large mixing bowl, start by whisking together the dry ingredients: the all-purpose flour, a teaspoon of salt, and a tablespoon of sugar. The sugar not only adds a subtle sweetness to the crust but also helps to activate the yeast, providing it with fuel to create a light and airy texture. Ensure these components are thoroughly combined so the salt and sugar are evenly distributed throughout the flour, contributing to a consistently flavored dough. This simple step lays the groundwork for a well-balanced crust.
Mixing Wet into Dry
Next, in a separate bowl or measuring cup, combine the warm water (around 105-115°F, or comfortably warm to the touch) with the active dry yeast. Let it sit for about 5 minutes until it becomes foamy, indicating the yeast is active. Then, pour this yeast mixture and the olive oil into the dry ingredients. Stir everything together with a sturdy spoon or your hands until a shaggy dough forms. At this point, turn the dough out onto a lightly floured surface and knead for 5-7 minutes until it’s smooth and elastic. If the dough is too sticky, add a little more flour, one tablespoon at a time.
Pressing Dough in Pan
Once your dough is ready, lightly grease a large rectangular baking sheet (approximately 13×18 inches) with olive oil. Transfer the dough to the center of the pan. Using your fingertips, gently press and stretch the dough evenly across the entire surface of the pan. It might try to spring back initially; if so, let it rest for 5-10 minutes before continuing to press it to the edges. This resting period allows the gluten to relax, making the dough more pliable. Aim for an even thickness across the entire pan for consistent baking.
Preparing the Classic School Pizza Sauce
The sauce for this school pizza is intentionally straightforward, designed to capture the essence of those beloved cafeteria flavors without unnecessary complexity. It’s not about gourmet ingredients, but rather a harmonious blend that creates a comforting, familiar taste. This simple tomato sauce serves as the perfect tangy and savory counterpoint to the rich beef and cheese, making each bite balanced and delicious. It’s a quick component to prepare, ensuring you can have your pizza assembled in no time.
Blending Sauce Ingredients
To prepare the sauce, combine your canned crushed tomatoes (or tomato sauce for a super smooth base) with a pinch of granulated sugar. The sugar is crucial here as it helps to cut the acidity of the tomatoes, providing that subtle sweetness that was often present in school cafeteria pizza. Add dried oregano and basil for their classic Italian aromatics, along with a dash of garlic powder for a savory depth. A little salt and freshly ground black pepper to taste will round out the flavors. You can either vigorously whisk these ingredients together in a bowl or use an immersion blender for an extra smooth consistency, though blending is optional.
Simmering for Rich Flavor
While the sauce can be used immediately, a brief simmer really helps to meld the flavors and develop a richer, more cohesive taste. Transfer your blended sauce mixture to a small saucepan and bring it to a gentle simmer over low heat. Let it cook for about 10-15 minutes, stirring occasionally, until it thickens slightly and the flavors have had a chance to deepen. This step is key to transforming simple ingredients into a robust and satisfying sauce that will elevate your homemade school pizza to truly authentic levels. Once simmered, allow it to cool slightly before spreading it over your pizza dough.
Cooking Ground Beef for Pizza
The savory ground beef topping is a cornerstone of the classic school pizza, providing a hearty and flavorful element that pairs perfectly with the tomato sauce and cheese. Proper cooking of the beef ensures it’s tender, well-seasoned, and not greasy, contributing to the overall deliciousness of your homemade pie. This step is quick and straightforward, requiring only a few minutes on the stovetop before the beef is ready to be layered onto your pizza. For more information on this versatile ingredient, you might want to visit the Wikipedia page for ground beef.
Browning the Beef Evenly
Start by placing your lean ground beef in a large skillet over medium-high heat. Break it apart with a spoon as it cooks. Stir frequently, ensuring the beef browns evenly on all sides, losing its raw, pink color and developing a nice, caramelized crust in places. This even browning is crucial for developing deep flavor. Avoid overcrowding the pan, as this can steam the beef instead of browning it; if you’re making a very large batch, consider cooking it in two stages.
Draining and Seasoning Meat
Once the ground beef is fully browned, carefully drain off any excess grease. This step is important to prevent your pizza from becoming soggy. You can do this by tilting the skillet and spooning out the fat, or by transferring the beef to a colander lined with paper towels. After draining, return the beef to the skillet. Season generously with a pinch of salt, black pepper, and garlic powder to enhance its savory profile. Stir well to combine the seasonings. Allow the seasoned beef to cool slightly before spreading it over the pizza sauce.
Assembling Your Easy School Pizza
With your dough pressed into the pan, the sauce simmered, and the ground beef cooked, it’s time for the exciting part: assembling your easy school pizza. This stage allows you to bring all the delicious components together, building layers of flavor that will bake into a cohesive and incredibly satisfying meal. The order of assembly is important for achieving that perfect balance of crispiness and melty goodness, reminiscent of the nostalgic cafeteria classic. Assembling your pizza is a fun step, bringing you closer to enjoying your creation.
Pre-Baking the Crust
For a truly authentic school pizza experience with a perfectly crisp crust that doesn’t get soggy under the toppings, a quick pre-bake of the dough is essential. Once your dough is pressed into the baking sheet, place it in a preheated oven (set according to the main baking instructions) for about 5-7 minutes. This short burst of heat helps to set the crust, giving it a head start on crispiness before the sauce and toppings are added. The crust should be lightly golden and firm to the touch but not fully cooked. Remove from the oven and prepare for layering.
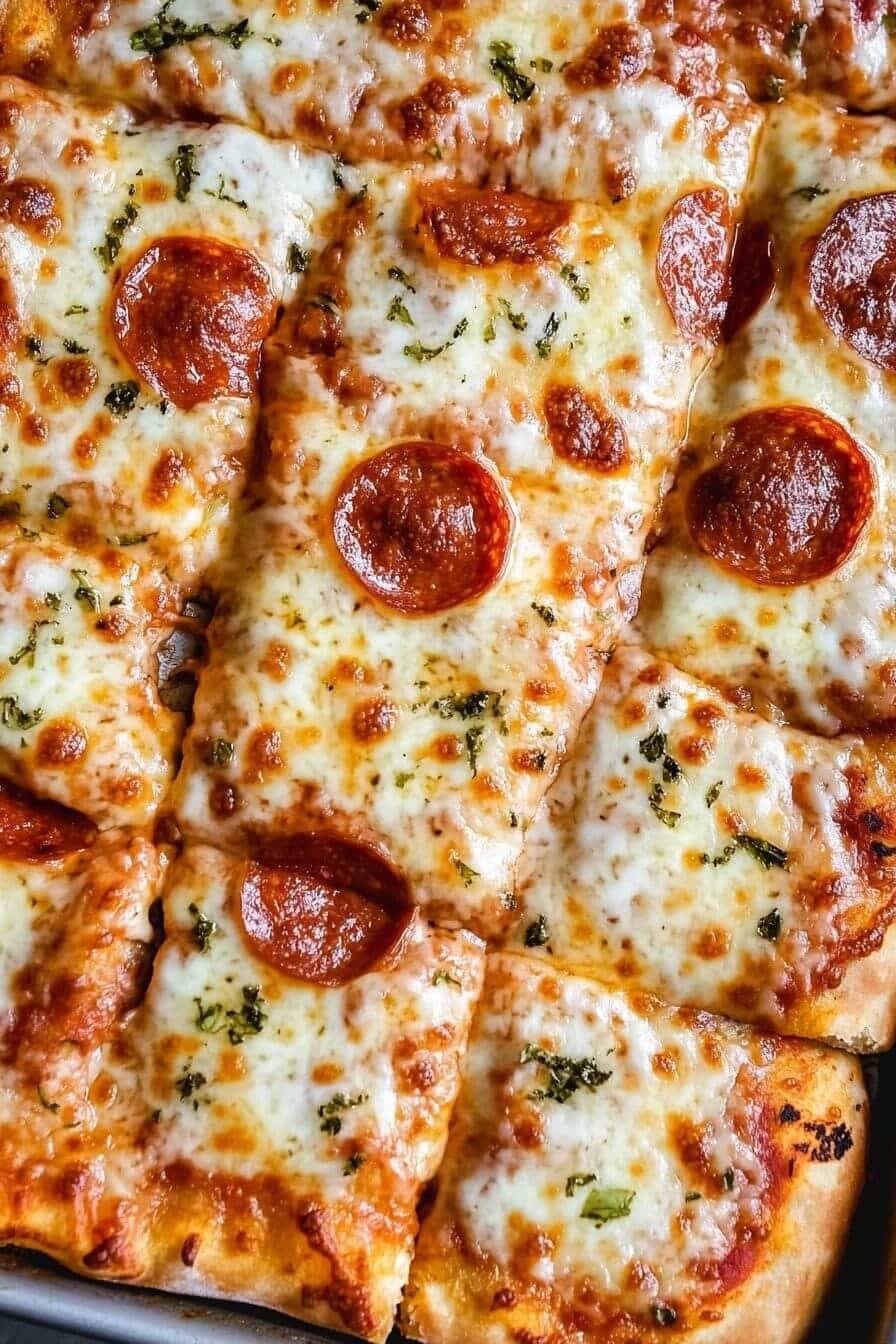
Layering Sauce, Beef, Cheese
Now, it’s time to build your masterpiece. First, spread an even layer of your classic school pizza sauce over the pre-baked crust, making sure to leave a small border for the crust. Next, evenly scatter the seasoned, cooked ground beef across the sauce. Ensure the beef is distributed well so every slice gets a good amount. Finally, generously sprinkle shredded mozzarella cheese over the beef. The cheese will melt into a glorious golden blanket during baking, creating the signature look and taste of cafeteria-style pizza. For another comforting family meal, consider trying this cheesy chicken and rice casserole.
Baking Your Cafeteria Style Pizza
The final step in recreating your easy school pizza is the baking process. This crucial stage transforms your assembled ingredients into a bubbly, golden, and incredibly aromatic dish. Baking at the correct temperature and for the right duration is key to achieving that perfectly crisp crust and deliciously melted, slightly browned cheese that defines a classic cafeteria-style pizza. Keep a close eye on your oven, as every oven can vary slightly, to ensure your pizza reaches its optimal state of deliciousness.
Setting Oven to 475°F
Preheat your oven to a high temperature of 475°F (245°C). The high heat is vital for achieving a quick bake that crisps the crust beautifully and melts the cheese rapidly without drying out the toppings. Ensure your oven is fully preheated before placing the pizza inside; using an oven thermometer can help verify the accurate temperature. A hot oven creates a professional-quality crust that’s both tender and delightfully crunchy, just like you remember from school lunches.
Checking for Golden Cheese
Once the oven reaches temperature, carefully slide your assembled pizza into the hot oven. Bake for approximately 12-18 minutes. The exact time may vary based on your oven and the thickness of your crust and toppings. Keep a watchful eye on it, especially during the last few minutes. You’re looking for the cheese to be completely melted, bubbly, and a beautiful golden-brown color, with the edges of the crust turning a deep golden hue and becoming visibly crisp. If you notice the crust browning too quickly, you can loosely tent the pizza with foil. Remove the pizza from the oven once it reaches this perfect state.
Serving Hot School Pizza Squares
The moment your easy school pizza emerges from the oven, golden and bubbling, it’s truly a sight to behold. However, resisting the immediate urge to slice into it is an important step to ensure the best possible texture and eating experience. Properly serving your hot school pizza squares is all about preserving its delicious integrity, allowing you and your family to enjoy every single bite of this nostalgic treat. Get ready to enjoy the fruits of your labor, bringing those beloved school day memories to life.
Resting Before You Slice
Once your hot school pizza is out of the oven, it’s crucial to let it rest on the baking sheet for 5-10 minutes before attempting to slice it. This resting period allows the cheese to set slightly, preventing it from sliding off with the first cut and ensuring that the crust maintains its crispness. It also helps the internal temperatures of the toppings to equalize, resulting in a more cohesive and pleasant eating experience. Patience here is a virtue that will be rewarded with perfect slices.
Enjoying Warm Pizza
After resting, transfer the pizza to a cutting board. Using a sturdy pizza cutter or a large chef’s knife, cut the pizza into squares, just like they did in the cafeteria! This square cut is part of the authentic school pizza charm. Serve the warm pizza immediately. The combination of the crisp crust, tangy sauce, savory beef, and gooey cheese is best enjoyed fresh out of the oven. This homemade version offers all the comfort and flavor of your childhood favorites. Don’t forget to share your delicious creation with us on Pinterest and Instagram!
Tips for Best School Pizza Recipe
While this easy school pizza recipe is straightforward, a few clever tips can elevate your homemade version from great to absolutely outstanding, ensuring it truly captures the essence of those nostalgic cafeteria lunches. These suggestions are designed to enhance convenience, maximize flavor, and even offer flexibility, allowing you to tailor the recipe to your preferences and lifestyle. Incorporating these simple tricks will ensure you consistently achieve the best possible results, making your family dinners a cherished experience.
Making Ahead for Speed
To make weeknight meal prep even quicker, you can prepare certain components of your school pizza in advance. The pizza dough can be made a day ahead and stored in an airtight container in the refrigerator; just let it come to room temperature for about 30 minutes before pressing into the pan. Similarly, the pizza sauce can be prepared and refrigerated for up to 3-4 days, allowing its flavors to deepen. Even the ground beef can be cooked and seasoned ahead of time. This pre-preparation drastically cuts down on active cooking time on busy days, making this classic school lunch accessible any night of the week. This approach also works well for a dish like easy honey garlic chicken.
Adding Other Toppings
While ground beef and cheese are the traditional school pizza toppings, feel free to get creative and customize your pizza. Sautéed onions, bell peppers, or mushrooms can add extra flavor and nutrition. Pepperoni slices are a classic addition that many enjoy. You could even add some cooked sausage or swap the ground beef for ground turkey for a lighter option. Just ensure any vegetable toppings are thinly sliced or pre-cooked to prevent them from making the pizza soggy. Have fun experimenting with your favorite combinations to make this recipe uniquely yours. For a twist on another classic, you might enjoy this creamy baked mac and cheese.
Storing Leftover School Pizza Slices
One of the best things about making a large, rectangular school pizza is the potential for delicious leftovers. Whether you’re planning for lunches the next day or saving some for a future craving, proper storage is key to maintaining the quality and flavor of your pizza. With the right methods, your leftover slices will taste almost as good as they did fresh from the oven, offering a convenient and satisfying meal whenever hunger strikes. Don’t let a single delicious slice go to waste!
Fridge Storage up to 3 Days
To store leftover school pizza in the refrigerator, allow the slices to cool completely to room temperature first. Then, place them in an airtight container or wrap individual slices tightly in aluminum foil or plastic wrap. This will protect them from drying out and absorbing other odors from the fridge. Stored this way, your pizza slices will remain fresh and delicious for up to 3 days. Reheat slices in a toaster oven, air fryer, or a hot skillet for the best crispy results.
Freezing for Longer Keeping
If you’ve made a large batch or want to save some pizza for a later date, freezing is an excellent option. Once the pizza has cooled completely, wrap individual slices tightly in plastic wrap, then again in aluminum foil. Place the wrapped slices in a freezer-safe bag or container. Frozen school pizza can be kept for up to 1-2 months. To reheat, you can bake the frozen slices directly in a preheated oven (around 375°F/190°C) until heated through and crispy, or microwave them if you’re in a hurry, though the crust won’t be as crisp.
Nutrition for Your School Pizza
Understanding the nutritional aspects of your homemade school pizza can help you enjoy this comforting meal as part of a balanced diet. While this recipe delivers classic flavor, making it at home allows for better control over ingredients compared to processed alternatives. The exact nutritional values will vary based on the specific brands of ingredients you choose and any modifications you make, but a general estimation can provide helpful insights into your intake.
Calories Per Serving
Estimating calories per serving for homemade dishes can be approximate, but for this easy school pizza recipe (which yields 8 slices), each serving typically ranges from 350-450 calories. This figure accounts for the dough, sauce, lean ground beef, and mozzarella cheese. Factors like the amount of olive oil used in the dough, the fat content of the beef, and the quantity of cheese can influence the final count. For a precise calculation, you can input your specific ingredient quantities into a reliable online nutrition calculator. This homemade version often offers more protein and fiber than many fast-food options.
Why You’ll Love This Recipe
There are countless reasons to fall in love with this easy school pizza recipe. Beyond its simplicity and the joy of creating something delicious from scratch, it taps into a deep well of nostalgia and comfort. This isn’t just another pizza recipe; it’s an invitation to relive cherished memories and create new ones around the dinner table. It’s a guaranteed crowd-pleaser that satisfies on multiple levels, making it a valuable addition to your recipe rotation.
Simple, Satisfying Meal
This recipe truly excels as a simple, satisfying meal that requires minimal fuss but delivers maximum flavor. The steps are easy to follow, and the ingredients are readily available, making it an approachable project for any cook. The combination of a robust crust, tangy sauce, savory ground beef, and melty cheese creates a dish that is hearty and incredibly fulfilling. It’s the perfect solution for a comforting dinner without the complexity often associated with homemade pizza. Your family will appreciate the effort and adore the taste.
Tastes Like School Days
Perhaps the biggest appeal of this recipe is its uncanny ability to transport you straight back to your school cafeteria days. That distinct flavor and texture – the slightly chewy, sturdy crust, the sweet-savory sauce, and the perfectly browned beef and cheese – are faithfully recreated. It’s more than just food; it’s a sensory journey that evokes happy memories of lunch breaks and childhood friendships. This pizza isn’t just a meal; it’s a nostalgic treat that brings joy and a smile to everyone who tries it. Share your recreated school pizza memories with us on Instagram!