
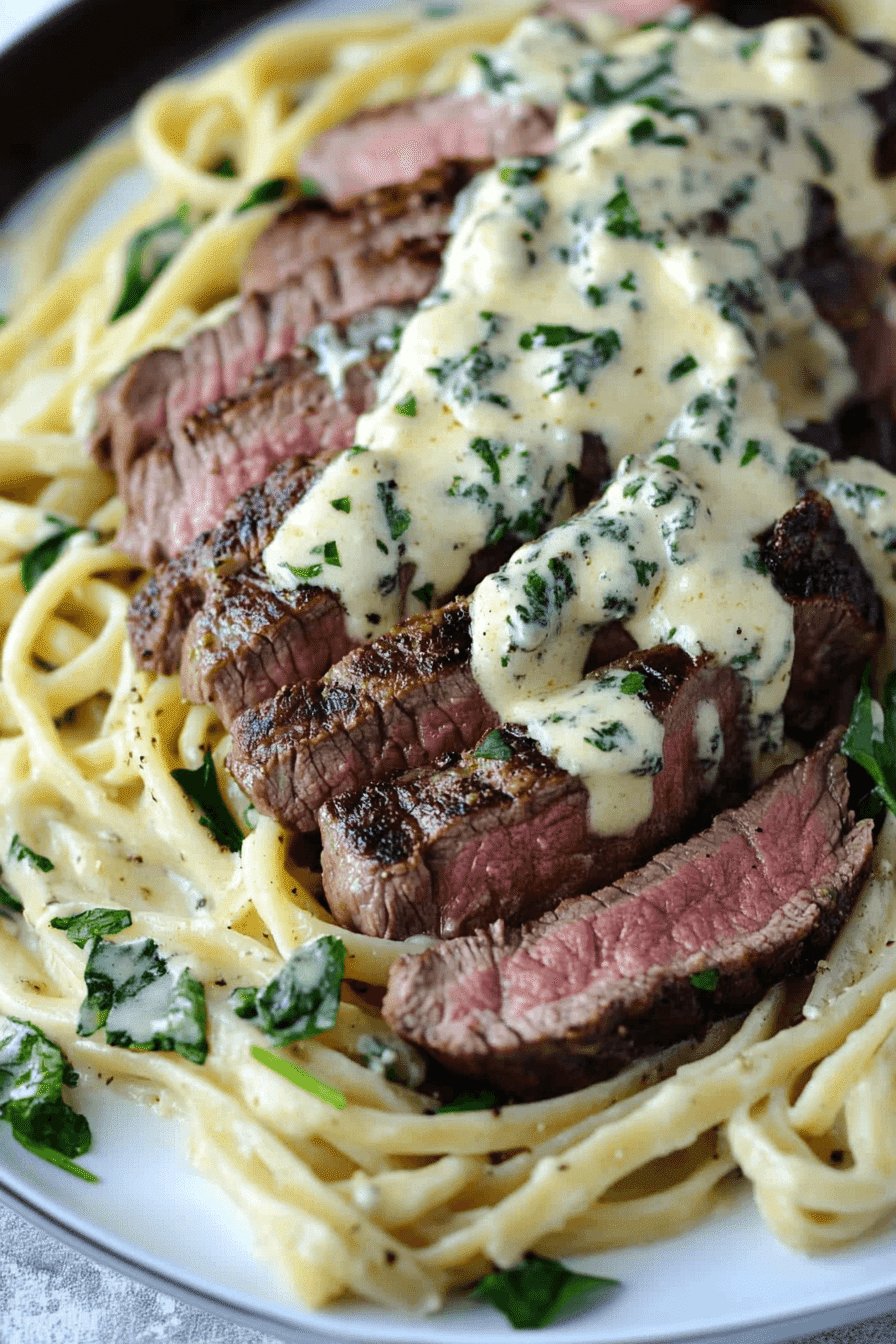
Double Crunch Honey Garlic Chicken offers an irresistible combination of crispy texture and sweet, savory flavor. This popular chicken recipe provides a delightful twist on a classic, perfect for any weeknight meal. Learn how to create this amazing dish, featuring golden brown chicken coated in a delicious homemade sauce.
Key Takeaways
- Master crispy frying techniques for a perfect double crunch.
- Craft a flavorful honey garlic marinade and a rich, savory glaze.
- Ensure correct oil temperature is key to achieving optimal crispiness.
- Learn expert tips for serving, garnishing, and storing your delicious creation.
Achieving perfect crunch is simple. Frying at the right temperature matters. A rich glaze adds incredible depth. This chicken recipe will impress. Enjoy every savory bite.
Making Delicious Honey Garlic Chicken
Get ready to elevate your dinner game with our incredible Double Crunch Honey Garlic Chicken. This isn’t just any fried chicken; it’s a culinary experience that brings together irresistible textures and a harmonious blend of flavors. We’ll guide you through every step to ensure your chicken achieves that sought-after crispy exterior and juicy interior, all bathed in a delectable homemade sauce. This dish truly stands out, transforming a simple meal into something extraordinary.
Why This Dish Is Special
This honey garlic chicken recipe is truly special because it promises a profound sensory experience. Unlike other versions, our method focuses on achieving a pronounced “double crunch” that makes every bite satisfying. The balance of sweet honey with pungent garlic creates a savory glaze that clings perfectly to the chicken, offering a burst of flavor with each mouthful. It’s a dish that satisfies cravings for something hearty, flavorful, and incredibly comforting, making it a favorite for family dinners or entertaining guests. The preparation, while detailed, is designed for success, ensuring even novice cooks can achieve restaurant-quality results at home. For more on chicken as a culinary staple, consider exploring its rich history on Wikipedia’s Chicken as Food page.
Quick Prep, Amazing Flavor
Despite its impressive outcome, the actual prep time for this Double Crunch Honey Garlic Chicken is surprisingly manageable, fitting perfectly into your routine as an easy weeknight meal. The magic happens through strategic marinating and a clever coating process. You’ll spend minimal time actively cooking, allowing the flavors to develop and the textures to perfect themselves. The reward is a dish bursting with amazing flavor—a rich, aromatic, and tangy honey garlic glaze that coats every piece of crispy chicken. The initial investment in preparation pays off immensely, leaving you with a meal that feels gourmet but is entirely attainable in your own kitchen. This thoughtful approach ensures maximum flavor impact with efficiency, proving that extraordinary meals don’t always require hours of work.
Gather Ingredients for Crunchy Chicken
Starting with the right ingredients is fundamental to crafting the perfect Double Crunch Honey Garlic Chicken. Quality components ensure that the flavors are vibrant and the textures are spot-on. We’re looking for fresh, robust ingredients that will contribute to both the savory depth of the sauce and the delightful crispiness of the chicken. Having everything prepped and measured before you begin will make the cooking process smooth and enjoyable, eliminating any last-minute rushes.
Chicken Thighs and Sweet Honey
For this chicken recipe, we highly recommend using bone-in, skin-on chicken thighs. Chicken thighs are inherently more flavorful and forgiving than breasts, staying juicy and tender even through the frying process. The skin is absolutely crucial for achieving that desired “double crunch” when fried. Alongside your chicken, you’ll need a good quality honey for the sweet component of our homemade sauce. Look for a pure, natural honey; its rich sweetness balances the garlic and other spices beautifully. Other key liquid ingredients include soy sauce for umami, rice vinegar for a slight tang, and minced garlic for its aromatic punch.
Spices, Flour, and Oil Ready
The dry ingredients are just as important for building layers of flavor and, of course, the crispy coating. You’ll need all-purpose flour for dredging, along with cornstarch to enhance the crispiness—this is a secret to our double crunch! Essential spices include salt, black pepper, and paprika, which add a subtle warmth and color to the coating. For frying, a neutral oil with a high smoke point is essential, such as vegetable, canola, or peanut oil. Ensure you have enough oil to submerge the chicken pieces adequately for even frying. Having all these items measured and ready at hand will streamline your cooking process for this fantastic main course.
Marinating Your Honey Garlic Chicken
The marinade is where the magic truly begins for our Honey Garlic Chicken, infusing each piece with incredible flavor long before it hits the hot oil. This crucial step not only tenderizes the chicken but also lays the foundation for the sweet and savory glaze that will coat it later. A well-marinated chicken ensures that every bite is bursting with the distinctive taste of honey and garlic, making the final dish exceptionally delicious and memorable.
Combine Sauce Ingredients
Start by preparing your vibrant marinade. In a medium-sized bowl, whisk together the honey, soy sauce, rice vinegar, and plenty of freshly minced garlic. You can also add a touch of grated fresh ginger for an extra layer of aromatic complexity if you desire. A pinch of red pepper flakes can introduce a subtle warmth without making the dish overtly spicy. Ensure all ingredients are thoroughly combined, creating a homogeneous homemade sauce that is both fragrant and balanced. This mixture will serve dual purposes: first as a marinade, and later, a portion of it will be transformed into your luscious glaze.
Soak Chicken for Rich Flavor
Once your marinade is ready, add your prepared chicken thighs to the bowl. Make sure each piece is fully coated in the mixture. Gently toss the chicken to ensure maximum contact with the flavorful liquid. For optimal results and truly rich flavor, cover the bowl and refrigerate the chicken for at least 30 minutes, or ideally, for 2-4 hours. If time permits, an overnight marinade can yield even deeper flavor penetration. This soaking period allows the chicken to absorb the sweet, tangy, and garlicky notes, preparing it perfectly for the subsequent frying and glazing steps. It’s a key factor in developing the overall deliciousness of this chicken recipe, setting it apart from quickly prepared dishes. Don’t forget to reserve some of the marinade (before adding chicken) to use for your glaze later!
Preparing the Crispy Chicken Coating
Achieving the signature “double crunch” in our Double Crunch Honey Garlic Chicken hinges significantly on the coating process. This isn’t just a simple dredge; it’s a carefully designed method to create layers of crispy texture that will withstand the frying process and cradle the delicious savory glaze. The combination of ingredients in our coating ensures a golden, crunchy exterior that contrasts beautifully with the tender, juicy meat inside. Pay close attention to these steps for the best possible results.
Mix Flour, Salt, Paprika
In a shallow dish or a large resealable bag, combine your dry coating ingredients. This includes all-purpose flour, cornstarch (which is key for extra crispiness), salt, black pepper, and paprika. The paprika not only adds a beautiful color to your fried chicken but also contributes a mild, smoky undertone that complements the honey garlic flavors. Whisk or shake these ingredients together until they are thoroughly mixed and evenly distributed. This dry mixture creates the foundational layer for the crispy chicken, ensuring a robust coating that will adhere well during frying chicken.
Dredge Chicken Evenly
Now comes the crucial part: dredging. Remove the marinated chicken from the refrigerator, allowing any excess marinade to drip off slightly. One piece at a time, place the chicken into the dry flour mixture. Press the mixture firmly onto all surfaces of the chicken, ensuring it’s completely coated. You want a thick, even layer—this is what contributes to the double crunch. Shake off any major excess, but don’t be afraid to really pack on that flour mixture. Set the dredged chicken aside on a wire rack while you prepare the next pieces. This resting period allows the coating to slightly hydrate and adhere better to the chicken, preventing it from flaking off during frying. Repeat until all chicken pieces are coated. This careful dredging is a fundamental step toward achieving that perfect crunch.
Heating Oil for Perfect Frying
The success of your Double Crunch Honey Garlic Chicken, particularly its enviable crispiness, largely depends on one critical factor: the oil temperature. Frying chicken requires precise heat to ensure it cooks through evenly, develops a golden brown crust, and achieves that irresistible crunch without becoming greasy or overcooked. Rushing this step or neglecting the temperature can lead to disappointing results, so pay close attention to the details.
Get Oil to 350°F
Pour your chosen frying oil (vegetable, canola, or peanut oil are ideal) into a heavy-bottomed pot or a deep cast-iron skillet. You’ll need enough oil to ensure the chicken pieces are at least halfway submerged, ideally more, for even cooking. Attach a deep-fry thermometer to the side of the pot, ensuring the tip doesn’t touch the bottom. Slowly heat the oil over medium-high heat until it reaches a steady 350°F (175°C). This specific temperature is crucial. If the oil is too cold, the chicken will absorb too much oil and become greasy; if it’s too hot, the exterior will burn before the interior is cooked. Consistency here is paramount for perfect frying chicken. This crispy chicken recipe relies on precise oil temperatures for its best results.
Fry in Small Batches
Once your oil reaches the target temperature, it’s vital to fry the chicken in small batches. Overcrowding the pot will drastically drop the oil temperature, leading to soggy, poorly cooked chicken. Depending on the size of your pot, fry 2-3 pieces at a time, ensuring there’s plenty of space around each piece. This allows the oil to maintain its heat and cook the chicken consistently. As you add chicken, the oil temperature will naturally dip; allow it to return to 350°F before adding the next batch. Patience in this step is truly when oil temp is key, as it guarantees each piece of chicken gets the attention it needs to become gloriously crispy and cooked through to perfection. Using tongs to carefully place and remove the chicken will prevent splatters and maintain safety during this delicious process.
Frying Chicken Until Golden Brown
The moment of truth for your Double Crunch Honey Garlic Chicken is during the frying process. This is where the magic of the coating, combined with the hot oil, transforms the chicken into a golden brown, irresistibly crispy masterpiece. Achieving this requires careful timing and attention to ensure the chicken is cooked through without compromising its exterior crunch or succulence. This stage is key to making sure your double crunch is truly achieved.
Cook Each Side 6-8 Minutes
Carefully lower the dredged chicken pieces into the preheated 350°F oil. Allow each side to cook for approximately 6-8 minutes, or until it reaches a beautiful golden brown hue and is deeply crispy. The exact timing can vary slightly based on the thickness of your chicken thighs and your stove’s heat consistency. Resist the urge to constantly flip the chicken; let it develop a solid crust on one side before turning it over with tongs. This steady frying chicken method ensures even cooking and a consistent crispness across the entire surface. Remember, frying in small batches prevents the oil temperature from dropping too much, maintaining that optimal cooking environment for a truly crispy chicken.
Check Internal Temperature
The visual cue of golden brown is important, but for safety and perfect doneness, always check the internal temperature of your chicken. Using a meat thermometer, insert it into the thickest part of the chicken thigh, avoiding the bone. The chicken is fully cooked when it reaches an internal temperature of 165°F (74°C). Once cooked, carefully remove the chicken from the oil and place it on a wire rack set over a baking sheet. This allows any excess oil to drain off and helps maintain the chicken’s crispiness while you finish frying the remaining batches. It’s a critical step to ensure your chicken is not only delicious but also safe to eat. For further reading on deep frying techniques, Deep Frying on Wikipedia offers valuable insights.
Crafting the Sweet Honey Garlic Glaze
While your crispy chicken rests, it’s time to create the crowning glory of this dish: the sweet and savory honey garlic glaze. This rich, sticky sauce is what ties all the flavors together, transforming the fried chicken into an utterly irresistible meal. Using a portion of the reserved marinade ensures that the glaze perfectly complements the flavors already infused in the chicken, creating a cohesive and mouthwatering experience. This is where the homemade sauce truly shines.
Simmer Leftover Marinade
In a small saucepan, pour the portion of the marinade you wisely set aside before the chicken was added. Bring this mixture to a gentle simmer over medium heat. It’s important to use a fresh portion that hasn’t touched raw chicken for food safety. If you didn’t reserve any, simply create a new batch of the marinade ingredients for your glaze. This simmering process allows the flavors to meld and intensify, preparing the sauce for its final transformation. You’ll notice the aromas becoming more pronounced as the honey and garlic heat up, creating a fragrant base for your savory glaze.
Thicken Sauce on Stove
To achieve that perfect coating consistency, you’ll need to thicken the glaze. In a separate small bowl, whisk together a tablespoon of cornstarch with two tablespoons of cold water to create a slurry. Once the marinade in the saucepan is simmering, slowly whisk in the cornstarch slurry. Continue to stir constantly as the sauce thickens. It will transform from a thin liquid into a glossy, syrupy glaze that can beautifully coat the back of a spoon. This thickening process usually takes only a few minutes. Remove the honey garlic glaze from the heat once it reaches your desired consistency – it should be thick enough to cling to the chicken but still pourable. This rich, sweet and savory sauce is what makes this dish truly exceptional, enhancing the flavorful chicken in every way.
Coating Chicken with Savory Glaze
The final step in preparing your Double Crunch Honey Garlic Chicken is the exhilarating moment of coating the perfectly fried chicken with the luscious savory glaze. This is where the dish truly comes alive, combining the textural delight of the crispy chicken with the bold, aromatic sweetness of the sauce. It’s a quick process, but one that requires a gentle touch to maintain the integrity of that hard-earned crunch.
Toss Fried Chicken Gently
Once your crispy chicken pieces have rested on the wire rack and your honey garlic glaze is perfectly thickened, it’s time to bring them together. Transfer the fried chicken into a large bowl. Pour the warm glaze over the chicken. Using tongs, gently toss the chicken pieces, ensuring each piece is thoroughly coated with the glistening sauce. The key here is to be gentle; you want to coat the chicken without bruising its delicate crispy exterior. The warmth of the glaze will slightly soften the crust, allowing it to absorb some of the rich flavors, while still retaining a satisfying crunch.
Ensure Every Piece Shines
Continue tossing until every single piece of chicken is evenly coated and shining with the glossy honey garlic glaze. You want that full, beautiful sheen on each thigh, signifying that it’s infused with the irresistible sweet and savory flavors. The goal is to create a dish where both the texture and the taste are harmoniously balanced. This quick coating process ensures that the chicken remains mostly crisp while taking on the full character of the sauce. Serve immediately to enjoy the chicken at its peak crispiness and warmth, delivering the ultimate double crunch experience.
Serving Your Crunchy Chicken Dish
After all your careful preparation, from marinating to frying chicken and glazing, the moment has arrived to present your magnificent Double Crunch Honey Garlic Chicken. The way you serve this dish can elevate the entire dining experience, adding visual appeal and complementary flavors that enhance its deliciousness. A thoughtful presentation makes this chicken recipe even more inviting and memorable for your family or guests.
Garnish with Green Onions
A simple yet effective garnish can truly make your dish pop. Once the glazed chicken is arranged on your serving platter, sprinkle generously with freshly chopped green onions. The vibrant green color provides a beautiful contrast to the golden brown chicken and the rich, savory glaze. Beyond aesthetics, green onions offer a mild, fresh, and slightly pungent flavor that cuts through the richness of the chicken and sauce, adding a delightful freshness to each bite. A scattering of toasted sesame seeds can also add another layer of texture and a nutty aroma, further enhancing the overall appeal of this crispy chicken.
Pair with Rice or Salad
To create a complete and balanced meal, consider pairing your Double Crunch Honey Garlic Chicken with appropriate side dishes. Fluffy steamed white rice or brown rice is an excellent choice, as it provides a neutral base to soak up any extra glaze and complements the Asian-inspired flavors. Alternatively, a crisp, light green salad with a simple vinaigrette can offer a refreshing counterpoint to the rich chicken, adding a healthy and vibrant element to your plate. For a heartier option, roasted vegetables or a side of sautéed broccoli would also be fantastic. The versatility of this honey garlic glaze means it pairs well with a variety of accompaniments, making it a perfect meal for any occasion.
Tips for Best Honey Garlic Chicken
To ensure every batch of your Double Crunch Honey Garlic Chicken is a resounding success, paying attention to a few critical details can make all the difference. These expert tips focus on maintaining the ideal frying conditions and handling the chicken properly after cooking, guaranteeing maximum crispiness and flavor every time. Heeding this advice will elevate your homemade version to restaurant quality.
Oil Temp is Key
We cannot stress this enough: accurate oil temperature is the single most important factor for achieving truly crispy chicken. As mentioned, maintaining the oil at a consistent 350°F (175°C) is paramount. If the oil is too cool, the chicken coating becomes greasy and soggy. If it’s too hot, the exterior will burn before the interior is cooked through. Use a reliable deep-fry thermometer and adjust your heat as needed. Frying in small batches also helps prevent drastic temperature drops. This diligent attention to detail ensures your double crunch is perfect, and the chicken is cooked safely and deliciously. Remember, oil temp is key for optimal results when frying chicken.
Let Chicken Rest After Frying
Once you remove the golden brown chicken from the hot oil, resist the urge to immediately toss it in the glaze. Instead, place the fried chicken on a wire rack set over a baking sheet. This allows excess oil to drain away, preventing the bottom from becoming soggy. More importantly, it gives the chicken a few minutes to cool slightly and for the crust to “set.” This brief resting period is crucial for maintaining that fantastic crunch even after the savory glaze is applied. A well-rested piece of fried chicken will absorb the sauce beautifully while largely retaining its textural integrity, delivering the ultimate Double Crunch Honey Garlic Chicken experience.
Ideas to Change Your Recipe
While our Double Crunch Honey Garlic Chicken recipe is fantastic as written, there’s always room to personalize and adapt it to your preferences. Don’t be afraid to experiment with different ingredients and cooking methods to make this chicken recipe uniquely yours. These ideas offer simple ways to introduce new flavors or cater to specific dietary needs, ensuring the dish remains exciting and versatile for future meals.
Try Different Chicken Cuts
While chicken thighs are recommended for their juiciness and flavor, you can certainly experiment with other cuts. For a leaner option, boneless, skinless chicken breasts can be used, though you might need to adjust frying times to prevent overcooking and dryness. Cut them into bite-sized pieces for “popcorn chicken” style bites, or use tenderloins for quick-cooking strips. Just remember that boneless cuts will require less frying time. If you prefer bone-in, drumsticks or even wings can also be adapted, offering a different eating experience while still benefiting from the delicious honey garlic glaze. Find more inspiration on our Carina Recipes Pinterest page!
Add a Spicy Kick
If you enjoy a bit of heat, incorporating a spicy kick is an excellent way to customize this sweet and savory dish. You can add more red pepper flakes to the marinade and the glaze for a subtle warmth. For a more pronounced spice, consider a dash of sriracha or your favorite hot sauce directly into the finished glaze, or even drizzle it over the chicken when serving. Finely chopped fresh chilies, such as bird’s eye chilies or jalapeños, can also be added to the marinade for an upfront heat. This modification transforms the classic honey garlic flavor into something with an exciting fiery edge, appealing to those who love a little extra zing in their meals. For more daily cooking inspiration, follow us on Instagram!
Storing Leftover Honey Garlic Chicken
While Double Crunch Honey Garlic Chicken is best enjoyed fresh off the stove, you might find yourself with delicious leftovers. Proper storage ensures your chicken remains safe to eat and retains as much of its flavor and texture as possible for future enjoyment. Even though the “double crunch” might mellow slightly upon reheating, the incredible honey garlic glaze and tender chicken will still make for a fantastic meal.
Keep in Airtight Container
To store any leftover Honey Garlic Chicken, allow it to cool completely at room temperature for no more than two hours. Once cooled, transfer the chicken pieces into an airtight container. This helps prevent them from drying out and protects them from absorbing other odors in the refrigerator. Properly stored, the chicken will remain fresh and flavorful in the refrigerator for up to 3-4 days. For optimal freshness, try to consume the leftovers within a day or two, as the crispiness of the coating will naturally diminish over time, even with careful storage.
Reheat to Stay Crispy
When reheating your leftover Honey Garlic Chicken, avoid the microwave if you want to retain any semblance of crispiness. The best method is to reheat the chicken in an oven or an air fryer. Preheat your oven to 375°F (190°C) or your air fryer to 350°F (175°C). Place the chicken pieces on a baking sheet or in the air fryer basket in a single layer, ensuring they are not overcrowded. Reheat for 10-15 minutes in the oven, or 5-8 minutes in the air fryer, or until heated through and the coating has re-crisped to your liking. This method helps bring back some of that delightful double crunch and ensures your leftover crispy chicken is as delicious as possible, making for an excellent quick lunch or dinner.