
Light Fluffy Yogurt Cloud Cake is a delightful sweet treat perfect for any occasion. This easy recipe promises a soft, airy texture that truly melts in your mouth. Follow our simple steps to create a homemade dessert that will impress everyone.
Key Takeaways
- Yogurt is the secret ingredient for an exceptionally fluffy and moist cake.
- Precise ingredient measurements and gentle mixing prevent a dense texture.
- Baking at the right temperature and avoiding overbaking ensures perfect doneness.
- Allowing the cake to cool completely is crucial for its delicate structure.
- Serving with fresh fruits or whipped cream enhances the sweet dessert experience.
Cloud cake is a special dessert. Its texture is incredibly light. Yogurt creates this unique fluffiness. Perfect for any sweet craving. You can bake it easily.
Making Light Fluffy Yogurt Cloud Cake
The journey to creating a truly exquisite dessert often begins with understanding its core characteristics. A light fluffy yogurt cloud cake is a masterpiece of texture, boasting an incredibly delicate crumb that feels like a sweet cloud melting in your mouth. Unlike traditional dense cakes, this cake offers a delightful airiness that makes it irresistible. Its unique softness comes from careful preparation and a star ingredient, making it a favorite for those who appreciate elegant, yet simple, sweet treats. The appeal lies not just in its taste, but in the delightful sensory experience it provides with every bite.
What Makes Cloud Cake Special
Cloud cake stands apart due to its ethereal texture and subtle tang. It’s often described as a hybrid between a sponge cake and a cheesecake, offering the best of both worlds without being overly rich or heavy. This distinct quality is achieved through specific techniques, including aerating the batter and incorporating ingredients that promote tenderness. The result is a cake that is remarkably moist, tender, and incredibly light, making it a refreshing option for any dessert table. It’s a dessert that feels both indulgent and surprisingly wholesome, captivating palates with its gentle sweetness and smooth finish.
Why Yogurt Makes it Fluffy
Yogurt is the secret weapon behind the remarkable fluffiness of this cloud cake. Its acidity reacts with baking soda (and sometimes baking powder), creating tiny air bubbles that expand during baking, resulting in a lighter, more tender crumb. Furthermore, yogurt adds moisture without adding excess fat, keeping the cake incredibly moist and preventing it from drying out. The milk proteins in yogurt also contribute to the cake’s structure, offering a delicate balance between stability and tenderness. Using plain, full-fat yogurt is often recommended for the best results, as it provides optimal moisture and richness for an incomparably fluffy yogurt cake. This natural leavening and moistening agent truly sets this easy recipe apart.
Gathering Ingredients for Cloud Cake
Before you begin the exciting process of baking your own light fluffy yogurt cloud cake, careful preparation of ingredients is key. Having everything measured and ready, often referred to as “mise en place,” ensures a smooth baking experience and reduces the chances of errors. Each ingredient plays a vital role in achieving that coveted cloud-like texture and sweet flavor profile. From dairy to leavening agents, selecting fresh, quality ingredients will significantly impact the final outcome of your homemade dessert. Double-checking your pantry before you start can save you a trip to the store mid-recipe, ensuring your baking flow remains uninterrupted and enjoyable.
Essential Yogurt Cake Supplies
To make this delicate cloud cake, you’ll need a few specific ingredients that are crucial for its structure and flavor. These include plain, full-fat yogurt, which provides the signature moisture and tang, and finely sifted cake flour, which contributes to its light texture. Eggs, often separated, are essential for aeration, while sugar adds sweetness and aids in browning. Baking powder and baking soda are the leavening agents responsible for the cake’s lift and fluffiness. Don’t forget a good quality vanilla extract for that aromatic warmth that complements the yogurt’s subtle notes. A touch of oil, like vegetable or canola, keeps the cake incredibly moist without being heavy.
Pantry Staples Checklist
Beyond the star ingredients, ensure you have common pantry staples on hand. This checklist helps confirm you’re fully equipped:
- All-purpose flour: If not using cake flour, ensure it’s unbleached and measured precisely.
- Granulated sugar: For sweetness and structure.
- Baking powder & baking soda: Check their expiry dates for optimal leavening.
- Salt: A pinch enhances all the flavors in the cake.
- Eggs: Fresh large eggs are usually best for baking.
- Vanilla extract: Pure vanilla adds depth of flavor.
- Neutral oil: Such as canola or vegetable oil, for moisture.
- Plain full-fat yogurt: The defining ingredient for this light fluffy yogurt cloud cake.
- Milk (optional): Sometimes a splash is needed for batter consistency.
Having these items ready will simplify the baking process and allow you to focus on the enjoyable aspects of creating your easy recipe. For another delightful sweet treat, consider trying a quick Italian cream cake or these delicious blueberry muffin cookies.
Simple Steps to Bake Cake
Baking a cloud cake doesn’t have to be intimidating. By breaking down the process into simple, manageable steps, anyone can achieve a perfect, light fluffy yogurt cloud cake. The key is to pay attention to details and follow each instruction carefully. From preparing your oven to mixing your ingredients, precision at every stage contributes to the cake’s ultimate success. These simple steps are designed to guide you through the entire baking journey, ensuring a delightful and stress-free experience as you create this delicate sweet treat. Let’s begin with the foundational setup.
Oven Prep and Pan Greasing
Proper oven preparation is the first crucial step for any successful baking endeavor. Begin by preheating your oven to the temperature specified in the recipe. This allows the oven to reach and maintain a consistent heat, which is vital for even baking and proper rise. An oven that isn’t fully preheated can lead to a dense or unevenly cooked cake. While the oven heats, prepare your baking pan. Lightly grease the bottom and sides of the pan with butter or a non-stick baking spray. For an extra layer of protection against sticking, especially with delicate cakes like this, you can line the bottom with a circle of parchment paper after greasing. This ensures your beautiful yogurt cake can be easily removed once cooled, preserving its soft and delicate structure. Choosing the right size pan is also important; typically, a round springform pan works best for cloud cakes, as it facilitates easy release.
Mixing Wet Ingredients Smoothly
Achieving the perfect, light fluffy yogurt cloud cake hinges significantly on how smoothly and correctly you combine your wet ingredients. This stage is where the foundational flavors and much of the cake’s eventual moisture are established. The goal is to create a homogenous mixture that is well-aerated but not over-beaten, ensuring that each component is fully incorporated without developing excess gluten in the flour later on. Taking your time here will result in a more tender and evenly textured crumb. Focus on a steady, gentle approach to build a beautifully consistent base for your easy recipe.
Yogurt, Sugar, Eggs Combined
Start by combining the plain, full-fat yogurt with granulated sugar in a large mixing bowl. Whisk these two ingredients together until the sugar is mostly dissolved and the mixture is smooth and creamy. This initial step helps to evenly distribute the sweetness throughout the batter and begins to lighten the yogurt. Next, crack in your eggs, one at a time, incorporating each egg fully before adding the next. For an even fluffier cake, some recipes might suggest separating the eggs, beating the yolks into the yogurt mixture, and then folding in stiffly beaten egg whites later. However, for a simpler approach, adding whole eggs works beautifully. Ensure the eggs are at room temperature, as this helps them emulsify better with the other ingredients, leading to a more consistent batter and a lighter texture. The mixture should become pale yellow and slightly thickened, indicating proper aeration and emulsification for your sweet treat.
Adding Oil and Vanilla
Once the yogurt, sugar, and eggs are smoothly combined, it’s time to introduce the oil and vanilla extract. Gently pour in the neutral-flavored oil, such as canola or vegetable oil. Oil contributes significantly to the cake’s moisture and tenderness without making it heavy, unlike butter, which can sometimes result in a denser crumb. Mix the oil until it is fully incorporated into the wet mixture, ensuring no streaks remain. Then, add the pure vanilla extract. Vanilla not only provides a wonderful aroma but also enhances the overall flavor profile of the yogurt cake, complementing its subtle tang. Stir it in briefly until just combined. Overmixing at this stage is not usually a concern, but a gentle hand always helps set the tone for a delicate batter. This completes your wet ingredient base, ready for the introduction of the dry components. For another creamy delight, consider making a vanilla bean creme brulee cheesecake cupcakes, which also benefits from smooth wet ingredient mixing.
Sifting Dry Mix for Airiness
The dry ingredients are just as critical as the wet ones in achieving the signature lightness of a cloud cake. Sifting is not merely a suggestion; it’s a vital step that contributes significantly to the cake’s airy texture. This process helps to break up any lumps in the flour, aerate the dry components, and ensure they are evenly distributed, leading to a uniformly textured and truly fluffy yogurt cake. Neglecting this step can result in pockets of unmixed ingredients or a denser crumb, detracting from the desired cloud-like consistency. Let’s look at the essential dry mix elements.
Flour, Baking Powder, Salt
In a separate bowl, combine your dry ingredients: flour, baking powder, and salt. For the best results, use cake flour if available, as its lower protein content yields a more tender crumb. If you’re using all-purpose flour, you can lighten it slightly by replacing a small amount with cornstarch. Place a fine-mesh sieve over the bowl and sift these ingredients together. Sifting ensures that the baking powder and salt are thoroughly distributed throughout the flour, preventing concentrated pockets that could lead to an uneven rise or flavor. It also introduces air into the flour, which is crucial for the cloud cake’s light and airy structure. The salt balances the sweetness and enhances the overall flavor profile, while the baking powder is the primary leavening agent working in conjunction with the yogurt to create that beautiful rise. Whisking them after sifting provides an additional level of mixing, guaranteeing a perfectly homogenous dry blend, ready to be gently folded into your wet ingredients for an easy recipe that promises a spectacular sweet treat.
Gently Combining Wet and Dry
The transition from separate wet and dry mixtures to a unified batter is perhaps the most delicate stage in baking a light fluffy yogurt cloud cake. This step requires a gentle touch and careful attention to ensure the cake’s texture remains airy and tender. The objective is to combine the ingredients just enough to integrate them, without overdeveloping the gluten in the flour. Overmixing at this point can lead to a tough, chewy cake, which is the antithesis of the desired cloud-like consistency. It’s a balance of thoroughness and restraint that truly makes all the difference in this easy recipe for a sweet treat.
Avoiding Overmixing Cake Batter
Once your dry ingredients are sifted and ready, gradually add them to the wet mixture in batches, usually in two or three additions. Use a spatula or a whisk on the lowest speed to gently fold or mix the dry into the wet. The key here is to mix *just* until no streaks of dry flour are visible. As soon as the flour is incorporated, stop mixing. Even a few extra seconds of vigorous stirring can activate the gluten in the flour, leading to a dense and tough cake rather than a light and fluffy one. The batter might still appear slightly lumpy, and that’s perfectly fine; these small lumps will often resolve themselves during baking. A properly mixed batter for a yogurt cake will be smooth but not overworked, retaining the airiness introduced by the eggs and baking powder. This careful technique is one of the most important baking tips for achieving that signature delicate texture of a cloud cake. For more baking tips and dessert ideas, you can check out our desserts category or follow us on Pinterest for visual inspiration!
Baking Your Yogurt Cloud Cake Right
The baking phase is where all your careful preparation comes to fruition. Achieving the perfect light fluffy yogurt cloud cake requires more than just mixing; it demands precise temperature control and attentive monitoring during its time in the oven. The interaction of heat with the leavening agents and moisture in the batter transforms it from a liquid mixture into a stable, airy structure. Understanding the nuances of oven settings and how to check for doneness are crucial baking tips that will ensure your homemade dessert emerges perfectly cooked, with a golden hue and that enviable cloud-like texture. Let’s delve into the specifics to master this final cooking stage.
Ideal Oven Temperature
For a delicate cloud cake, the ideal oven temperature is typically moderate, often around 325°F to 350°F (160°C to 175°C). A slightly lower temperature allows the cake to rise gradually and evenly, preventing the crust from setting too quickly and cracking, which can trap moisture and result in a dense center. It also helps to prevent overbrowning before the inside is fully cooked. Always ensure your oven is fully preheated before placing the cake inside. An oven thermometer can be a valuable tool to verify your oven’s accuracy, as many home ovens can fluctuate in temperature. Baking at the correct temperature is fundamental to developing the perfect crumb and achieving that signature light and fluffy texture of your yogurt cake.
Checking for Doneness
Knowing when your cloud cake is perfectly baked is crucial. Typically, a light fluffy yogurt cloud cake will bake for 40-60 minutes, depending on your oven and pan size. To check for doneness, look for a few key indicators:
- The cake should be golden brown on top and pull away slightly from the edges of the pan.
- A gentle press on the center of the cake should show a slight spring back. If it leaves an indentation, it needs more time.
- The most reliable test is inserting a wooden skewer or toothpick into the center of the cake. If it comes out clean, the cake is done. If there is wet batter clinging to it, continue baking in 5-minute increments until clean.
Avoid opening the oven door too frequently during the first 30 minutes of baking, as sudden temperature drops can cause the cake to collapse. Once done, remove the cake from the oven immediately to prevent overbaking and maintain its moist, light consistency. This ensures your homemade dessert achieves the optimal texture and flavor. Read more about the science of baking on Wikipedia.
Cooling Before Serving Cake
After the delightful aroma fills your kitchen and your light fluffy yogurt cloud cake emerges from the oven, resist the temptation to slice into it immediately. The cooling process is just as important as the baking itself for developing the cake’s final structure, flavor, and texture. Patience truly is a virtue here, as rushing this stage can compromise the delicate nature of your sweet treat. Proper cooling ensures that your easy recipe yields the perfectly moist and airy result you’ve been working towards, making every bite a heavenly experience.
Patience for Best Texture
Once removed from the oven, allow your yogurt cake to cool in its pan on a wire rack for about 10-15 minutes. This initial cooling period allows the cake to firm up slightly, preventing it from breaking apart when you attempt to remove it. The residual heat in the pan continues to cook the cake gently, further setting its structure. After this initial cooling, carefully invert the cake onto the wire rack to cool completely. Cooling on a wire rack ensures air circulates around all sides, preventing condensation from making the bottom soggy. It can take anywhere from 1 to 2 hours, or even longer, for a larger cake to cool entirely. Cutting into a warm cloud cake will not only be challenging due to its delicate crumb but also might result in a gummier texture. A fully cooled cake will be firmer, easier to slice, and its flavors will have had time to meld, offering the best possible tasting experience of this light, fluffy dessert. This crucial step is part of the simple steps for baking success.
7 Secrets to Perfect Bliss Cake
Achieving a consistently perfect light fluffy yogurt cloud cake goes beyond just following an easy recipe; it involves understanding subtle nuances and applying smart baking tips. These seven secrets are gleaned from years of baking experience and are designed to elevate your cloud cake from good to truly extraordinary. By paying attention to these details, you can ensure that every homemade dessert you bake is a masterpiece of texture and flavor, impressing everyone who takes a bite. Embrace these simple steps to unlock the full potential of your yogurt cake and create a sweet treat that is nothing short of bliss.
Ingredient Temperature Tips
The temperature of your ingredients significantly impacts the final texture of your cloud cake. Always ensure that dairy products, such as yogurt and eggs, are at room temperature. Room temperature ingredients emulsify more easily, creating a smoother, more uniform batter that holds air better. This leads to a lighter, more tender crumb. Cold ingredients can cause the batter to curdle or become lumpy, hindering aeration and resulting in a denser cake. Take your eggs and yogurt out of the refrigerator at least 30 minutes to an hour before you plan to start mixing. This simple baking tip makes a huge difference in the consistency and lightness of your yogurt cake.
Mixing Techniques
Proper mixing is paramount for a light fluffy yogurt cloud cake.
- Creaming: If your recipe calls for creaming butter and sugar, do so until light and fluffy to incorporate plenty of air.
- Alternating Wet and Dry: When combining wet and dry ingredients, add them in alternating batches, starting and ending with dry. This helps to create a stable emulsion and prevents the batter from becoming too stiff or too liquidy too quickly.
- Gentle Folding: Perhaps the most critical technique, especially when adding dry ingredients or beaten egg whites, is gentle folding. Use a spatula to fold the ingredients carefully, cutting down through the middle and then folding over the sides. This preserves the air you’ve incorporated, which is essential for the cake’s airy texture.
Avoid overmixing at all costs; stop as soon as the ingredients are just combined. This prevents gluten development and ensures your cloud cake remains tender. For visual baking tutorials, check out Carina Recipes on Instagram.
Don’t Overbake Your Cake
Overbaking is a common pitfall that can ruin an otherwise perfect light fluffy yogurt cloud cake. Even a few extra minutes in the oven can transform a moist, tender cake into a dry, crumbly one. Keep a close eye on your cake as it nears the end of its baking time, relying on visual cues and the toothpick test mentioned earlier. Every oven is different, so learning your own oven’s quirks is a valuable baking tip. Set a timer for the minimum suggested baking time and then check frequently. Remove the cake from the oven as soon as it passes the doneness test. A slightly underbaked cake is often better than an overbaked one, as it will retain more moisture. Prioritizing correct baking duration ensures the soft, delicate texture that defines this delightful sweet treat. This truly makes a difference in your homemade dessert.
Light Fluffy Yogurt Cloud Cake Nutrition
While the focus of a light fluffy yogurt cloud cake is often on its delightful taste and texture, it’s also helpful to understand its nutritional aspects. This sweet treat, like most desserts, should be enjoyed in moderation as part of a balanced diet. The use of yogurt can offer some benefits, contributing to its moisture and tang while potentially reducing the overall fat content compared to cakes made with heavier creams. However, sugar and other ingredients still play a significant role. Being aware of the nutritional breakdown can help you make informed choices, especially when considering portion sizes for this homemade dessert. Here’s a general look at what you might expect.
Calories Per Slice
The caloric content of a slice of light fluffy yogurt cloud cake can vary significantly based on the specific ingredients used, such as the type of yogurt (full-fat vs. low-fat), the amount of sugar, and any added toppings or glazes. On average, a standard slice might range from 250 to 400 calories. This estimate assumes a moderately sized slice from a typical 8 or 9-inch round cake. Recipes using less sugar, more protein-rich yogurt, or smaller portion sizes would naturally have lower calorie counts. If you’re tracking your intake, recalculating based on your exact recipe and serving size is always the most accurate approach for this easy recipe.
Sugar and Fat Content
The sugar content in a yogurt cake contributes not only to its sweetness but also to its moistness and browning during baking. A single slice can contain a notable amount of sugar, often ranging from 25 to 40 grams, depending on the recipe and portion. The fat content typically comes from the yogurt, eggs, and any added oil or butter. While yogurt can be a lower-fat alternative to other dairy products, full-fat yogurt still contributes healthy fats. A slice might contain between 10 to 20 grams of fat. Baking tips for a lighter version might include reducing sugar slightly (without compromising structure) and opting for low-fat yogurt, though this can slightly alter the desired rich taste and fluffy texture. Remember that this sweet treat is primarily a dessert, meant for enjoyment, and these numbers are general estimates. For detailed nutrition information about ingredients like yogurt, Wikipedia offers extensive resources.
Serving Ideas for Cloud Cake
A light fluffy yogurt cloud cake is a delightful sweet treat on its own, but its versatility truly shines when paired with complementary toppings and accompaniments. Its delicate flavor profile makes it an excellent canvas for both simple and elaborate additions, allowing you to customize your homemade dessert for any occasion. Whether you’re aiming for an elegant presentation or a comforting, everyday indulgence, these serving ideas will enhance the experience of your easy recipe and make every slice of yogurt cake even more enjoyable. Thoughtful pairings can elevate the entire dessert experience, making it unforgettable.
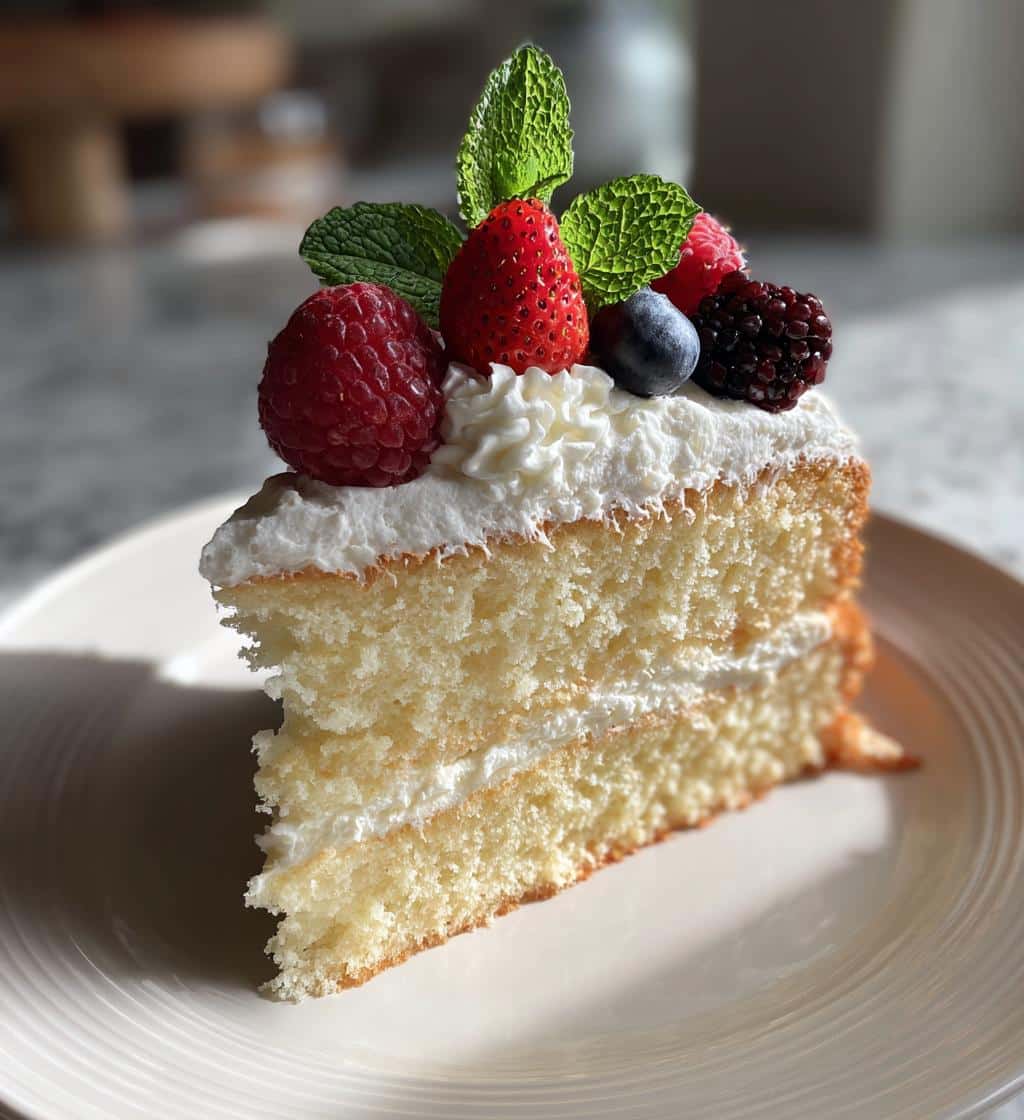
With Fresh Fruits
One of the most popular and aesthetically pleasing ways to serve a cloud cake is with an assortment of fresh fruits. The natural sweetness and slight tartness of berries, such as strawberries, blueberries, raspberries, or sliced kiwi, perfectly complement the cake’s subtle flavors. Arrange a colorful medley of fruits around or on top of each slice just before serving. A light dusting of powdered sugar over the fruits can add a touch of elegance. The vibrant colors and varying textures of fresh fruit provide a wonderful contrast to the soft, airy cake, creating a refreshing and visually appealing dessert that is perfect for spring or summer gatherings. This simple addition elevates the cake without overpowering its delicate essence.
Add Whipped Cream
For an extra layer of indulgence and creamy texture, a dollop of freshly whipped cream is an ideal accompaniment to your light fluffy yogurt cloud cake. Homemade whipped cream, lightly sweetened with a touch of vanilla, offers a rich yet airy contrast to the cake’s tenderness. You can pipe it elegantly onto each slice or simply spoon it alongside. For an added touch, a sprinkle of lemon zest or a few mint leaves on top of the cream can introduce a burst of fresh aroma and flavor. This pairing creates a classic dessert experience, making the cloud cake feel even more luxurious and satisfying. The cool, smooth cream balances the cake’s sweetness, creating a harmonious and utterly delicious sweet treat.
Storing Leftover Yogurt Cloud Cake
After enjoying the delightful experience of your freshly baked light fluffy yogurt cloud cake, you might find yourself with some leftovers – a wonderful problem to have! Proper storage is essential to maintain the cake’s delicate texture and flavor, ensuring that each subsequent slice is just as enjoyable as the first. This is especially true for cloud cakes, which are known for their moisture and airiness. Following a few simple steps for storage will help preserve your homemade dessert, allowing you to savor its goodness for days to come. Let’s look at the best practices to keep your easy recipe tasting fresh.
Keeping it Fresh
The key to keeping your yogurt cake fresh is to protect it from air, which can quickly dry out the delicate crumb. If the cake is unfrosted, it can often be stored at room temperature for a day or two. However, due to the moisture content from the yogurt, refrigeration is generally recommended for longer storage. Before refrigerating, ensure the cake has completely cooled to room temperature. Placing a warm cake in the fridge will create condensation, making it soggy. Once cool, cover the cake properly to prevent it from absorbing odors from other foods in the refrigerator. This simple step helps maintain the cake’s light, fluffy texture and delicious sweet flavor.
Airtight Container Tips
To keep your light fluffy yogurt cloud cake fresh in the refrigerator, an airtight container is your best friend.
- Whole Cake: If you have a whole or large portion of the cake, place it in a cake carrier or a large airtight container.
- Slices: For individual slices, arrange them in a single layer in a smaller airtight container. You can place a piece of parchment paper between layers if stacking is necessary, though a single layer is ideal.
- Plastic Wrap: If a container isn’t available, tightly wrap the cake or slices in multiple layers of plastic wrap, ensuring no part of the cake is exposed to air. Follow this with a layer of aluminum foil for extra protection.
Stored correctly in an airtight container, your yogurt cake will remain moist and delicious for 3-5 days in the refrigerator. For longer storage, cloud cake can often be frozen for up to a month, though freezing might slightly alter the delicate texture. Thaw frozen cake in the refrigerator overnight before serving. These simple steps ensure your homemade dessert remains a delightful sweet treat.