
Orange cheesecake offers a burst of sunshine in every creamy bite. This delectable dessert combines the bright zest of fresh oranges with a rich, smooth filling, making it a crowd-pleaser. Learn how to bake this easy recipe and impress everyone with your homemade delight. It’s perfect for any occasion.
Key Takeaways
- Enjoy the vibrant, zesty flavor and creamy texture of a homemade orange cheesecake.
- Prepare this impressive dessert using simple, readily available ingredients for both crust and filling.
- Follow clear, step-by-step instructions for perfect baking and chilling results.
- Serve a beautifully garnished, firm cheesecake that is ideal for any celebration or sweet craving.
- Understand the prep, bake times, and basic nutritional facts for informed dessert planning.
This dessert is wonderfully satisfying. It brings bright flavor to any table. Fresh ingredients make it truly shine. Everyone will ask for the easy recipe. You’ll love making it.
Why You’ll Love This Orange Cheesecake
There’s something truly special about a homemade cheesecake, and when you infuse it with the bright, vibrant flavor of oranges, it becomes an instant favorite. This zesty orange cheesecake recipe isn’t just a dessert; it’s a celebration of fresh citrus and creamy indulgence. Its appealing aesthetic and delightful aroma make it a standout on any dessert table. It’s a wonderful choice for those who appreciate a dessert that balances sweetness with a refreshing tang, offering a unique twist on the classic cheesecake.
Zesty, Creamy Flavor
The hallmark of this homemade delight is its incredible flavor profile. The creaminess comes from a velvety smooth cream cheese base, perfectly complemented by the invigorating zest and juice of fresh oranges. Each bite delivers a harmonious blend of sweet and tangy notes, awakening your palate. The subtle tartness of the orange cuts through the richness of the cream cheese, creating a balanced and utterly addictive taste. It’s a truly quick Italian cream cake alternative if you’re looking for a citrusy dessert.
Perfect for Any Occasion
Whether you’re hosting a casual brunch, a formal dinner party, or simply craving a sweet treat for yourself, this orange cheesecake fits the bill. Its elegant appearance makes it ideal for special occasions like birthdays, holidays, or anniversaries, yet its relatively simple steps mean you can enjoy it any day of the week. It’s a versatile dessert that consistently earns rave reviews, proving that a delicious, creamy dessert doesn’t have to be overly complicated. Consider pairing it with other desserts for a lavish spread.
Irresistible Orange Cheesecake: Key Ingredients
Creating a truly irresistible orange cheesecake starts with selecting the right ingredients. Quality components are essential for achieving that perfect balance of texture and flavor. This easy recipe calls for standard pantry staples, along with the star of the show: fresh oranges. Paying attention to the freshness of your ingredients will make a significant difference in the final taste and presentation of your homemade delight. You want your cream cheese to be at room temperature for a smooth filling, and your butter to be good quality for a rich crust.
For the Delicious Crust
A great cheesecake begins with a sturdy and flavorful crust. For this orange cheesecake, we rely on the classic combination of graham cracker crumbs, melted butter, and a touch of sugar. The graham cracker crumbs provide a slightly sweet and crunchy base that perfectly complements the creamy filling. Ensure your crumbs are finely crushed for a uniform texture. Many people prefer using a food processor for this task. The melted butter acts as a binder, holding the crumbs together, while a small amount of granulated sugar enhances the sweetness of the crust. This simple yet effective foundation is crucial for supporting the rich filling.
For the Rich Filling
The heart of our orange cheesecake is its incredibly rich and flavorful filling. You’ll need full-fat cream cheese, softened to room temperature, which is key for a smooth, lump-free mixture. Granulated sugar provides the sweetness, balanced by fresh orange zest and juice, which infuse the cheesecake with its signature bright, fresh citrus flavor. Eggs act as a binder and help the cheesecake set properly, ensuring a creamy, consistent texture. A touch of vanilla extract rounds out the flavors, adding depth and warmth. Some recipes also include a dollop of sour cream or heavy cream to enhance creaminess, but for a true cheesecake experience, these core ingredients are paramount.
Simple Steps for Your Crust
Preparing the crust for your orange cheesecake is a straightforward process, setting the stage for the creamy, zesty filling to come. This foundational step is crucial for both the structure and flavor of your homemade delight. With just a few ingredients and minimal effort, you can create a perfectly crunchy and buttery base that will hold up beautifully to the rich filling. Even if you’re new to baking, these simple steps are easy to follow and yield consistent results every time, ensuring your cheesecake starts off strong. The goal is an even, firm layer.
Mixing Crumbs and Butter
Begin by combining the finely crushed graham cracker crumbs with granulated sugar in a medium bowl. Use a fork or whisk to ensure they are well mixed. Then, gradually pour in the melted unsalted butter. Stir the mixture until the crumbs are thoroughly moistened and resemble wet sand. It’s important that every crumb is coated, as this is what allows the crust to bind together when pressed. The butter imparts a rich, nutty flavor that complements the vibrant orange filling. This step is key to avoiding a crumbly or dry crust, so take your time to ensure proper incorporation.
Pressing into the Pan
Once your crumb mixture is ready, transfer it to a 9-inch springform pan. Use the back of a spoon or the bottom of a flat-bottomed glass to firmly and evenly press the mixture into the bottom of the pan. You can also press a small amount up the sides if you prefer a slightly higher crust. The key here is firmness and evenness; a well-pressed crust will prevent crumbling when sliced and provide a stable base for your orange cheesecake. After pressing, refrigerate the crust for at least 15-20 minutes, or even better, while you prepare the filling, to help it set.
Creating the Creamy Orange Filling
The filling is where the magic truly happens for this zesty orange cheesecake. Achieving a smooth, creamy texture with the bright flavor of fresh citrus is paramount. This section details the steps to blend your ingredients to perfection, ensuring a velvety consistency and an invigorating taste. Paying close attention to the order and method of mixing will prevent lumps and over-mixing, both of which can affect the final texture of your homemade delight. This is the heart of your creamy dessert.
Beating Cream Cheese Smooth
Start by placing your softened full-fat cream cheese in a large mixing bowl. Using an electric mixer (handheld or stand mixer with a paddle attachment), beat the cream cheese on medium speed until it is completely smooth and free of any lumps. This step is crucial; if your cream cheese isn’t soft enough or isn’t beaten thoroughly, your filling will have an undesirable lumpy texture. Scrape down the sides of the bowl frequently to ensure all parts of the cream cheese are incorporated and smooth. This foundational step ensures a silky base for your amazing orange cheesecake.
Adding Zest and Juice
Once the cream cheese is smooth, gradually add the granulated sugar and continue beating until just combined. Next, it’s time to infuse that wonderful fresh citrus flavor. Add the finely grated orange zest and fresh orange juice to the mixture. Be careful not to include any white pith from the orange, as it can impart a bitter taste. Beat on low speed until the zest and juice are evenly distributed. Finally, beat in the eggs, one at a time, mixing just until each egg is incorporated before adding the next. Over-mixing the eggs can introduce too much air, which can cause the cheesecake to crack during baking. Finish by adding a splash of vanilla extract for depth of flavor. For more amazing dessert ideas, visit us on Pinterest!
Baking Your Perfect Orange Cheesecake
Baking an orange cheesecake to perfection requires careful attention to temperature and timing. A properly baked cheesecake will have a creamy texture that is firm yet jiggly in the center. The key is to avoid overbaking, which can lead to a dry, cracked surface. This section will guide you through the crucial steps of preheating and checking for doneness, ensuring your homemade delight turns out beautifully every time. Getting the baking just right is a significant part of what makes this an easy recipe to master.
Preheat Oven Correctly
Before you even think about putting your cheesecake in the oven, it’s vital to preheat it correctly. Set your oven to the specified temperature (usually around 325-350°F or 160-175°C, but always double-check your specific recipe). Allow the oven to preheat for at least 15-20 minutes after it signals it’s reached temperature. This ensures the oven interior is uniformly heated and the temperature is stable. Some bakers also recommend a water bath, where the springform pan is wrapped in foil and placed in a larger pan filled with hot water. This creates a moist baking environment, preventing cracks and ensuring a very creamy texture, similar to what you might find in vanilla bean creme brulee cheesecake cupcakes.
Checking for Doneness
Knowing when your orange cheesecake is done baking is more about feel than strict timing. The edges should appear set and slightly puffed, while the center (about a 2-3 inch diameter) should still have a slight jiggle when you gently shake the pan. It shouldn’t be liquidy, but a subtle wobble is exactly what you’re looking for. The residual heat will continue to cook the center as it cools. Avoid opening the oven door too often during baking, as this can cause temperature fluctuations that lead to cracking. Once done, turn off the oven, crack the door slightly, and let the cheesecake cool in the oven for about an hour before removing it. This gradual cooling further prevents cracks and ensures a smooth, even surface. You can learn more about baking techniques on Wikipedia’s baking page.
Cooling and Chilling Secrets
The journey to a perfect orange cheesecake doesn’t end when it comes out of the oven. The cooling and chilling phases are just as crucial as the baking itself. These steps allow the cheesecake to set properly, develop its full creamy texture, and become firm enough for clean slicing. Rushing these stages can result in a collapsed or overly soft cheesecake, so patience is truly a virtue here. Following these secrets ensures your homemade delight is a beautiful and delicious success.
Let It Cool Down
After removing your orange cheesecake from the oven, resist the urge to immediately transfer it to the refrigerator. First, let it cool completely on a wire rack at room temperature. This gradual cooling process helps prevent cracks and allows the cheesecake to slowly firm up. Expect this to take at least 1-2 hours, sometimes longer depending on your kitchen’s temperature. Once it’s completely cool to the touch, you can remove the sides of the springform pan. Run a thin knife around the edge of the cheesecake before detaching the ring to prevent sticking and ensure a clean release.
Refrigerate for Firmness
Once cooled to room temperature, cover your cheesecake loosely with plastic wrap and transfer it to the refrigerator. This is perhaps the most important secret for achieving that signature firm, dense, and creamy cheesecake texture. It needs to chill for a minimum of 6-8 hours, but ideally overnight. The extended chilling time allows the flavors to meld and the cheesecake to set completely, making it much easier to slice neatly. A well-chilled cheesecake is not only firmer but also tastes better, as the cold enhances its refreshing qualities, especially with the fresh citrus notes. This step is non-negotiable for a truly delightful and stable cheesecake.
Serving Your Delightful Dessert
After all your hard work, serving your orange cheesecake is the moment of truth! Proper slicing and portioning ensure every guest enjoys a beautiful and satisfying piece of this creamy dessert. The presentation is almost as important as the taste, and with a few simple techniques, you can make your homemade delight look as impressive as it tastes. This simple steps guide helps ensure that each serving is perfect, making your zesty orange cheesecake a true centerpiece.
Slicing Your Cheesecake
For clean, perfect slices of your orange cheesecake, there are a couple of tricks. First, always ensure the cheesecake is thoroughly chilled. A warm cheesecake will be much messier to cut. Before each slice, dip a sharp, thin-bladed knife into hot water, then wipe it dry. The warm, clean blade will glide through the creamy filling effortlessly. Repeat this process for every slice. This method prevents the filling from sticking to the knife and creating ragged edges, ensuring each piece is picture-perfect. Presenting neat slices truly elevates the dessert experience.
Recommended Portion Sizes
Cheesecake is a rich dessert, so modest portion sizes are generally recommended. For a standard 9-inch round cheesecake, cutting it into 12-16 slices is usually appropriate. This provides a satisfying portion without being overly indulgent. If serving at a large gathering, you might even opt for smaller pieces, allowing guests to sample other treats or enjoy a lighter finish to their meal. Remember, this is a dense and flavorful treat, so a little goes a long way. Consider serving alongside other desserts like peanut butter brownie swirl cookies for variety. Don’t forget to share your creations and find inspiration on Instagram!
Quick Prep and Bake Times
This easy recipe for orange cheesecake is designed to be manageable, offering reasonable prep and bake times without compromising on flavor or quality. Understanding the time commitment upfront helps in planning your baking schedule, especially when preparing for an event. While some desserts can be incredibly time-consuming, this homemade delight strikes a good balance, making it accessible for bakers of all skill levels. It’s a simple steps guide to a delicious treat.
Total Time to Enjoy
The actual hands-on preparation for this zesty orange cheesecake is surprisingly quick, often taking only about 20-30 minutes. This includes mixing the crust and preparing the creamy orange filling. The baking time typically ranges from 50 to 70 minutes, depending on your oven and the exact size of your cheesecake. However, remember the crucial cooling and chilling phases. After baking, allow 1-2 hours for cooling at room temperature, followed by a minimum of 6-8 hours (or preferably overnight) in the refrigerator for proper setting. So, while the active work is minimal, the total process from start to serve usually spans around 8-12 hours, mostly passive chilling time. This makes it an ideal dessert to prepare a day in advance.
Nutrition for Orange Cheesecake
While this orange cheesecake is a delicious indulgence, it’s also helpful to have a general idea of its nutritional content. Like most creamy desserts, it is calorie-dense, but enjoying a homemade delight in moderation is part of a balanced lifestyle. Understanding the basic facts can help you make informed choices, especially when planning it as part of a meal or celebration. This offers a quick overview of what a typical slice might contain.
Calories Per Slice
The exact calorie count per slice of orange cheesecake can vary significantly based on the specific ingredients used (e.g., full-fat vs. reduced-fat cream cheese, amount of sugar, crust thickness) and the size of your slice. On average, a 1/12th slice of a standard 9-inch cheesecake can range from approximately 300 to 450 calories. This figure typically includes the graham cracker crust and the rich, creamy orange filling. It’s a decadent treat, so planning your portions accordingly is always a good idea.
Key Nutritional Facts
Beyond calories, a typical slice of orange cheesecake will also contribute to your intake of fats, carbohydrates, and some protein. It is generally high in saturated fat due to the cream cheese and butter in the crust. Carbohydrates primarily come from sugar and the graham cracker crumbs. While oranges do provide some Vitamin C and fiber, these contributions are modest in a single dessert slice compared to the overall nutritional profile. This easy recipe is certainly a treat, best enjoyed occasionally rather than as a daily staple. You can find general information on the health benefits of oranges on Wikipedia.
Tips for Best Flavor
Achieving the most outstanding flavor in your orange cheesecake goes beyond just following the steps; it involves a few key considerations that truly elevate this homemade delight. These simple steps ensure that every bite bursts with fresh citrus and creamy richness, making your easy recipe even more memorable. Incorporating these tips will transform your delicious dessert into an irresistible masterpiece, showcasing the full potential of its zesty profile.
Use Fresh Oranges
This might seem obvious, but using freshly squeezed orange juice and freshly grated orange zest is absolutely critical for the best flavor. Bottled juice simply won’t provide the same bright, vibrant, and authentic citrus punch that fresh oranges do. The zest contains aromatic oils that are essential for that intense orange aroma and taste. Always zest your oranges before juicing them. Seek out ripe, fragrant oranges; organic options often yield superior flavor. This is the single most impactful tip for making your orange cheesecake truly sing with fresh citrus notes.
Benefit of Overnight Chilling
While a minimum of 6-8 hours of refrigeration is necessary for the cheesecake to set, chilling it overnight (12-24 hours) offers an even greater benefit. During this extended chilling period, the flavors within the creamy orange filling have ample time to meld and deepen. The fresh citrus notes become more pronounced, and the overall texture becomes denser and more luxurious. An overnight chill also guarantees a perfectly firm cheesecake that slices beautifully without any crumbling, making it a dream to serve. This patience is truly rewarded with a superior-tasting and visually stunning creamy dessert.
Garnishing Your Sweet Treat
Garnishing your orange cheesecake is the final touch that transforms a delicious baked good into a stunning masterpiece. A beautifully garnished cheesecake not only looks more appealing but also enhances the overall fresh citrus experience. This easy recipe’s presentation can be as simple or as elaborate as you like, allowing for personal creativity. These simple steps for decoration make your homemade delight even more special.
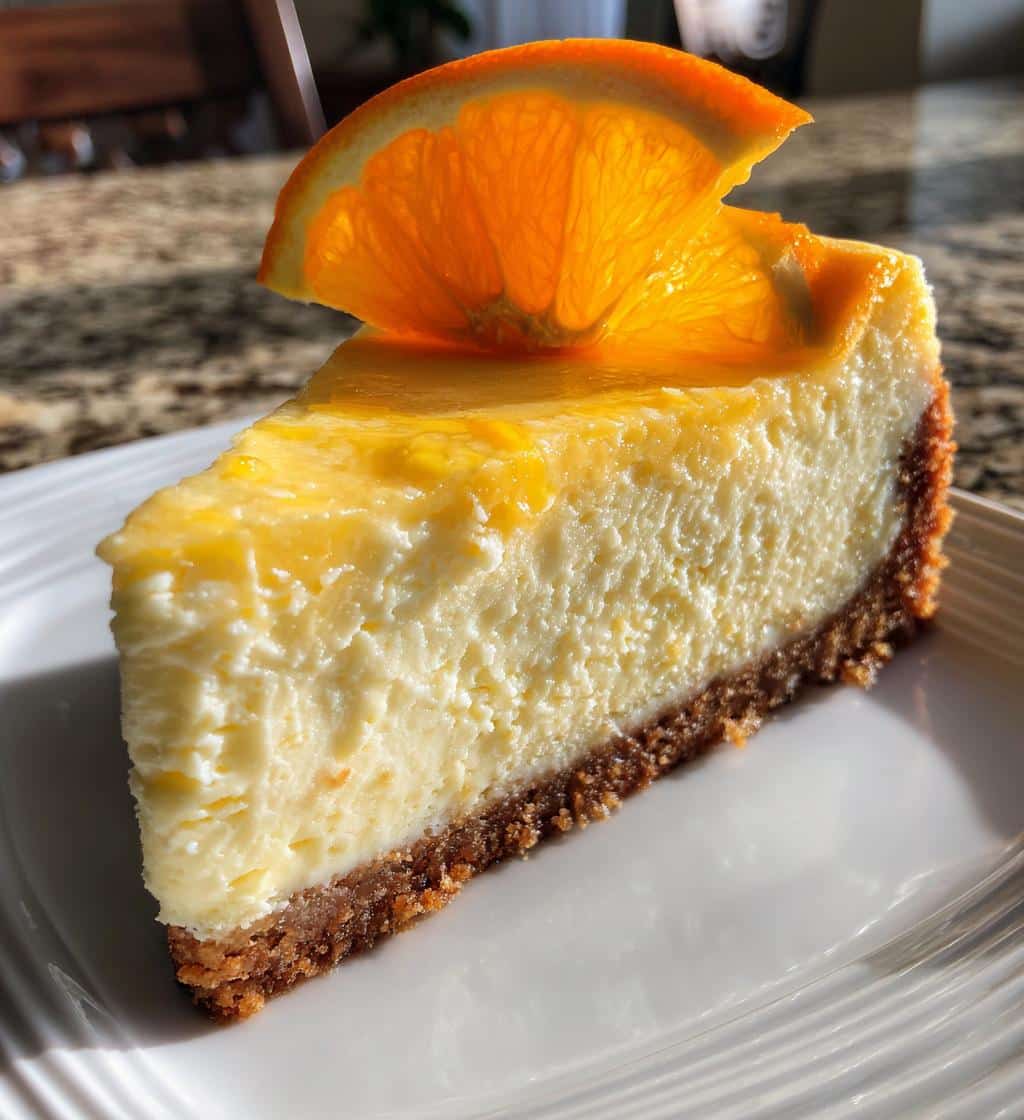
Fresh Orange Slices
One of the most elegant and fitting garnishes for an orange cheesecake is, naturally, fresh orange slices or segments. Arrange thinly sliced orange wheels or half-moon segments decoratively on top of the chilled cheesecake. You can create a full circle around the edge, or place them artistically in the center. A light brush of melted apricot jam or a simple sugar glaze can make them shine. Candied orange peel is another fantastic option, offering both visual appeal and a delightful chewy texture that complements the creamy dessert perfectly.
Other Fun Toppings
Beyond fresh oranges, there are many other delightful toppings that can elevate your zesty orange cheesecake. A dollop of whipped cream or crème fraîche adds an extra layer of creaminess. A sprinkle of toasted coconut flakes can provide a lovely textural contrast and tropical hint. For a touch of sophistication, consider shaving dark chocolate over the top or drizzling with a homemade orange syrup. Fresh mint leaves can add a pop of color and freshness. Don’t be afraid to experiment with combinations to find your favorite way to enhance this fantastic homemade delight. This easy recipe can be dressed up for any occasion!
Enjoy This Easy Dessert
You’ve successfully created a truly magnificent orange cheesecake, a creamy dessert that promises to be a hit with anyone who tastes it. From the initial steps of crust preparation to the final flourish of garnishing, you’ve followed an easy recipe to produce a homemade delight brimming with fresh citrus flavor. This zesty treat proves that baking an impressive dessert doesn’t have to be overly complicated. It’s now time to savor the fruits of your labor.
Gather your loved ones, pour a cup of coffee or tea, and indulge in a slice of this heavenly creation. Its smooth texture and bright, invigorating taste make it the perfect ending to any meal or a delightful afternoon treat. Whether you’re celebrating a special occasion or simply enjoying a moment of sweet solitude, this orange cheesecake is sure to bring joy and satisfaction. Don’t hesitate to share your delicious journey and inspire others to try this simple steps dessert!