
Homemade Apple Pie is a cherished dessert, bringing warmth and comfort to any table. This detailed guide simplifies the baking process, helping you achieve a perfect golden, flaky crust and a deliciously spiced apple filling every time. Get ready to bake a memorable treat.
Key Takeaways
- Choosing the right mix of sweet and tart apples is crucial for optimal flavor.
- Mastering the pie crust is key to a truly delicious homemade apple pie.
- Accurate oven temperatures and timing ensure a perfectly baked, golden crust.
- Allowing the pie to cool completely prevents a soggy bottom and ensures proper setting.
Baking apple pie is a true joy. Simple steps lead to amazing flavor. Choose good apples. Follow the recipe. A warm slice tastes wonderful. Enjoy your kitchen creation.
Homemade Apple Pie Bliss Begins Here
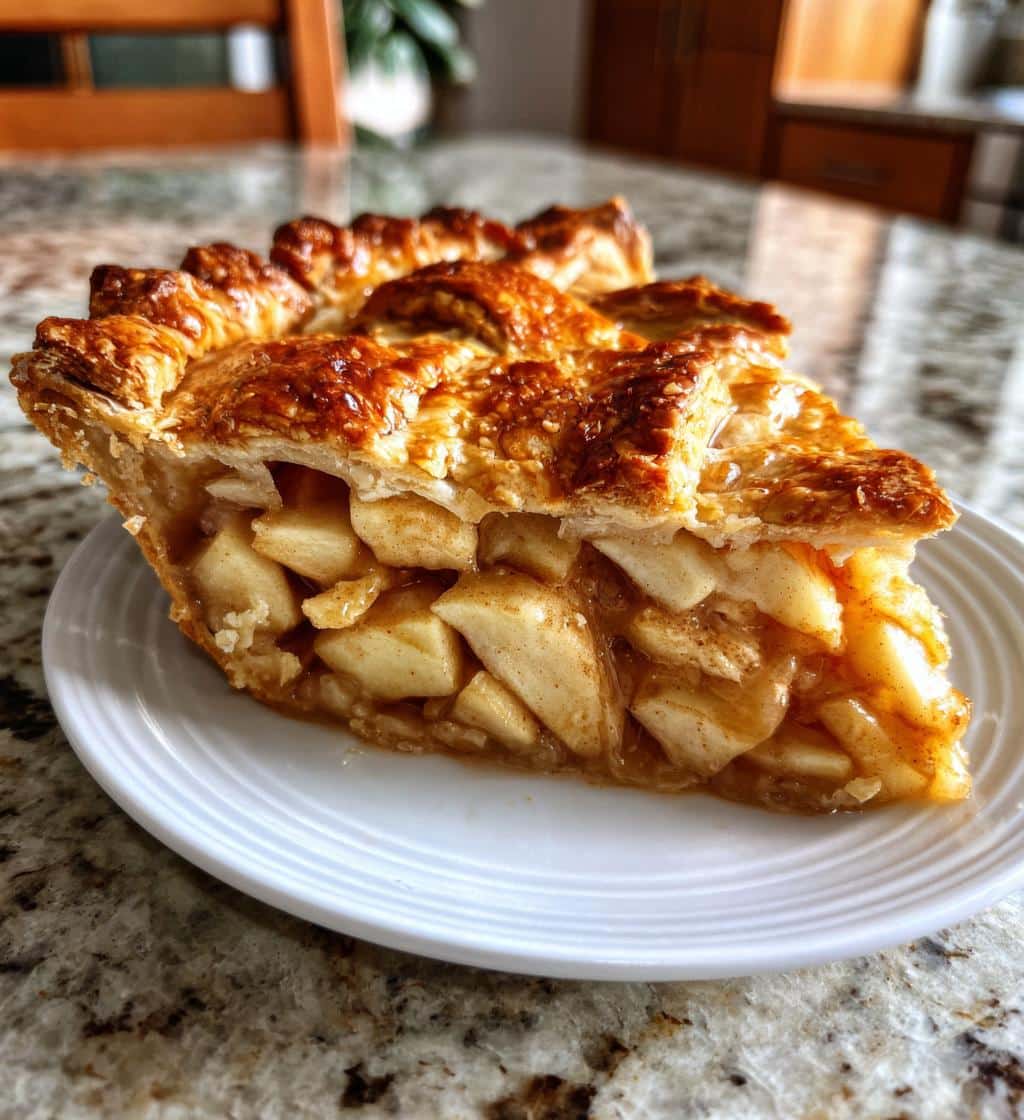
There’s nothing quite like the aroma of a fresh homemade apple pie baking in your kitchen. This timeless dessert evokes comfort and joy, making it a favorite for family gatherings and special occasions. Achieving that perfect balance of tender, spiced apples and a golden, flaky crust starts with careful preparation and attention to detail. Our comprehensive guide will walk you through each step, ensuring your baking experience is as delightful as the first bite of your creation.
Preheat Oven to 425°F
Before you even begin mixing ingredients, proper oven preheating is paramount. Set your oven to 425°F (220°C) and allow it ample time to reach and maintain this temperature. A well-preheated oven ensures that your pie crust begins to cook immediately and consistently, contributing to a truly flaky texture and helping prevent a soggy bottom. Using an oven thermometer can confirm your oven’s accuracy, a small step that makes a significant difference in your homemade apple pie’s success.
Gather Ingredients for Your Perfect Bake
The foundation of any spectacular homemade apple pie lies in the quality and quantity of its ingredients. A meticulous selection ensures that your pie delivers on flavor, texture, and aroma. Taking the time to gather everything before you start mixing not only streamlines the baking process but also prevents any last-minute rushes or forgotten components that could compromise your final product. This preparation phase is crucial for a smooth and enjoyable baking journey.
Fresh Apple Pie Fillings
For the filling, you’ll need approximately 6-8 cups of sliced apples. A blend of sweet and tart varieties like Granny Smith, Honeycrisp, and Fuji creates a balanced flavor profile and varied texture. Other key ingredients include granulated sugar (adjust to apple sweetness), a touch of brown sugar for depth, all-purpose flour or cornstarch as a thickener, and a warm spice blend. Cinnamon is non-negotiable, often complemented by nutmeg, cloves, or allspice. A squeeze of lemon juice can brighten the flavors and prevent browning. While we focus on pie, exploring other sweet treats like peanut butter brownie swirl cookies can also be a delightful baking adventure.
Easy Pie Crust Essentials
A truly easy pie crust requires cold butter or shortening, all-purpose flour, a pinch of salt, and ice water. The cold fat is crucial for creating those coveted flaky layers, as it melts slowly in the oven, releasing steam that separates the flour layers. Some recipes might also call for a tablespoon of sugar for a slightly sweeter crust. Ensuring all your ingredients are chilled before mixing is a top baking apple pie tip. For a deeper dive into the history and varieties of this classic dessert, visit the Apple pie Wikipedia page.
Prepare Delicious Apple Pie Filling Easily
Crafting the perfect apple pie filling is a straightforward process that yields incredible flavor. The key is to balance the sweetness of the sugar with the natural tartness of the apples, all while infusing a comforting blend of spices. Proper preparation of your apples ensures an even cook and prevents a watery filling, which is a common concern for many home bakers. This step is where the magic of the fruit truly comes to life, setting the stage for a mouth-watering dessert.
Mix Apples with Spices
Begin by peeling, coring, and thinly slicing your chosen apples. Aim for slices that are about 1/4 inch thick to ensure they cook evenly. In a large bowl, combine the sliced apples with your sugars (granulated and brown), the thickener (flour or cornstarch), and your preferred spices—cinnamon, nutmeg, and perhaps a dash of cloves or allspice. Add a tablespoon of lemon juice to prevent the apples from browning and to add a bright counterpoint to the sweetness. Toss everything gently until the apples are thoroughly coated. Let the mixture sit for about 10-15 minutes; this allows the apples to release some of their juices, which will combine with the thickener to create a luscious, syrupy filling during baking. This simple step is vital for achieving the ideal consistency in your apple pie filling, avoiding an overly dry or watery result.
Assemble Your Homemade Pie Crusts
Assembling your homemade pie is an art form, bringing together all your carefully prepared components into one cohesive, delicious dessert. The integrity of your crust and the even distribution of your filling are crucial for a visually appealing and structurally sound pie. This stage requires a gentle touch and attention to detail, ensuring that each layer contributes to the final masterpiece. A well-assembled pie is a promise of baking success.
Place First Crust Firmly
On a lightly floured surface, roll out one disc of your prepared pie dough into a 12-inch circle. Carefully transfer this crust to your 9-inch pie plate, gently pressing it into the bottom and sides without stretching. Trim any excess dough, leaving about a 1/2-inch overhang. This initial crust forms the base, providing support and containing the generous apple filling. Ensure it fits snugly and evenly to create a perfect foundation for your homemade apple pie.
Add Filling and Butter Dots
Pour your spiced apple filling evenly into the prepared bottom crust. Distribute the apples to create a slight dome in the center, as they will cook down during baking. For an extra touch of richness and flavor, dot the top of the apple filling with small pieces of cold butter (about 2 tablespoons total). These butter dots will melt and seep into the filling, creating a more luxurious texture and enhancing the overall taste of your apple pie recipe.
Cover with Second Crust
Roll out your second pie dough disc to another 12-inch circle. You can either place this entire crust over the filling or cut it into strips to create a beautiful lattice top. If using a full top crust, cut several slits in the center to allow steam to escape during baking. Place the top crust over the filling, aligning it with the bottom crust’s overhang. Trim any excess, then crimp the edges of both crusts together to seal the pie. Learning about different types of pie crusts on Wikipedia can further enhance your baking skills.
Initial Baking Steps for Apple Pie
The initial phase of baking is critical for developing the coveted golden color and flaky texture of your apple pie crust. Starting with a higher temperature provides the necessary burst of heat to set the crust quickly before the filling has a chance to make it soggy. This strategic approach ensures that your efforts in preparing the dough and filling pay off with a perfectly crisp and delicious result, making every bite a delight.
First Bake at High Heat
Once assembled, place your pie on a baking sheet to catch any potential drips. Transfer it to your preheated 425°F (220°C) oven. Bake for the first 15-20 minutes at this high temperature. This initial blast of heat is designed to “shock” the crust, causing the butter to rapidly melt and create steam, which separates the layers of dough, resulting in that wonderfully flaky texture everyone desires. It also helps to quickly set the bottom crust, a key strategy for preventing a soggy bottom. Keep an eye on the edges; if they start browning too quickly, you can loosely cover them with aluminum foil or a pie crust shield.
Finishing the Perfect Bake Process
After the initial high-heat bake, the pie enters its final, more gentle cooking phase. This part of the process is about ensuring the apples become tender and the filling thickens appropriately, all while the crust continues to develop its beautiful golden hue without burning. Patience and careful observation are your best tools here, as slight adjustments can make a significant difference to the overall perfection of your homemade apple pie.
Reduce Temperature and Continue
After the initial high-heat bake, reduce the oven temperature to 375°F (190°C). This lower temperature allows the pie to continue baking gently, ensuring the apples inside become perfectly tender without the crust becoming over-browned. Continue baking for another 35-50 minutes. If the crust edges are already golden, maintain the foil or pie shield to prevent further darkening. This gradual baking ensures the filling bubbles consistently and the flavors meld beautifully throughout the apple pie recipe. This process is similar to achieving perfection in other baked desserts.
Check for Golden Crust
The ultimate sign of a perfectly baked homemade apple pie is a deep golden-brown crust and a filling that is bubbling enticingly through the vents. If your pie has a full top crust, you might want to check the internal temperature of the filling; it should reach around 200-205°F (93-96°C) for optimal doneness. Use a thin knife or skewer to gently pierce through a vent and check if the apples are tender. The bubbling juices indicate that the thickener has done its job, creating a luscious and flavorful filling. Avoid under-baking, as this can lead to a raw-tasting crust and a watery filling.
Homemade Apple Pie Cooling and Serving Tips
The waiting period after baking is just as critical as the baking itself when it comes to homemade apple pie. While the tempting aroma fills your kitchen, allowing the pie to cool properly ensures that the filling sets to the perfect consistency, preventing a messy, runny slice. This step guarantees a satisfying presentation and an even more delightful eating experience, showcasing your baking efforts.
Allow Pie to Set
Once your homemade apple pie emerges golden and bubbling from the oven, resist the urge to slice into it immediately. Transfer the pie to a wire rack and allow it to cool completely for at least 2-4 hours, or even longer, before serving. This cooling time is crucial for the filling to set properly. The starches in the thickener need time to cool and solidify, creating that perfectly firm, yet still yielding, apple filling. Cutting into a hot pie will likely result in a runny, unstable slice. Patience truly is a virtue here, leading to a much more enjoyable apple pie experience.
Understanding Your Apple Pie Total Time
Baking a homemade apple pie, while rewarding, does require a commitment of time. Understanding the various stages and their approximate durations can help you plan your baking day efficiently, ensuring you have enough time for each step without rushing. This foreknowledge prevents stress and allows for a more enjoyable and successful baking process, contributing to a truly satisfying final product.
Preparation Time Needed
The preparation time for a homemade apple pie typically ranges from 30 to 45 minutes. This includes peeling, coring, and slicing the apples, mixing the filling, and preparing and rolling out the pie crusts. If you opt for a homemade crust from scratch, factor in an additional 15-20 minutes for dough preparation and chilling time. Having all your ingredients prepped and ready before you begin assembly can significantly reduce this overall preparation duration, making the process smoother.
Baking Duration Explained
The total baking duration for an apple pie is usually between 50 and 70 minutes. This is broken down into two main phases: an initial 15-20 minutes at a higher temperature (425°F/220°C) to set the crust, followed by 35-50 minutes at a lower temperature (375°F/190°C) to fully cook the apples and brown the crust. Remember that oven temperatures can vary, so always keep an eye on your pie and adjust baking times as needed to achieve a perfectly golden-brown crust and bubbling, tender filling.
Nutrition Details for Your Apple Pie
While homemade apple pie is a delightful indulgence, it’s helpful to have a general idea of its nutritional content. Understanding the approximate calorie count and macronutrient breakdown can help you enjoy your slice responsibly or make informed choices about ingredients if you’re mindful of dietary needs. Remember, these are general estimates, as actual values will vary based on specific ingredients and serving sizes.
Per Serving Calorie Count
A typical slice of homemade apple pie, depending on the recipe and serving size, can range from approximately 350 to 500 calories. This estimate considers a standard two-crust pie made with butter, sugar, and apples. Factors such as the amount of sugar, type of crust (e.g., all-butter vs. shortening), and the size of the slice will influence the precise calorie count. While enjoying this classic dessert, savor it as a special treat.
Macronutrient Breakdown Summary
In terms of macronutrients, a serving of apple pie typically provides a good balance of carbohydrates, fats, and some protein. Carbohydrates, primarily from the apples, sugar, and flour in the crust, usually make up the largest portion. Fats come mainly from the butter or shortening in the crust. Protein content is generally lower, stemming from the flour. Dietary fiber is also present, thanks to the apples. For more dessert ideas, consider making a quick Italian cream cake to balance your sweet cravings.
Choosing Best Apples for Pie Tips
The success of your homemade apple pie hinges significantly on the apples you choose. Not all apples are created equal when it comes to baking; some hold their shape better, while others offer a desirable balance of sweetness and tartness. Selecting the right varieties ensures a filling that is neither too mushy nor too firm, delivering a complex flavor profile that elevates your dessert.
Use Sweet and Tart Apples
For the quintessential apple pie flavor and texture, a blend of sweet and tart apples is ideal. Tart apples like Granny Smith are fantastic for their firm texture and bright, tangy flavor that cuts through the sweetness of the sugar. For sweetness and a complementary texture, consider adding varieties such as Honeycrisp (crisp and sweet), Fuji (sweet and firm), or Braeburn (sweet-tart with good texture). Using a mix ensures a more dynamic and flavorful filling, preventing the pie from being overwhelmingly sweet or bland. The combination yields a perfect balance, making your apple pie recipe truly stand out.
Serving Your Apple Pie Bliss Fresh
A freshly baked homemade apple pie is a comforting dessert on its own, but its appeal can be significantly enhanced with the right accompaniments. The way you serve your apple pie can elevate the entire experience, turning a simple slice into a memorable culinary moment. Consider options that complement its warm, spiced flavors and flaky texture for a truly blissful dessert experience.
Pair with Vanilla Ice Cream
The classic pairing for warm homemade apple pie is a generous scoop of vanilla ice cream. The cold, creamy sweetness of the ice cream provides a delightful contrast to the warm, spiced apple filling and flaky crust. The ice cream slowly melts, creating a luscious sauce that mingles with the pie’s juices, enhancing every bite. Other delicious options include a dollop of fresh whipped cream, a drizzle of caramel sauce, or even a thin slice of sharp cheddar cheese for a traditional twist that adds a surprising savory note.
Additional Tips for Perfect Apple Pie
Even seasoned bakers encounter challenges, but with a few expert tips, you can overcome common apple pie dilemmas. Addressing issues like a soggy bottom or achieving that coveted golden crust can elevate your baking from good to extraordinary. These insights provide practical solutions, ensuring your homemade apple pie is consistently flawless, delightful, and a testament to your baking prowess.
Preventing a Soggy Bottom
A soggy bottom is a common fear for apple pie bakers, but it’s entirely preventable. One effective method is to par-bake (or blind bake) your bottom crust before adding the filling. Line the crust with parchment paper, fill with pie weights or dried beans, and bake for 10-15 minutes until lightly golden. Another tip is to bake the pie on a preheated baking sheet or pizza stone; the direct heat helps crisp the bottom crust. Additionally, ensure your apple filling isn’t too wet by allowing the spiced apples to sit and release some juice, then draining any excess before adding them to the crust. You might also enjoy other comforting bakes, like a snickerdoodle cobbler, for similar baking joy.
How to Get Golden Crust
Achieving a beautiful golden-brown crust adds to the visual appeal and indicates a perfectly baked apple pie. For a truly golden finish, brush the top crust with an egg wash (one egg beaten with a tablespoon of water or milk) before baking. This encourages browning and gives the crust a lovely sheen. You can also sprinkle a little coarse sugar over the egg wash for an extra sparkle and subtle crunch. Ensure your oven temperature is accurate and consistent, and don’t be afraid to shield the edges with foil if they start browning too quickly during the longer baking phase. Consistent oven heat and proper browning agents are key for a stunning crust. Find more baking inspiration on our Carina Recipes Pinterest or follow us on Instagram for daily food ideas.