
Grilled Shrimp Caesar Wraps offer a delightful and quick meal solution for any day of the week. This easy recipe combines succulent grilled shrimp with crisp romaine lettuce and creamy Caesar dressing, all tucked into a soft tortilla. It’s a flavorful and satisfying dish that comes together effortlessly, perfect for busy evenings.
Key Takeaways
- Quickly prepare and grill shrimp for maximum flavor.
- Gather fresh ingredients and essential tools before starting.
- Master grilling techniques to prevent overcooking and achieve perfect sear marks.
- Assemble wraps efficiently by warming tortillas and layering components.
- Explore variations and healthier options to customize your meal.
- Properly store leftovers for enjoyment later.
These wraps are a weeknight hero. Grilled shrimp adds amazing taste. Fresh ingredients make them pop. Quick assembly means dinner fast. Enjoy a light, satisfying meal.
Making Grilled Shrimp Caesar Wraps
Crafting delicious grilled shrimp Caesar wraps is simpler than you might imagine, offering a perfect blend of fresh flavors and satisfying textures. This popular dish is ideal for a weeknight dinner or a casual gathering. The key to its success lies in efficient preparation and understanding how to cook shrimp quickly without sacrificing tenderness. By following a few straightforward steps, you can achieve restaurant-quality wraps right in your own kitchen.
Quick Prep and Cook Times
One of the most appealing aspects of grilled shrimp Caesar wraps is their incredible speed from prep to plate. The actual cooking time for shrimp on a hot grill is remarkably short, often just 2-3 minutes per side. This means that once your ingredients are prepped, dinner can be ready in under 30 minutes. Focus on having everything chopped, seasoned, and ready to go before you even light the grill, ensuring a smooth and stress-free cooking experience. Consider pairing this with a simple beet salad with feta for a complete meal.
Servings for Your Family
This recipe is easily scalable to feed any size family. Typically, 12-16 medium-sized shrimp per person provides a generous serving, especially when combined with crisp romaine and other fillings. A pound of shrimp usually contains about 30-40 pieces, making it suitable for 2-3 hungry individuals. If you’re hosting a larger group, simply adjust the quantities of shrimp, tortillas, and other ingredients accordingly. These wraps are always a crowd-pleaser and offer a lighter, yet filling, dinner option compared to heavier dishes like creamy chicken alfredo lasagna rolls.
Gathering Ingredients for Your Wraps
The foundation of any great recipe begins with quality ingredients. For grilled shrimp Caesar wraps, simplicity is key, allowing the fresh components to truly shine. Before you begin any cooking, ensure you have all your items laid out and ready. This mise en place approach will streamline your process and make assembly much more enjoyable. Focus on fresh, vibrant produce and good quality shrimp for the best outcome.
Fresh Romaine Lettuce and Shrimp
The stars of your wrap are undoubtedly the fresh romaine lettuce and the succulent shrimp. Choose firm, crisp heads of romaine, ensuring they are free from wilting or discoloration. Wash and thoroughly dry the lettuce before chopping or tearing it into bite-sized pieces. For the shrimp, opt for large or jumbo shrimp, either fresh or frozen. If using frozen, thaw them completely in the refrigerator overnight or under cold running water. Look for shrimp that are peeled and deveined to save prep time, though doing it yourself ensures maximum freshness. Remember, the quality of your shrimp directly impacts the final taste, so select wisely. For another fantastic shrimp dish, you might enjoy learning about shrimp cocktail, a classic appetizer.
Essential Dressing and Cheese
No Caesar wrap is complete without its signature dressing and cheese. A good Caesar dressing can be homemade for a truly fresh taste, or you can opt for a high-quality store-bought version for convenience. If making your own, ingredients like fresh garlic, Parmesan, Dijon mustard, lemon juice, and olive oil are crucial. As for cheese, freshly grated Parmesan cheese is non-negotiable. Its salty, nutty flavor complements the shrimp and dressing perfectly. Avoid pre-grated varieties if possible, as they often contain anti-caking agents that can affect texture and flavor. Having these key elements ready will make assembly a breeze and guarantee that authentic Caesar taste.
Tools for Grilling Shrimp Perfectly
Having the right equipment on hand makes a significant difference in achieving perfectly grilled shrimp. While grilling might seem intimidating, especially for smaller items like shrimp, the proper tools ensure safety, efficiency, and fantastic results. A little preparation in your grilling setup goes a long way towards a successful and enjoyable cooking experience. You don’t need a gourmet kitchen, just a few key items to make the process smooth.
Setting Up Your Grill
Whether you’re using a gas grill or charcoal, proper setup is crucial. For gas grills, preheat to a medium-high heat (around 400-450°F / 200-230°C). For charcoal grills, aim for coals that are glowing orange with a light ash coating, indicating they are ready for cooking. Always clean your grill grates thoroughly with a wire brush before cooking to prevent sticking and transfer of old flavors. Oiling the grates with a high-smoke-point oil (like canola or grapeseed) right before adding the shrimp will further reduce sticking. Ensure you have enough fuel, whether it’s propane or charcoal, to maintain consistent heat throughout the short cooking process.
Needed Bowls and Utensils
Beyond the grill itself, a few essential kitchen tools will assist in the preparation and grilling of your shrimp. You’ll need at least one large mixing bowl for seasoning and marinating the shrimp. Tongs are indispensable for handling the shrimp on the grill; opt for long-handled tongs to keep your hands safe from the heat. A shallow dish or baking sheet is useful for transporting the seasoned shrimp to and from the grill. If you’re concerned about shrimp falling through the grates, consider using skewers (metal or pre-soaked wooden) or a grill basket, which can make flipping multiple shrimp at once much easier. Having a clean plate ready for the cooked shrimp prevents cross-contamination and allows for easy serving.
Preparing Shrimp for Grilling Flavor
The flavor of your grilled shrimp Caesar wraps largely depends on how well you prepare the shrimp before it even touches the heat. Proper cleaning and seasoning are fundamental steps that elevate the taste from good to outstanding. Don’t rush this stage; a few extra minutes here will pay dividends in the final dish. The goal is to ensure the shrimp is perfectly seasoned and ready to absorb the smoky flavors of the grill.
Cleaning and Seasoning Shrimp
Start by rinsing the shrimp under cold water and patting them completely dry with paper towels. Excess moisture can steam the shrimp instead of searing it, preventing those desirable grill marks and crispy texture. If your shrimp are not already peeled and deveined, now is the time to do so. To devein, make a shallow cut along the back of the shrimp and remove the dark vein. Once cleaned and dried, season them generously. A simple yet effective seasoning often includes salt, freshly ground black pepper, garlic powder, onion powder, and a touch of smoked paprika. For an added zesty kick, a squeeze of fresh lemon juice or a dash of red pepper flakes can brighten the flavors. This preparation is similar to preparing proteins for other popular main course dishes.
Marinating for Best Taste
While shrimp cooks quickly and absorbs flavors readily, a short marinade can significantly enhance its taste and tenderness. A good marinade for grilled shrimp typically includes olive oil (to help seasonings adhere and prevent sticking), an acid like lemon juice or white wine vinegar (to tenderize and add brightness), and herbs and spices. Think minced garlic, fresh parsley or dill, and a pinch of cayenne pepper for a subtle heat. Marinate the shrimp for no more than 15-30 minutes. Any longer, especially with acidic marinades, can start to “cook” the delicate shrimp, resulting in a rubbery texture. After marinating, drain any excess liquid before grilling to ensure a good sear.
How to Grill Shrimp Quickly
Grilling shrimp quickly is the secret to tender, flavorful results, preventing the rubbery texture that comes from overcooking. The high heat of the grill is your friend here, as it cooks the shrimp rapidly while imparting a beautiful smoky char. Timing is everything, so stay vigilant and don’t stray far from the grill once the shrimp are on. This process is much faster than you might expect, making it perfect for a quick dinner.
Achieving Perfect Sear Marks
Perfect sear marks not only look appealing but also indicate that the shrimp has developed a delicious caramelized crust. To achieve these, ensure your grill is hot and clean, and the grates are lightly oiled. Place the seasoned shrimp directly over the heat. Avoid overcrowding the grill, as this can lower the temperature and lead to steaming instead of searing. Cook undisturbed for 2-3 minutes until the shrimp turn pink and opaque about halfway up their sides. Then, flip them over to cook for another 1-2 minutes until they are entirely pink and slightly curled. The key is high heat and minimal handling.
Don’t Overcook the Shrimp
This is perhaps the most crucial tip for grilling shrimp: do not overcook them. Shrimp cooks very quickly, and even an extra minute can turn them from tender and juicy to tough and rubbery. As soon as the shrimp turn opaque pink all the way through and curl into a C-shape (an O-shape means overcooked!), they are done. Immediately remove them from the heat. The residual heat will continue to cook them slightly even after they’re off the grill, so it’s better to undercook them by a hair than to overcook. Your quick meal will be much more enjoyable with perfectly cooked shrimp.
Warming Tortillas for Easy Filling
While the grilled shrimp is the star, don’t underestimate the importance of warming your tortillas. Cold, stiff tortillas are prone to cracking when folded, making assembly a frustrating task. Warming them not only makes them more pliable and easier to work with but also enhances their flavor and texture, creating a more pleasant eating experience. This simple step takes just a moment but makes a world of difference in your final wrap.
Softening Wraps on the Grill
The grill is the perfect place to warm your tortillas, especially if it’s already hot from cooking the shrimp. Place tortillas directly on the clean grill grates for about 15-30 seconds per side, just until they become soft and slightly pliable, with perhaps a hint of char. Be careful not to leave them on too long, or they will become stiff and brittle. Alternatively, you can warm them in a dry skillet over medium heat, in the microwave wrapped in a damp paper towel, or even briefly over an open flame for a rustic touch. The goal is warmth and flexibility.
Keeping Tortillas Pliable
Once warmed, it’s important to keep your tortillas soft and pliable until you’re ready to assemble the wraps. The best way to do this is to stack them in a tortilla warmer or wrap them in a clean kitchen towel. This traps the steam and heat, keeping them warm and flexible for a good 10-15 minutes, giving you plenty of time to get everything else ready. Having soft tortillas ready makes the assembly process smooth and enjoyable, ensuring your Caesar wraps are easy to fold and delightful to eat. This attention to detail is similar to crafting perfect cheesy garlic chicken wraps.
Assembling Your Caesar Shrimp Wraps
With all your ingredients prepped and your shrimp perfectly grilled, it’s time for the enjoyable part: assembling your grilled shrimp Caesar wraps. This is where all your hard work comes together in a symphony of flavors and textures. The key is to distribute the components evenly and layer them thoughtfully, ensuring every bite offers a balanced experience. Don’t overload the wraps, as this can make them difficult to roll and eat.
Layering Lettuce and Shrimp
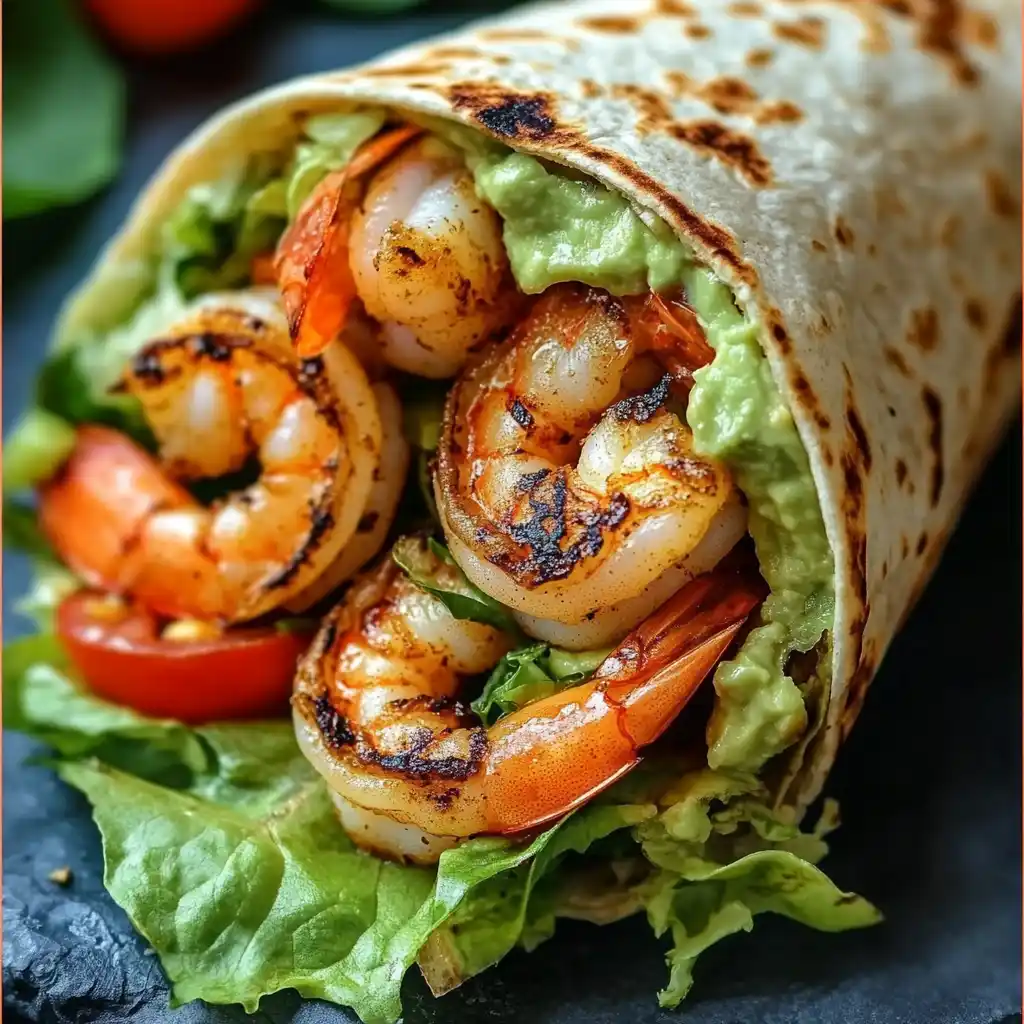
Begin by laying a warmed tortilla flat on your work surface. First, spread a thin layer of Caesar dressing down the center, leaving space around the edges for folding. Next, pile a generous handful of crisp romaine lettuce on top of the dressing. The lettuce forms a crucial base, adding freshness and crunch. Then, arrange a serving of your delicious grilled shrimp over the lettuce. Aim for about 3-4 shrimp per wrap, depending on their size, ensuring they are evenly spaced. This initial layering sets the stage for a well-balanced and satisfying wrap.
Adding Dressing and Toppings
Once the lettuce and shrimp are in place, it’s time to complete your Caesar wrap with the finishing touches. Drizzle a little more Caesar dressing over the shrimp and lettuce to ensure every component is coated with that creamy, tangy flavor. Then, sprinkle a generous amount of freshly grated Parmesan cheese over everything. For additional texture and flavor, consider adding a sprinkle of crunchy croutons (crushed slightly) or a pinch of black pepper. Carefully fold in the sides of the tortilla, then roll it up tightly from the bottom, creating a neat, portable wrap. Serve immediately for the best fresh taste.
Smart Tips for Delicious Wraps
Beyond the basic steps, a few smart tips can elevate your grilled shrimp Caesar wraps from good to truly exceptional. These minor adjustments in technique and timing can significantly impact the texture, flavor, and overall enjoyment of your meal. Incorporating these simple practices will ensure your wraps are consistently delicious and a pleasure to prepare.
Preventing Grill Overcrowding
One of the most common mistakes when grilling, especially with smaller items like shrimp, is overcrowding the grill. When too many items are placed on the grates at once, the grill’s temperature drops, and the food starts to steam instead of sear. This results in less appealing grill marks and a tougher, less flavorful product. Cook your shrimp in batches if necessary, ensuring there’s enough space around each piece for proper airflow and direct heat contact. Patience here yields far superior results, guaranteeing perfectly cooked, beautifully seared shrimp every time.
Resting Shrimp After Grilling
Just like larger cuts of meat, shrimp benefits from a brief resting period after grilling. As soon as you remove the shrimp from the heat, transfer them to a clean plate and cover loosely with foil for 2-3 minutes. This allows the internal juices to redistribute, resulting in more tender and succulent shrimp. While it might seem like a small detail given the quick cooking time, this resting phase prevents the shrimp from drying out and ensures they are juicy and full of flavor when you add them to your wraps. This quick rest is a simple step that makes a noticeable difference in tenderness.
Variations for Grilled Shrimp Wraps
While the classic grilled shrimp Caesar wrap is undeniably delicious, don’t hesitate to experiment with variations to suit your taste or to utilize ingredients you have on hand. Customizing your wraps can add exciting new dimensions of flavor and texture, making this versatile dish even more appealing. These variations also offer a great way to keep your meal rotation fresh and interesting.
Adding Spices or Veggies
To infuse different flavor profiles, consider altering the seasoning for your shrimp. A dash of Cajun spice blend can add a spicy kick, while a sprinkle of Italian herbs brings an aromatic twist. You could even use a squeeze of lime juice with chili powder for a Mexican-inspired profile. Beyond spices, incorporating extra vegetables can boost nutrition and crunch. Thinly sliced red onion, bell peppers (grilled alongside the shrimp), cherry tomatoes, or even a handful of spinach can be delightful additions. These vegetables not only add vibrant color but also contribute different textures and nutrients, enhancing the overall wrap experience.
Skillet Cooking Alternative
No grill? No problem! You can easily prepare the shrimp for your Caesar wraps using a skillet on the stovetop. A cast-iron skillet or a heavy-bottomed frying pan works best to achieve a good sear. Heat a tablespoon of olive oil or butter in the skillet over medium-high heat until shimmering. Add the seasoned shrimp in a single layer, ensuring not to overcrowd the pan. Cook for 1-2 minutes per side until pink and opaque, just like on the grill. This method offers a fantastic alternative for rainy days or when you simply prefer not to fire up the outdoor grill, delivering equally delicious results right in your kitchen.
Making Lighter Caesar Wrap Options
For those looking to enjoy the flavors of grilled shrimp Caesar wraps while keeping an eye on calorie intake, several simple adjustments can transform this dish into a lighter, equally satisfying meal. Small changes can make a big difference in the nutritional profile without compromising on taste. These healthier alternatives ensure you can enjoy your favorite flavors guilt-free, making them perfect for any dietary plan.
Choosing Healthier Dressing
The Caesar dressing is often the most calorie-dense component of the wrap. To lighten it up, consider using a low-fat or Greek yogurt-based Caesar dressing. Many brands offer lighter versions that maintain much of the classic flavor with fewer calories and less fat. Alternatively, you can make your own light Caesar dressing by reducing the amount of oil, substituting some of the mayonnaise with Greek yogurt, and increasing the fresh lemon juice and Dijon mustard for flavor. A homemade vinaigrette with a touch of Parmesan could also be a delicious, lighter alternative, offering a tangy counterpoint to the rich shrimp.
Incorporating Fresh Avocado
While avocado does add healthy fats, it can also replace some of the richness typically provided by heavy dressing or extra cheese, thereby contributing to a healthier profile overall. Sliced or mashed avocado adds a creamy texture and a wealth of beneficial nutrients, including fiber and monounsaturated fats. Its subtle, earthy flavor pairs wonderfully with grilled shrimp and crisp romaine. Adding avocado allows you to potentially reduce the amount of dressing needed, creating a satisfying and filling wrap that feels indulgent without being overly heavy. This simple addition is a delicious way to boost the nutritional value and appeal of your wraps.
Storing Leftover Shrimp Caesar Wraps
If you happen to have any leftover grilled shrimp Caesar wraps, proper storage is key to maintaining their freshness and ensuring they remain delicious for another meal. While wraps are always best enjoyed fresh, with a little care, you can savor them later. The main goal is to prevent the tortillas from becoming soggy and the ingredients from losing their vibrancy.
Keeping Wraps Airtight
To store leftover wraps, it’s crucial to keep them airtight. Wrap each individual wrap tightly in plastic cling film or aluminum foil. This barrier helps prevent air exposure, which can dry out the tortillas and the shrimp, or make the lettuce wilt. Once wrapped, place them in an airtight container in the refrigerator. If you anticipate having leftovers, consider assembling some wraps without the dressing or with the dressing on the side. This prevents the lettuce from becoming soggy and allows you to add fresh dressing just before eating, greatly improving the quality of the reheated wrap. Properly stored, they should be good for up to 1-2 days.
Reheating Gently When Needed
Reheating leftover shrimp Caesar wraps requires a gentle approach to maintain their texture and flavor. The microwave can quickly overcook shrimp and make tortillas rubbery, so it’s best to avoid it if possible. Instead, try warming the wrap in a dry skillet over low heat for a few minutes per side until just warmed through. You can also place them in a toaster oven or conventional oven at a low temperature (around 250°F / 120°C) for 5-7 minutes. If you stored the dressing separately, add it fresh after reheating. This gentle reheating ensures the shrimp remains tender and the tortilla regains some of its softness, making for a much more enjoyable second meal.
Enjoying Your Fresh Shrimp Wraps
After all your efforts in prepping, grilling, and assembling, the final and most rewarding step is to simply enjoy your fresh grilled shrimp Caesar wraps. These wraps are designed for immediate enjoyment, where the crispness of the lettuce, the tenderness of the shrimp, and the creaminess of the dressing are at their peak. Gather your family or friends and savor this delightful creation.
Serve Immediately and Fresh
For the absolute best experience, serve your grilled shrimp Caesar wraps as soon as they are assembled. The textures are vibrant, the flavors are pronounced, and the warmth of the tortilla perfectly complements the cool, crisp filling. The contrast between the warm, savory shrimp and the fresh, cool vegetables is what makes this dish truly special. Consider serving them with a side of extra Caesar dressing for dipping, or a simple fruit salad to complete the meal. Enjoying them fresh guarantees the highest quality and most satisfying culinary experience.
Great for Quick Lunch
While perfect for dinner, these wraps also make an excellent quick lunch option. Their portability and satisfying nature make them ideal for taking to work or school (just pack the dressing separately!). Preparing the shrimp in advance and quickly assembling the wraps just before serving makes for an efficient midday meal. They offer a refreshing change from typical sandwiches and provide a protein-packed, flavorful alternative that keeps you energized throughout the afternoon. Don’t forget to check out more quick and easy recipes on our Pinterest and Instagram pages for daily inspiration!