
snickerdoodle cobbler.
A Taste of Sweet Nostalgia
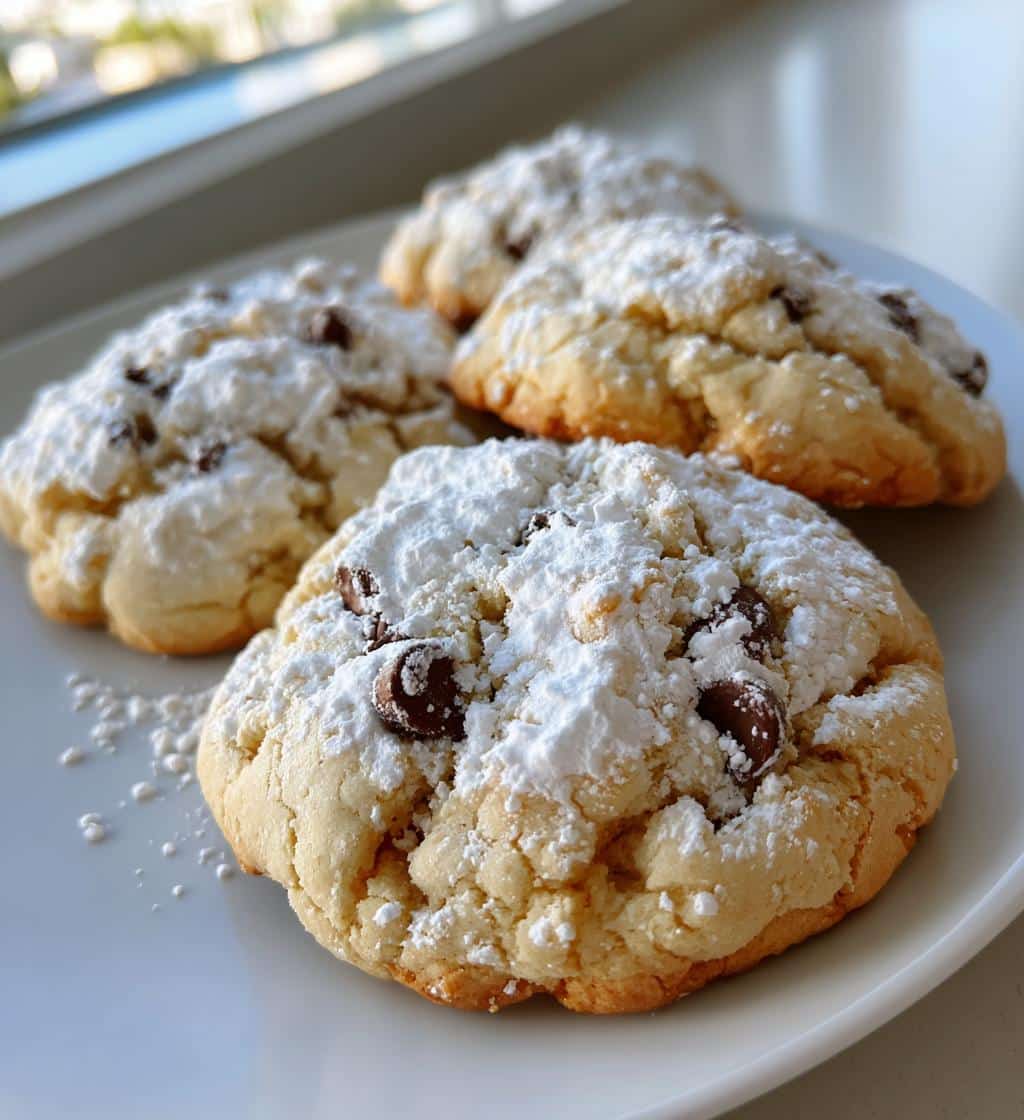
There’s something inherently comforting about a cookie that tastes like it came straight from grandma’s kitchen. These grandma’s cookies recipe capture that sentiment perfectly. The subtle caramel notes from the condensed milk, combined with a perfectly soft and chewy texture, transport you back to childhood days. They evoke images of family gatherings and cozy afternoons, making them more than just a dessert; they’re a little piece of edible history. This connection to a familiar past makes them an instant hit, providing solace and joy with every bite. For many, the aroma alone brings back a flood of happy memories, proving that food truly is a powerful link to our past. Learn more about the history of this beloved treat on Wikipedia’s cookie page.
Easy Steps to Delicious Treats
One of the best aspects of these easy homemade cookies is their straightforward preparation. You don’t need fancy equipment or advanced baking skills to achieve stellar results. We’ve broken down the process into clear, manageable steps, ensuring your baking journey is enjoyable and stress-free. From gathering simple pantry staples to the final golden-brown bake, each stage is designed for success. This recipe empowers you to create delicious, high-quality cookies with confidence, making it a fantastic choice for busy weeknights or a fun weekend baking project. The simplicity ensures consistent results, allowing you to focus on the joy of creating and savoring these delightful treats. Embrace the ease and prepare for deliciousness!
Ingredients for Grandma’s Cookies
Creating these beloved cookies begins with a carefully selected list of ingredients, most of which are likely already in your kitchen. The beauty of this recipe lies in its reliance on common items that, when combined, create something truly magical. We focus on quality yet accessible components to ensure that anyone can whip up a batch of these soft chewy cookies without a special trip to the grocery store. Having these staples on hand means that the craving for freshly baked treats can be satisfied almost instantly. It’s this accessibility that contributes to the enduring popularity of such classic recipes, allowing families to enjoy delicious homemade desserts regularly. Building a well-stocked pantry is key for delicious desserts.
Simple Pantry Staples Needed
To craft these wonderful condensed milk cookies, you’ll need butter, granulated sugar, a large egg, vanilla extract, all-purpose flour, baking powder, a pinch of salt, and, of course, the star ingredient: sweetened condensed milk. These are the foundational building blocks that ensure your cookies have the perfect texture and flavor. The use of sweetened condensed milk not only provides a unique sweetness but also contributes significantly to the cookies’ signature softness and slight chewiness. Ensure your butter is at room temperature for optimal creaming, as this affects the final texture. Each ingredient plays a crucial role in developing the rich taste and appealing consistency that define these irresistible treats, making them a testament to the power of basic yet effective baking.
Prepping Your Oven and Bowl
Proper preparation is the bedrock of successful baking, and these condensed milk cookies are no exception. Taking a few moments to set up your workspace and ingredients correctly will significantly impact the final outcome of your treats. This initial phase ensures that everything is ready and at its optimal state when it comes time to mix and bake. Overlooking these preliminary steps can lead to uneven baking or a less-than-perfect texture, so pay close attention to the details. A well-prepared environment contributes to a more relaxed and enjoyable baking experience, setting you up for success even before the first ingredient is combined. It’s all part of the art of baking.
Preheat Oven to 350°F
One of the most critical steps for achieving evenly baked cookies is preheating your oven correctly. Set your oven to 350°F (175°C) and allow it to fully reach this temperature before placing your cookie dough inside. This typically takes about 10-15 minutes after the preheat light indicates it’s ready. A properly preheated oven ensures that the cookies begin baking immediately and consistently, preventing them from spreading too much or baking unevenly. It’s a fundamental cooking tip that applies across many recipes, guaranteeing better results and a more professional finish to your baked goods.
Cream Butter and Sugar First
The creaming method is vital for light and airy cookies. In a large mixing bowl, combine the room temperature butter and granulated sugar. Beat them together with an electric mixer on medium speed until the mixture is light, fluffy, and pale yellow. This process incorporates air into the butter, which creates pockets that expand during baking, resulting in softer, chewier cookies. It’s a foundational technique for many cookie recipes and is essential for developing the ideal texture in your grandma’s cookies. Don’t rush this step; properly creamed butter and sugar are key to the cookie’s structure and tenderness, directly impacting the final quality of your delicious treats.
Mixing the Wet Ingredients Well
After creaming your butter and sugar, the next stage involves carefully incorporating the wet ingredients to form the foundation of your cookie dough. This step is where the unique flavor profile of these condensed milk cookies truly begins to take shape. The aim is to achieve a smooth, homogenous mixture that will seamlessly integrate with the dry components later on. Precision in measurement and gentle, thorough mixing here contributes significantly to the overall texture and consistency of the final cookie. It’s a straightforward but important phase that builds upon the aeration achieved during creaming, preparing the dough for its distinct sweet and tender qualities. Proper mixing ensures that all flavors are evenly distributed throughout the batch.
Add Milk and Vanilla Smoothly
Once your butter and sugar are beautifully creamed, it’s time to introduce the sweetened condensed milk and vanilla extract. Add the egg first, beating until just combined. Then, gradually pour in the sweetened condensed milk and the vanilla extract. Continue mixing on low speed until all the wet ingredients are thoroughly combined and the mixture appears smooth and uniform. Be careful not to overmix at this stage; just enough to ensure everything is incorporated. The sweetened condensed milk provides a wonderful richness and unique sweetness that is characteristic of these special cookies, while the vanilla extract enhances all the other flavors, giving your easy homemade cookies that irresistible aroma and taste. This smooth integration is crucial for the perfect dough consistency.
Combining Dry Ingredients Together
The dry ingredients might seem secondary, but their careful preparation and incorporation are just as critical as the wet components for achieving the desired cookie texture. This step ensures that leavening agents, flavor enhancers, and the structural base are evenly distributed throughout the dough. Lumping or uneven distribution can lead to inconsistencies in texture and rise, resulting in cookies that don’t meet the expectation of soft chewy cookies. Taking a moment to properly combine these elements separately before mixing them into the wet mixture is a simple yet effective technique that significantly elevates the quality of your finished product. It’s a foundational principle in baking that guarantees uniform results every time.
Whisk Flour, Baking Powder, Salt
In a separate medium-sized bowl, whisk together the all-purpose flour, baking powder, and salt. This seemingly simple step is incredibly important. Whisking ensures that the baking powder, which is responsible for the cookies’ rise, is evenly distributed throughout the flour. It also helps to break up any lumps in the flour, preventing pockets of unmixed ingredients in your dough. The salt balances the sweetness of the condensed milk and sugar, enhancing the overall flavor profile. A well-whisked dry mixture guarantees a consistent texture in every cookie, contributing to their signature softness and preventing dense or crumbly spots. This careful preparation is one of the best cookie tips for reliable baking outcomes.
Making the Perfect Cookie Dough
Creating the ideal cookie dough is a delicate balance, particularly when aiming for that perfect soft chewy cookies texture. This stage is where the wet and dry elements unite, and careful handling is paramount to avoid tough or crumbly results. The goal is to mix just enough to combine the ingredients, without overworking the gluten in the flour. Overmixing can develop the gluten too much, leading to cookies that are dense and hard, rather than tender and soft. Paying close attention to the dough’s consistency and stopping at the right moment ensures your grandma’s cookies live up to their reputation for delectable tenderness. This step truly defines the final product’s quality.
Stir Gently Until Just Combined
Once your wet and dry ingredients are prepared, it’s time to bring them together. Gradually add the dry ingredient mixture to the wet ingredients in small batches, mixing on low speed or by hand with a spatula. The key here is to stir gently until *just* combined. As soon as you no longer see streaks of dry flour, stop mixing. Overmixing develops the gluten in the flour, which can lead to tough, dense cookies instead of the desired soft and tender texture. This careful approach is one of the most important best cookie tips for achieving light and airy baked goods. Remember, less is often more when it comes to mixing cookie dough, ensuring a truly enjoyable treat.
Dough Should Be Soft
Upon completion of mixing, your cookie dough should have a noticeably soft and pliable consistency. It might be slightly sticky but should hold its shape when scooped. This characteristic softness is crucial for ensuring the cookies spread just enough during baking and retain their tender crumb. If the dough feels stiff or crumbly, it might indicate overmixing or an imbalance in ingredients. A properly soft dough is a promise of delicious, melt-in-your-mouth cookies, allowing for that signature chewiness these condensed milk cookies are famous for. Trust your senses here; the feel of the dough is a reliable indicator of its readiness for baking.
Baking Your Condensed Milk Cookies
The moment has arrived to transform your carefully prepared dough into golden, fragrant cookies. Baking is where the magic truly happens, as the heat interacts with the ingredients to create that irresistible aroma and perfect texture. This stage requires vigilance and understanding of your oven’s nuances. Every oven is slightly different, so closely monitoring your cookies is key to achieving that ideal golden edge without overbaking. A perfectly baked cookie is soft chewy cookies at its finest, with just the right amount of crispness on the outside and tenderness within. Prepare to fill your home with the wonderful smell of fresh-baked goodness.
Drop Dough onto Lined Sheets
Prepare your baking sheets by lining them with parchment paper or silicone baking mats. This prevents sticking and ensures easy cleanup. Using a cookie scoop (about 1.5 to 2 tablespoons) or two spoons, drop rounded spoonfuls of dough onto the prepared sheets, leaving about 2 inches between each cookie to allow for spreading. Do not flatten the dough; they will naturally spread as they bake. Uniformly sized dough portions are essential for even baking, ensuring all your grandma’s cookies cook at the same rate and reach that perfect golden hue simultaneously. This simple step makes a big difference in the final presentation and consistency of your treats.
Bake Until Edges Are Golden
Place the baking sheets into your preheated 350°F (175°C) oven and bake for 9-12 minutes. Baking time can vary depending on your oven and cookie size, so start checking at the 9-minute mark. The cookies are ready when their edges are lightly golden brown, but the centers still look slightly soft and puffed. They will continue to set as they cool. Avoid overbaking, as this can lead to dry, hard cookies. You want to preserve that soft, chewy interior that makes these easy homemade cookies so delightful. Pay close attention to the visual cues to pull them out at just the right moment for optimal texture and flavor.
Cooling and Enjoying Your Treats
After the wonderful aroma of freshly baked cookies fills your kitchen, the cooling process is just as crucial as the baking itself. This often-overlooked step is essential for allowing the cookies to fully set and achieve their intended texture. Rushing this stage can lead to crumbling or a less satisfying experience. Patience here is rewarded with perfectly firm yet tender condensed milk cookies that are ready for enjoyment. Proper cooling methods ensure that your delicious treats maintain their structure and delightful chewiness, making them ready to be savored or stored for later. Soon you’ll be enjoying your sweet dessert ideas.
Let Cookies Cool on Sheet
Once your cookies are out of the oven, resist the urge to immediately transfer them. Allow them to cool on the baking sheet for about 5 minutes. During this time, the hot cookies will continue to cook slightly, firm up, and become less fragile. This crucial cooling period prevents them from breaking apart when you move them and helps set their delicate structure. This initial cooling ensures that your soft chewy cookies retain their shape and integrity, making them much easier to handle without sacrificing their delicious texture. It’s a small step that makes a big difference in the overall success of your baking.
Transfer to Wire Rack Properly
After their initial rest on the baking sheet, carefully transfer the cooled cookies to a wire rack to cool completely. A wire rack allows air to circulate all around the cookies, preventing them from becoming soggy on the bottom due to trapped heat and steam. This method ensures that your grandma’s cookies achieve an even cool, maintaining their tender interior and crisp edges. Cooling completely before storing is also vital for preventing condensation, which can lead to premature spoilage. Once fully cooled, they’re ready to be enjoyed or stored, ensuring maximum freshness and optimal texture.
Storing Your Homemade Cookies
Once you’ve baked a delicious batch of grandma’s cookies, proper storage is key to maintaining their freshness and wonderful texture. Whether you plan to enjoy them over a few days or save some for later, understanding the best storage methods will ensure every cookie tastes as good as the first. From simple pantry solutions to longer-term freezer options, these cookie storage hacks help you keep your treats perfect. Preserving the quality of your baked goods means you can extend the joy of your homemade creations, always having a sweet treat ready when a craving strikes. This section provides all the details you need to keep your delightful condensed milk cookies at their best.
Keep Fresh at Room Temperature
For short-term storage, your condensed milk cookies can be kept fresh at room temperature. Place them in an airtight container once they have completely cooled. This prevents them from drying out and maintains their soft, chewy texture. A cookie jar or a sealed plastic container works perfectly. They will stay fresh for up to 3-5 days this way. For an extra touch, you can place a slice of bread in the container; the cookies will absorb moisture from the bread, keeping them softer for longer. Ensure they are in a cool, dry spot away from direct sunlight to preserve their quality and flavor. These easy homemade cookies are always a delight, especially when stored correctly.
How to Freeze Cookies Safely
If you’ve baked a large batch or want to enjoy fresh-baked goodness anytime, freezing is an excellent option. To freeze your soft chewy cookies safely, first ensure they are completely cooled. Arrange them in a single layer on a baking sheet and flash freeze for about 30 minutes until firm. This prevents them from sticking together. Then, transfer the frozen cookies to a freezer-safe airtight container or heavy-duty freezer bag, separating layers with parchment paper if stacking. They can be stored in the freezer for up to 2-3 months. This method is perfect for preserving the texture and flavor, ensuring you always have delicious treats on hand. For another freezer-friendly dessert, check out our vanilla bean creme brulee cheesecake cupcakes.
Reheating Frozen Cookies Simply
When you’re ready to enjoy your frozen cookies, there are a couple of simple ways to bring them back to life. You can let them thaw at room temperature for an hour or two; they will be perfectly soft and ready to eat. For a warm, “fresh from the oven” experience, place the thawed or partially frozen cookies on a baking sheet and warm them in a preheated oven at 300°F (150°C) for 5-7 minutes. This gentle reheating restores their tender texture and releases their inviting aroma. Alternatively, a quick 10-15 second blast in the microwave can also work for a single cookie. Enjoying your Carina Recipes favorites anytime is easy!
For more delicious content and baking inspiration, be sure to follow us on Instagram!
Success Tips for Grandma’s Cookies
Achieving consistently perfect grandma’s cookies is easier than you think, especially with a few expert tips. These insights go beyond the basic recipe steps, providing you with the nuances that differentiate a good cookie from a truly exceptional one. From ingredient preparation to baking vigilance, these suggestions are designed to empower your baking journey, ensuring every batch of condensed milk cookies is a triumph. Mastering these techniques will not only enhance this recipe but also improve your general baking skills, making you a more confident and capable baker. Pay attention to these cooking tips for optimal results.
Use Room Temperature Butter Always
One of the most crucial elements for soft, chewy cookies is using truly room temperature butter. This means the butter should be soft enough to indent with a finger but not melted or greasy. Room temperature butter creams beautifully with sugar, creating tiny air pockets that contribute to the cookies’ light texture. Cold butter won’t cream properly, leading to dense cookies, while melted butter can result in a greasy texture and excessive spreading. Plan ahead by taking your butter out of the refrigerator at least 30-60 minutes before you start baking. This simple tip is a game-changer for best cookie tips.
Avoid Overmixing Dough for Softness
We’ve emphasized this before, but it bears repeating: overmixing is the enemy of soft cookies. Once you add the dry ingredients to the wet, mix only until the flour streaks have just disappeared. The moment the dough comes together, stop mixing. Excess mixing develops gluten, which can make your cookies tough and chewy in an undesirable way, rather than delicate and tender. Gentle incorporation is key to preserving the ideal texture of these soft chewy cookies. This meticulous attention to mixing technique is crucial for achieving that melt-in-your-mouth quality.
Watch Baking Time Closely
Oven temperatures can vary, and even a minute or two can make a big difference in cookie texture. Start checking your easy homemade cookies at the minimum recommended baking time (around 9 minutes). Look for lightly golden edges and centers that still appear slightly soft. The cookies will continue to bake and firm up slightly as they cool on the baking sheet. Pulling them out just before they seem fully done is a trick to ensuring a chewy interior. Overbaking is the quickest way to dry out your cookies, so keep a close eye on them for optimal results.
Prepare Dough Ahead Safely
For ultimate convenience, you can prepare the cookie dough ahead of time. Wrap the dough tightly in plastic wrap and refrigerate for up to 2-3 days. This actually deepens the flavors slightly, leading to even more delicious cookies. When ready to bake, let the dough sit at room temperature for about 15-20 minutes to soften slightly before scooping and baking as usual. You can also scoop individual dough balls and freeze them on a baking sheet before transferring them to a freezer bag for up to a month. Bake directly from frozen, adding a couple of minutes to the baking time, for quick access to warm grandma’s cookies anytime.
Try Fun Cookie Variations
While the classic grandma’s cookies recipe is perfect as is, part of the joy of baking is experimenting and making it your own. These easy homemade cookies serve as an excellent base for various additions and substitutions, allowing you to tailor them to your taste preferences or whatever ingredients you have on hand. Whether you’re looking to add a burst of new flavor or adapt for dietary needs, the possibilities are vast. Don’t be afraid to get creative; these suggestions will help you transform a beloved recipe into something uniquely yours, adding exciting twists to your repertoire of sweet dessert ideas. This section provides inspiration for elevating your baking game.
Add Chocolate Chips or Nuts
Elevate your condensed milk cookies by incorporating delicious mix-ins. Once the dough is just combined, gently fold in a cup of your favorite additions. Classic semi-sweet chocolate chips are always a hit, but white chocolate, milk chocolate, or even dark chocolate chunks can add a wonderful dimension. For a nutty crunch, consider chopped walnuts, pecans, or almonds. Dried cranberries or raisins can add a chewy, fruity sweetness. Ensure you don’t overmix when adding these ingredients; just enough to distribute them evenly throughout the dough. These simple additions transform the cookies into personalized treats, offering a delightful surprise with every bite and making them truly unique.
Smart Ingredient Swaps Possible
Looking to tweak the recipe slightly? There are a few smart ingredient swaps you can consider. For instance, if you prefer a different flavor profile, you can experiment with varying extracts, such as almond extract for a subtle nutty note, or lemon zest for a bright, citrusy twist. While butter is traditional, some bakers might experiment with a dairy-free alternative for specific dietary needs, though this may alter the texture slightly. For a different texture, you could try substituting a small portion of the all-purpose flour with whole wheat pastry flour for added chewiness and fiber, without drastically changing the overall structure. These quick cookie variations allow for flexibility while maintaining the core deliciousness of the recipe.
Quick Look at Cookie Nutrition
When indulging in delightful homemade treats like these grandma’s cookies, it’s natural to be curious about their nutritional content. While these are certainly a sweet indulgence, understanding the basic breakdown can help you enjoy them mindfully. Keep in mind that nutritional values can vary based on specific ingredient brands, exact measurements, and any variations you choose to add. This section provides a general overview, offering a simple guide to the caloric, fat, sugar, and protein content per serving. It’s about providing transparency so you can make informed choices while still savoring every delicious bite of your desserts.
Per Serving: Calories and Fat
A typical serving of these condensed milk cookies (approximately one medium-sized cookie) generally contains around 120-150 calories. The fat content per serving usually ranges from 6-8 grams, with a portion of that being saturated fat, primarily from the butter and condensed milk. These figures are estimates and can fluctuate depending on the size of your cookies and the precise ingredients used. For instance, adding chocolate chips or nuts will naturally increase both the calorie and fat count. It’s a sweet treat, so moderation is always key to enjoying these without excess. This provides a clear picture of the initial “simple cookie nutrition” for your treats.
Carbs, Sugar, and Protein Details
In terms of carbohydrates, each cookie typically contains about 15-20 grams. A significant portion of this comes from sugars, given the presence of both granulated sugar and sweetened condensed milk, contributing approximately 10-14 grams of sugar per serving. While these cookies are a carbohydrate-rich treat, they do offer a small amount of protein, usually around 1-2 grams per cookie, mainly from the flour, egg, and dairy components. This nutritional snapshot helps you understand the energy sources provided by these delicious soft chewy cookies. Enjoy them as a wonderful occasional indulgence, appreciating the balance of flavors and textures they offer.
