
herbs to ensure their flavors are well distributed throughout the butter and readily released during roasting. For the garlic, use fresh cloves, finely minced or pressed, to impart a pungent, savory kick. Avoid using pre-minced garlic in a jar, as its flavor profile is often milder and less fresh. Combine the softened butter with the finely chopped herbs, minced garlic, a good pinch of salt, and freshly ground black pepper. Mix everything thoroughly until all ingredients are evenly distributed, creating a beautiful, fragrant paste ready to transform your chicken.
Seasoning Your Garlic Herb Butter Chicken
The proper application of your homemade garlic herb butter is key to achieving a deeply flavored and succulent roast chicken. This step goes beyond merely coating the exterior; it’s about infusing every part of the bird with the rich, aromatic goodness. A thorough seasoning process ensures that the flavors penetrate the meat, not just the skin, leading to a truly juicy roasted chicken that boasts consistent taste throughout. Paying attention to these details will set your chicken apart and guarantee a memorable meal.
Rubbing butter under chicken skin
This technique is a game-changer for moist and flavorful chicken. Gently separate the skin from the breast meat and thigh meat using your fingers, being careful not to tear the skin. Once you’ve created pockets, take a generous amount of your garlic herb butter and carefully push it under the skin, spreading it evenly over the meat. This allows the butter to melt directly into the chicken flesh as it roasts, basting it from the inside and preventing it from drying out. The herbs and garlic will deeply infuse the meat, resulting in incredibly tender and aromatic bites. This direct contact with the meat is what truly amplifies the flavor profile of your garlic herb butter chicken.
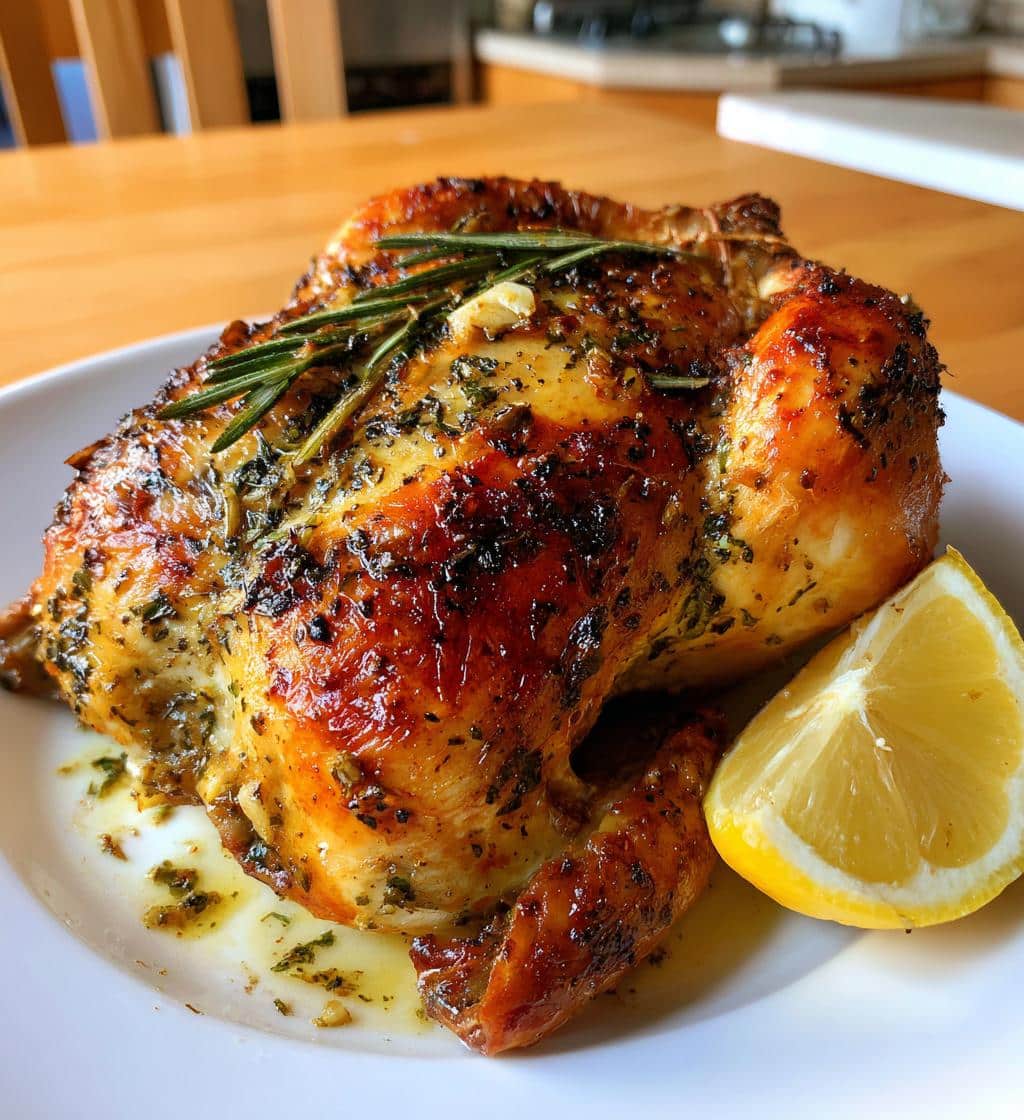
Coating chicken generously all over
After you’ve applied butter under the skin, don’t forget the exterior. Take the remaining garlic herb butter and rub it generously all over the outside of the chicken. Ensure every crevice, nook, and cranny is coated, including the legs, wings, and back. This outer layer of butter will contribute to a beautifully golden, crispy skin and a rich, savory crust. Season the exterior generously with additional salt and freshly ground black pepper. Some people also like a sprinkle of paprika for color. The butter on the outside helps the skin achieve that desired crispness while locking in moisture, ensuring your easy chicken dinner is flavorful from the first bite to the last. This comprehensive butter application ensures a truly satisfying roasted chicken.
Roasting Perfect Garlic Herb Butter Chicken
Roasting a perfect garlic herb butter chicken involves more than just putting it in the oven; it requires strategic temperature management and careful monitoring to achieve that ideal balance of crispy skin and juicy, tender meat. This crucial stage in the cooking process determines the overall success of your meal, turning simple ingredients into a show-stopping centerpiece. Understanding the nuances of oven temperature and the role of a reliable meat thermometer is fundamental for any home cook aspiring to create a consistently delicious roast chicken recipe.
Setting the right oven temperature
For a beautiful, golden-brown skin and thoroughly cooked interior, a two-stage roasting process often yields the best results. Start by preheating your oven to a higher temperature, typically around 425°F (220°C). This initial blast of heat helps to crisp the skin quickly and develop a rich color. After about 15-20 minutes at this higher temperature, reduce the oven heat to a more moderate 375°F (190°C) for the remainder of the cooking time. This lower temperature allows the chicken to cook through evenly without burning the skin, ensuring the meat stays incredibly moist. The exact cooking time will vary depending on the size of your chicken, but generally, expect 1 hour 15 minutes to 1 hour 45 minutes for a 4-5 pound bird. You might also consider starting your chicken breast-side down to protect the breast meat from drying out, flipping it halfway through, a technique used for many main course chicken dishes.
Using a reliable meat thermometer
Guessing if your chicken is done is a recipe for either undercooked (and unsafe) or overcooked (and dry) meat. A reliable meat thermometer is an indispensable tool for roasting any poultry. Insert the thermometer into the thickest part of the thigh, avoiding the bone, as bone conducts heat and can give a falsely high reading. The target internal temperature for cooked chicken is 165°F (74°C). However, remember that the chicken’s temperature will continue to rise a few degrees after it’s removed from the oven (this is called carryover cooking). Therefore, you can safely pull the chicken out when the thermometer reads around 160-162°F (71-72°C), knowing it will reach the safe temperature during resting. Investing in a good instant-read thermometer will give you peace of mind and consistently perfectly cooked, juicy chicken.
Knowing When Your Chicken is Done
Ensuring your roast chicken is perfectly cooked, neither underdone nor overcooked, is paramount for both safety and flavor. While visual cues are helpful, the most accurate method involves a reliable meat thermometer. This step is critical in any roast chicken recipe to guarantee a delicious and safe meal. Overcooking can lead to dry, stringy meat, while undercooking poses health risks. Mastering these indicators will instill confidence in your cooking and consistently deliver a beautiful, juicy bird.
Checking internal temperature correctly
The gold standard for determining chicken doneness is using an instant-read meat thermometer. Insert the thermometer into the thickest part of the thigh, making sure it doesn’t touch the bone. The bone conducts heat differently and can give an inaccurate reading. The ideal internal temperature for cooked chicken is 165°F (74°C). Remember that the temperature will continue to rise by a few degrees after the chicken is removed from the oven due to residual heat, a phenomenon known as carryover cooking. Therefore, you can typically take the chicken out when it reaches 160-162°F (71-72°C) in the thigh, letting it come up to 165°F (74°C) as it rests. This method ensures maximum juiciness while guaranteeing food safety.
Juices running clear from chicken
Another traditional, though less precise, indicator of doneness is to check if the juices run clear. Carefully pierce the thickest part of the thigh meat with a small knife or skewer. If the juices that come out are clear and translucent, without any pinkness, the chicken is likely done. If the juices are still cloudy or tinged with pink, the chicken needs more time in the oven. While a helpful visual cue, relying solely on this method can be misleading, especially with heavily seasoned or brined chicken. For absolute certainty and the best results, always back up this visual check with a reading from your meat thermometer. Combining both methods offers the highest assurance of a perfectly cooked, delicious garlic herb butter chicken.
Why Resting Your Chicken Matters
After all the effort of preparing and roasting your chicken, it might be tempting to carve into it immediately. However, resisting this urge and allowing the chicken to rest is arguably one of the most crucial steps for achieving an incredibly juicy and flavorful result. This simple act makes a profound difference in the final texture and succulence of your roast, turning a good meal into an exceptional one. Resting is the final, non-negotiable step to perfecting your juicy roasted chicken.
Letting chicken rest for juiciness
When chicken roasts in the oven, the muscle fibers contract, pushing the juices towards the center of the bird. If you cut into the chicken immediately after taking it out of the oven, these juices will rush out, leaving you with dry meat. Resting allows the muscle fibers to relax and reabsorb those delicious juices, redistributing them evenly throughout the meat. The result is a significantly juicier, more tender chicken. To rest, simply transfer the cooked chicken from the roasting pan to a cutting board. Tent it loosely with aluminum foil to keep it warm, but don’t seal it tightly, as this can steam the skin and make it less crispy. A general rule of thumb is to let the chicken rest for 15-20 minutes for a whole bird. This gives the meat ample time to reabsorb its moisture, ensuring every slice of your garlic herb butter chicken is as succulent as possible. This patience pays off tremendously, preventing a common pitfall of home roasting.
Serving Your Garlic Herb Butter Chicken
Once your perfectly roasted garlic herb butter chicken has rested and been carved, the next exciting step is presenting it alongside complementary side dishes. The rich, savory, and aromatic flavors of the chicken pair beautifully with a variety of accompaniments, transforming a simple meal into a delightful feast. The selection of side dishes can elevate the entire dining experience, providing balance and additional textures to your flavorful chicken dish. Consider the occasion and your guests’ preferences when planning your menu.
Delicious side dishes to pair
The versatility of a roast chicken means it can be paired with an array of delicious side dishes. For a classic, comforting meal, consider creamy mashed potatoes or roasted root vegetables like carrots, parsnips, and potatoes, which can often be cooked alongside the chicken in the same oven. A fresh green salad with a light vinaigrette provides a refreshing contrast to the richness of the chicken, cutting through the savory notes with its bright acidity. Steamed or sautéed green beans, asparagus, or broccoli also make excellent, healthy additions. Don’t forget a warm, crusty bread to soak up any leftover pan drippings or to accompany your meal. For a different twist, you might enjoy serving it with a flavorful grain like quinoa or wild rice pilaf. The key is to choose sides that enhance, rather than overpower, the robust flavors of your garlic herb butter chicken, ensuring a harmonious and satisfying meal.
Creative Ideas for Chicken Side Dishes
Beyond the traditional, there’s a whole world of creative side dishes that can beautifully complement your garlic herb butter chicken, turning a great meal into an extraordinary culinary experience. Thinking outside the box with your accompaniments allows for a diverse palette of flavors and textures, ensuring every dinner feels fresh and exciting. These ideas not only pair well but can also simplify your cooking process by utilizing your oven effectively, making your easy chicken dinner even more convenient to prepare.
Roasting vegetables with the chicken
One of the easiest and most flavorful ways to prepare side dishes is to roast them alongside your chicken. This method allows the vegetables to absorb some of the chicken’s drippings, infusing them with rich, savory flavors. Hearty vegetables like potatoes, carrots, onions, Brussels sprouts, or bell peppers are excellent choices. Simply chop them into evenly sized pieces, toss with a little olive oil, salt, pepper, and perhaps some additional herbs, then arrange them around the chicken in the roasting pan during the last 45-60 minutes of cooking. This not only saves oven space but also minimizes cleanup, as everything cooks together. For a vibrant addition, consider roasting some crispy cauliflower florets with a sprinkle of paprika for extra color and flavor.
Mashed potatoes or fresh salad
For those who prefer classic comfort, a generous serving of creamy mashed potatoes is always a winning choice with roast chicken. Their smooth, buttery texture provides a wonderful contrast to the chicken’s crispy skin and tender meat. You can enrich your mashed potatoes with roasted garlic, cream cheese, or even some of the pan drippings from the chicken for an extra layer of flavor. Alternatively, for a lighter and fresher approach, a crisp green salad offers a refreshing counterpoint. A vibrant mix of leafy greens, cherry tomatoes, cucumber, and a light vinaigrette dressing can cut through the richness of the chicken, cleansing the palate and adding a welcome crunch. Whether you opt for a comforting classic or a refreshing twist, these side dishes ensure a well-rounded and delicious meal for your family and guests.
Saving Flavorful Pan Drippings for Gravy
One of the most valuable byproducts of roasting a whole chicken is the accumulation of flavorful pan drippings. These savory juices, infused with garlic, herbs, and chicken fat, are pure liquid gold and should never be discarded. They form the perfect base for a rich, homemade gravy that will elevate your roast chicken recipe to an entirely new level. Transforming these drippings into gravy is a simple process that adds another layer of indulgence to your meal, ensuring no flavor goes to waste and enhancing the entire dining experience.
To make gravy, carefully pour the pan drippings into a fat separator or a heatproof container. Allow the fat to separate and rise to the top. Skim off most of the fat, leaving behind the concentrated flavorful juices. In the same roasting pan (or a saucepan), heat a small amount of the skimmed fat (or butter) over medium heat. Whisk in a tablespoon or two of flour to create a roux, cooking it for a couple of minutes until it forms a golden paste. Gradually whisk in the reserved chicken drippings along with some chicken broth, stirring constantly to prevent lumps. Simmer the gravy, whisking occasionally, until it thickens to your desired consistency. Season with salt and pepper to taste, and if desired, a splash of white wine or a few drops of lemon juice for brightness. This homemade gravy, made from your flavorful pan drippings, is the ultimate accompaniment to your garlic herb butter chicken, adding moisture and an incredible depth of flavor to every bite, and it’s far superior to any store-bought alternative.
Experimenting with Your Roast Chicken Flavor
While the classic garlic herb butter chicken is undeniably delicious, the beauty of roasting a whole bird lies in its adaptability. Don’t be afraid to step beyond the traditional and experiment with different flavor profiles to suit your taste or occasion. This experimentation can transform your regular roast into a completely new culinary adventure, making the process of cooking an easy chicken dinner even more exciting. Customizing your seasonings and aromatics allows for endless possibilities, ensuring your table is never boring.
Trying different herbs and spices
The world of herbs and spices is vast, offering countless combinations to enhance your chicken. Instead of the standard rosemary and thyme, consider a Mediterranean twist with oregano, marjoram, and a pinch of dried mint. For a warmer, earthier flavor, incorporate smoked paprika, cumin, and coriander into your butter mixture. A touch of chili flakes can add a subtle heat, while a blend of Italian herbs offers a familiar yet different taste. You can also explore Asian-inspired flavors with ginger, five-spice powder, and a touch of soy sauce (brushed on the skin, not mixed in butter). Remember to adjust the quantities based on your preference and the intensity of the spices. This willingness to explore new spice combinations allows you to personalize your homemade herb butter chicken, making each roast a unique and flavorful chicken dish. For more inspiration on diverse chicken flavors, you might check out our easy butter chicken recipe.
Swapping citrus for a new twist
Lemons are a classic choice for a reason, but other citrus fruits can offer exciting new dimensions to your roast chicken. Oranges, for instance, provide a sweeter, more aromatic note that pairs wonderfully with herbs like tarragon or sage. Limes can lend a sharper, more zesty kick, perfect when combined with cilantro and a touch of chili. Grapefruit, with its slightly bitter undertones, can create a sophisticated and intriguing flavor profile. Experiment with slices of these fruits both inside the cavity and nestled around the chicken in the roasting pan. The acidity and essential oils from the citrus will penetrate the meat, keeping it moist and imparting a fresh, vibrant aroma. This simple swap can dramatically alter the character of your garlic herb butter chicken, proving that small changes can lead to big flavors.
Storing and Reheating Leftover Chicken
A perfectly roasted garlic herb butter chicken is a gift that keeps on giving, especially when you have delicious leftovers. Knowing how to properly store and reheat your chicken ensures that every subsequent meal is as enjoyable and safe as the first. This practical knowledge extends the life of your culinary creation and minimizes food waste, making your easy chicken dinner even more economical and convenient. Following these guidelines will maintain the quality and taste of your flavorful chicken dish.
Keeping chicken fresh in the fridge
Once your roast chicken has cooled completely (within two hours of cooking), it’s crucial to store it correctly to maintain freshness and prevent bacterial growth. Carve any remaining meat off the bone, as the bones can take up unnecessary space and don’t contribute to keeping the meat fresh once cooked. Place the carved chicken meat in airtight containers. You can separate light meat from dark meat if preferred, but it’s not strictly necessary. Store the containers in the refrigerator, where the cooked chicken will remain fresh for 3-4 days. For optimal freshness, consider placing a small amount of pan drippings or chicken broth with the meat before sealing, which helps to keep it moist. Labeling the containers with the date can also help you keep track of storage times.
Best ways to warm up chicken
Reheating chicken can sometimes lead to dry, unappetizing results if not done correctly. To preserve moisture and flavor, avoid high heat. The oven is often the best method for reheating larger pieces or a significant quantity of chicken. Preheat your oven to a moderate 300-325°F (150-160°C). Place the chicken in an oven-safe dish, add a splash of chicken broth or water to the bottom of the dish, and cover it tightly with foil. This creates a steamy environment that gently warms the chicken without drying it out. Reheat for 20-30 minutes, or until warmed through. For smaller portions, the microwave can be used, but reheat in short bursts (30-60 seconds) on a lower power setting to prevent the meat from becoming tough. For more general dinner ideas and meal prep, browse our dinners category for inspiration.
Quick Answers to Common Chicken Questions
Even seasoned cooks can encounter questions when preparing a roast chicken. This section aims to provide straightforward answers to some frequently asked queries, ensuring you feel confident in every step of making your garlic herb butter chicken. From achieving that desired juiciness to planning ahead, these insights will help you master the art of the perfect roast chicken recipe and tackle any culinary challenges with ease. A clear understanding of these points helps ensure a consistently successful outcome for your flavorful chicken dish.
How to ensure juicy meat?
Ensuring a juicy roasted chicken involves a few key practices. First, proper preparation is essential: starting with a dry chicken and applying the garlic herb butter both under and over the skin helps to lock in moisture. Secondly, avoid overcooking at all costs; use a reliable meat thermometer to pull the chicken from the oven as soon as it reaches the safe internal temperature of 165°F (74°C) in the thickest part of the thigh. Finally, and arguably most importantly, allow the chicken to rest for 15-20 minutes after roasting, loosely tented with foil. This crucial resting period allows the juices to redistribute throughout the meat, resulting in an incredibly tender and succulent bird. Some cooks also advocate for brining the chicken before roasting, which infuses moisture and flavor. For more visual tips and inspiration, you can always check out our latest posts on Pinterest.
Can I prepare this in advance?
Yes, several components of your garlic herb butter chicken can be prepared in advance to streamline your cooking process on the day of your meal. The garlic herb butter can be made up to 2-3 days ahead of time and stored in an airtight container in the refrigerator. You can also prepare and chop your aromatics like lemons, onions, or extra herbs a day or two in advance. For the chicken itself, you can pat it dry and even apply the herb butter under the skin the night before. This allows the flavors to truly penetrate the meat. Simply cover the buttered chicken loosely with plastic wrap or foil and refrigerate. On the day of roasting, remove the chicken from the fridge about 30-60 minutes before cooking to bring it closer to room temperature, which promotes more even cooking. This advance preparation makes an easy chicken dinner even more manageable for busy weeknights or special occasions. Follow us on Instagram for daily recipe ideas and cooking hacks!
