
Making a focaccia bread recipe at home is simpler than you might imagine. This delightful Italian flatbread, known for its soft interior and crispy exterior, is perfect for any occasion. Our guide provides easy steps to achieve a truly perfect focaccia, ensuring a soft and fluffy result every time.
Key Takeaways
- Focaccia is an incredibly easy and rewarding bread to bake at home.
- Proper yeast activation is the foundation for a light, airy focaccia dough.
- Gentle handling during mixing and kneading creates the desired soft texture.
- Generous olive oil, dimpling, and strategic toppings are key to authentic flavor.
- Achieving a golden brown exterior and crispy crust enhances the overall experience.
- Cooling properly prevents a soggy bottom and ensures the best texture.
Focaccia making is a rewarding kitchen skill. Simple ingredients yield incredible flavor. Gentle handling creates airy texture. Fresh herbs add aromatic bliss. Enjoy this versatile bread often.
Gathering Your Focaccia Bread Recipe Essentials
Embarking on your homemade focaccia journey begins with gathering the right ingredients. This focaccia bread recipe is celebrated for its simplicity, using staple pantry items that transform into something truly extraordinary. Understanding each component is crucial for achieving that desired soft and fluffy texture paired with a beautiful crispy crust. From the flour that forms its structure to the olive oil that imparts its signature richness, every ingredient plays a vital role in creating a perfect focaccia. We’ll focus on making this an easy focaccia baking experience from start to finish.
Ingredients for Focaccia Bread
To prepare your homemade focaccia, you’ll need all-purpose flour, warm water, active dry yeast, a touch of sugar, salt, and, most importantly, good quality extra virgin olive oil. For toppings, fresh rosemary and coarse sea salt are classic choices, but we’ll explore other options later. The quality of your ingredients, particularly the olive oil, significantly impacts the final flavor of your focaccia bread. Make sure your yeast is fresh; this is a common mistake that can hinder your bread’s rise. This simple list forms the foundation for a delightful baking focaccia session.
Quick Prep and Cook Times
One of the great appeals of this focaccia bread recipe is its relatively manageable timeline. While there are a couple of rising periods involved, much of the time is hands-off. Expect about 20-30 minutes of active prep and mixing, followed by approximately 1.5 to 2 hours for the first rise, and then a shorter second rise. The actual bake time for your focaccia bread is typically around 20-25 minutes. This makes it a fantastic project for a lazy afternoon or for preparing ahead of a gathering, allowing for that wonderful aroma of freshly baked bread to fill your kitchen without too much stress.
Activating Yeast: First Simple Step
The magic of any good bread, especially a focaccia bread recipe, starts with the yeast. Activating your yeast properly is a fundamental step that ensures your focaccia dough will rise beautifully, yielding that characteristic light and airy interior. Think of it as waking up tiny microorganisms that will do all the heavy lifting in creating the structure and texture of your bread. Don’t rush this part; patience here truly pays off for an easy focaccia experience. If your yeast doesn’t become foamy, it might be expired, and you’ll need to start again with fresh yeast.
Mixing Water, Sugar, Yeast
To begin, combine warm water (ideally between 105-115°F or 40-46°C) with a pinch of sugar and your active dry yeast in a small bowl. The sugar acts as food for the yeast, encouraging it to bloom. Stir gently and then let the mixture sit for about 5-10 minutes. During this time, you should observe the surface becoming foamy and bubbly, indicating that your yeast is alive and active. This visual cue is crucial; if your yeast doesn’t foam, it’s likely dormant or expired, and your focaccia dough won’t rise. Using water that is too hot will kill the yeast, while water that is too cold won’t activate it sufficiently. Learning about yeast and its role in baking is a simple step towards successful baking focaccia.
Mixing Focaccia Dough: Easy Bread Bliss
Once your yeast is active and bubbly, you’re ready to bring together the rest of the ingredients for your focaccia bread recipe. This stage is where the individual components begin to meld into a cohesive focaccia dough, laying the groundwork for its eventual texture. The key here is not to overmix, as focaccia benefits from a more relaxed approach. This easy focaccia process ensures the gluten develops just enough to give the bread its signature chewiness without becoming tough. It’s a simple process that builds anticipation for that delicious homemade focaccia.
Combining Flour and Salt
In a large mixing bowl, combine your all-purpose flour with the salt. It’s important to keep the salt separate from the yeast initially, as direct contact can inhibit yeast activity. Once the flour and salt are thoroughly mixed, create a well in the center. This prepares the dry ingredients for the wet yeast mixture, ensuring an even distribution as you start to combine everything. The flour provides the structure, and the salt enhances the flavor, making every bite of your perfect focaccia truly enjoyable.
Gentle Dough Embrace
Pour your activated yeast mixture and a generous splash of olive oil into the well of the dry ingredients. Using a wooden spoon or your hands, gently mix until a shaggy dough forms. At this stage, it will look quite sticky and unformed, but that’s exactly what you want. Avoid vigorous kneading; the focus is on bringing the ingredients together rather than developing strong gluten bonds just yet. This gentle dough embrace helps create a tender crumb for your homemade focaccia, a hallmark of a truly soft and fluffy focaccia bread. You can find more simple and delicious dinner recipes, like Easy Honey Garlic Chicken, to pair with your freshly baked focaccia.
Kneading for a Perfect Focaccia Texture
While focaccia is often considered a less demanding bread to knead compared to some other varieties, the kneading stage is still important for developing the gluten structure that gives the bread its characteristic chewiness and open crumb. It’s not about aggressive pounding but rather a gentle working of the focaccia dough to bring it to the right consistency. This process contributes significantly to achieving a perfect focaccia, ensuring it’s both soft and fluffy on the inside, a hallmark of a great homemade focaccia. Proper kneading prepares the dough for its crucial rising periods, leading to a truly easy focaccia experience.
Achieve Smooth, Elastic Dough
Turn the shaggy dough out onto a lightly floured surface. Begin to knead, folding the dough over itself and pressing down with the heels of your hands. Continue this process for about 5-7 minutes. You’ll notice the dough transforming from sticky and rough to smooth, elastic, and more manageable. It should feel pliable and bounce back slowly when gently poked. This indicates that the gluten has developed sufficiently, trapping air and preparing the dough to rise beautifully. A well-kneaded focaccia dough is essential for that desired airy texture. Consider serving this alongside a hearty Creamy Baked Mac and Cheese for a delightful meal.
Kneading Technique Tips
For this focaccia bread recipe, you don’t need to be a professional baker to get great results. If the dough is too sticky, resist the urge to add too much extra flour, which can make the finished bread dry. Instead, lightly flour your hands or use a dough scraper to handle it. You can also incorporate a little extra olive oil on your hands or the work surface to prevent sticking. The goal is to develop enough gluten for structure without overworking the dough, which could make it tough. Keep the movements smooth and rhythmic. For those who prefer minimal effort, a stand mixer with a dough hook can also be used for about 5 minutes on medium-low speed until the dough comes together and is smooth.
First Rise: Letting Your Dough Grow
The first rise, often called bulk fermentation, is a critical stage in any focaccia bread recipe, including our easy focaccia guide. It’s during this time that the yeast really gets to work, consuming the sugars and producing carbon dioxide, which creates air pockets within the focaccia dough. This expansion is essential for developing the open, airy crumb that is characteristic of a perfect focaccia. Patience during this period is key, as trying to rush the rise can result in a dense, less flavorful bread. Giving your homemade focaccia ample time to grow ensures a soft and fluffy result.
Find a Warm, Draft-Free Spot
After kneading, lightly oil a large bowl and place your focaccia dough inside, turning it once to coat with oil. This prevents the dough from drying out and sticking to the bowl. Cover the bowl tightly with plastic wrap or a clean kitchen towel. Now, find a warm, draft-free spot for your dough to rise. Ideal temperatures are typically around 75-80°F (24-27°C). Good locations include a slightly warmed oven (turned off!), near a sunny window, or on top of a refrigerator. Avoid cold spots or direct drafts, which can hinder the yeast activity. The consistent warmth encourages an even and robust rise for your baking focaccia.
Dough Doubles in Size
Allow the focaccia dough to rise for approximately 1.5 to 2 hours, or until it has visibly doubled in size. The exact time can vary depending on the ambient temperature and the activity of your yeast. You’ll know it’s ready when it looks puffy and airy. To test if it’s sufficiently risen, gently poke the dough with a floured finger; if the indentation remains, it’s ready. If it springs back immediately, it needs a little more time. This first rise is fundamental for developing the texture and flavor, contributing significantly to that sought-after soft and fluffy focaccia bread.
Preheating Oven: Ready to Bake
As your focaccia dough nears the end of its second rise, or just as you begin the shaping process, it’s crucial to preheat your oven. A properly preheated oven is a non-negotiable step for any successful bread baking, and our focaccia bread recipe is no exception. This ensures that when the focaccia enters the oven, it immediately begins to cook and rise rapidly (known as oven spring), contributing to a beautiful structure and a desirable crispy crust. Don’t underestimate this simple step; it sets the stage for a truly perfect focaccia. Getting the oven to temperature correctly will make your baking focaccia experience much more rewarding.
Set Oven to 425°F (220°C)
Set your oven to 425°F (220°C). It’s important to allow sufficient time for the oven to reach and maintain this temperature consistently. Most ovens take at least 15-20 minutes to fully preheat, and often longer for the internal temperature to stabilize, especially if you’re using a baking steel or stone. Placing your baking sheet or cast-iron pan into the oven during preheating can also help create a very hot surface for the focaccia to bake on, promoting an even crispier bottom crust. A hot oven is essential for an easy focaccia to achieve its signature texture and golden-brown finish.
Shaping Focaccia: Simple Steps to Pan
Once your focaccia dough has completed its first rise, it’s time for the exciting part of shaping it into its familiar form. This stage of the focaccia bread recipe is remarkably forgiving, so don’t stress about achieving absolute perfection. The beauty of homemade focaccia lies in its rustic charm. These simple steps to pan placement are designed to be intuitive, even for novice bakers. The goal here is to gently coax the dough into shape without deflating all the precious air bubbles developed during the rise, which are key to a soft and fluffy texture. Achieving a perfect focaccia is about embracing its natural, irregular beauty.
Punch Down and Press Dough
Gently punch down the risen focaccia dough to release some of the air. Then, turn it out onto a generously olive-oiled baking sheet or into a round baking pan. Begin to press the dough outwards with your fingertips, working from the center to the edges. The dough might resist at first and try to spring back; if this happens, let it rest for 5-10 minutes to allow the gluten to relax, then continue pressing. You want to spread the dough evenly across the pan, reaching most of the corners. This gentle handling ensures that you retain some of the air from the first rise, contributing to an airy, easy focaccia. For more dinner ideas, check out Crispy Parmesan Chicken with a Rich Garlic Sauce.
Rustic is the Goal
Remember, focaccia is inherently rustic. Don’t aim for a perfectly flat, uniform surface. The slight irregularities and uneven edges are part of its appeal. The pressing action also creates a slightly uneven thickness, which leads to wonderful variations in texture after baking – some parts crispier, others softer. Once the dough is spread, cover the pan lightly with plastic wrap or a kitchen towel and let it undergo its second rise for another 20-30 minutes in a warm spot. This final brief rise allows the dough to relax and puff up slightly before the final dimpling and topping, paving the way for a truly delightful baking focaccia experience.
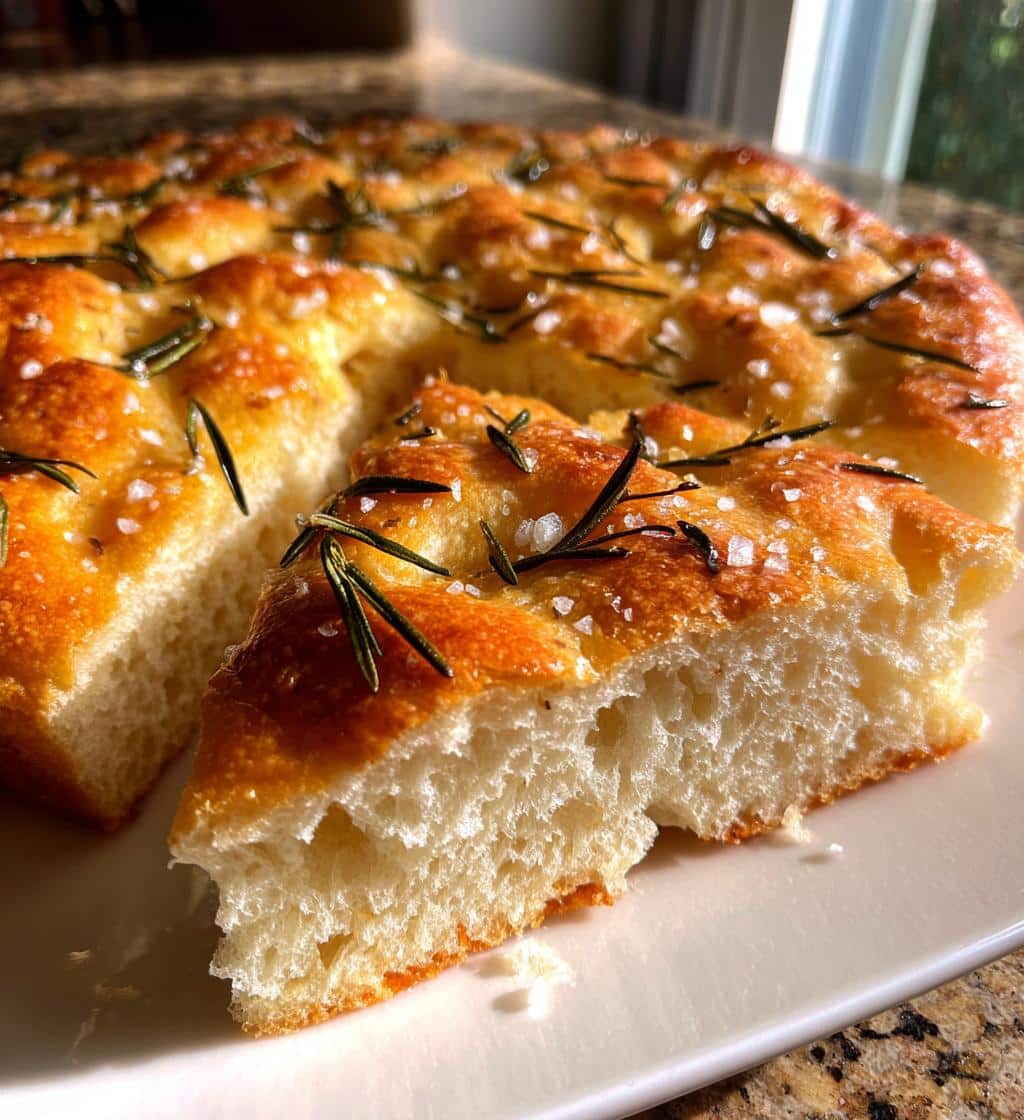
Dimpling and Topping Your Focaccia Bread
This is arguably the most recognizable and enjoyable step in making a focaccia bread recipe. The act of dimpling, combined with generous application of olive oil and flavorful toppings, transforms the simple dough into the iconic focaccia. This stage is crucial for both the texture and the taste, creating those beautiful pockets that hold the oil and seasonings, leading to a truly perfect focaccia with a wonderful crispy crust and aromatic appeal. Mastering this part is key to an easy focaccia that looks as good as it tastes. The right dimpling and topping techniques are focaccia tips that elevate your homemade focaccia significantly.
Drizzle Olive Oil Generously
Before dimpling, drizzle a generous amount of high-quality extra virgin olive oil over the surface of the risen dough. Don’t be shy here; the olive oil not only adds incredible flavor and richness but also contributes to the desired crispy crust. Once oiled, use your fingertips to gently, but firmly, press deep indentations all over the surface of the dough, taking care not to poke all the way through to the pan. These dimples will prevent the focaccia from rising too much like a standard loaf of bread and will become reservoirs for the olive oil and toppings, enhancing every bite of your baking focaccia.
Add Rosemary and Sea Salt
The classic combination for focaccia is fresh rosemary and flaky sea salt. Sprinkle fresh rosemary leaves generously over the dimpled, oiled dough. The heat of the oven will release the aromatic oils from the rosemary, infusing the entire bread with its fragrant essence. Follow with a good sprinkle of coarse sea salt. The larger crystals of sea salt provide bursts of salty flavor and a delightful textural contrast that perfectly complements the soft and fluffy interior of the focaccia. These traditional toppings highlight the simplicity and elegance of the focaccia bread recipe.
Customizable Topping Ideas
While rosemary and sea salt are timeless, focaccia bread is incredibly versatile and lends itself beautifully to various customizable topping ideas. Feel free to get creative and experiment based on your preferences or what you have on hand. Other popular options include thinly sliced cherry tomatoes, olives (kalamata or green), caramelized onions, minced garlic, a sprinkle of parmesan or feta cheese, or even thin slices of bell peppers. For a sweeter version, some people add grapes or figs. Remember to add these toppings after dimpling and before the final drizzle of olive oil, ensuring they adhere well to the dough. This personalization makes every homemade focaccia unique and exciting.
Baking Your Focaccia Bread Recipe
The moment of truth arrives as your beautifully dimpled and topped focaccia bread enters the hot oven. This stage of the focaccia bread recipe is where all your efforts come together, transforming the simple dough into that golden, aromatic masterpiece. The high heat of the oven works quickly to create a gorgeous crispy crust while allowing the interior to become wonderfully soft and fluffy. Achieving the right bake is crucial for a perfect focaccia, ensuring that balance of texture and flavor that makes this bread so irresistible. Proper baking focaccia techniques will yield a truly rewarding result.
Golden Brown and Heavenly Aroma
Bake your focaccia in the preheated 425°F (220°C) oven for about 20-25 minutes. Keep an eye on it, as oven temperatures can vary. The focaccia is ready when its top is beautifully golden brown, and the crust is crisp. You’ll also notice a truly heavenly aroma filling your kitchen – that unmistakable scent of freshly baked bread. If you’re unsure, you can gently lift an edge with a spatula to check if the bottom is also golden. This vibrant color and enticing smell are indicators of a well-baked, easy focaccia that’s almost ready to be enjoyed.
Achieve a Crispy Crust
The high initial heat helps in achieving that coveted crispy crust. The olive oil on the surface and in the dimples fries the dough slightly, contributing to the crispiness. As the focaccia bakes, the exterior caramelizes, adding depth of flavor and a delightful crunch. If you prefer an even crispier bottom, baking on a preheated baking steel or stone, or even directly on a hot cast iron pan, can make a significant difference. Just ensure you oil the surface thoroughly to prevent sticking. This crispy texture contrasts beautifully with the soft and fluffy interior, making every bite of your homemade focaccia a textural delight.
Cooling Your Homemade Focaccia Loaf
Once your focaccia bread emerges from the oven, golden and fragrant, the temptation to slice into it immediately can be overwhelming. However, resisting this urge and allowing your homemade focaccia loaf to cool properly is a crucial step for achieving the best possible texture and preventing common issues like a soggy bottom. This cooling process allows the internal structure of the bread to set and for excess moisture to escape, ensuring your perfect focaccia lives up to its potential. It’s an essential part of the focaccia bread recipe for a truly enjoyable eating experience.
Crucial for Best Texture
Immediately after removing the focaccia from the oven, carefully transfer it from the baking pan to a wire cooling rack. This is a very important focaccia tip. Cooling on a rack allows air to circulate around all sides of the bread, preventing moisture from becoming trapped underneath. Cutting into the bread too soon can result in a gummy texture because the internal starches haven’t fully set. Allowing it to cool for at least 15-20 minutes on the rack ensures that the steam can escape, leading to a lighter, more airy, and truly soft and fluffy interior that contrasts wonderfully with the crispy crust. This also applies to other delicious bakes, like a Snickerdoodle Cobbler, where proper cooling enhances the final outcome.
Prevent a Soggy Bottom
The most common pitfall when cooling bread is leaving it in the hot pan or on a flat surface, which inevitably leads to a soggy bottom. As the hot bread cools, it releases steam. If this steam has nowhere to go, it condenses on the bottom of the bread and the pan, making the crust wet and unappetizing. By transferring your homemade focaccia to a wire rack, you ensure that the steam dissipates freely, maintaining the crispness of the bottom crust. This simple step guarantees that every part of your easy focaccia, from top to bottom, has the perfect texture and flavor. This cooling focaccia advice is fundamental for a flawless finish.
Focaccia Bread Recipe Tips for Success
Making focaccia bread is a truly rewarding experience, and with a few key focaccia tips, you can ensure every loaf you bake is a resounding success. This focaccia bread recipe is inherently forgiving, but understanding some nuances can elevate your homemade focaccia from good to absolutely perfect. These insights focus on simplicity and consistency, helping you achieve that ideal balance of a soft and fluffy interior and a delightful crispy crust with every baking focaccia session. Our simple steps are designed for an easy focaccia, making bread baking accessible to everyone.
Super Easy to Make
One of the best things about focaccia is how incredibly easy it is to make. Unlike some other artisanal breads that require complex folds and precise shaping, focaccia embraces a more rustic approach. The kneading is minimal, the shaping is straightforward, and the ingredients are common. Don’t be intimidated by yeast; if you follow the activation steps, it’s quite cooperative. The beauty of this easy focaccia is that even if your dimples aren’t perfectly uniform or your rosemary isn’t evenly distributed, the result will still be delicious. It’s an ideal recipe for beginners looking to venture into bread making, offering great rewards for minimal fuss. For more culinary inspiration, visit Carina Recipes on Pinterest.
Soft and Fluffy Texture
Achieving that signature soft and fluffy texture in your focaccia bread is dependent on a few factors. Firstly, proper yeast activation and sufficient rising time are paramount; don’t rush these stages. Secondly, gentle handling of the focaccia dough during mixing and shaping helps to preserve the delicate air pockets. Over-kneading can toughen the gluten, while rough handling can deflate the rise. Lastly, the generous use of olive oil contributes significantly to both the tenderness of the crumb and the crispness of the crust. By paying attention to these simple steps, you’ll consistently produce a homemade focaccia with an enviable light and airy interior that melts in your mouth, making it a perfect focaccia every time.
Storing and Enjoying Your Focaccia Bread Bliss
Once you’ve baked your perfect focaccia, the joy of creating it is matched only by the pleasure of sharing and savoring it. This section covers how to best enjoy your homemade focaccia and some practical tips for storing focaccia leftovers to maintain its delicious quality. A freshly baked focaccia bread recipe is a versatile delight, suitable for many occasions and meals. Whether you’re serving it at a gathering or enjoying it throughout the week, knowing how to handle it ensures every bite is as good as the first, making your easy focaccia experience last longer.
Perfect for Gatherings
Focaccia bread is an absolute showstopper at any gathering. Its inviting aroma, beautiful golden appearance, and delightful texture make it an instant crowd-pleaser. Serve it as an appetizer with a bowl of good olive oil and balsamic vinegar for dipping, or alongside a charcuterie board. It also makes an excellent accompaniment to soups, stews, or salads, offering a wonderful textural contrast. Sliced horizontally, it can form the base for incredible sandwiches. The rustic charm and easy focaccia appeal mean it fits perfectly into casual family dinners or more formal entertaining. It’s a bread that sparks conversation and encourages sharing.
Storing Leftovers Properly
While focaccia is best enjoyed fresh from the oven, any leftovers can be stored to maintain their quality. To keep your focaccia bread soft and fluffy, wrap it tightly in aluminum foil or plastic wrap at room temperature for up to 2-3 days. Avoid refrigerating it, as this can dry out the bread and make it stale faster. For longer storage, focaccia freezes beautifully. Slice it into individual portions, wrap each tightly in plastic wrap, then again in foil, and freeze for up to 2-3 months. To reheat, thaw at room temperature and then warm in a preheated oven at 350°F (175°C) for 5-10 minutes until warmed through and the crispy crust is restored. This careful storing focaccia technique ensures you can enjoy your baking focaccia bliss for days to come. Don’t forget to follow us for more amazing recipes on Instagram!