
Easy Whipped Kool Aid Drink is a delightful, no-bake confection that brings a burst of fruity flavor to any occasion. This simple recipe combines a few common ingredients into a light, airy, and wonderfully sweet treat. It’s ideal for quick preparation and pleasing everyone with its vibrant taste.
Key Takeaways
- Whipped Kool-Aid is a simple, no-bake, creamy dessert.
- Requires only a few basic ingredients like heavy cream and Kool-Aid powder.
- Cold ingredients are crucial for proper whipping.
- Customizable with various Kool-Aid flavors and toppings.
- Best served fresh for optimal texture and enjoyment.
This vibrant dessert is truly simple to make. Just whip a few ingredients. Then watch a colorful, creamy treat appear. It’s perfect for summer. Enjoy this quick, sweet delight.
Easy Whipped Kool Aid Drink Basics
What is this fluffy dessert?
This easy whipped Kool-Aid drink is a surprisingly simple yet incredibly delightful no-bake dessert that captures the essence of childhood fun in a light, airy, and creamy treat. Imagine a vibrant, fruit-flavored cloud that melts in your mouth, offering a burst of sweet and tangy notes. It’s essentially a flavored whipped cream, transformed by the addition of colorful Kool-Aid powder, making it an instant crowd-pleaser. Unlike traditional custards or mousses, this dessert requires no cooking, making it accessible for even novice bakers or those looking for a quick fix. Its unique, fluffy texture and intense fruity taste make it a memorable addition to any menu, especially when you are looking for new desserts to try.
Whether scooped into bowls, layered into parfaits, or piped onto other treats, this whipped Kool-Aid stands out with its playful colors and refreshing flavor profile. It’s a versatile foundation for countless creative variations, from a simple dessert to a component in more complex creations. The magic lies in its simplicity – just a few ingredients combine to create something truly extraordinary and effortlessly delicious, embodying the joy of a homemade dessert without the fuss.
Quick facts: prep time, servings
One of the many appealing aspects of this easy whipped Kool-Aid recipe is its incredible efficiency. You can have this delightful dessert ready in astonishingly little time, perfect for spontaneous cravings or last-minute gatherings. The total preparation time is typically around 10-15 minutes, with most of that dedicated to the simple act of whipping. There’s no cooking involved, which further streamlines the process and keeps your kitchen cool.
Regarding servings, a standard batch using common ingredient measurements will generally yield 4 to 6 servings, depending on the portion size. This makes it ideal for a small family treat, a sweet addition to a picnic, or a vibrant contribution to a potluck. If you’re hosting a larger event, simply scale up the ingredients to accommodate more guests. This quick recipe truly delivers maximum impact with minimal effort, ensuring everyone gets to enjoy a taste of this flavorful drink.
Gather Ingredients for Whipped Kool-Aid
Essential creamy base items
Creating the perfect fluffy, creamy treat starts with a strong foundation of high-quality ingredients. For our easy whipped Kool-Aid, the absolute star of the show is heavy whipping cream. This ingredient is non-negotiable for achieving that coveted airy texture and rich mouthfeel. Ensure your cream is very cold, as this significantly aids in the whipping process and helps it reach stiff peaks efficiently. Look for cream with a fat content of at least 36% for the best results. Another key component is powdered sugar (also known as confectioners’ sugar). Unlike granulated sugar, powdered sugar dissolves instantly, preventing a grainy texture and ensuring a smooth, uniform sweetness throughout your whipped creation. The amount can be adjusted to your taste, but it’s crucial for balancing the tartness of the Kool-Aid and providing a pleasant sweetness.
Together, these form the creamy, stable base that will hold all the vibrant flavor of your chosen Kool-Aid. Using quality ingredients ensures not only a delicious outcome but also a stable dessert that holds its shape, making presentation much easier. Remember, the colder the cream and bowl, the quicker and more effectively your cream will whip to perfection, setting the stage for a truly delightful no-bake recipe.
Your chosen Kool-Aid flavor
This is where the fun truly begins, and your easy whipped Kool-Aid comes to life with a burst of color and flavor! The beauty of this recipe lies in its incredible versatility when it comes to flavor choices. You can select virtually any powdered Kool-Aid mix to infuse your creamy dessert. Popular choices include classic favorites like cherry, grape, strawberry, or tropical punch. Each flavor will impart its distinct taste and a vibrant hue to your whipped creation, making it visually appealing and delicious. Consider matching your Kool-Aid flavor to the occasion, perhaps red for holidays or a mix of colors for a festive gathering. The powdered mix blends seamlessly into the cream, distributing its flavor evenly and creating a uniform color.
Feel free to experiment with different varieties to find your personal favorite or to create unique combinations. The intensity of the flavor can also be subtly adjusted by adding a little more or less powder, though generally, one standard packet is sufficient for a batch. For an even more intense fruit flavor, you could consider adding a very small amount of fruit extract that complements your chosen Kool-Aid flavor. To learn more about the history and varieties of this iconic drink mix, you can visit the Kool-Aid Wikipedia page.
The touch of vanilla
While Kool-Aid brings the vibrant fruit flavor, a subtle addition of vanilla extract is what truly elevates this easy whipped Kool-Aid from good to extraordinary. Vanilla acts as a flavor enhancer, deepening the overall taste profile and adding a layer of warmth and complexity that beautifully complements the fruity notes of the Kool-Aid. It doesn’t overpower the main flavor but rather rounds it out, making the dessert feel more refined and balanced. A small amount, typically a teaspoon or two, is all that’s needed to make a noticeable difference.
You can use either pure vanilla extract for a more authentic flavor or imitation vanilla if that’s what you have on hand. For a slightly different twist, consider using vanilla bean paste for visible specks of vanilla bean, adding a gourmet touch to your creamy treat. This simple addition ensures that your whipped Kool-Aid isn’t just sweet and fruity, but also possesses a depth of flavor that will leave your taste buds wanting more. Just like in a batch of peanut butter brownie swirl cookies, vanilla plays a supporting but essential role.
Simple Steps to Make Whipped Kool-Aid
Combining all the ingredients
Making this delightful easy whipped Kool-Aid is surprisingly straightforward, requiring minimal fuss and effort. Begin by ensuring your heavy whipping cream, mixing bowl, and whisk attachment (if using a stand mixer) are all thoroughly chilled. This is a critical step for successful whipping. Pour the very cold heavy whipping cream into your chilled mixing bowl. Next, add the powdered sugar. If you prefer a less sweet dessert, you can slightly reduce the amount of sugar, but remember it helps stabilize the cream. Then, carefully sprinkle in the powdered Kool-Aid mix of your chosen flavor. Be sure to evenly distribute it over the cream to aid in uniform color and flavor mixing. Finally, add the vanilla extract to the bowl. All your ingredients are now assembled and ready for the transformation into a vibrant, fluffy dessert. Combining everything before whipping ensures that all flavors are incorporated from the start, leading to a consistent and delicious outcome.
Whipping to stiff peaks
Now comes the fun part: whipping! Using a stand mixer with a whisk attachment or a hand-held electric mixer, start on a low speed to combine the ingredients gently without splattering. Once the dry ingredients are moistened, increase the speed to medium-high. Continue to whip the mixture, scraping down the sides of the bowl occasionally to ensure everything is incorporated evenly. You’ll notice the cream beginning to thicken and increase in volume, gradually forming soft peaks. These peaks will hold their shape briefly before collapsing. Continue whipping, observing the texture closely.
The goal is to reach “stiff peaks.” This means that when you lift the whisk out of the cream, the peaks that form will stand up straight and firm, holding their shape without drooping. The cream will be light, airy, and fluffy, with a beautiful vibrant color from the Kool-Aid. Be careful not to over-whip, as this can lead to a grainy or curdled texture. Stop whipping as soon as stiff peaks are achieved for the best results, creating the perfect base for your creamy treat.
Serving your creation
Once your easy whipped Kool-Aid has reached those perfect stiff peaks, it’s ready to be served and enjoyed immediately! Its light, airy texture and refreshing flavor are at their peak when fresh. You can scoop generous portions into individual serving bowls or elegant glasses for a beautiful presentation. For a more sophisticated look, use a piping bag with a decorative tip to create swirls and rosettes. Garnish with fresh berries that complement your Kool-Aid flavor, a sprig of mint, or a sprinkle of additional powdered sugar or candy for extra flair.
This versatile dessert can also be used as a topping for cakes, cupcakes, or pies, adding a unique, fruity twist. Consider layering it with crushed cookies, granola, or fruit in parfait glasses for a delightful textural contrast. The vibrant color makes it an excellent choice for parties or special occasions where you want to add a pop of fun to your dessert spread. Serve it chilled, and watch as your guests delight in this simple yet wonderfully flavorful treat.
Achieving Perfect Whipped Kool-Aid Texture
Importance of cold ingredients
When it comes to whipping cream successfully, temperature is your best friend. The importance of using cold ingredients cannot be overstated, particularly for the heavy whipping cream itself, but also for the bowl and whisk you’re using. Chilling your heavy whipping cream thoroughly, ideally in the refrigerator for at least 30 minutes before use (or even in the freezer for 10-15 minutes), ensures that the fat molecules in the cream are firm. These firm fat molecules are essential for trapping air bubbles efficiently as you whip, leading to a stable and voluminous whipped cream.
A cold mixing bowl, especially a metal or glass one, helps maintain the cream’s low temperature throughout the whipping process. If the cream gets too warm, the fat molecules can’t hold their structure as effectively, making it difficult to achieve stiff peaks and often resulting in a runny or greasy texture. Similarly, chilling your whisk attachment for a few minutes before use further contributes to keeping the overall mixture cold. This dedication to cold temperatures is a small but crucial step that guarantees a light, airy, and beautifully textured whipped Kool-Aid every single time, making your no-bake recipe a success.
Avoiding over-whipping cream
While achieving stiff peaks is the goal, there’s a fine line between perfectly whipped and over-whipped cream. Over-whipping can quickly transform your smooth, airy mixture into a grainy, curdled, or even buttery consistency. As you whip, the fat molecules in the cream clump together, trapping air and forming a stable foam. If you continue whipping beyond the stiff peak stage, these fat molecules will clump too tightly, expelling the liquid and separating into butter and buttermilk. The texture will become dense and unappetizing, losing its light and fluffy appeal.
To avoid this common pitfall, pay close attention to the cream as you whip. It’s best to start at a lower speed and gradually increase, watching the cream carefully once it starts to thicken. Stop whipping as soon as the peaks hold their shape firmly when the whisk is lifted. A common mistake is to walk away or get distracted during the final stages of whipping, as the transition from soft to stiff to over-whipped can happen surprisingly fast. Be present and attentive to ensure your easy whipped Kool-Aid retains its ideal, creamy texture.
When peaks become stiff
Understanding what “stiff peaks” look like is fundamental to perfecting your easy whipped Kool-Aid. Stiff peaks represent the ideal consistency for this dessert, providing both structure and a delightful mouthfeel. When you lift the whisk (or beaters) from the cream, the peaks that form should stand straight up and hold their shape without drooping or collapsing. The cream itself will appear opaque, voluminous, and glossy, with a smooth, uniform texture.
Before reaching stiff peaks, you’ll typically pass through the soft peak stage, where the peaks flop over slightly. Keep whipping until they are firm and unwavering. It’s a visual cue you’ll quickly learn to recognize. The cream will be light and airy, perfectly holding the vibrant color and flavor of the Kool-Aid. Achieving this stage ensures your whipped Kool-Aid will maintain its elegant form, whether it’s scooped into bowls, piped onto cupcakes, or used as a component in a layered quick Italian cream cake or other dessert. This precision guarantees a successful and appealing creamy treat.
Customize with Fun Kool-Aid Flavors
Choosing your favorite mix
The beauty of the easy whipped Kool-Aid recipe lies in its incredible adaptability, primarily through the vast array of Kool-Aid flavors available. This allows for endless customization, ensuring there’s a perfect match for every palate and occasion. Are you a fan of classic fruit flavors? Opt for Cherry, Grape, or Strawberry for a sweet and familiar taste. Craving something more exotic? Tropical Punch, Kiwi-Lime, or Black Cherry can transport your taste buds to a different world. Lemonade or Pink Lemonade offer a refreshing tangy twist that balances the sweetness beautifully. Don’t shy away from experimenting!
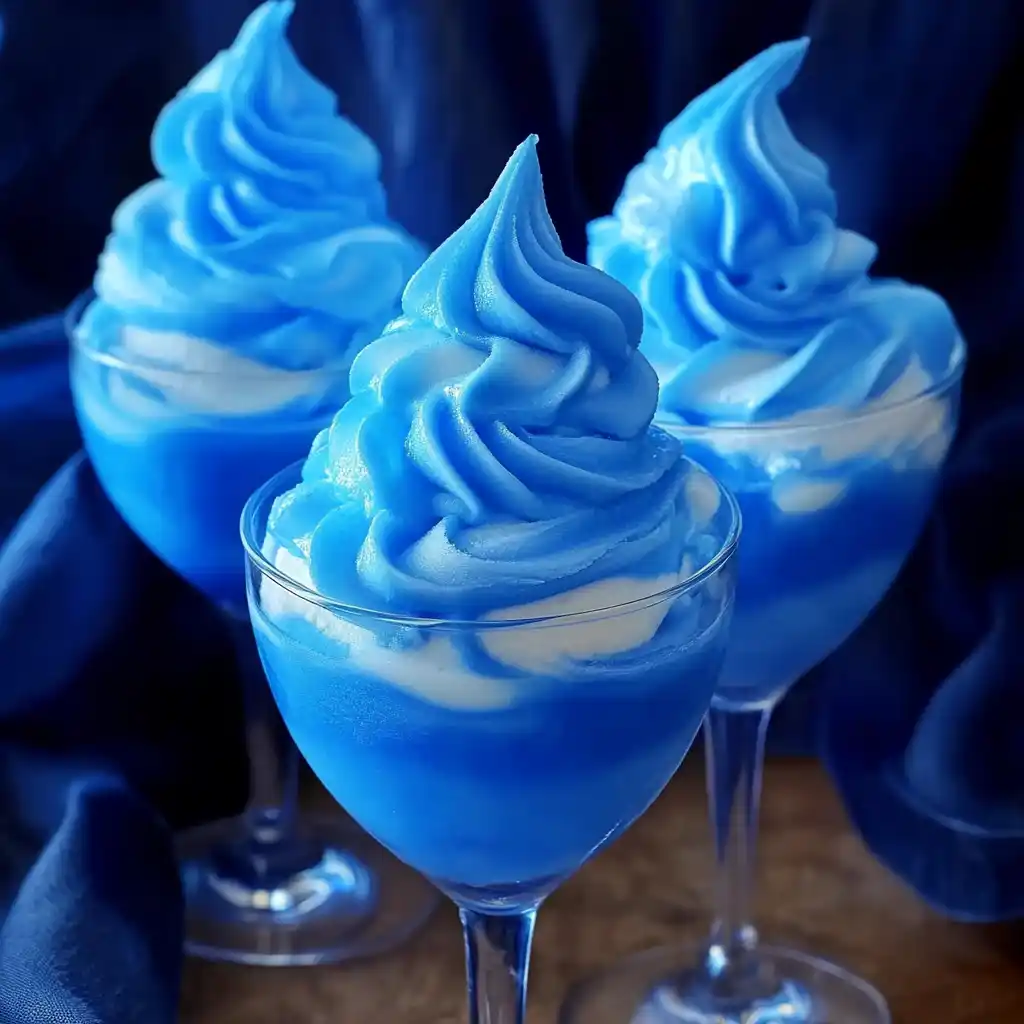
Consider the color as well as the taste when choosing. A bright red or blue Kool-Aid makes for a visually striking dessert, while a blend of colors can create a festive, multi-hued experience. The powdered mix ensures that both the flavor and color are evenly distributed throughout your creamy treat. Feel free to sample different flavors or even combine two complementary ones for a unique blend. This customization aspect makes every batch of whipped Kool-Aid a fresh and exciting culinary adventure, always offering a new flavor journey for your quick recipe needs.
Swirling for rainbow effects
For those who love a dessert that’s as visually stunning as it is delicious, creating rainbow or swirled effects with your easy whipped Kool-Aid is an absolute game-changer. This technique adds an extra layer of fun and makes your creamy treat even more appealing, especially for parties or children’s gatherings. To achieve this, you’ll need to prepare two or more different batches of whipped Kool-Aid, each with a distinct color and flavor. Once each batch has reached stiff peaks, gently layer them into your serving dish or piping bag.
For a layered look, simply alternate scoops of different colors. For a swirling effect, place alternating dollops of each color into your serving container or piping bag. Then, take a skewer or a butter knife and gently swirl through the different colors just once or twice. Be careful not to overmix, as this will blend the colors completely rather than creating distinct swirls. The goal is a marbleized effect where vibrant hues dance together. This technique transforms a simple dessert into a vibrant spectacle, making your whipped Kool-Aid a true showstopper and an unforgettable dessert inspiration for your Pinterest board.
Serving Your Delightful Whipped Kool-Aid
Presentation ideas for serving
Once your easy whipped Kool-Aid is perfectly prepared, half the fun lies in how you present it. Its vibrant colors and fluffy texture make it a naturally appealing dessert, but a little creative flair can elevate it even further. For individual servings, consider using clear glass parfait cups, martini glasses, or small dessert bowls. This allows the beautiful colors to shine through, especially if you’ve created swirled or layered effects.
Garnishes can add both visual appeal and complementary flavors. Think fresh berries (strawberries, blueberries, raspberries) that match or contrast your Kool-Aid flavor. A sprig of fresh mint adds a touch of green and a refreshing aroma. You could also sprinkle some colorful edible glitter, crushed cookies, mini chocolate chips, or even a dusting of powdered sugar. For a more playful touch, mini marshmallows or fun sprinkles work wonders. If serving from a larger bowl, a dollop in the center with a few carefully placed garnishes creates an inviting centerpiece. Don’t be afraid to experiment; the goal is to make your delicious creamy treat look as good as it tastes!
Best served immediately
While the easy whipped Kool-Aid is a remarkably stable creamy treat for a no-bake recipe, its light and airy texture is at its absolute peak when served immediately after preparation. The delicate air bubbles that give it its signature fluffiness are freshest and most voluminous right after whipping. Over time, even with proper refrigeration, whipped cream can slowly begin to lose some of its volume and become slightly less airy, although it will still be delicious.
Therefore, for the ultimate experience, plan to whip and serve your Kool-Aid dessert within an hour or two of making it. If you need to prepare it slightly in advance, keep it chilled in the refrigerator, covered loosely to prevent it from absorbing refrigerator odors. However, avoid making it too far ahead. The beauty of this quick recipe is its speed, so embrace the immediacy! This ensures every spoonful offers that perfect, melt-in-your-mouth sensation and vibrant flavor that makes whipped Kool-Aid so special.
Troubleshooting Whipped Kool-Aid Issues
Dealing with runny cream
Encountering runny cream when making easy whipped Kool-Aid can be frustrating, but it’s a common issue with several potential solutions. The primary culprit for runny cream is usually a lack of proper chilling. Ensure your heavy whipping cream is ice-cold before you start, and ideally, chill your mixing bowl and whisk attachments too. Warm cream simply won’t whip effectively. If your cream is already runny, you might be able to salvage it by placing the bowl (with the cream and whisk) back into the refrigerator or even the freezer for 10-15 minutes to chill everything down thoroughly. Once everything is very cold, try whipping again, starting slowly and gradually increasing speed.
Another reason could be insufficient whipping time or speed. Be patient and allow the mixer to do its work, making sure to scrape down the sides of the bowl periodically. If you’ve added too much liquid (though unlikely with just Kool-Aid powder), you may need to add a bit more heavy cream to re-establish the right fat-to-liquid ratio. Sometimes, a tiny pinch of cream of tartar or a tablespoon of cornstarch (dissolved in a tiny bit of cold milk) can help stabilize runny cream, though this is usually a last resort for truly stubborn batches. Addressing these factors will typically lead to a perfectly fluffy and stable creamy treat.
Fixing an over-whipped batch
Accidentally over-whipping your easy whipped Kool-Aid can lead to a grainy, stiff, or even slightly buttery texture, but all hope is not lost for your flavorful drink! If you’ve just slightly over-whipped it and it’s starting to look a bit grainy but hasn’t fully separated into butter, you can often bring it back by gently folding in a tablespoon or two of fresh, cold heavy cream. Add it slowly, folding by hand, until the mixture regains a smoother, softer consistency. This helps to re-emulsify the cream and improve its texture. Do not use the mixer for this step, as it will only exacerbate the problem.
If the cream has completely separated into butter and liquid, unfortunately, it’s very difficult to revert it back to a smooth whipped cream. In such cases, you might be able to use the “butter” component for something else (like spreading on toast, though it will have a sweet Kool-Aid flavor!) and start a new batch of whipped Kool-Aid. The key is to stop whipping as soon as stiff peaks are formed to prevent this common issue. Learning to recognize the perfect stiff peak stage is crucial for any successful no-bake recipe involving whipped cream.
Creative Twists for Whipped Kool-Aid
Adding a tart lemon splash
While Kool-Aid flavors offer a delightful sweetness, sometimes a contrasting element can truly elevate the dessert. Adding a tart lemon splash is a fantastic way to introduce a refreshing zing to your easy whipped Kool-Aid, especially if you’re using a very sweet Kool-Aid flavor like cherry or grape. A small amount of freshly squeezed lemon juice (start with 1/2 to 1 teaspoon) can cut through the sweetness, providing a bright, tangy counterpoint that makes each spoonful feel lighter and more invigorating. The acidity also helps to highlight the fruit flavors of the Kool-Aid, making them pop even more.
This simple addition is particularly effective with berry or tropical Kool-Aid varieties, enhancing their natural tartness. Be careful not to add too much lemon juice, as it can sometimes thin the cream slightly, or make it too sour. It’s best to add a little at a time after the cream has already begun to thicken, tasting as you go. This creative twist offers a sophisticated edge to an otherwise playful dessert, making your creamy treat even more complex and enjoyable.
Making it lighter
For those looking for a version of easy whipped Kool-Aid that feels a bit lighter without sacrificing flavor, there are some excellent modifications you can make. One popular option is to partially substitute some of the heavy whipping cream with an alternative. For example, replacing a portion of the heavy cream with full-fat Greek yogurt can introduce a subtle tanginess and a slightly denser, yet still creamy, texture while reducing the overall richness. Start by replacing about a quarter to a third of the heavy cream with chilled Greek yogurt. Keep in mind that the texture will be slightly different, but still delightful.
Another approach is to simply reduce the amount of powdered sugar, allowing the natural tartness of the Kool-Aid to shine through more prominently. You could also incorporate fruit purées (like mashed raspberries or finely chopped mango) for natural sweetness and bulk, which can help to extend the volume without adding more heavy cream. While these modifications might subtly alter the classic texture of a whipped creamy treat, they offer a fantastic way to enjoy a delicious, flavorful drink with a lighter feel.
Fancy toppings and drizzles
Transforming your easy whipped Kool-Aid into an impressive, fancy dessert is all about the finishing touches. Beyond simple garnishes, a variety of toppings and drizzles can add both visual appeal and layers of flavor and texture. Think about complementary textures: crunchy elements like crushed shortbread cookies, graham cracker crumbs, or toasted coconut flakes can provide a delightful contrast to the airy cream. Candied nuts or sprinkles also add a festive crunch. For a gooey, indulgent touch, consider a drizzle of chocolate syrup, caramel sauce, or a fruit coulis made from berries or mango.
If you’re serving individual portions, consider layering the whipped Kool-Aid with other elements like fresh fruit, pudding, or even mini brownies for a more substantial dessert. Edible flowers can add an elegant touch for special occasions. Don’t forget about playful options like mini marshmallows, gummy candies, or popping candy for kids’ parties. The goal is to create a multi-sensory experience that makes your flavorful drink not just a treat for the taste buds, but also a feast for the eyes, perfect for any party food spread.
Storage Tips for Whipped Kool-Aid
Refrigeration guidelines
While easy whipped Kool-Aid is undoubtedly best enjoyed fresh, there are times when you might have leftovers or need to prepare it slightly in advance. Proper refrigeration is key to maintaining its texture and freshness. Store any remaining whipped Kool-Aid in an airtight container in the refrigerator. This helps to prevent it from absorbing odors from other foods and minimizes exposure to air, which can cause it to deflate or dry out. When storing, try to fill the container as much as possible to reduce air pockets.
Generally, whipped Kool-Aid will keep well in the refrigerator for up to 2-3 days. Beyond that, it may start to lose its airy volume and become slightly denser or weep a bit of liquid. If it has slightly deflated, you might be able to give it a very gentle, quick whisk by hand for a few seconds just before serving to revive some of its fluffiness, but be careful not to overmix. Always ensure it’s kept cold; avoid leaving it out at room temperature for extended periods, especially in warm weather, as this will quickly compromise its creamy texture and freshness.
Freezing for firmer treats
For a different kind of creamy treat experience, you can absolutely freeze your easy whipped Kool-Aid! This transforms it into a delightful, firmer, and even more refreshing dessert, perfect for hot days. To freeze, scoop the whipped Kool-Aid into freezer-safe containers, individual ramekins, or even pop molds for a fun, frozen pop. You can also pipe it onto a parchment-lined baking sheet in individual dollops and then freeze until firm, transferring the frozen dollops to a freezer bag for easy storage.
When frozen, the texture will become more like a light mousse or a soft-serve ice cream, rather than the airy whipped cream. It’s a fantastic way to extend its shelf life and enjoy it as a different kind of flavorful drink or dessert. It can typically be stored in the freezer for up to 1-2 weeks. When ready to serve, you can enjoy it directly from the freezer for a firmer consistency, or let it soften for a few minutes at room temperature for a softer, scoopable texture. This opens up even more possibilities for enjoying your vibrant no-bake recipe.
Why Choose This Easy Whipped Kool-Aid?
Quick preparation, no cooking
In a world where time is often a luxury, the easy whipped Kool-Aid stands out as a true culinary gem due to its remarkable simplicity and speed. One of its most compelling advantages is the quick preparation time. From gathering your few ingredients to serving a beautiful, fluffy dessert, the entire process can be completed in under 15 minutes. This makes it an ideal choice for spontaneous cravings, unexpected guests, or simply when you need a delicious treat without a lengthy commitment.
Even better, this delightful creation requires no cooking whatsoever. There’s no oven preheating, no stovetop stirring, and no complicated techniques involved. This aspect not only saves time and energy but also makes it an incredibly accessible recipe for cooks of all skill levels, including children with adult supervision. The absence of heat means it’s a perfect no-bake recipe for warmer months when you want to avoid heating up your kitchen. This combination of speed and ease makes whipped Kool-Aid a go-to for anyone seeking a flavorful drink or creamy treat that delivers maximum enjoyment with minimal effort.
A fun, crowd-pleasing dessert
Beyond its quick preparation, the easy whipped Kool-Aid is an undisputed champion when it comes to being a fun, crowd-pleasing dessert. Its vibrant colors alone are enough to capture attention and spark joy, immediately signaling that this is a treat meant for enjoyment. The playful hues, derived from the various Kool-Aid flavors, make it visually appealing for all ages, particularly children who are drawn to bright and cheerful foods. This visual appeal translates into excitement even before the first bite.
The taste itself is equally captivating. The light, airy texture combined with the burst of sweet and tangy fruit flavor from the Kool-Aid creates a delightful sensory experience. It’s nostalgic for many adults, bringing back childhood memories, while being an exciting new discovery for younger generations. Its customizable nature means you can tailor flavors and colors to suit any gathering or personal preference, guaranteeing there’s always a version that everyone will love. Whether it’s a birthday party, a casual get-together, or just a family dinner, this creamy treat consistently delivers smiles and satisfied taste buds, making it the ultimate party food.
Enjoying Your Easy Whipped Kool Aid Treat
Perfect for parties
The easy whipped Kool-Aid treat truly shines as a centerpiece at any social gathering, making it perfect for parties. Its vibrant colors immediately add a festive pop to your dessert spread, instantly making it an eye-catching attraction. Imagine a rainbow of individual cups, each boasting a different Kool-Aid flavor, or a large trifle bowl layered with multi-colored whipped goodness. The visual appeal alone makes it a conversation starter and invites guests to indulge.
Beyond aesthetics, its quick and easy preparation means you spend less time in the kitchen and more time enjoying your guests. You can whip up several batches in different flavors to offer variety, catering to diverse preferences. It’s a refreshing option, especially during warmer months, offering a light alternative to heavier desserts. Plus, the familiar, beloved taste of Kool-Aid guarantees it will be a hit with both kids and adults, cementing its status as a reliable and fun party food option. For other delicious party food ideas, explore options like funnel cake bites, which are always a hit.
A sweet treat anytime
While it excels at parties, the easy whipped Kool-Aid doesn’t need a special occasion to be enjoyed. It’s truly a sweet treat anytime, offering a delightful pick-me-up whenever a craving strikes. Its minimal prep time means you can decide to make it on a whim, satisfying your sweet tooth within minutes. This quick recipe provides instant gratification without the hassle of baking or extensive ingredient lists, making it an ideal choice for a spontaneous dessert.
Whether you’re unwinding after a long day, looking for a refreshing afternoon snack, or simply wanting a burst of fruity flavor, this creamy treat fits the bill perfectly. It’s a comforting yet exciting dessert that brings a touch of whimsy to your everyday routine. Keep a packet of your favorite Kool-Aid on hand, and you’re always just moments away from creating this delightful, colorful, and utterly satisfying no-bake recipe. For more sweet ideas and culinary inspiration, follow us on Instagram!
Quick & Delicious Kool-Aid Desserts
More fun flavor combinations
The world of Kool-Aid flavors is vast, and our easy whipped Kool-Aid recipe is just the beginning for exploring creative and delicious combinations. Don’t limit yourself to single flavors; mixing and matching can lead to surprisingly delightful results. Consider pairing complementary flavors like strawberry and lemonade for a refreshing “strawberry lemonade” whipped treat. Grape and tropical punch can create a unique, layered fruit explosion. For a more adventurous twist, try mixing orange with a hint of cherry for a “sunrise” effect, both in color and taste.
You can also think seasonally. In summer, bright and zesty flavors like lemon-lime and blue raspberry are perfect. During fall, a cranberry or black cherry Kool-Aid might offer a richer, deeper flavor profile. Experimenting with different brands or even sugar-free versions can also open up new possibilities. The key is to have fun and allow your taste buds to guide your choices, transforming a simple creamy treat into an endless parade of flavorful drinks and desserts.
Adapting for different occasions
The versatility of easy whipped Kool-Aid extends beyond just flavor combinations; it can be effortlessly adapted for various occasions, making it a truly flexible dessert. For holiday celebrations, choose colors that match the theme: red and green for Christmas, or pastel hues for Easter. You can pipe it onto gingerbread cookies or serve it alongside festive fruit platters.
For children’s birthday parties, multiple colors are a must. Serve them in small, colorful cups with fun sprinkles, or use them as a topping for cupcakes or ice cream sundaes. For adult gatherings, you can elevate the presentation with elegant glassware and sophisticated garnishes like fresh mint leaves or a drizzle of gourmet chocolate. You could even consider infusing it with a tiny splash of a complementary liqueur for an adult-only version. Whether it’s a casual backyard BBQ, a school bake sale, or a sophisticated brunch, this flavorful drink can be customized to perfectly fit the mood and theme, proving itself as a truly adaptable and delicious quick recipe for any event.
