
No Bake Payday Nut Squares offer a wonderfully simple way to enjoy a sweet and salty treat without turning on your oven. This easy dessert recipe combines crunchy peanuts, creamy peanut butter, and soft marshmallows. It’s perfect for a quick snack or a family gathering, providing a delightful homemade treat with minimal effort. Get ready to create these irresistible bars!
Key Takeaways
- Create delicious nut squares with no baking required.
- Uses common, simple ingredients for a quick homemade treat.
- Perfect for any occasion, from casual snacks to party desserts.
- Offers great versatility for dietary needs and flavor preferences.
- Enjoy convenient storage options for lasting freshness.
Craving a sweet and salty treat? These squares are your answer. They require no baking at all. Minimal effort yields big flavor. Perfect for any time. Enjoy this easy homemade delight.
Make Easy No Bake Payday Nut Squares
Creating delicious desserts doesn’t always have to involve a hot oven and complex steps. The beauty of no bake desserts lies in their sheer simplicity and the joy they bring with minimal fuss. Our recipe for easy no bake payday nut squares exemplifies this perfectly. Imagine a world where you can whip up a delectable treat that tastes like your favorite candy bar, all without breaking a sweat. These squares are a testament to how humble ingredients can come together to create something truly extraordinary. Whether you’re a seasoned baker or a kitchen novice, this recipe is designed for success, promising a satisfyingly sweet and salty experience every single time.
Why No Bake Treats Are Best
No bake treats offer unparalleled convenience, especially when time is short or the weather is too warm to heat up your kitchen. There’s no need to preheat an oven, monitor baking times, or worry about your dessert burning. This means less stress, fewer dishes, and more time to enjoy your creation. For those new to dessert making, no-bake recipes provide a fantastic starting point, building confidence without the intimidation of baking precision. They often rely on refrigeration to set, which is a foolproof method for achieving perfect texture. Furthermore, the quick assembly makes them an ideal choice for last-minute gatherings or when a craving for something sweet hits unexpectedly.
Quick Dessert for Any Occasion
The versatility of these no bake payday nut squares makes them suitable for a multitude of occasions. Need a quick dessert for a potluck? Check. Looking for a simple yet impressive treat for a family gathering? Absolutely. Or perhaps you just want a satisfying snack to curb your sweet tooth after a long day? These squares fit the bill perfectly. Their combination of crunchy peanuts, creamy peanut butter, and a chewy base makes them universally appealing. They travel well, hold their shape, and can be prepared ahead of time, freeing you up to focus on other aspects of your event. From casual weeknight desserts to festive holiday spreads, these sweet and salty wonders are always a welcome addition. If you enjoy other quick and delightful desserts, you might also like our Quick Italian Cream Cake, which also simplifies a classic treat.
Gather Ingredients for Nut Squares Recipe
The beauty of this easy dessert recipe lies in its straightforward ingredient list, featuring items you likely already have in your pantry or can easily find at any grocery store. No exotic spices or hard-to-source components here—just simple, delicious staples that combine to create something truly magical. The core of these nut squares revolves around the irresistible pairing of peanuts and peanut butter, elevated by a few sweet additions. Always opt for fresh ingredients to ensure the best flavor and texture in your final product. This section will walk you through the key components you’ll need to create these homemade desserts.
Peanuts and Sweetened Condensed Milk
For the quintessential “Payday” experience, roasted, salted peanuts are non-negotiable. The saltiness balances the sweetness of the other ingredients, creating that addictive sweet and salty profile that these squares are known for. You can use whole peanuts or roughly chopped ones, depending on your preference for texture. The crunch they provide is a crucial element. Sweetened condensed milk acts as the primary binder and a major source of sweetness. Its thick, syrupy consistency is perfect for holding everything together without any baking, and it imparts a rich, milky flavor that enhances the overall taste. Make sure you’re using sweetened condensed milk, not evaporated milk, as they are very different products.
Peanut Butter Chips and Marshmallows
To deepen the peanut butter flavor and add another layer of creaminess, peanut butter chips are incorporated into the filling. When melted, they create a smooth, rich base that perfectly complements the crunchy peanuts. You can find these chips in the baking aisle alongside chocolate chips. Mini marshmallows are another star ingredient, contributing a delightful chewiness and helping to achieve that gooey, sticky texture reminiscent of a classic Payday candy bar. As they melt into the mixture, they help bind the filling even further, adding a soft, pillowy contrast to the nuts. Together, these ingredients form the irresistible core of your peanut butter bars, ensuring every bite is a delightful combination of flavors and textures.
Preparing the Crunchy Peanut Layer Base
The foundation of any great no bake square is a well-prepared base, and our easy no bake payday nut squares are no exception. This initial layer of crunchy peanuts sets the stage for the rest of the dessert, providing that signature texture and salty kick right from the start. Taking a few moments to properly prepare your pan and evenly distribute this first layer will make all the difference in the final presentation and enjoyment of your homemade treat. It’s a simple step, but crucial for ensuring your squares hold together beautifully and are easy to serve.
Greasing Your Pan Properly
Proper pan preparation is key to ensuring your nut squares come out cleanly and without any sticking. For best results, use a square baking pan, typically 8×8 or 9×9 inches, depending on how thick you prefer your squares. Begin by lightly greasing the pan with butter, cooking spray, or coconut oil. After greasing, line the pan with parchment paper, leaving an overhang on two opposite sides. This “sling” will allow you to easily lift the entire slab of set squares out of the pan for effortless cutting. The greasing helps the parchment paper adhere smoothly, preventing any wrinkles that could affect the appearance of your base. This simple step saves a lot of hassle when it’s time to slice and serve your delicious creation.
Spreading the First Peanut Layer
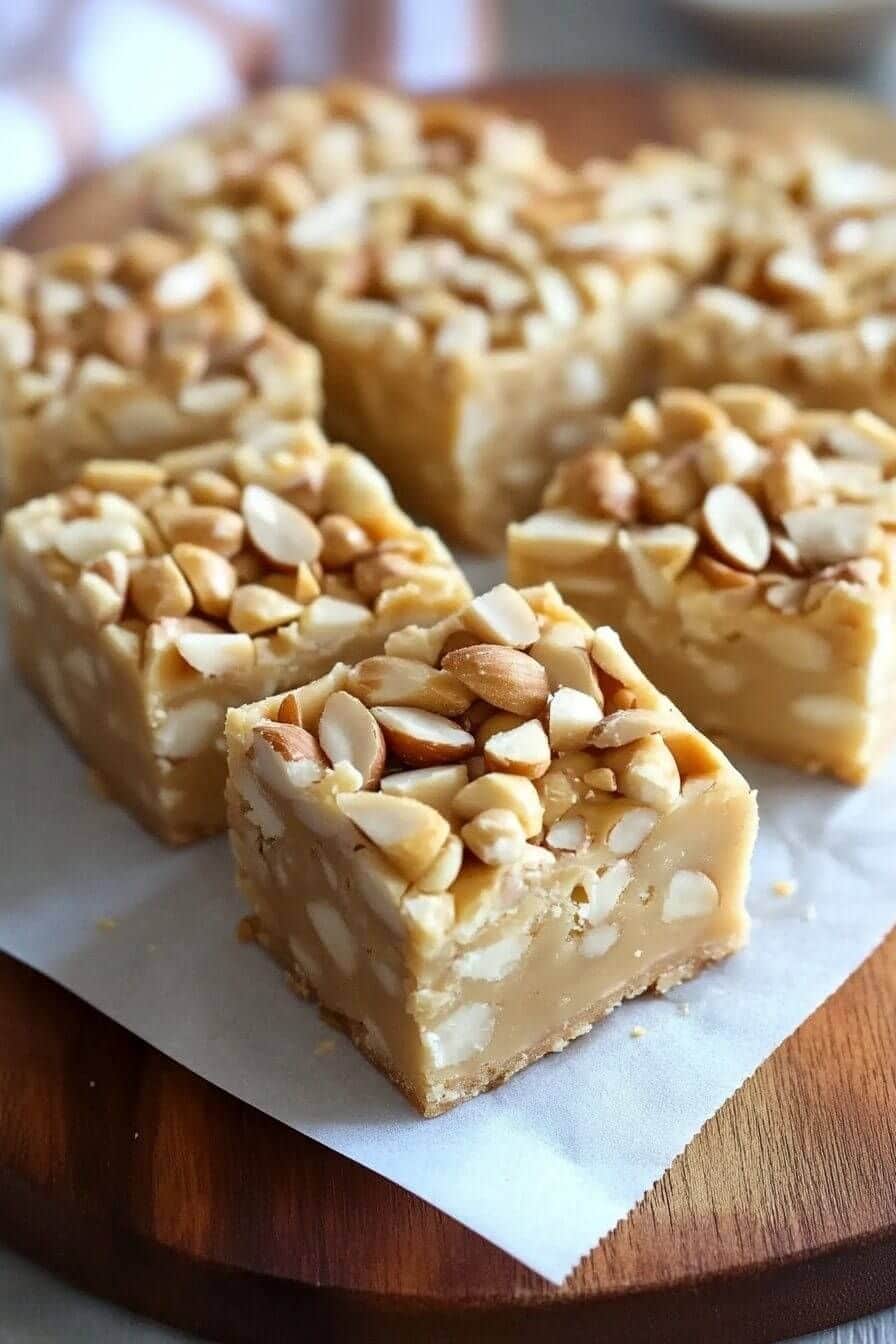
Once your pan is prepped, it’s time to create the initial layer of crunchy peanuts. Spread a generous amount of roasted, salted peanuts evenly across the bottom of the prepared pan. Aim for a single, consistent layer that covers the entire surface. You might need to press them down gently with your hands or the back of a spoon to ensure they are firmly packed and form a cohesive base. This isn’t just for aesthetics; a well-compacted first layer helps the squares maintain their shape once cut and provides a stable foundation for the creamy filling that will follow. Don’t be shy with the peanuts here; they are a star ingredient, delivering the essential crunch and salty contrast that defines these no bake payday nut squares. This base layer truly contributes to the overall texture and taste profile, making each bite an enjoyable experience.
Making the Creamy Peanut Butter Filling
The heart of these no bake payday nut squares is undoubtedly their rich, creamy peanut butter filling. This is where the magic happens, transforming simple ingredients into a gooey, sweet, and utterly irresistible mixture that forms the core of your homemade treat. Achieving the right consistency is key, as it needs to be smooth enough to spread easily yet firm enough to set properly when chilled. Pay attention to the melting process and the sequence of adding ingredients to ensure a perfectly integrated filling. This section guides you through creating the luscious center that makes these chilled desserts so popular.
Melting Butter and Peanut Butter Chips
The first step in crafting this decadent filling is to gently melt the butter and peanut butter chips together. This can be done either in a saucepan over low heat or in a microwave-safe bowl, heating in short bursts and stirring frequently. If using a saucepan, ensure the heat is low to prevent scorching the chips or butter. Stir continuously until the mixture is smooth and fully melted, with no lumps of chips remaining. The goal is to achieve a glossy, uniform liquid that will serve as the base for the rest of your filling. This careful melting process ensures a creamy texture and prevents any grainy bits in your final product. Take your time with this step, as it forms the foundation of the filling’s texture and flavor.
Mixing in Milk and Mini Marshmallows
Once your butter and peanut butter chips are beautifully melted, it’s time to incorporate the remaining filling ingredients. Remove the mixture from the heat and stir in the sweetened condensed milk. This will immediately add a rich sweetness and contribute to the filling’s binding properties. Mix thoroughly until the condensed milk is fully combined and the mixture is smooth. Next, add the mini marshmallows. The residual heat from the melted peanut butter mixture will gently soften and melt the marshmallows, creating that wonderfully gooey and chewy texture that is so characteristic of Payday-inspired treats. Continue to stir until the marshmallows are mostly melted and fully incorporated, forming a thick, pliable, and incredibly creamy peanut butter filling. This mixture should be spreadable but not too runny, ready to be layered over your crunchy peanut base. It’s truly a sweet and salty masterpiece in the making.
Assembling Your No Bake Payday Squares
With your crunchy peanut base prepared and your creamy peanut butter filling ready, it’s time for the exciting part: assembling your easy no bake payday nut squares. This stage brings all the delicious components together, creating the distinctive layers that make this dessert so appealing. Precision here ensures an even distribution of flavor and texture in every bite. The layering process is straightforward, but taking a moment to spread each component carefully will result in a visually appealing and perfectly balanced homemade treat. Soon, these simple ingredients will transform into a delightful main course worthy dessert, though it is technically a snack!
Layering the Peanut Butter Mixture
Carefully spoon the warm, creamy peanut butter filling over the prepared peanut base in your pan. Take your time to spread the mixture evenly from edge to edge. A rubber spatula or the back of a spoon works well for this. The goal is to create a consistent layer that covers the entire peanut base, ensuring that every piece of your finished square will have a balanced ratio of the gooey filling to the crunchy nuts. Work relatively quickly while the filling is still warm and pliable, as it will start to set as it cools. Smooth out the top as much as possible to create a neat surface for the final layer. This beautiful, thick layer is the defining characteristic of these sweet and salty bars, promising a satisfying chewiness with every mouthful.
Adding the Top Peanut Crunch
Once the creamy peanut butter layer is spread, it’s time to add the final touch: more crunchy peanuts! Sprinkle the remaining roasted, salted peanuts generously over the entire surface of the peanut butter filling. This top layer not only adds another burst of salty crunch but also mimics the iconic look of a Payday candy bar. After sprinkling, gently press the peanuts into the peanut butter mixture. You can use your hands, a piece of parchment paper, or the back of a clean spoon to apply light pressure. This helps the peanuts adhere firmly to the soft filling, preventing them from falling off when the squares are cut and served. This final step completes the construction of your no bake payday nut squares, preparing them for their crucial chilling period. The combination of sweet, salty, creamy, and crunchy textures is what makes this dessert recipe a family favorite.
Refrigerate Until Set: Payday Nut Squares
The final, and arguably most important, step in perfecting your no bake payday nut squares is the chilling process. Unlike traditional baked goods that rely on heat to solidify, these sweet and salty peanut butter bars depend entirely on refrigeration to firm up and achieve their ideal texture. Patience during this stage is a virtue, as rushing it can lead to soft, crumbly squares that are difficult to cut and serve. Properly set squares will be firm, easy to handle, and provide that satisfying chewiness you’re looking for. This waiting period is crucial for allowing all the flavors to meld together and for the various layers to become cohesive, transforming a sticky mixture into a stable, sliceable homemade treat.
How Long to Chill Your Squares
For your no bake payday nut squares to achieve optimal firmness, they need ample time in the refrigerator. Generally, a minimum of 2 to 3 hours is recommended. However, for best results and truly firm, easy-to-cut squares, allowing them to chill for at least 4 hours or even overnight is ideal. The longer chilling time ensures that the sweetened condensed milk and melted marshmallows have completely cooled and solidified, binding all the ingredients together into a stable bar. Placing the pan uncovered in the fridge initially can help to speed up the setting process slightly by allowing moisture to escape, but after the first hour, covering loosely with plastic wrap is advisable to prevent them from drying out or absorbing fridge odors. This duration is critical for the structural integrity of your easy dessert recipe.
Checking if Squares Are Firm
Before attempting to cut your no bake payday nut squares, it’s important to verify that they are thoroughly set. You can easily check for firmness by gently pressing a finger onto the center of the squares. If it feels solid and resilient, with little to no give, then your squares are ready. If there’s still a noticeable softness or a slight wobble, return them to the refrigerator for additional chilling time. Another indicator is their appearance; once fully set, the layers will look more defined, and the surface will appear less glossy and more matte. When they are properly firm, use the parchment paper overhangs to lift the entire slab of squares out of the pan and onto a cutting board. A sharp, warm knife (wiped clean between cuts) will help you achieve clean, precise slices, transforming your perfectly set creation into individual, irresistible peanut butter bars ready for enjoyment.
Serving Ideas for Your Nut Squares Recipe
Once your no bake payday nut squares are perfectly chilled and firm, the next delightful step is serving them up! These sweet and salty treats are incredibly versatile, fitting seamlessly into various dining experiences. Whether you prefer them as a simple snack or as part of a more elaborate dessert spread, their rich flavor and satisfying texture are sure to impress. Thinking about how to present and pair them can elevate the enjoyment of this easy dessert recipe, making each bite even more special. This section offers creative ways to enjoy your homemade treat, ensuring they are always a crowd-plepleaser.
Chilled or Room Temperature
The temperature at which you serve your no bake payday nut squares can slightly alter their texture and eating experience. When served directly from the refrigerator, they will be firmer and offer a more distinct crunch from the peanuts, with a chewy, dense filling. This is often the preferred method, especially during warmer months, as it maintains their structure and keeps them wonderfully refreshing. However, if you let them sit out at room temperature for about 15-20 minutes before serving, the peanut butter filling will soften slightly, becoming even gooier and more yielding, while the peanuts retain their crunch. This can enhance the melt-in-your-mouth quality of the filling. Experiment with both to see which you and your guests enjoy most!
Delicious Pairings and Dipping Options
These sweet and salty peanut butter bars are fantastic on their own, but they can also be enhanced with simple pairings. A cold glass of milk or a hot cup of coffee makes an excellent companion, balancing the sweetness and richness. For a more decadent experience, consider serving them alongside a scoop of vanilla bean ice cream, allowing the chilled dessert to contrast with the creamy coldness. You can also get creative with dipping options. A drizzle of melted dark chocolate or a warm caramel sauce over the top just before serving adds an extra layer of indulgence. For another delightful peanut butter treat, check out our Butterfinger Balls recipe. These squares are also wonderful when cut into smaller pieces and offered on a dessert platter with other finger foods. Their robust flavor holds its own, making them a standout addition to any spread.
Storing Your Easy Payday Nut Squares
One of the many benefits of making these easy no bake payday nut squares is their excellent storage potential. Unlike some delicate desserts that need to be consumed immediately, these sweet and salty treats hold up beautifully, allowing you to enjoy them for days or even weeks. Proper storage ensures that your homemade treat remains fresh, delicious, and maintains its perfect texture. Whether you’re planning to enjoy them over a few days or want to save some for a future craving, understanding the best storage methods will help preserve their quality. This means you can always have a quick snack on hand, ready to satisfy any sweet and salty craving.
Fridge Storage for Freshness
For day-to-day enjoyment, storing your no bake payday nut squares in the refrigerator is the ideal method. Once they are fully set and cut into individual pieces, transfer them to an airtight container. Layering them with parchment paper between layers can prevent sticking and make it easier to grab a single square. Stored this way, they will remain fresh, firm, and delicious for up to 5-7 days. The cool temperature helps maintain their structural integrity and keeps the peanut butter filling from becoming too soft. Always ensure the container is tightly sealed to protect them from absorbing any odors from other foods in the fridge and to prevent them from drying out. This method is perfect for keeping a batch on hand for a quick dessert throughout the week.
Freezing for Longer Enjoyment
If you’ve made a large batch or simply want to extend the shelf life of your easy dessert recipe, freezing is an excellent option. To freeze, arrange the cut squares in a single layer on a baking sheet and place them in the freezer for about 30 minutes, or until they are firm. This step, known as flash-freezing, prevents them from sticking together. Once firm, transfer the squares to an airtight, freezer-safe container or a heavy-duty freezer bag, again separating layers with parchment paper if stacking. They can be stored in the freezer for up to 2-3 months. When you’re ready to enjoy them, simply remove the desired number of squares from the freezer and let them thaw in the refrigerator overnight or at room temperature for about 30-60 minutes. They will retain their wonderful texture and flavor, providing a convenient homemade treat whenever you desire.
Variations for Your No Bake Nut Squares
The beauty of this easy no bake payday nut squares recipe extends beyond its simplicity; it’s also incredibly adaptable. Once you’ve mastered the basic recipe, feel free to unleash your creativity and customize it to suit your personal tastes or dietary needs. Swapping out ingredients or adding new elements can completely transform the flavor profile, making this a truly versatile homemade treat. Whether you’re looking to intensify the sweetness, add more crunch, or even make it suitable for those with nut allergies, these desserts offer endless possibilities for exploration and enjoyment. Let’s look at some exciting ways to put your own spin on these sweet and salty bars.
Adding Different Nuts or Chocolate
While peanuts are traditional for a “Payday” inspired square, you can easily experiment with other nuts for a unique twist. Consider using a mix of almonds, cashews, or walnuts for a varied texture and flavor. Toasted nuts can add an extra depth of flavor. If you’re a chocolate lover, the possibilities are even more exciting! Fold in some mini chocolate chips or chopped chocolate bars into the peanut butter filling for a delightful surprise. A drizzle of melted milk, dark, or white chocolate over the top once the squares have set also adds a beautiful finish and an extra layer of indulgence. You could also press crushed pretzels into the base or sprinkle them on top for an extra salty crunch. These additions turn a classic into your own unique peanut butter bars creation.
Making It Nut-Free or Caramel Swirled
For those with peanut allergies or who simply prefer an alternative, making these squares nut-free is entirely possible. Substitute the peanut butter with sunflower seed butter (like SunButter) and replace the peanuts with roasted sunflower seeds or puffed rice cereal. Be mindful that sunflower seed butter can sometimes react with baking soda to turn green, though this is less common in no-bake recipes. Another exciting variation is to introduce a caramel swirl. You can either make a simple homemade caramel sauce or use a store-bought caramel topping. After spreading the peanut butter filling, drizzle lines of caramel over it and then use a knife or skewer to gently swirl the caramel through the peanut butter before adding the top layer of nuts (or nut-free alternative). This adds a rich, buttery sweetness that complements the other flavors beautifully, creating a truly decadent version of this quick snack.
Understanding Nut Squares Nutrition Facts
When indulging in a delicious homemade treat like no bake payday nut squares, it’s natural to consider their nutritional aspects. While these sweet and salty bars are certainly a treat and not a health food, understanding the components that contribute to their overall nutrition can help you enjoy them mindfully. Packed with energy-dense ingredients, they offer a satisfying burst of flavor and a good source of protein from the peanuts. This section provides a general perspective on the caloric content and other key elements found in this easy dessert recipe, encouraging you to savor each bite as part of a balanced diet.
Calories Per Delicious Square
Due to the rich nature of their ingredients—peanuts, sweetened condensed milk, peanut butter chips, and marshmallows—no bake payday nut squares are quite calorie-dense. Each square, depending on its size and the exact proportions used, will typically contain a significant amount of calories, primarily from fats and sugars. Peanuts and peanut butter are excellent sources of healthy fats and protein, providing sustained energy, but they also contribute substantially to the calorie count. Sweetened condensed milk and marshmallows add considerable sugar, which provides quick energy but should be consumed in moderation. These squares are best enjoyed as an occasional treat rather than a daily staple. They offer a rewarding burst of energy and flavor, making them a satisfying dessert or quick snack. Being mindful of portion sizes is key to incorporating this delicious homemade treat into your diet without overindulging. Always remember that treats like these are meant for enjoyment, bringing happiness with every sweet and salty bite.
Time Needed for Delicious Nut Squares
One of the most appealing aspects of making easy no bake payday nut squares is the minimal time commitment required for their preparation. Unlike many baked goods that demand hours in the kitchen, this easy dessert recipe is designed for efficiency, making it perfect for busy schedules or last-minute cravings. While there is a waiting period involved for chilling, the active hands-on time is incredibly short, allowing you to create a delightful homemade treat without feeling overwhelmed. Understanding the difference between prep time, active cooking time, and total chill time will help you plan your kitchen adventure effectively and ensure your sweet and salty bars are ready exactly when you want them.
Quick Prep and Short Cooking Time
The active preparation time for these no bake payday nut squares is remarkably brief. You can expect to spend approximately 15-20 minutes on hands-on tasks. This includes gathering your simple ingredients, melting the butter and peanut butter chips, mixing in the condensed milk and marshmallows, preparing your pan, and layering the components. There is no actual “cooking” time in the traditional sense, as no oven is involved. The only heat comes from gently melting ingredients on the stovetop or in the microwave. This quick prep makes it an ideal chilled dessert for those who are short on time but still want to create something special and delicious. You’ll be amazed at how quickly you can bring this sweet and salty masterpiece together from start to finish.
Total Time Including Chill Period
While the active prep is minimal, the most significant portion of the “time needed” for these no bake payday nut squares is the essential chill period. As discussed earlier, these sweet and salty treats require time in the refrigerator to firm up properly. For optimal results, you should plan for a total chilling time of at least 2-4 hours, with overnight being the best option for maximum firmness and ease of cutting. This means that while you can assemble the squares quickly, you’ll need to factor in this waiting period before they are ready to be sliced and enjoyed. If you’re making them for a specific event, it’s always best to prepare them the day before. So, while the “cooking” is short, the “setting” takes time, but the wait is absolutely worth it for these incredibly satisfying peanut butter bars, ensuring a truly firm and delightful homemade treat.
Why This Easy Nut Squares Recipe Works
The enduring popularity of these easy no bake payday nut squares isn’t just a happy accident; it’s a testament to a perfectly balanced recipe that caters to both convenience and cravings. This sweet and salty sensation hits all the right notes, providing a satisfying texture and a familiar, comforting flavor profile that resonates with almost everyone. From its simple ingredients to its fuss-free preparation, every aspect of this homemade treat is designed for success and enjoyment. It’s more than just a dessert; it’s a smart solution for anyone looking to create something delicious without the usual kitchen stress. Let’s delve into what makes this particular easy dessert recipe so remarkably effective and beloved by many.
Perfect for Busy Schedules
In today’s fast-paced world, finding time to bake elaborate desserts can be a challenge. This easy nut squares recipe shines precisely because it fits seamlessly into busy schedules. The minimal hands-on time—just 15-20 minutes of active preparation—means you can whip up the mixture during a quick break or even after dinner, then simply let the refrigerator do the rest of the work overnight. There’s no need to monitor an oven, deal with rising times, or fret over complex techniques. This makes it an ideal solution for parents, working professionals, or anyone who wants a delicious, homemade dessert without sacrificing precious time. It’s the ultimate quick snack or dessert, providing maximum reward for minimal effort, proving that incredible flavors don’t always require hours in the kitchen.
Customizable for Every Taste
Beyond its ease, the versatility of these no bake payday nut squares is a major reason for their widespread appeal. The base recipe is fantastic on its own, but it also serves as a perfect canvas for customization. Whether you prefer a sweeter profile, a bolder crunch, or a completely different set of nuts, this recipe allows for endless creativity. You can easily add chocolate chips, mix in different types of nuts, swirl in caramel, or even adapt it to be nut-free. This adaptability ensures that the squares can be tailored to individual preferences, dietary needs, or seasonal ingredients, making them truly personal. This flexibility means you can make a slightly different version every time, ensuring this easy dessert recipe never gets boring and always satisfies, truly making it a family favorite and a timeless homemade treat for all occasions.