
Easy cheesecake cups are delightful, individual desserts that bring joy without the fuss of a traditional cheesecake. This simple recipe guides you through creating creamy, delectable mini cheesecakes, perfect for any gathering or a sweet personal treat. Get ready for blissful dessert bites!
Key Takeaways
- Quickly prepare delicious, individual cheesecake cups.
- Enjoy creamy filling and crisp graham cracker crust.
- Customize with various toppings for any taste.
- Easily make ahead and freeze for future enjoyment.
Cheesecake cups offer individual servings. They are perfect for parties. Minimal effort brings big flavor. Everyone loves these sweet treats. Pure dessert bliss awaits.
Getting Started: Easy Cheesecake Cups
Craving the rich, creamy goodness of cheesecake without the lengthy baking time or complex techniques? Easy cheesecake cups are your answer! These delightful dessert bites are perfect for novice bakers and seasoned pros alike, offering individual portions of velvety smooth cheesecake on a satisfying graham cracker crust. For background, the dessert we call cheesecake itself boasts a long history, dating back to ancient Greece. Forget water baths and cracked tops; this simple recipe focuses on straightforward steps for consistently delicious results, making them ideal for any occasion from casual family dinners to elegant gatherings.
Why make these easy dessert bites?
There are numerous reasons why these mini cheesecakes are a fantastic choice. First, their individual size makes serving incredibly convenient, eliminating the need for slicing and ensuring everyone gets a perfectly portioned treat. They are also highly customizable, allowing you to experiment with various toppings to suit different tastes. Think fresh berries for a vibrant pop, chocolate shavings for decadence, or a drizzle of caramel for a sweet finish. This versatility makes them a go-to for events or when you want to impress without stress.
Planning your blissful baking journey
Before you dive into mixing, a little preparation goes a long way. Gather all your ingredients and tools, making sure your cream cheese is softened to room temperature for that perfectly smooth filling. This recipe is designed to be low-stress, so take your time and enjoy the process. Consider what toppings you might want to add later to enhance your easy cheesecake cups, and ensure you have enough space in your refrigerator for the crucial chilling time. For more dessert inspiration, check out our collection of delicious desserts.
Gathering Your Simple Cheesecake Ingredients
One of the beauties of this recipe for easy cheesecake cups is its reliance on readily available ingredients. You won’t need any exotic items; just a few pantry staples and dairy products will come together to create a luxurious dessert. Quality ingredients make a noticeable difference in flavor and texture, so opt for full-fat cream cheese for the creamiest results.
Pantry staples for creamy cups
For the quintessential cheesecake experience, you’ll need:
- Cream Cheese: Full-fat block cream cheese, softened to room temperature. This is the star for a rich, creamy filling.
- Granulated Sugar: Provides the perfect sweetness, balancing the tang of the cream cheese.
- Vanilla Extract: A splash of good quality vanilla enhances all the flavors.
- Heavy Whipping Cream: Whipped until stiff peaks form, it creates the light and airy texture essential for these easy dessert bites.
- Graham Crackers: The foundation of your crunchy crust. You can also use digestive biscuits or shortbread cookies. Learn more about the history of graham crackers on Wikipedia.
- Unsalted Butter: Melted butter binds the graham cracker crumbs together for a stable crust.
Having these items ready before you begin will streamline your preparation process, ensuring a smooth journey to your blissful cheesecake cups.
Prepare your tools and workspace
A well-organized workspace makes baking enjoyable. For this simple recipe, you’ll need:
- A standard 12-cup muffin tin.
- Paper liners or foil liners for easy removal.
- Mixing bowls (at least two: one for the filling, one for whipping cream).
- An electric mixer (handheld or stand mixer) for whipping cream and blending the filling.
- A rubber spatula for folding.
- Measuring cups and spoons.
- A small saucepan or microwave-safe bowl for melting butter.
- A food processor or a Ziploc bag and rolling pin for crushing graham crackers.
With your simple cheesecake ingredients and tools prepped, you’re ready to move on to crafting the creamy filling.
Crafting the Smooth Cheesecake Filling
The heart of any great cheesecake lies in its filling, and these easy cheesecake cups are no exception. Achieving a perfectly smooth, lump-free filling is crucial for that melt-in-your-mouth texture. This step requires a little patience and attention to detail, but the results are incredibly rewarding.
Softening cream cheese for ease
The most important tip for a smooth cheesecake filling is to start with room temperature cream cheese. If your cream cheese is cold, it will be lumpy and difficult to incorporate evenly with other ingredients, leading to an uneven texture. To soften it quickly, unwrap the cream cheese blocks and place them on a plate for 30-60 minutes, or immerse the sealed package in warm water for 10-15 minutes. Once softened, it will cream beautifully, forming the perfect base for your simple recipe. This ensures your creamy cups will have that luxurious consistency you desire.
Blending sugar and vanilla smoothly
Once your cream cheese is perfectly soft, place it in a large mixing bowl. Add the granulated sugar and vanilla extract. Using an electric mixer on medium-low speed, beat the mixture until it’s completely smooth and creamy. Scrape down the sides of the bowl frequently with a rubber spatula to ensure all ingredients are well combined. Avoid overmixing at this stage, as it can incorporate too much air, though we will be adding whipped cream later for lightness. The goal here is a homogeneous, velvety base before the next crucial step. This initial blend sets the stage for the exquisite flavor and texture of your finished dessert bites.
Gently Folding in Whipped Cream
Adding whipped cream to your cheesecake mixture is what elevates these easy cheesecake cups from dense to delightfully light and airy. This step requires a delicate touch to maintain the volume and incorporate it evenly without deflating the cream.
Keeping the cheesecake light and airy
In a separate, chilled bowl, whip the heavy cream until stiff peaks form. It’s important not to over-whip, as it can turn grainy. The cream should hold its shape firmly when the beater is lifted. This fluffy, whipped cream is key to achieving that wonderful melt-in-your-mouth texture in your mini cheesecakes. It introduces lightness, contrasting beautifully with the rich cream cheese base and preventing the dessert from feeling too heavy. For another dessert that utilizes a light, airy component, consider making vanilla bean creme brulee cheesecake cupcakes.
Achieving perfect filling texture
Once your whipped cream is ready, gently fold it into the cream cheese mixture in two or three additions. Use a rubber spatula, employing an “up and over” motion, rather than stirring vigorously. This technique helps to preserve the air in the whipped cream, ensuring your creamy filling remains light and smooth. Continue folding until no streaks of whipped cream remain, and the mixture is uniformly combined. Be careful not to overmix, which can deflate the whipped cream and result in a denser filling. The final texture should be smooth, pillowy, and ready to be added to your crusts.
Preparing Your Graham Cracker Crust
A good crust provides the perfect counterpoint to the creamy filling of your easy cheesecake cups. The graham cracker crust is a classic for a reason – its subtle sweetness and crisp texture are ideal. This simple component comes together quickly and easily, forming a sturdy base for your dessert bites.
Crushing crackers for the base
Begin by finely crushing your graham crackers. You have a few options for this:
- Food Processor: The quickest method. Pulse the graham crackers until they resemble fine crumbs.
- Ziploc Bag & Rolling Pin: Place crackers in a sturdy freezer bag, seal it, and crush them with a rolling pin until fine. This is a great stress reliever!
The goal is a consistent, fine crumb texture, similar to sand. Any large pieces will prevent the crust from setting properly and can create an uneven base. Aim for about 1 ½ cups of crumbs for a standard 12-cup muffin tin. This step is crucial for achieving a uniform and appealing graham cracker crust.
Mixing with melted butter
Once your graham cracker crumbs are perfectly fine, transfer them to a medium-sized bowl. Melt the unsalted butter and pour it over the crumbs. Use a fork or your hands to thoroughly mix the butter into the crumbs until they are evenly moistened and resemble wet sand. Every crumb should be coated with butter, as this is what binds them together and allows the crust to hold its shape once pressed into the muffin liners. This mixture is now ready to form the delicious base for your mini cheesecakes.
Building Your Easy Cheesecake Cups
Now comes the exciting part: assembling your individual easy cheesecake cups! This is where all your careful preparation comes together, transforming simple ingredients into beautiful, ready-to-chill dessert bites. Proper layering ensures a balanced texture in every bite.
Layering the graham cracker base
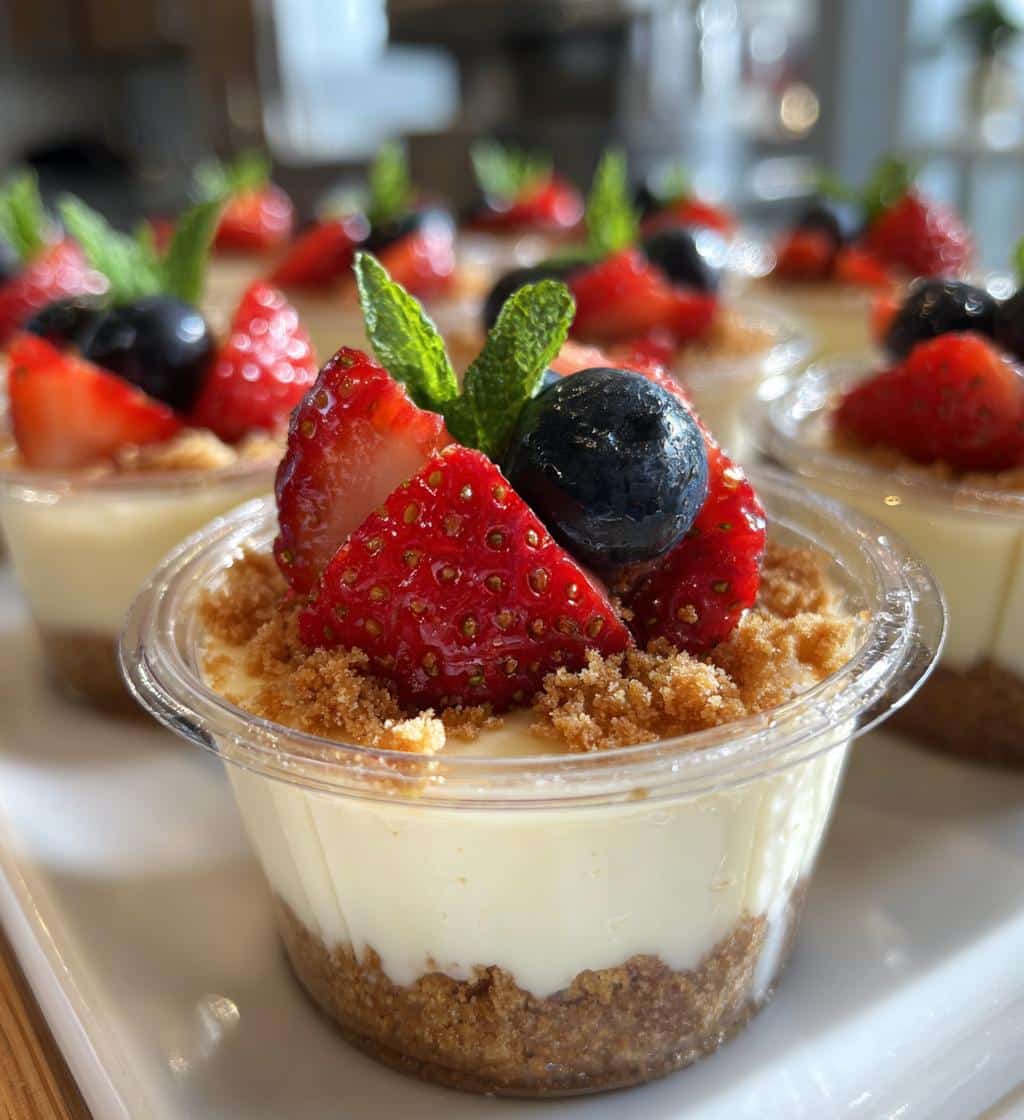
Line your 12-cup muffin tin with paper or foil liners. This is crucial for easy removal after chilling. Take approximately 1 to 1 ½ tablespoons of the buttered graham cracker mixture and press it firmly into the bottom of each liner. You can use the back of a spoon, a small tamper, or even your fingers to create a compact, even base. A well-pressed crust is essential to prevent it from crumbling when you remove your mini cheesecakes. This creates a delightful foundation for your creamy filling. For more simple yet satisfying recipes, try our peanut butter brownie swirl cookies.
Adding creamy cheesecake mixture
Once the crusts are in place, it’s time to add the star – your smooth, creamy cheesecake mixture. Using a spoon or a small cookie scoop, carefully dollop the filling over each graham cracker base, dividing it evenly among the 12 cups. Gently smooth the tops with the back of a spoon or an offset spatula. Fill the cups almost to the top, leaving a small margin for any optional toppings you might want to add later. The consistent portioning here ensures that each of your easy cheesecake cups offers the same delightful experience. These individual dessert bites are now ready for the crucial chilling phase.
Adding Delightful Toppings (Optional)
While your easy cheesecake cups are utterly delicious on their own, adding toppings takes them to another level of visual appeal and flavor complexity. This is where you can truly make these dessert bites your own, customizing them for any occasion or personal preference. The possibilities are vast, limited only by your imagination.
Fresh fruit ideas for vibrancy
Fresh fruits are a classic and highly recommended topping. They add a burst of natural sweetness, a pleasant tang, and a beautiful splash of color. Some excellent choices include:
- Berries: Sliced strawberries, blueberries, raspberries, or blackberries offer a juicy contrast.
- Mango or Peach: Diced fresh mango or ripe peaches provide tropical sweetness.
- Kiwi or Pomegranate Seeds: For a vibrant green or ruby red pop and a slightly tart flavor.
A simple fruit compote or a quick berry coulis can also elevate the experience, offering a more gourmet touch to your mini cheesecakes. The freshness of fruit complements the creamy filling perfectly.
Other tasty topping suggestions
Beyond fruit, there’s a world of other delicious toppings to explore:
- Chocolate: Shaved chocolate, mini chocolate chips, or a drizzle of chocolate sauce.
- Caramel or Butterscotch: A generous drizzle adds a rich, sweet, and sticky element.
- Nuts: Toasted pecans, walnuts, or almonds for crunch and nutty flavor.
- Whipped Cream: An extra dollop of whipped cream for even more indulgence.
- Lemon Curd: A zesty and tangy addition that brightens the flavor profile.
- Cookie Crumbles: Crushed Oreos, shortbread, or speculoos cookies for added texture.
Remember to add most toppings just before serving to maintain their freshness and prevent them from making the cheesecake soggy. This ensures each of your easy cheesecake cups looks and tastes its absolute best.
Chilling Time for Blissful Bites
The chilling phase is perhaps the most critical, yet often underestimated, step in making perfect easy cheesecake cups. Unlike baked cheesecakes, these no-bake dessert bites rely entirely on cold to set their creamy filling and firm up the crust. Patience during this stage will be richly rewarded with a wonderfully stable and delicious dessert.
Important chilling for proper setting
Once you’ve assembled your cheesecake cups, cover the muffin tin loosely with plastic wrap and transfer it to the refrigerator. The minimum chilling time required is usually 4 hours, but for the best results and a truly firm texture, allow them to chill for at least 6-8 hours, or even overnight. During this time, the cream cheese mixture will firm up significantly, and the butter in the graham cracker crust will solidify, creating a cohesive and easy-to-handle dessert. Rushing this step will result in soft, messy cups that lack the characteristic cheesecake structure. Proper setting is key to enjoying these mini cheesecakes without them falling apart.
Achieving a firm texture
A well-chilled cheesecake cup should be firm to the touch, and when you gently press on the surface, it should offer some resistance. The flavors will also meld and deepen during this period, enhancing the overall taste experience. If you plan to add toppings, it’s generally best to do so just before serving, as some toppings (especially fresh fruit) can release moisture and affect the texture if added too early. Once fully chilled, you can carefully remove the paper liners to reveal perfectly formed, individual easy cheesecake cups, ready for presentation and enjoyment. This ensures a delightful firm texture that defines a great cheesecake.
Serving Your Delicious Cheesecake Cups
After all your careful preparation and patient chilling, it’s finally time to enjoy your easy cheesecake cups! Serving them beautifully enhances the overall experience, making these dessert bites even more appealing to your guests or simply to yourself. The presentation can be as simple or as elaborate as you like.
Enjoying these blissful bites
Once thoroughly chilled, carefully remove the cheesecake cups from the muffin tin. The paper liners should peel away easily, revealing perfectly shaped mini cheesecakes. If you find them a bit stubborn, a trick is to gently twist the liner while holding the base. Serve them individually on small plates or arrange them artfully on a large platter. These blissful bites are best enjoyed cold, straight from the refrigerator. Their rich, creamy texture and sweet graham cracker crust make them an irresistible treat that’s ideal for parties, potlucks, or as a special weeknight dessert.
Best ways to present them
Presentation can truly make your easy cheesecake cups shine.
- Simple & Elegant: Arrange them on a white platter, perhaps with a dusting of powdered sugar.
- Fruity Flair: Top each cup with a single berry or a small cluster of raspberries for a pop of color.
- Dessert Bar: Offer a variety of toppings alongside the plain cheesecake cups, allowing guests to customize their own. Think small bowls of chocolate shavings, chopped nuts, fruit compotes, or caramel sauce.
- Tiered Stand: For a party, display them on a tiered dessert stand to create an impressive focal point.
No matter how you present them, these charming easy cheesecake cups are sure to be a hit. For more dinner ideas that pair well with these desserts, explore our easy honey garlic chicken recipe or find inspiration on our Pinterest page.
Nutritional Snapshot of Each Cup
Understanding the nutritional aspects of your easy cheesecake cups can help you enjoy them responsibly. While these dessert bites are undoubtedly a treat, being aware of their general calorie, fat, and sugar content allows for informed consumption. Keep in mind that exact figures will vary based on specific brands and portion sizes.
Understanding calories and fats
A typical serving of these mini cheesecakes will naturally contain a moderate amount of calories, primarily from the full-fat cream cheese, sugar, and butter in the crust. The fat content will also be notable due to these ingredients, contributing to the rich and satisfying texture. Most of the fat will be saturated fat. If you are monitoring your intake, enjoying these easy cheesecake cups as an occasional treat or opting for smaller portions can be a good strategy. Remember that this recipe prioritizes flavor and indulgence, but it’s good to be mindful of your dietary needs.
Sugar and protein per serving
Sugar is a key component for sweetness, and these cheesecake cups will contain a moderate amount per serving, derived from both the granulated sugar in the filling and the natural sugars in the graham crackers. For those managing sugar intake, pairing these with fresh, unsweetened fruit toppings can help balance the overall sweetness. Protein content will be relatively low, primarily coming from the dairy ingredients. These dessert bites are designed to be a delightful indulgence rather than a significant source of daily protein or fiber. Always refer to specific ingredient labels for precise nutritional data if needed, or check out our Instagram account for more tempting treats.
Expert Tips for Perfect Bites
Even with a simple recipe, a few expert tips can elevate your easy cheesecake cups from good to absolutely perfect. These techniques focus on achieving the ideal texture and consistency for your creamy filling and crust, ensuring every bite is a blissful experience.
Using a mixer for smoothness
While some recipes might suggest hand-mixing, an electric mixer (either a handheld or stand mixer) is highly recommended for achieving the ultimate smoothness in your cream cheese filling. Beat the softened cream cheese on its own first, until it’s light and fluffy. Then, gradually add the sugar and vanilla, continuing to beat until the mixture is completely free of lumps. This ensures a consistent, velvety texture that forms the luxurious base of your mini cheesecakes. A smooth base is non-negotiable for these delicious dessert bites.
Gentle folding for lightness
After preparing your smooth cream cheese base and whipping your heavy cream to stiff peaks, the technique of gently folding is paramount. Avoid vigorously stirring the whipped cream into the cheesecake mixture. Instead, use a rubber spatula to carefully fold it in, lifting the mixture from the bottom of the bowl and turning it over the whipped cream. This preserves the air bubbles in the whipped cream, which are responsible for the light, airy, and pillowy texture of the final easy cheesecake cups. Overmixing can deflate the cream, leading to a denser dessert. Precision in this step ensures the lightness that makes these treats so enjoyable.
Make Ahead and Freezing These Cups
One of the many advantages of these easy cheesecake cups is their incredible flexibility for make-ahead preparation and freezing. This makes them an ideal choice for busy hosts, meal preppers, or anyone who loves having a delicious, ready-to-eat dessert on hand. Planning ahead can save you significant time and stress, especially when entertaining.
Preparing layers in advance
You can certainly prepare components of your cheesecake cups in advance. The graham cracker crust can be made and pressed into liners up to a day ahead and stored in the refrigerator. The cheesecake filling mixture (without the whipped cream, if you prefer to add it fresh) can also be made a day in advance and stored covered in the fridge. When ready to assemble, simply whip the cream and fold it in, then proceed with layering. This staged preparation makes the final assembly process incredibly quick, letting you enjoy your baking journey without feeling rushed. This approach ensures fresh, creamy cups when it’s time to serve.
Freezing for later enjoyment
These easy cheesecake cups freeze exceptionally well, offering a convenient solution for future dessert cravings or unexpected guests.
- Chill First: Ensure the cheesecake cups are fully set in the refrigerator before freezing.
- Flash Freeze: Place the uncovered cups (still in their liners) in the freezer for about 1-2 hours until solid.
- Store: Once firm, transfer the frozen cups to an airtight freezer-safe container or a heavy-duty freezer bag. You can layer them with parchment paper in between.
- Thaw: To enjoy, simply remove from the freezer and let them thaw in the refrigerator for a few hours (or overnight) until soft enough to eat.
They will maintain their delicious taste and texture for up to 1-2 months in the freezer. This is perfect for when you need a quick dessert bite without any additional effort.