
Yummy Lemon Meringue Cheesecake offers a delightful blend of tart lemon and sweet, creamy textures. This recipe helps you create a show-stopping dessert, featuring a buttery graham cracker crust, smooth lemon curd, and a cloud-like meringue topping. Master each layer for a truly impressive treat.
Key Takeaways
- Achieve a perfect cheesecake by ensuring ingredients are at room temperature.
- Prevent cracks by slow cooling and chilling your cheesecake completely.
- Make homemade zesty lemon curd for an unparalleled flavor layer.
- Whip meringue to stiff peaks for a fluffy, impressive topping.
- Use a kitchen torch or broiler for a beautifully toasted meringue finish.
- Avoid overmixing and use fresh lemon juice for the best results.
Cheesecake success relies on careful steps. Room temperature ingredients are key. Don’t overmix your batter. Slow cooling prevents cracks. Fresh lemon juice shines bright.
Welcome to Yummy Lemon Meringue Cheesecake
Prepare to impress with this incredible Yummy Lemon Meringue Cheesecake! It’s a symphony of flavors and textures, combining the richness of a classic creamy cheesecake, the zesty tang of homemade lemon curd, and a delicate, fluffy meringue topping. This dessert elevates the traditional cheesecake to new heights, making it perfect for special occasions or simply a delightful weekend treat. The graham cracker crust provides a buttery, crunchy base, complementing the smooth filling and vibrant lemon layers. Follow our detailed steps to create a show-stopping dessert that will earn rave reviews from everyone who tastes it. This recipe is designed to guide you through each layer, ensuring a beautiful and delicious outcome every time.
Gather Ingredients for This Recipe
Before you begin your baking adventure, gather all your ingredients to ensure a smooth process. For the graham cracker crust, you’ll need graham cracker crumbs, granulated sugar, and melted unsalted butter. The creamy cheesecake filling calls for full-fat cream cheese, granulated sugar, large eggs, sour cream, fresh lemon juice, lemon zest, and vanilla extract. For the vibrant lemon curd layer, prepare more fresh lemon juice and zest, granulated sugar, large egg yolks, unsalted butter, and a pinch of salt. Finally, the fluffy meringue topping requires large egg whites, granulated sugar, and cream of tartar. Having everything measured and ready will make the baking experience much more enjoyable and efficient.
Room Temperature Matters Most
One of the most crucial steps for achieving a perfectly smooth and lump-free creamy cheesecake filling is to ensure all your dairy ingredients, especially the cream cheese, sour cream, and eggs, are at room temperature. Cold ingredients don’t emulsify properly, leading to a lumpy batter and a less uniform texture in your baked cheesecake. Take your cream cheese and sour cream out of the refrigerator at least an hour or two before you plan to start mixing. Similarly, allow your eggs to warm up on the counter. This simple preparation step makes a significant difference in the final quality and creaminess of your lemon meringue cheesecake.
Crafting Your Graham Cracker Crust
The foundation of any great cheesecake is its crust, and for this Yummy Lemon Meringue Cheesecake, a classic graham cracker crust is ideal. Begin by crushing your graham crackers into fine crumbs. You can use a food processor for a quick and even consistency, or place them in a resealable bag and crush them with a rolling pin. Combine these crumbs with granulated sugar and melted unsalted butter until well mixed. The mixture should resemble wet sand and hold together when pressed. This simple yet essential component provides a delightful texture and buttery flavor that perfectly balances the rich filling and tart lemon curd above it. Getting this first layer right sets the stage for a truly exceptional dessert experience.
Preparing Your Springform Pan
A springform pan is indispensable for cheesecakes, allowing for easy removal without damaging the delicate sides. Properly preparing it is key to preventing sticking. Start by lightly greasing the bottom and sides of a 9-inch springform pan. For extra security against leaks and for easier handling, especially if using a water bath, you can line the bottom with a circle of parchment paper and wrap the outside of the pan securely with heavy-duty aluminum foil. Press your graham cracker mixture evenly into the bottom of the prepared pan. Use the bottom of a flat glass or measuring cup to firmly compact the crumbs, creating a solid and even crust.
Baking the Crust Until Golden
Once your crust is firmly pressed into the springform pan, it’s time to pre-bake it. This step helps to set the crust, making it crispier and preventing it from becoming soggy once the filling is added. Bake the crust in a preheated oven at 350°F (175°C) for about 8-10 minutes, or until it’s lightly golden brown and fragrant. Keep a close eye on it to prevent over-browning. Once baked, remove the pan from the oven and let the crust cool completely on a wire rack while you prepare the creamy cheesecake filling. A properly baked crust is the first step towards a perfect cheesecake.
Making Creamy Cheesecake Filling
The heart of your Yummy Lemon Meringue Cheesecake is its incredibly creamy filling. This step requires precision and a gentle touch to ensure a smooth, velvety texture without cracks. Start with all your ingredients at room temperature, as previously advised. The quality of your cream cheese will greatly impact the final result, so opt for full-fat, good-quality cream cheese. This layer is what gives the cheesecake its characteristic richness and serves as the perfect canvas for the bright lemon notes. Careful mixing is paramount to incorporate air while avoiding over-mixing, which can lead to a dense texture or cracks during baking.
Beat Cream Cheese Until Smooth
In a large mixing bowl, beat the softened cream cheese on medium speed using an electric mixer until it is completely smooth and free of any lumps. This can take several minutes, but it’s a critical step. Add the granulated sugar gradually, continuing to beat until the mixture is light and fluffy. Scrape down the sides of the bowl frequently to ensure everything is well combined. This initial beating creates the creamy base for your cheesecake, providing the foundation for its luxurious texture. A smooth cream cheese mixture will prevent a grainy filling later on.
Mix in Lemon and Sour Cream
Once the cream cheese and sugar are smooth, it’s time to incorporate the sour cream, fresh lemon juice, lemon zest, and vanilla extract. Add the sour cream in and beat on low speed until just combined. Then, stir in the fresh lemon juice and zest. The lemon provides that quintessential vibrant tang that makes this lemon meringue cheesecake so special, while the sour cream adds an extra layer of richness and helps create a wonderfully smooth texture. Be careful not to overmix at this stage; simply beat until the ingredients are uniformly blended.
Gently Fold in Eggs
The final step for the filling is to incorporate the eggs. Add them one at a time, beating on the lowest speed until just combined after each addition. The key here is *gentle* folding or mixing. Overmixing the eggs introduces too much air into the batter, which can cause the cheesecake to puff up too much during baking and then crack as it cools. Once the last egg is barely incorporated, stop mixing. Pour the prepared filling over your cooled graham cracker crust in the springform pan. This careful technique will help ensure a perfectly smooth, creamy, and crack-free cheesecake.
Baking Your Cheesecake to Perfection
Baking a creamy cheesecake requires a gentle, steady heat to ensure it cooks evenly without over-browning or cracking. A water bath is highly recommended for this recipe, as it provides a moist cooking environment that helps prevent cracks and yields a silkier texture. Place your foil-wrapped springform pan into a larger roasting pan. Carefully pour hot water into the roasting pan, ensuring it comes halfway up the sides of the springform pan. Bake in a preheated oven at 325°F (160°C). The baking time can vary, but generally, it will be between 60-80 minutes, or until the edges are set and the center still has a slight wobble when gently shaken. This delicate balance ensures a perfectly cooked interior.
Slow Cooling Prevents Cracks
Once your Yummy Lemon Meringue Cheesecake is baked, resist the urge to pull it out of the oven immediately. Sudden changes in temperature are a primary cause of cracks. Turn off the oven, prop the door open slightly, and let the cheesecake cool gradually inside the oven for about an hour. After this, remove the cheesecake from the water bath and place it on a wire rack at room temperature for another hour. This slow cooling process allows the cheesecake to settle gently, greatly reducing the risk of cracks appearing on the surface, ensuring a beautiful presentation for your dessert.
Chill Completely Before Topping
After the cheesecake has cooled at room temperature, it’s essential to chill it completely before adding the lemon curd and meringue topping. Loosely cover the cheesecake with plastic wrap (avoiding direct contact with the surface) and refrigerate it for at least 6-8 hours, or preferably overnight. Chilling allows the cheesecake to fully set and firm up, making it easier to slice and preventing the warm curd from melting into the cheesecake. A well-chilled cheesecake offers the best texture and flavor, ready for its crowning layers. For other delightful desserts, explore our desserts category.
Preparing Zesty Lemon Curd Layer
The vibrant, tangy lemon curd layer is what truly makes this a lemon meringue cheesecake, providing a delightful contrast to the sweet creaminess. Making homemade lemon curd is surprisingly simple and yields a far superior flavor to store-bought versions. You’ll need fresh lemon juice and zest for maximum impact, granulated sugar, large egg yolks for richness and thickening, and unsalted butter for a silky finish. This zesty layer brings a burst of citrus that perfectly complements the rich cheesecake and airy meringue. The bright yellow color also adds to the visual appeal of this impressive dessert.
Cook Until Thickened and Smooth
In a medium saucepan, whisk together the fresh lemon juice, lemon zest, granulated sugar, and egg yolks until well combined. Cook this mixture over medium-low heat, whisking constantly, until it thickens to the consistency of pudding, about 8-10 minutes. The key is to keep whisking to prevent the eggs from scrambling. Once thickened, remove from heat and stir in the cold, cubed unsalted butter until it’s completely melted and incorporated, creating a smooth, glossy curd. The butter adds richness and contributes to the curd’s luxurious texture. This step requires patience but is well worth the effort for the intense lemon flavor it delivers.
Strain for Silky Texture
For an exceptionally silky smooth lemon curd, it’s highly recommended to strain the cooked curd through a fine-mesh sieve into a clean bowl. This removes any potential small bits of cooked egg or lemon zest, ensuring a perfectly smooth and luxurious texture. Press the curd through the sieve with a spoon or spatula. Once strained, cover the surface of the lemon curd directly with plastic wrap to prevent a skin from forming as it cools. Refrigerate the lemon curd until it’s completely chilled and firm, which typically takes a few hours. This allows it to set up beautifully before it’s spread over the cheesecake.
Whipping Up Fluffy Meringue Topping
The cloud-like, fluffy meringue topping is the crowning glory of your Yummy Lemon Meringue Cheesecake, offering a delicate sweetness and a beautiful visual appeal. This classic topping, primarily made from egg whites and sugar, requires careful technique to achieve the perfect consistency. You’ll need large egg whites, granulated sugar, and a touch of cream of tartar to stabilize the meringue. Ensure your mixing bowl and whisk attachments are spotlessly clean and free of any grease, as even a tiny speck can prevent the egg whites from whipping up properly. This light, airy layer provides a wonderful textural contrast to the dense cheesecake and smooth curd.
Achieving Stiff Peaks Easily
In a very clean, dry bowl, combine the egg whites and cream of tartar. Beat on medium speed with an electric mixer until soft peaks form. Gradually add the granulated sugar, about a tablespoon at a time, continuing to beat on high speed until stiff, glossy peaks form. The mixture should be thick and shiny, and when you lift the whisk, the meringue should hold its shape without drooping. Be careful not to overbeat, as this can make the meringue dry and brittle. This attention to detail will ensure your meringue is light, stable, and ready to be beautifully piped or spread onto your cheesecake. For another sweet treat with a fantastic texture, try making peanut butter brownie swirl cookies.
Assembling Your Yummy Lemon Meringue Cheesecake
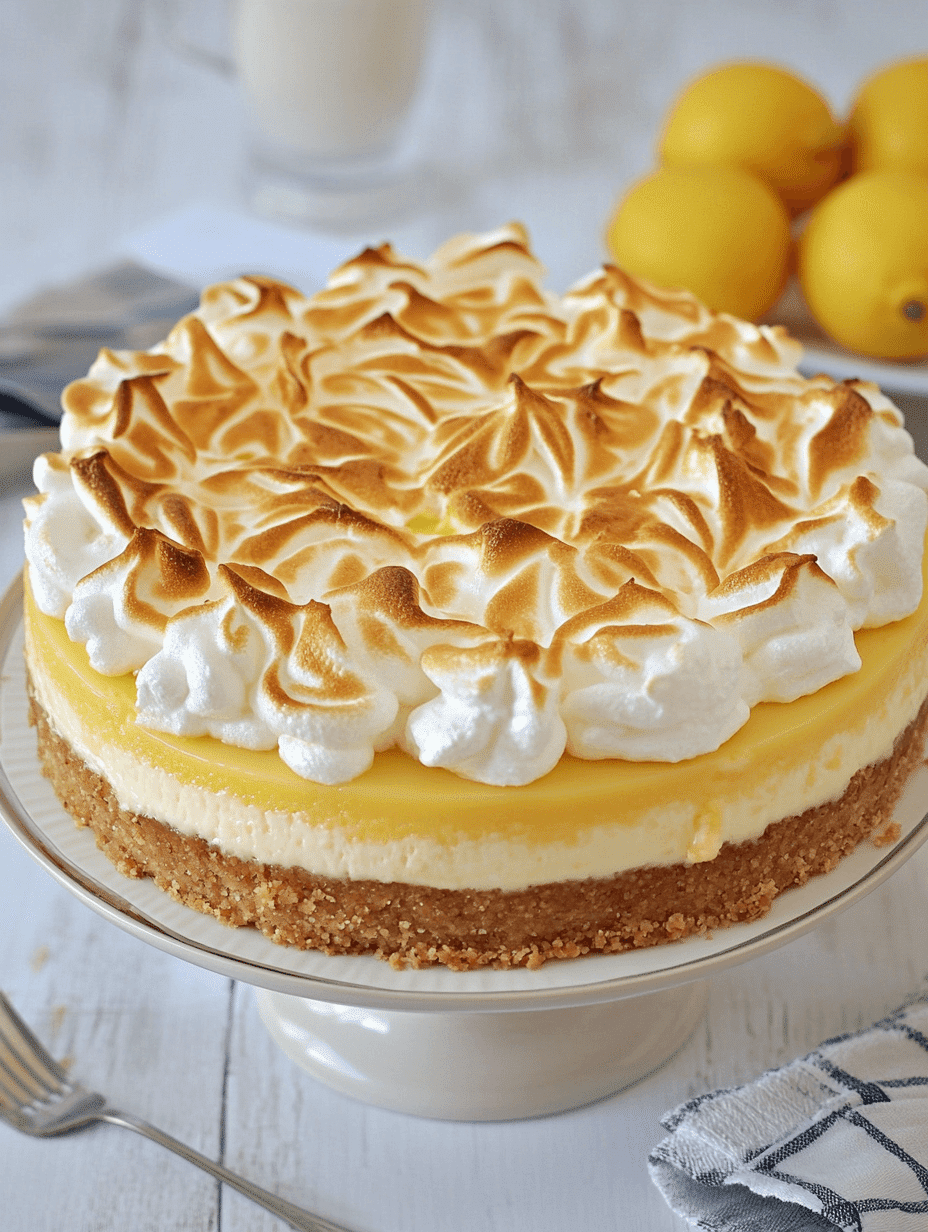
The moment has arrived to bring all the delicious components of your Yummy Lemon Meringue Cheesecake together. This layering process is where the visual appeal of the dessert truly shines, so take your time and assemble with care. You’ll have a beautifully chilled and set cheesecake, a smooth and tangy lemon curd, and a fluffy meringue topping ready to go. The combination of these layers creates a harmonious balance of flavors and textures, making each bite an absolute delight. Proper assembly ensures that every slice showcases the distinct layers, making it as pleasing to the eye as it is to the palate.
Layering Curd and Meringue
Once your cheesecake is thoroughly chilled and the lemon curd has set, carefully spread the chilled lemon curd evenly over the top of the cheesecake. Use an offset spatula to create a smooth layer, extending it to the very edges. Next, gently spoon or pipe your fluffy meringue topping over the lemon curd. You can create decorative swirls and peaks using the back of a spoon, or use a piping bag with a star tip for a more elegant finish. Ensure the meringue covers the entire surface of the lemon curd, creating a striking contrast with its white peaks against the yellow. For more inspiration, check out our latest creations on Pinterest!
Sealing Edges with Meringue
An important tip for assembly, especially if you plan to toast the meringue, is to ensure the meringue firmly touches the crust or the springform pan’s edge all around the circumference of the cheesecake. This helps to “seal” the meringue and prevents it from shrinking too much or weeping when heated. By extending the meringue right to the edge and pressing it gently against the sides, you create a beautiful, continuous topping that holds its shape. This small detail greatly contributes to the professional finish and overall stability of your assembled lemon meringue cheesecake.
Toasting Meringue for Perfect Finish
Toasting the meringue topping adds a beautiful golden-brown color, a hint of caramelized flavor, and a delightful crispness to the peaks, making your Yummy Lemon Meringue Cheesecake truly irresistible. This final flourish elevates the dessert from simply delicious to visually stunning. There are a couple of methods you can use to achieve this perfect finish, each offering slightly different results but both delivering that desirable toasted texture and appearance. Be mindful when using heat, as meringue can burn quickly.
Using a Kitchen Torch Safely
For precise browning and a professional look, a kitchen torch is the ideal tool. Hold the torch a few inches away from the meringue and move the flame constantly over the peaks until they achieve a beautiful golden-brown color. Work quickly and evenly to avoid burning any spots. Ensure you’re in a well-ventilated area and keep flammable materials away. This method gives you excellent control over the level of toastiness and allows you to create striking variations in color on your meringue peaks, adding depth and appeal to your lemon meringue cheesecake.
Broiling as an Oven Option
If you don’t have a kitchen torch, you can use your oven’s broiler setting. Place the cheesecake on a baking sheet on the top rack of your oven, ensuring it’s far enough from the broiler element to prevent quick burning. Watch the meringue constantly, as it can brown very quickly, usually within 1-3 minutes. Rotate the cheesecake for even browning. Remove it from the oven as soon as the meringue reaches your desired golden hue. Be extremely vigilant, as broiler heat is intense and can turn your perfect meringue into charcoal in seconds if left unattended. This method also creates a wonderful toasted finish, just be sure to keep a close eye on it!
Important Tips for This Cheesecake
Achieving a truly spectacular Yummy Lemon Meringue Cheesecake goes beyond just following the steps; it involves understanding some key principles that ensure a perfect outcome. These baking tips are crucial for preventing common cheesecake pitfalls and enhancing the overall flavor and texture. Paying attention to these details will make all the difference, transforming a good cheesecake into an extraordinary one that will leave everyone asking for your secret recipe. Incorporating these expert insights will ensure a creamy cheesecake that’s consistently delicious.
Avoid Overmixing Batter
This is perhaps the most critical tip for any cheesecake. Overmixing the cream cheese batter, especially after adding the eggs, incorporates too much air. This excess air causes the cheesecake to puff up significantly during baking and then deflate dramatically as it cools, leading to unsightly cracks. Beat the cream cheese and sugar until smooth, but once you add the eggs, mix on the lowest speed only until they are just combined. A gentle touch ensures a dense, creamy, and crack-free texture, which is the hallmark of a perfectly baked cheesecake. For a similarly creamy dessert, try our quick Italian cream cake.
Use Fresh Lemon Juice
For a lemon meringue cheesecake, the quality of your lemon flavor is paramount. Always use freshly squeezed lemon juice and fresh lemon zest for both the filling and the lemon curd. Bottled lemon juice often contains preservatives and lacks the bright, vibrant flavor that fresh lemons provide. The natural oils in the zest also contribute a depth of flavor that cannot be replicated. Using fresh ingredients will make a noticeable difference in the overall taste and aroma of your cheesecake, giving it that authentic, zesty punch.
Martha Stewart’s Creamy Secret
While Martha Stewart’s specific recipe secrets are well-guarded, many expert bakers advocate for a few techniques that contribute to an exceptionally creamy cheesecake. One common “secret” is using full-fat cream cheese and high-quality sour cream, both at room temperature, and mixing them just enough to combine without over-aerating. Additionally, a water bath during baking (as mentioned earlier) is a technique widely endorsed by professional chefs, including those often associated with Martha Stewart, for ensuring an incredibly smooth, even texture and preventing cracks. Following these general principles of using good ingredients and precise techniques will give you a cheesecake worthy of any culinary icon.
Serving and Storing Your Yummy Cheesecake
After all your hard work, properly serving and storing your Yummy Lemon Meringue Cheesecake is the final step to ensuring maximum enjoyment. This delicious dessert tastes best when fully chilled, allowing all the flavors to meld and the textures to firm up. A perfectly presented slice will showcase all the beautiful layers you’ve created, from the crisp graham cracker crust to the creamy filling, zesty lemon curd, and fluffy meringue topping. Knowing how to store leftovers correctly will also help maintain its freshness and deliciousness for several days, so you can savor every last bit.
Chill Well Before Serving
Before slicing and serving, ensure your lemon meringue cheesecake is thoroughly chilled. After toasting the meringue (if desired), allow the cheesecake to cool completely at room temperature if it was warm, then refrigerate it for at least 2-4 hours to allow the meringue and any residual warmth to fully set. A well-chilled cheesecake not only tastes better, with its refreshing lemon notes, but also holds its shape much better, making for clean, beautiful slices. Use a sharp knife dipped in hot water and wiped clean between each cut for the best results.
Store Leftovers for Three Days
Leftover lemon meringue cheesecake should be stored in an airtight container in the refrigerator. Due to the fresh ingredients, especially the lemon curd and meringue (which can start to weep over time), it is best consumed within three days. While the cheesecake itself might last longer, the meringue topping is at its best within a day or two of being made and toasted. Properly covered, your creamy cheesecake will retain its delicious flavor and texture, ready for another delightful serving. Remember to follow us on Instagram for more fresh recipe ideas!
FAQs for Yummy Lemon Meringue Cheesecake
Have some lingering questions about making this delightful Yummy Lemon Meringue Cheesecake? Here are answers to some frequently asked questions that can help clarify common concerns and make your baking experience even smoother. From making components ahead of time to freezing options and using store-bought ingredients, these tips will ensure your cheesecake is a success.
Can I Make Parts Ahead?
Absolutely! This is one of the beauties of this lemon meringue cheesecake recipe. You can prepare the graham cracker crust up to two days in advance, baking it and storing it wrapped at room temperature. The lemon curd can also be made 2-3 days ahead of time and stored in an airtight container in the refrigerator. Even the cheesecake filling can be baked and chilled overnight before adding the curd and meringue the next day. This phased approach makes the overall baking process much more manageable for entertaining.
Freezing the Cheesecake
You can freeze the baked cheesecake *without* the lemon curd or meringue topping. Once the baked cheesecake is completely chilled, wrap it tightly in several layers of plastic wrap, then a layer of aluminum foil. Freeze for up to 1-2 months. Thaw overnight in the refrigerator before adding the fresh lemon curd and meringue topping. It is not recommended to freeze the cheesecake with the meringue topping, as meringue does not freeze well and will become watery and lose its texture upon thawing.
Store-Bought Lemon Curd?
While homemade lemon curd offers superior flavor and freshness, you can certainly use good quality store-bought lemon curd in a pinch to save time. Look for a brand with a strong, natural lemon flavor and a smooth consistency. Using store-bought curd will significantly reduce prep time, making this Yummy Lemon Meringue Cheesecake more accessible for busy bakers. Just ensure it’s chilled before spreading onto the cheesecake.