
Make the best Strawberry Earthquake Cake today! This delightful dessert features a moist strawberry cake batter swirled with a rich cream cheese filling, creating an irresistible texture and flavor explosion. Follow our simple steps for a truly amazing homemade treat that will impress everyone.
Key Takeaways
- Master the steps for a perfect strawberry earthquake cake.
- Learn to create a delightful cream cheese swirl in your dessert.
- Get expert tips for baking, cooling, and serving this fruit cake.
- Discover easy ingredient swaps for a personalized homemade cake.
Baking cake is rewarding. Fresh strawberries add brightness. Cream cheese makes it rich. Layering creates delicious surprises. Enjoy this fantastic dessert.
Make the Best Strawberry Earthquake Cake Today
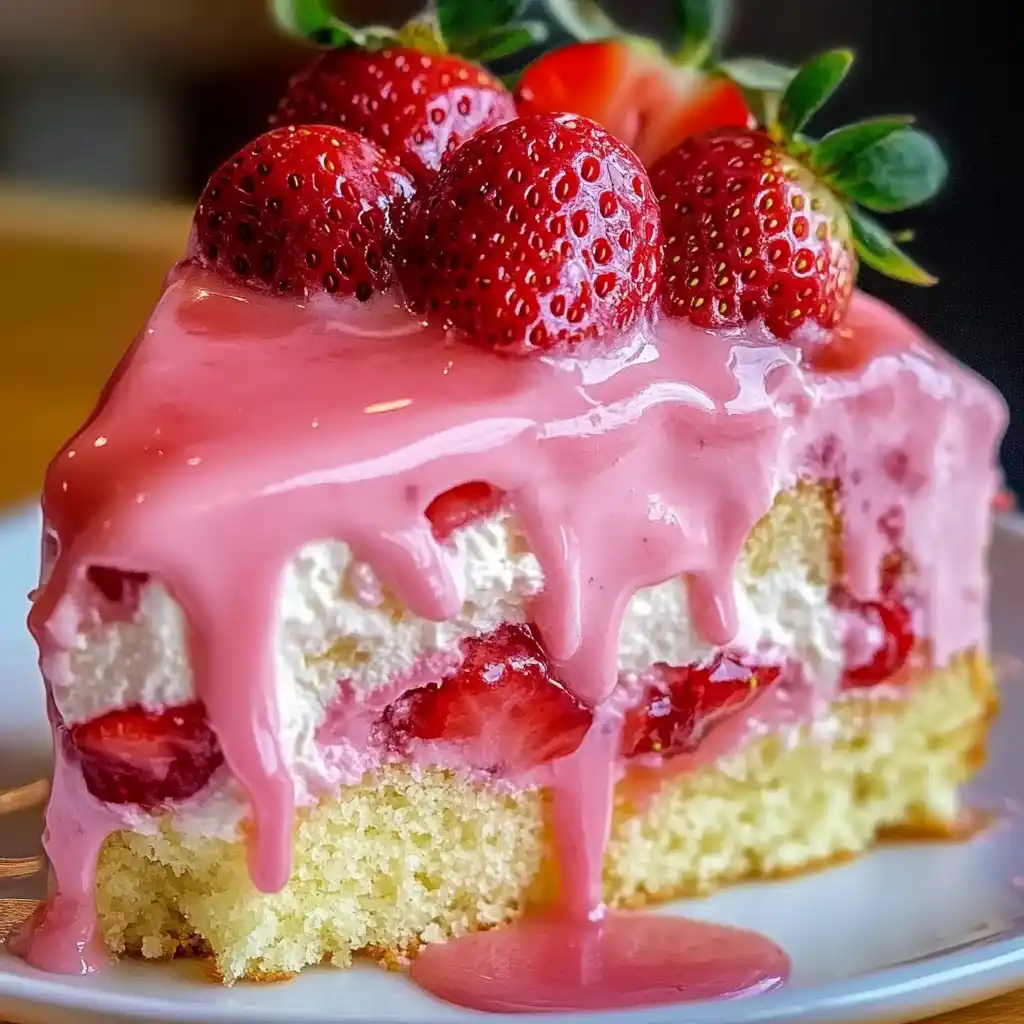
Get ready to create a show-stopping strawberry earthquake cake that’s as fun to make as it is to eat! This unique dessert combines the fresh, vibrant taste of ripe strawberries with a decadent, tangy cream cheese filling, all baked into a wonderfully moist cake. The “earthquake” effect comes from the cream cheese mixture sinking and cracking the surface during baking, revealing pockets of creamy goodness. It’s a fantastic homemade cake for any occasion, offering a delightful twist on traditional fruit cakes.
Gather Ingredients for This Amazing Cake
Before you begin your baking adventure, ensure you have all your ingredients measured and ready. This preparation step, often called “mise en place,” streamlines the baking process and helps prevent any last-minute surprises. Having everything at hand is a crucial baking tip for achieving consistently great results, especially with a layered dessert like this strawberry earthquake cake.
Cake batter essentials: flour, sugar, oil
For the foundation of your strawberry cake, you’ll need standard pantry staples. All-purpose flour provides the structure, granulated sugar sweetens the batter and contributes to moisture, and a neutral oil (like vegetable or canola) ensures a tender crumb. Baking powder or soda will give your cake its lift, creating a light and airy texture. Don’t forget a pinch of salt to balance the flavors!
Fresh strawberries and cream cheese
The stars of this strawberry earthquake cake are undoubtedly the fresh, ripe strawberries and the luscious cream cheese. Choose plump, vibrant red berries for the best flavor and visual appeal. For the cream cheese filling, opt for full-fat block cream cheese, as it offers the best consistency and richness when blended. Ensure your cream cheese is softened to room temperature for a smooth, lump-free filling – a vital step for a perfect creamy swirl.
Mixing Your Perfect Strawberry Cake Batter
Creating the perfect strawberry cake batter is the first step towards a truly exceptional strawberry earthquake cake. The key is proper mixing – enough to combine ingredients thoroughly without overworking the gluten, which can lead to a tough cake. Follow these simple steps for a beautifully smooth and moist batter that will be the base of your delicious quick Italian cream cake or other delightful desserts.
Combining dry ingredients smoothly
Begin by whisking together all your dry ingredients. This typically includes the flour, sugar, baking powder, baking soda, and salt. Whisking them well not only combines them but also aerates the flour, contributing to a lighter cake texture. It also ensures that leavening agents are evenly distributed throughout the mixture, leading to an even rise and preventing pockets of unmixed ingredients. This simple action prepares your dry base perfectly for the wet additions.
Adding wet ingredients for moisture
Next, it’s time to incorporate the wet ingredients. This often involves combining milk, eggs, vanilla extract, and oil or melted butter. When adding them to the dry mixture, do so gradually and mix until just combined. Overmixing at this stage can develop too much gluten, resulting in a dense and chewy cake rather than the tender, moist crumb you desire for a homemade cake. A light hand is always recommended here.
Gently folding in sliced strawberries
The final touch for your strawberry cake batter is gently folding in the sliced fresh strawberries. This step should be done with care to avoid crushing the fruit and to ensure the berries are evenly distributed throughout the batter. Coating the strawberries lightly in a tablespoon of flour before adding them can sometimes prevent them from sinking to the bottom of the cake during baking. This ensures every slice of your strawberry earthquake cake has a burst of fresh fruit flavor.
Crafting The Cream Cheese Filling Layer
The irresistible “earthquake” effect and rich flavor of this cake come from its luscious cream cheese filling. This layer, strategically placed within the batter, creates pockets of creamy goodness that burst through the cake’s surface as it bakes. Mastering this simple yet crucial step ensures your strawberry earthquake cake lives up to its name, providing a delightful contrast in both texture and taste to the sweet strawberry cake. A well-made cream cheese filling is the secret to a truly memorable dessert.
Softening cream cheese for smoothness
The most important tip for a silky-smooth cream cheese filling is to start with softened cream cheese. Cold cream cheese will be lumpy and difficult to blend, no matter how much you mix it. Take your block cream cheese out of the refrigerator at least an hour before you plan to bake, allowing it to reach room temperature. This simple step makes a world of difference, resulting in a perfectly creamy consistency that will melt deliciously into your strawberry cake.
Blending with powdered sugar and lemon
Once your cream cheese is soft, combine it with powdered sugar. Powdered sugar dissolves easily, ensuring a smooth texture without any graininess. A touch of lemon juice or lemon zest adds a bright, tangy note that beautifully complements the sweetness of the strawberries and balances the richness of the cream cheese. Blend these ingredients with an electric mixer on medium speed until the mixture is completely smooth and free of lumps. Avoid over-beating, as too much air can make the filling too thin. This mixture forms the heart of your strawberry earthquake cake’s distinctive swirl.
Layering Strawberries and Cream Cheese
The layering technique is what gives the strawberry earthquake cake its distinctive appearance and taste. It’s not just about putting ingredients together; it’s about creating an intentional design that allows the cream cheese to meld and sink, forming those delightful “earthquake” fissures. This step is easier than it sounds and adds an element of surprise to every slice, making this desserts category recipe a standout for any gathering.
Spreading first half of batter
To begin the layering process, pour and spread half of your prepared strawberry cake batter evenly into your greased and floured baking dish. Use an offset spatula or the back of a spoon to ensure an even layer from edge to edge. This provides a stable base for the cream cheese filling and ensures that the cake bakes uniformly. An even base is crucial for the overall structure and presentation of your finished homemade cake.
Spooning cream cheese onto batter
Next, carefully spoon dollops of your cream cheese filling over the first layer of strawberry batter. Don’t worry about spreading it perfectly or covering the entire surface; the “earthquake” effect is achieved when the filling is somewhat disbursed. Leave some gaps, as the filling will naturally spread and sink as it bakes. This seemingly random placement is key to the cake’s signature marbled and cracked look. You want distinct pockets, not a uniform layer.
Covering with remaining strawberry batter
Finally, gently spoon the remaining strawberry cake batter over the cream cheese dollops. Be careful not to disturb the cream cheese too much as you add the top layer. You can use the back of a spoon to lightly spread the batter, ensuring it mostly covers the cream cheese. As the cake bakes, the cream cheese will warm and become more fluid, naturally finding its way through the batter to create its unique pattern. This strategic layering is essential for the magic of the strawberry earthquake cake.
Baking Your Strawberry Earthquake Cake Perfectly
Baking is where all your careful preparation comes to fruition. Achieving a perfectly baked strawberry earthquake cake means knowing your oven and following the recipe’s temperature and time guidelines. Proper baking ensures a moist crumb, a golden-brown top, and the beautiful “earthquake” effect from the cream cheese filling. This section covers the final steps to get your homemade cake ready for tasting.
Preheat oven and prepare baking dish
Always start by preheating your oven. This ensures that the oven reaches and maintains the correct temperature throughout the baking process, which is vital for an even rise and consistent results. While the oven preheats, prepare your baking dish by greasing it thoroughly with butter or cooking spray, then dusting it lightly with flour. This prevents the cake from sticking and makes for easy removal once baked. A well-prepared dish is a simple but important baking tip for any cake, including our southern-style collard green and potato stew recipe, where oven temperature matters.
Bake for 40-45 minutes until golden
Once your oven is preheated and your cake is assembled in the dish, it’s time to bake! Place the baking dish in the center of the preheated oven. Bake your strawberry earthquake cake for approximately 40-45 minutes. The exact timing can vary slightly depending on your oven, so keep an eye on it. The cake should rise, and the top should turn a beautiful golden brown. You’ll notice the distinctive cracks forming on the surface as the cream cheese filling bubbles and settles, creating the “earthquake” pattern.
Checking If Your Cake Is Done
Knowing when your strawberry earthquake cake is perfectly baked is a skill that comes with practice, but there’s a reliable method to ensure it’s cooked through without being dry. An underbaked cake can be gooey, while an overbaked one might be tough or crumbly. For a moist and tender homemade cake, paying attention to these cues is important.
The simple toothpick test method
The toothpick test is the most common and effective way to check for doneness. Towards the end of the baking time, gently insert a clean wooden toothpick into the center of the cake. Be careful to avoid inserting it directly into a visible pocket of cream cheese filling, as this will always appear wet. Aim for a spot that seems more like cake batter.
What a clean toothpick means
If the toothpick comes out clean or with only a few moist crumbs clinging to it, your strawberry earthquake cake is done! This indicates that the cake batter has cooked through. If the toothpick has wet batter on it, return the cake to the oven for a few more minutes and test again. Remember that residual heat will continue to cook the cake slightly after it’s removed from the oven, so it’s better to pull it out when it’s just done rather than waiting for it to be completely dry. This ensures a wonderfully moist fruit cake.
Cooling and Slicing Your Delicious Cake
Patience is a virtue, especially when it comes to cooling your freshly baked strawberry earthquake cake. While it might be tempting to slice into it right away, proper cooling is essential for the cake’s structure, texture, and flavor. Rushing this step can lead to a crumbly cake or a filling that hasn’t fully set, detracting from your beautiful homemade dessert. Take your time for the best results.
Cooling in pan then on wire rack
Once your strawberry earthquake cake is out of the oven, allow it to cool in the baking pan for about 10-15 minutes. This initial cooling period allows the cake to set and firm up slightly, making it less likely to break when you remove it. After this, carefully invert the cake onto a wire rack to cool completely. Cooling on a wire rack ensures air circulates around all sides, preventing condensation and a soggy bottom. Allow the cake to cool fully before attempting to slice it.
Patience ensures best cake texture
A fully cooled cake means the internal structure has settled, the moisture has distributed evenly, and any warm filling has firmed up. Slicing into a warm cake can cause it to crumble, and the cream cheese filling might be too runny. For the best cake texture and clean slices, wait until the cake is completely cool – sometimes even an hour or two – before serving. This patience truly ensures you get to enjoy the full deliciousness and visual appeal of your strawberry earthquake cake.
Serving The Best Earthquake Cake with a Twist
Your delicious strawberry earthquake cake is a masterpiece on its own, but a few simple additions can elevate its presentation and flavor even further. Whether you’re serving it at a casual family dinner or a special gathering, these serving suggestions will make your homemade dessert truly unforgettable. It’s all about enhancing the fresh fruit notes and the creamy texture.
Add whipped cream or vanilla ice cream
For an extra layer of indulgence, serve slices of your strawberry earthquake cake with a dollop of freshly whipped cream or a scoop of premium vanilla ice cream. The cool, creamy toppings provide a wonderful contrast to the moist cake and tangy cream cheese filling. The vanilla complements the strawberry flavor beautifully, making each bite an even more delightful experience. Consider a homemade whipped cream for an even fresher taste!
Garnish with fresh berries or sugar
To add a final flourish, garnish each slice with a few extra fresh strawberries or a sprinkle of powdered sugar. A sprig of fresh mint can also add a pop of color and a subtle aromatic note. These simple garnishes not only make your cake look professionally presented but also reinforce the fresh, fruity theme of the dessert. Presenting your strawberry earthquake cake this way will surely impress your guests and highlight your baking skills.
Storing Your Strawberry Earthquake Cake Safely
Once you’ve enjoyed a slice (or two!) of your incredible strawberry earthquake cake, proper storage is key to keeping it fresh and delicious. Because this cake contains a cream cheese filling, it has specific storage requirements to maintain its quality and ensure food safety. Don’t let your efforts go to waste; follow these tips to enjoy your homemade dessert for days to come.
Refrigerate leftovers in airtight container
Due to the dairy content in the cream cheese filling, any leftover strawberry earthquake cake must be refrigerated. Transfer slices or the remaining cake to an airtight container. This prevents the cake from drying out and absorbing odors from other foods in your fridge. Stored properly in the refrigerator, your cake will remain fresh and flavorful for up to 3-4 days. This is a crucial baking tip for any cream cheese-based dessert, like a vanilla bean creme brulee cheesecake cupcakes.
Freezing slices for enjoyment later
If you anticipate having a lot of leftovers or simply want to save some for a rainy day, your strawberry earthquake cake freezes beautifully. Wrap individual slices tightly in plastic wrap, then place them in an airtight freezer-safe container or a heavy-duty freezer bag. Frozen cake can be stored for up to 2-3 months. To enjoy, simply thaw slices in the refrigerator overnight or at room temperature for a few hours. This makes it easy to have a delightful fruit cake treat whenever a craving strikes.
Easy Ingredient Swaps for Your Cake
One of the joys of baking a homemade cake is the flexibility to customize it to your taste or what you have on hand. The strawberry earthquake cake is versatile, allowing for several easy ingredient swaps that can subtly change its flavor profile or accommodate dietary needs. Don’t hesitate to experiment and make this recipe truly your own, while still ensuring it remains a delightful fruit cake experience.
Vanilla and almond extract options
While vanilla extract is a classic choice that complements strawberries beautifully, consider experimenting with almond extract for a slightly different flavor. Almond extract has a stronger, nuttier aroma that can add depth and a sophisticated twist to your strawberry cake. A combination of both can also be wonderful. Just remember that almond extract is potent, so use it sparingly to avoid overpowering the delicate strawberry and cream cheese flavors.
Using frozen strawberries in recipe
Fresh strawberries are ideal, but if they’re not in season or readily available, frozen strawberries can be a perfectly acceptable substitute. Thaw them completely and drain any excess liquid before gently folding them into the batter. While they might be slightly softer in texture, they will still infuse your strawberry earthquake cake with delicious fruit flavor. Just be aware that they might release a bit more moisture into the batter, potentially extending baking time slightly.
Gluten-free flour alternatives for cake
For those with gluten sensitivities, converting this recipe to a gluten-free strawberry earthquake cake is often straightforward. Simply swap the all-purpose flour for a good quality gluten-free all-purpose flour blend that contains xanthan gum. Many brands are available today that perform very well in baking. You might notice a slight difference in texture, but the delicious strawberry and cream cheese flavors will still shine through, making it an accessible and enjoyable homemade dessert for everyone. For more main-course ideas, consider exploring our extensive collection.
Pro Baking Tips for Great Results
Even experienced bakers benefit from a few tried-and-true tips to ensure consistently great results. For your strawberry earthquake cake, these professional baking tips will help you avoid common pitfalls and produce a truly spectacular homemade dessert every time. From ingredient preparation to mixing techniques, attention to these details can make all the difference in the final outcome of your fruit cake.
Room temperature cream cheese is key
We’ve mentioned it before, but it bears repeating: room temperature cream cheese is absolutely crucial for a smooth filling. If your cream cheese is cold, it won’t cream properly with the sugar, leading to lumps in your filling. This will affect both the texture and the “earthquake” effect of your cake. Plan ahead and take your cream cheese out of the fridge well in advance. This simple step is one of the most impactful baking tips you can follow.
Avoid overmixing cake batter
Overmixing is a common mistake that can turn a potentially tender cake into a tough, rubbery one. Once you’ve added the wet ingredients to the dry, mix only until the flour streaks disappear. A few small lumps are perfectly acceptable and often preferred over overmixing. Overdeveloped gluten leads to a dense texture, which you definitely want to avoid in a light and airy strawberry cake. Gentle folding and minimal stirring are your friends here.
Adjusting sugar for strawberry sweetness
The sweetness of strawberries can vary greatly depending on their ripeness and the season. Taste your fresh strawberries before you add them to the batter. If they are particularly tart, you might want to slightly increase the sugar in the cake batter by a tablespoon or two. Conversely, if they are exceptionally sweet, you might reduce the sugar slightly. This small adjustment allows you to fine-tune the flavor profile of your strawberry earthquake cake, ensuring a perfectly balanced sweetness. Follow Carina Recipes on Instagram for more baking inspiration and Pinterest for visual guides!