
S’mores Bars are a delightful twist on the classic campfire treat, bringing all the beloved flavors indoors without the fire. This easy dessert bars recipe lets you create a gooey marshmallow goodness, rich chocolate, and a crispy graham cracker base in under 30 minutes. It’s the perfect homemade s’mores treat for any time.
Key Takeaways
- Quick 25-minute prep for a classic S’mores taste.
- Simple ingredients: graham crackers, chocolate, marshmallows.
- Easy to make for any event or craving.
- Customizable with various additions for a unique chocolate delight.
- Proper storage keeps them fresh for days.
Love the taste of S’mores? These bars are a perfect answer. No campfire needed for this delight. Just simple ingredients come together. A sweet treat everyone will adore. Enjoy baking this wonderful dessert.
Delicious S’mores Bars: Quick Overview
Craving the nostalgic taste of s’mores but without the campfire hassle? These delicious S’mores Bars are your perfect solution. Combining a buttery graham cracker crust, a generous layer of melted chocolate, and fluffy toasted marshmallows, they capture the essence of the classic treat in an easy-to-manage bar format. This recipe is designed for maximum flavor with minimal effort, making it a fantastic homemade s’mores treat for busy schedules or spontaneous cravings. It’s a guaranteed crowd-pleaser that brings smiles and sweet satisfaction.
What makes them so good?
The magic of these S’mores Bars lies in their balanced texture and flavor profile. The crispy, slightly salty graham cracker base provides an excellent counterpoint to the sweet, gooey marshmallows and rich, melted chocolate. Each bite offers a delightful combination of crunch, chew, and melt-in-your-mouth goodness. Plus, the convenience of baking them in a pan means consistent results and no burnt marshmallows – just perfectly golden, toasted tops every time. It’s an easy dessert bars recipe that delivers on all fronts, creating a truly irresistible experience.
Total time: 25 minutes joy
One of the biggest advantages of this recipe is its incredible speed. From start to finish, you can have these delectable S’mores Bars ready to cool in just about 25 minutes. This quick turnaround makes them ideal for last-minute gatherings, a quick after-dinner dessert, or when you simply need a sweet escape without spending hours in the kitchen. The minimal prep and baking time ensure that you can enjoy homemade s’mores treat goodness almost instantly, making joy both delicious and fast.
Why Make This S’mores Bars Recipe?
Beyond the undeniable deliciousness, there are many compelling reasons to choose this S’mores Bars recipe. It offers a wonderful blend of simplicity, versatility, and pure indulgence. If you’re a fan of classic desserts with a convenient twist, this recipe will quickly become a staple in your kitchen. It transforms a beloved outdoor experience into an indoor delight, perfect for any season or weather, ensuring you can enjoy that campfire taste whenever the mood strikes.
Simple steps for a sweet treat
This recipe prides itself on its straightforward approach. You won’t find complicated techniques or exotic ingredients here. The steps are intuitive, making it a fantastic recipe for both seasoned bakers and beginners alike. You simply mix the crust, press it, add your toppings, and bake. It’s a foolproof method that consistently yields perfectly layered and wonderfully gooey bars. The simplicity ensures that anyone can create a professional-tasting, homemade dessert without any stress, allowing the joy of baking to shine through. For more sweet ideas, check out our desserts section.
Perfect for any occasion
Whether you’re hosting a backyard barbecue, looking for a treat for a school bake sale, celebrating a birthday, or simply want to satisfy a sweet craving on a quiet evening, S’mores Bars fit the bill. Their universal appeal and easy portability make them a hit at potlucks and parties. They’re also an excellent choice for a family dessert night, providing a fun and interactive element if you involve kids in the layering process. These easy dessert bars are truly versatile, adapting effortlessly to various events and bringing smiles wherever they go. They offer all the gooey marshmallow goodness everyone loves, making any moment special.
Ingredients for Your S’mores Bars
Gathering your ingredients for these delicious S’mores Bars is incredibly simple, as you’ll likely find most items already in your pantry. The beauty of this recipe lies in its reliance on classic, readily available components that come together to create something truly magical. Using quality ingredients will always enhance the final taste, so opt for your favorite brands of chocolate and marshmallows to ensure the best gooey marshmallow goodness. A detailed list is provided below to help you prepare.
Graham cracker base items
The foundation of your S’mores Bars is the irresistible graham cracker crust. You’ll need:
- Graham cracker crumbs: About 1 ½ cups, which is roughly 10-12 full sheets of graham crackers. You can crush them yourself in a food processor or a bag with a rolling pin, or buy pre-crushed crumbs.
- Granulated sugar: A few tablespoons to add a touch more sweetness to the crust and help it bind.
- Melted butter: Unsalted butter is preferred to control the saltiness, but salted works too. This binds the crumbs together and creates that rich, buttery flavor.
Ensuring your crumbs are finely ground helps create a compact and stable base. The butter-sugar mixture will hold it all together beautifully.
Chocolate and marshmallow toppings
These are the stars that give S’mores Bars their signature gooey, melty appeal:
- Chocolate chips: Semi-sweet chocolate chips are a classic choice, providing a balanced sweetness. Milk chocolate chips offer a creamier, sweeter profile, while dark chocolate chips can add a richer, more intense flavor if you prefer. About 1 ½ to 2 cups are ideal for a generous layer.
- Mini marshmallows: These are essential for the iconic toasted marshmallow topping. Mini marshmallows melt and toast more evenly than larger ones, creating that perfect golden-brown top. You’ll need a generous amount, usually about 3-4 cups, to ensure full coverage and a fluffy layer.
Together, these elements create the luscious, chocolate delight and gooey marshmallow goodness that makes these easy dessert bars so famous. For another decadent treat, consider making Peanut Butter Brownie Swirl Cookies.
Tools You Need for S’mores Bars
Baking S’mores Bars doesn’t require a lot of specialized equipment, making it an accessible recipe for almost anyone. Having the right tools on hand will simply streamline the process and ensure a smooth, enjoyable baking experience. Most of these items are standard kitchen essentials, so you might already own everything you need to get started on your homemade s’mores treat. Here’s a quick list to prepare your baking station:
- 9×13 inch baking dish: This standard size is perfect for creating a good thickness for your bars. You can also use an 8×8 inch dish for thicker bars, but you might need to adjust baking time slightly.
- Parchment paper or aluminum foil: Lining your baking dish is crucial. It prevents sticking and makes lifting the cooled bars out for cutting incredibly easy and mess-free. Be sure to leave an overhang on the sides for “handles.”
- Mixing bowls: At least two – one for the graham cracker crust ingredients and another for any melting butter or measuring toppings.
- Measuring cups and spoons: Essential for accurate ingredient proportions, which is key for consistency in baking.
- Rubber spatula or spoon: For mixing crust ingredients and spreading the melted butter.
- Offset spatula or back of a spoon: Useful for pressing the graham cracker crust evenly into the pan.
- Small saucepan or microwave-safe bowl: For melting the butter for the crust.
- Oven mitts: To safely handle the hot baking dish.
- Wire cooling rack: Allows the bars to cool evenly and prevents them from becoming soggy at the bottom.
With these basic tools, you’ll be well-equipped to create perfect S’mores Bars. These simple tools ensure your path to a delicious chocolate graham dessert is smooth and enjoyable.
Making the Graham Cracker Crust Easy
The graham cracker crust is the delectable foundation of your S’mores Bars, providing that signature crunch and buttery sweetness. Getting it right is simple and sets the stage for the layers to come. It’s a quick process that requires minimal effort but yields maximum flavor. This step is crucial for the overall success of your easy dessert bars, so pay a little attention to ensure an even and firm base. The aroma of toasted graham crackers and butter will already start to fill your kitchen, building anticipation for the gooey marshmallow goodness to follow.
Mixing the crust ingredients
Start by preparing your graham cracker crumbs. If you’re crushing whole crackers, place them in a food processor and pulse until fine crumbs form, or put them in a Ziploc bag and crush with a rolling pin. Aim for a consistent, sandy texture. In a medium mixing bowl, combine these graham cracker crumbs with your granulated sugar. Then, slowly pour in the melted butter. Use a rubber spatula or spoon to mix everything together until the crumbs are thoroughly moistened and resemble wet sand. Every crumb should be coated in butter, ensuring a cohesive crust. This simple combination is the secret to a perfect graham cracker base.
Pressing into baking dish
Once your crust mixture is ready, transfer it to your prepared 9×13 inch baking dish (lined with parchment paper). Use the back of a spoon, an offset spatula, or even the bottom of a measuring cup to firmly and evenly press the mixture across the bottom of the dish. It’s important to create an even layer, as this will ensure uniform baking and stability for your bars. Press it down quite firmly; this compaction is what gives the crust its crispness and helps it hold its shape once baked. A well-pressed crust is key to a sturdy and satisfying homemade s’mores treat.
Adding Chocolate Chips and Marshmallows
This is where the S’mores Bars truly come to life, as you add the iconic layers of chocolate and marshmallow that define this beloved treat. The order and distribution of these toppings are key to achieving that perfect gooey center and beautifully toasted top. This step is not just about adding ingredients; it’s about crafting the texture and flavor profile that makes these bars so irresistible. The rich chocolate and fluffy marshmallows combine to create a chocolate delight that everyone will adore, making this an easy dessert bars recipe to remember.
Layering the chocolate evenly
After your graham cracker crust has had its initial bake (or just been pressed, depending on your preferred recipe variation), it’s time for the chocolate. Generously sprinkle your chocolate chips evenly over the entire surface of the warm crust. The warmth from the crust will help the chocolate chips start to soften and melt slightly, which is exactly what you want for that gooey, molten chocolate layer. You can use semi-sweet, milk, or even a blend of different chocolate types to customize the flavor. Ensure the chips are spread from edge to edge so every bite of your delicious S’mores Bars gets a fair share of chocolatey goodness. This creates the quintessential chocolate graham dessert experience.
Topping with mini marshmallows
Once the chocolate chips are in place, it’s time for the fluffy clouds of mini marshmallows. Distribute them evenly over the chocolate layer, making sure to cover as much of the surface as possible. Don’t be shy – a thick layer of marshmallows is what creates that iconic gooey, toasted top when baked. The mini size ensures they melt and brown consistently without burning before the chocolate is fully warm and melty. This generous topping promises that signature gooey marshmallow goodness that defines a perfect s’mores experience. You’re now just moments away from a truly spectacular homemade s’mores treat.
Baking Your S’mores Bars Quickly
The final, exciting stage of creating your S’mores Bars is the baking process. This step brings all the layers together, transforming raw ingredients into a warm, gooey, and irresistible dessert. The short baking time is another reason these bars are so popular, allowing you to enjoy your sweet creation without a long wait. Proper oven temperature and careful monitoring are key to achieving perfectly golden marshmallows and a delightfully melted chocolate layer. Get ready for your kitchen to smell absolutely incredible!
Oven temperature and time
Preheat your oven to approximately 350°F (175°C). This temperature is ideal for gently melting the chocolate and toasting the marshmallows without overcooking the graham cracker crust. Once preheated, carefully place your baking dish with the layered bars into the oven. The baking time is remarkably short, usually between 10 to 15 minutes. Keep a close eye on them, especially during the last few minutes, as ovens can vary. The goal is to get those marshmallows perfectly puffed and golden brown, signaling they are ready. This quick bake ensures you get to enjoy your easy dessert bars in no time.
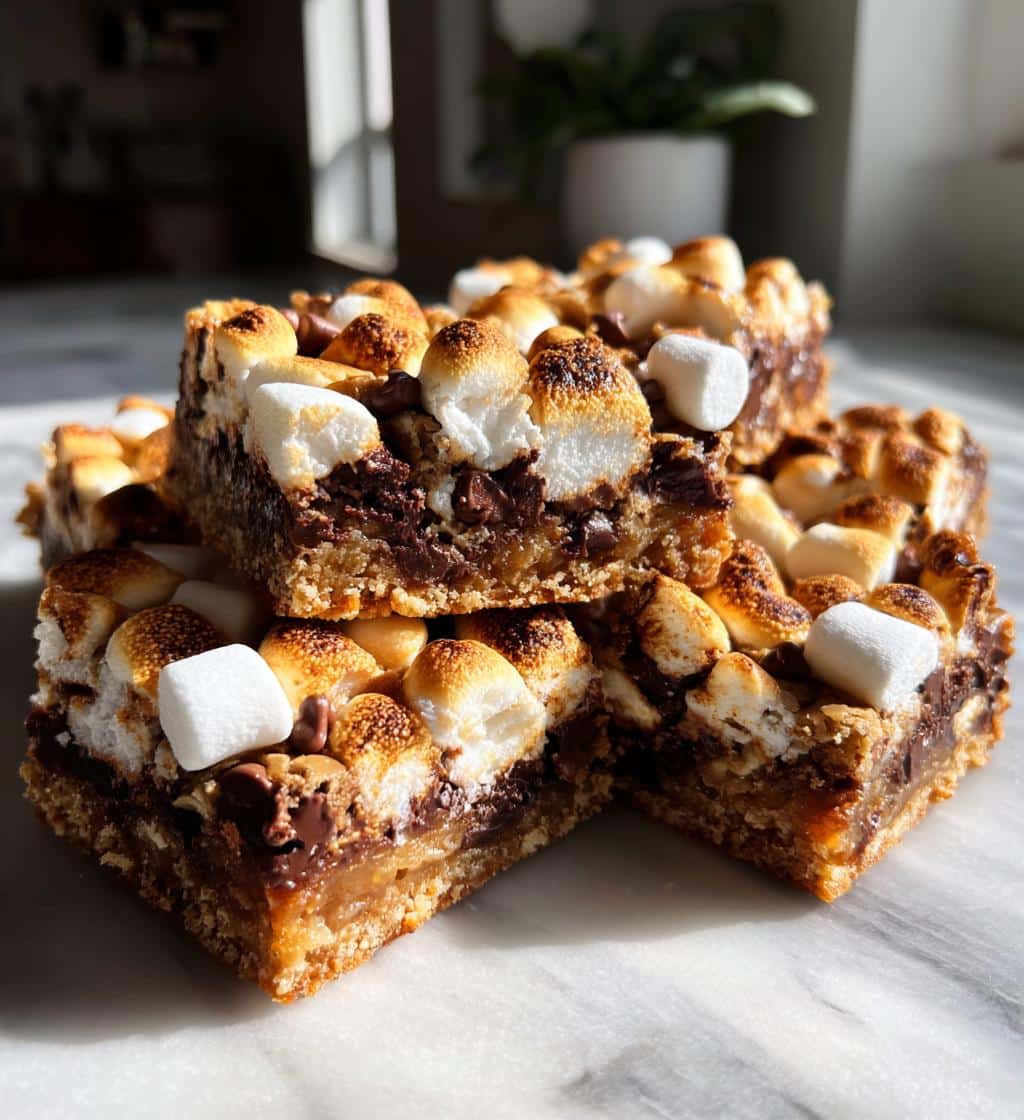
Checking for golden marshmallows
The visual cue for perfectly baked S’mores Bars is the appearance of the marshmallows. You’re looking for them to be beautifully puffed up, soft, and lightly golden brown on top. Some areas might get a slightly darker, caramelized hue, which adds to the authentic s’mores flavor. If you prefer a darker, more toasted marshmallow, you can briefly switch your oven to a broiler setting for 30-60 seconds, but watch them very carefully as they can burn quickly. Once the marshmallows are to your liking and the chocolate underneath appears melted and gooey, your delicious S’mores Bars are done. This gooey marshmallow goodness is almost ready to enjoy! For another quick meal, check out this Crispy Parmesan Chicken recipe.
Cooling and Cutting S’mores Bars
While it’s tempting to dive into your warm, gooey S’mores Bars straight out of the oven, allowing them to cool properly is a crucial step for clean cutting and optimal enjoyment. The cooling process allows the chocolate to set slightly and the layers to firm up, making the bars easier to handle and ensuring they hold their shape beautifully. Patience here will be rewarded with perfectly formed, delicious S’mores Bars that are a joy to serve and eat. This step is key to transforming a hot pan of chocolate and gooey marshmallow goodness into manageable, portable squares.
Once your bars are removed from the oven, place the baking dish on a wire cooling rack. Allow them to cool at room temperature for at least 1-2 hours. For even cleaner cuts and a firmer set, you can refrigerate them for an additional 30 minutes to an hour after they’ve cooled sufficiently at room temperature. When ready to cut, use the parchment paper overhangs to carefully lift the entire slab of bars out of the baking dish and onto a cutting board. A sharp, non-serrated knife works best for cutting. You can wipe the knife clean between cuts for the neatest edges. Cut them into squares or rectangles of your desired size, typically 12-16 bars from a 9×13 inch pan. Each cut reveals the delightful layers of graham cracker, melted chocolate, and soft marshmallows – a truly satisfying chocolate graham dessert experience. You can find more cooking ideas on our Pinterest page.
S’mores Bars Recipe: Quick Tips
While the classic S’mores Bars recipe is perfect as is, there are always ways to elevate or adapt your homemade s’mores treat to suit different tastes or occasions. These quick tips will help you personalize your easy dessert bars, ensuring every batch is exactly what you or your guests desire. Experimenting with additions can turn a simple recipe into a gourmet delight, making your chocolate delight even more special. Feel free to play around with these suggestions to make these delicious S’mores Bars truly your own.
Adding nuts for crunch
For an extra layer of texture and nutty flavor, consider sprinkling chopped nuts over the chocolate chip layer before adding the marshmallows. Pecans, walnuts, or even a mix of your favorite nuts can add a delightful crunch that complements the soft, gooey components. Toasting the nuts lightly before adding them can enhance their flavor even further, adding a sophisticated touch to your classic S’mores Bars. This small addition can make a big difference for those who enjoy a bit more complexity in their treats.
Dark chocolate for rich flavor
If you prefer a less sweet and more intense chocolate experience, substitute semi-sweet chocolate chips with dark chocolate chips or even chopped dark chocolate bars. The deeper, more bitter notes of dark chocolate will provide a wonderful contrast to the sweetness of the marshmallows and graham cracker crust, resulting in a more sophisticated and less overtly sugary S’mores Bar. This variation is particularly popular among adults who appreciate a richer, more complex chocolate delight in their dessert.
Storage for best freshness
To keep your S’mores Bars tasting their best, proper storage is key. Store cooled bars in an airtight container at room temperature for up to 3-4 days. While they can be refrigerated, this might make the graham cracker crust a bit harder. If you do refrigerate, allow them to come closer to room temperature before serving for the best texture. For longer storage, you can freeze individual bars wrapped tightly in plastic wrap and then placed in a freezer-safe bag for up to 1 month. Thaw at room temperature before enjoying. Proper storage ensures you can savor that gooey marshmallow goodness for days.
Storing Leftover S’mores Bars Safely
Ensuring your delicious S’mores Bars remain fresh and enjoyable for as long as possible is important, especially if you’ve made a large batch or have a few leftovers after a gathering. Proper storage techniques prevent the bars from drying out, becoming stale, or losing their delightful texture. While these easy dessert bars are best enjoyed within a few days of baking, knowing how to store them safely allows you to extend their shelf life and savor that homemade s’mores treat flavor for longer. Don’t let your chocolate graham dessert go to waste!
Airtight container for freshness
The primary rule for storing S’mores Bars is to use an airtight container. Exposure to air is the fastest way for baked goods to lose their freshness, causing the graham cracker crust to become stale and the marshmallows to harden. Once the bars have completely cooled, place them in an airtight container with a tight-fitting lid. You can stack them with a piece of parchment paper between layers to prevent them from sticking together. Store this container at room temperature, away from direct sunlight or heat, which can cause the chocolate to melt or the bars to become overly soft. For similar considerations with other baked goods, consider the guidelines for Snickerdoodle Cobbler.
How long do bars last?
When stored correctly in an airtight container at room temperature, S’mores Bars typically maintain their optimal freshness for 3 to 4 days. After this period, they are still safe to eat, but their texture might start to change, with the marshmallows becoming a bit chewier and the crust losing some of its crispness. If you need to store them longer, freezing is a great option. Wrap individual bars tightly in plastic wrap, then place them in a freezer-safe bag or container. They can last up to 1 month in the freezer. Thaw frozen bars at room temperature for a few hours before serving to bring back their delightful gooey marshmallow goodness. You can learn more about general food safety on Wikipedia’s food preservation page.
S’mores Bars Nutrition Facts
Understanding the nutritional aspects of your S’mores Bars can be helpful, especially if you’re mindful of your dietary intake. While these are undoubtedly a sweet indulgence, knowing the approximate calorie and sugar content per bar allows for informed enjoyment. Keep in mind that homemade recipes can vary widely based on exact ingredients and serving sizes, so these figures are estimates. The chocolate delight, gooey marshmallow goodness, and buttery graham cracker crust contribute to a rich treat, making them a delicious occasional indulgence. It’s an easy dessert bars recipe, but it’s still a dessert!
Calories and sugar per bar
The exact calories and sugar per S’mores Bar will depend on the specific brands of graham crackers, chocolate chips, and marshmallows used, as well as the size you cut your bars. However, as a general estimate, a typical S’mores Bar (cut into 16 servings from a 9×13 pan) might contain approximately:
- Calories: Around 250-350 calories per bar. This can increase if you add extra ingredients like nuts or use full-fat condensed milk in the crust.
- Sugar: Roughly 25-40 grams of sugar per bar. This comes primarily from the marshmallows, chocolate chips, and the added sugar in the graham cracker crust.
These figures highlight that S’mores Bars are a treat to be enjoyed in moderation as part of a balanced diet. They offer a delightful sweet snack that satisfies cravings, making them a perfect homemade s’mores treat for special occasions or when you need a little pick-me-up. For more information on marshmallows and their composition, check out the Marshmallow Wikipedia page.
Making S’mores Bars Your Own
The beauty of this S’mores Bars recipe extends beyond its delicious taste and simple preparation; it also offers incredible flexibility for customization. While the classic combination of graham crackers, chocolate, and marshmallows is undeniably perfect, there’s always room to add your personal touch and tailor these easy dessert bars to your unique preferences. This section provides ideas to inspire you to make your homemade s’mores treat truly one-of-a-kind, letting your creativity shine and creating an even more special chocolate delight.
Customize with favorite additions
Unleash your inner baker and experiment with various additions to enhance your S’mores Bars:
- Different Chocolates: Instead of just semi-sweet, try using milk chocolate, white chocolate, or even a mix. Caramel chips or peanut butter chips can also add a fun twist.
- Flavor Extracts: A dash of vanilla extract in the graham cracker crust, or a hint of peppermint extract with dark chocolate for a holiday twist, can be delightful.
- Candy Bits: Crush up your favorite chocolate candies (like M&M’s, Reese’s Pieces, or Butterfingers) and sprinkle them over the chocolate layer for extra flavor and color.
- Salty Pretzels: For a sweet and salty contrast, add a layer of crushed pretzels to the graham cracker crust or sprinkle them over the chocolate.
- Drizzles: After cooling, drizzle with melted caramel, chocolate fudge, or even a raspberry sauce for an elegant finish.
These additions can transform your simple S’mores Bars into an even more complex and satisfying chocolate graham dessert, tailored precisely to your cravings and making them truly delicious S’mores Bars.
Enjoy this homemade dessert
Ultimately, whether you stick to the classic recipe or experiment with custom additions, the goal is to enjoy the process and the delicious outcome. Baking these S’mores Bars is a joyful experience, from mixing the crust to watching the marshmallows puff up and turn golden in the oven. They are a celebration of simple ingredients coming together to create a beloved comfort food. So, gather your loved ones, bake a batch, and savor every gooey, chocolatey bite of this wonderful homemade dessert. Share your creations and find more recipe inspiration by following us on Instagram!