
Reese’s Earthquake Cake is a stunning dessert that combines rich chocolate with creamy peanut butter. This baking recipe yields a truly decadent homemade cake, beloved for its surprising gooey center. It is an ideal sweet treat for gatherings or a special family dessert. Prepare for pure indulgence with this amazing chocolate peanut butter cake.
Key Takeaways
- This Reese’s Earthquake Cake blends rich chocolate and peanut butter in a delightful dessert.
- Follow simple steps for preparing the batter and adding the iconic Reese’s cups.
- Achieve the signature gooey center by layering ingredients correctly before baking.
- Learn expert tips for baking, cooling, and serving your perfect homemade cake.
- Explore flavor enhancements and serving suggestions to customize this sweet treat.
Baking this cake is fun. The flavors are simply divine. Everyone loves this chocolate peanut butter treat. Its unique texture always impresses. Make it for your next celebration.
Reese’s Earthquake Cake: Pure Indulgence
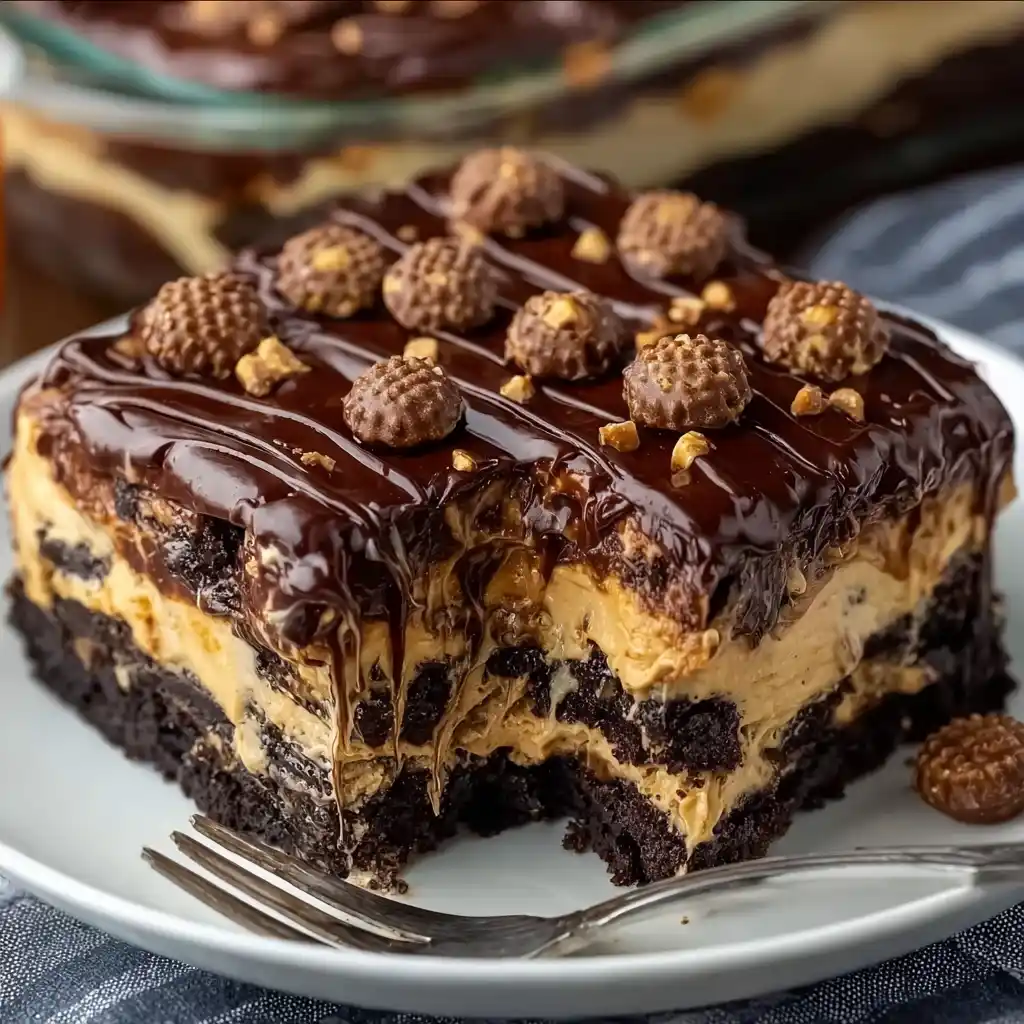
The Reese’s Earthquake Cake is more than just a dessert; it’s a celebration of two classic flavors: rich chocolate and creamy peanut butter. This particular baking recipe has gained immense popularity due to its irresistible combination of textures and tastes, making it a standout sweet treat for any occasion. Imagine a moist, tender chocolate cake with pockets of melted peanut butter cups and a surprisingly gooey, almost pudding-like center that ‘erupts’ when you cut into it – hence the name “Earthquake.” It’s a truly spectacular homemade cake that consistently impresses guests and satisfies the deepest cravings for something sweet and decadent. Whether you’re hosting a birthday party, a holiday gathering, or simply want to treat your family to an extraordinary dessert, this chocolate peanut butter cake delivers an experience of pure indulgence.
Why everyone loves this dessert
There’s an undeniable allure to a dessert that offers both comfort and excitement. The Reese’s Earthquake Cake ticks all these boxes. Its appeal lies in its familiar yet unexpected nature. Everyone recognizes the delightful taste of Reese’s Peanut Butter Cups, and when these are baked into a chocolate cake, they create bursts of salty-sweet goodness. The unique “earthquake” effect – a soft, molten middle – adds an element of surprise and delight that sets it apart from traditional cakes. It’s a dessert that feels both homemade and gourmet, making it a crowd-pleaser for all ages. People love how simple it is to achieve such an impressive result, making it a go-to for many who want a show-stopping sweet treat without overly complicated steps. For more delightful dessert ideas, check out our desserts category.
The amazing blend of flavors
The magic of this Reese’s earthquake cake lies in its perfect harmony of flavors. The deep, slightly bitter notes of chocolate cake provide an excellent foundation, perfectly complemented by the creamy, sweet, and salty explosion of peanut butter from the embedded Reese’s cups. This blend is meticulously balanced, ensuring neither flavor overpowers the other, but rather, they enhance each other in every bite. The addition of sweetened condensed milk creates that signature gooey center, infusing the cake with an extra layer of sweetness and moisture. This creates a multi-layered taste sensation: the chewiness of the cake, the softness of the melted peanut butter cups, and the rich, flowing caramel-like texture of the center. It’s a decadent symphony that makes this chocolate peanut butter cake an unforgettable dessert. If you enjoy peanut butter in your sweets, you might also like these peanut butter brownie swirl cookies.
Gather Your Reese’s Cake Ingredients
Creating a truly magnificent Reese’s Earthquake Cake begins with assembling the right ingredients. While the final product appears sophisticated, the list of necessary items is surprisingly straightforward, focusing on common pantry staples that make this baking recipe accessible to everyone. Having all your ingredients measured and ready before you start mixing (mise en place) will ensure a smooth and enjoyable baking process. This approach is key to any successful homemade cake, especially when dealing with multiple layers of flavor and texture.
All you need for baking
For the cake batter, you will typically need all-purpose flour, granulated sugar, unsweetened cocoa powder, baking soda, baking powder, salt, eggs, milk, vegetable oil, and vanilla extract. These create a rich and moist chocolate cake base. The star of the show, of course, is the Reese’s Peanut Butter Cups, which should be chopped into bite-sized pieces. You’ll also need chocolate chips for added chocolatey goodness. The secret to the gooey center lies in a can of sweetened condensed milk. Having these simple ingredients ready is the first step towards your delicious sweet treat. Always ensure your ingredients are fresh for the best flavor and texture in your homemade cake.
Simple kitchen staples
Many of the items for this Reese’s earthquake cake are likely already in your kitchen. Flour, sugar, cocoa powder, baking soda, and baking powder are standard in most baking pantries. Milk, eggs, and vegetable oil are also very common. The specific brands of Reese’s Peanut Butter Cups and chocolate chips can be chosen based on your preference, but standard milk chocolate chips and regular-sized Reese’s cups work perfectly. Don’t forget the vanilla extract, which adds a crucial aromatic depth to the chocolate flavor. The sweetened condensed milk is perhaps the most unique item on the list, but it’s widely available and essential for achieving the cake’s signature gooey texture. Preparing this chocolate peanut butter cake doesn’t require any exotic or hard-to-find components, making it an excellent baking recipe for home bakers.
Quick Prep for Chocolate Peanut Butter Cake
Before diving into the mixing bowl, a little bit of preparation goes a long way to ensure your chocolate peanut butter cake comes out perfectly. This quick prep phase is not just about gathering ingredients; it’s about setting up your workspace and ensuring all necessary equipment is at hand. A smooth baking experience, especially for a multi-textured sweet treat like the Reese’s Earthquake Cake, depends heavily on an organized start. Taking these few moments to prepare will save time and prevent potential mishaps during the more active stages of the baking recipe.
Get ready to bake
First, preheat your oven to the specified temperature, usually around 350°F (175°C), to ensure it’s at the correct heat when the cake is ready to go in. Next, prepare your baking dish. A 9×13-inch baking pan is standard for this Reese’s earthquake cake. Grease and flour the pan thoroughly, or line it with parchment paper and then grease it. This crucial step prevents the cake from sticking and ensures easy removal after baking. Chop your Reese’s Peanut Butter Cups into small, manageable pieces. You want them to be distinct but not so large that they create huge holes in the cake. Also, measure out your chocolate chips. Having these components ready to add will streamline the assembly process and make your baking recipe much more enjoyable.
Essential tools for success
While this homemade cake doesn’t require highly specialized equipment, having a few essential tools will make the process much smoother. You’ll need a large mixing bowl for the batter, a whisk or electric mixer, and measuring cups and spoons for precise ingredient amounts. A rubber spatula is handy for scraping down the sides of the bowl and folding in ingredients. For preparing the pan, cooking spray or butter and flour are needed. A good quality baking dish, such as a sturdy metal or ceramic 9×13-inch pan, is vital for even baking. Later, you’ll want oven mitts and a wire cooling rack. These simple kitchen tools are all you need to create a truly spectacular chocolate peanut butter cake, ensuring success with this fun baking recipe.
Making the Delicious Chocolate Cake Batter
The foundation of a great Reese’s Earthquake Cake is its rich, moist chocolate cake batter. This section details the process of combining your prepared ingredients to create a smooth and flavorful base for your dessert. The method is straightforward, but careful attention to how and when you mix the ingredients can significantly impact the final texture of your homemade cake. Achieving a perfectly balanced batter is a key step in this popular baking recipe.
Combine dry and wet ingredients
Start by whisking together all your dry ingredients in a large mixing bowl. This includes the all-purpose flour, granulated sugar, unsweetened cocoa powder, baking soda, baking powder, and salt. Whisking them thoroughly ensures that the leavening agents and cocoa are evenly distributed, preventing pockets of unmixed ingredients in your final cake. In a separate, medium-sized bowl, combine your wet ingredients: the eggs, milk, vegetable oil, and vanilla extract. Gently whisk these together until they are just combined. It’s important not to overmix at this stage, as the goal is simply to bring the liquids together before introducing them to the dry mixture. This careful separation and gradual combination is a fundamental technique for many successful baking recipes, including this delectable chocolate peanut butter cake.
Mix until just smooth
Once your dry and wet ingredients are prepared, gradually add the wet mixture to the dry ingredients. Begin mixing on low speed with an electric mixer, or use a whisk or rubber spatula if mixing by hand. The key here is to mix until the batter is *just* smooth. Overmixing develops the gluten in the flour, which can lead to a tough, dry cake. You want a light and tender crumb for this Reese’s earthquake cake. Scrape down the sides of the bowl periodically to ensure all ingredients are incorporated. A few small lumps are acceptable; it’s better to slightly undermix than to overmix. The resulting chocolate cake batter should be glossy, uniform in color, and have a pourable consistency, ready for the next exciting additions. This step is crucial for achieving that desired moist and tender texture in your homemade cake, setting it up for a truly indulgent sweet treat.
Adding Reese’s Peanut Butter Cups
This is where the Reese’s Earthquake Cake truly lives up to its name and becomes an irresistible sweet treat. Incorporating the chopped Reese’s Peanut Butter Cups and chocolate chips into the chocolate cake batter is a pivotal step, infusing every bite with bursts of peanut butter and extra chocolate goodness. The goal is to ensure these delightful additions are well-distributed, promising a delightful surprise in every slice of your homemade cake.
Chocolate chips and candy
Before adding, ensure your Reese’s Peanut Butter Cups are chopped into appropriate, bite-sized pieces. Too large, and they might sink to the bottom or create large voids; too small, and their distinct flavor might get lost. Aim for pieces roughly ¼ to ½ inch in size. Along with the Reese’s cups, you’ll be adding chocolate chips, which further enhance the rich chocolate flavor profile of the cake. Both milk chocolate and semi-sweet chocolate chips work wonderfully, depending on your preference for sweetness. The combination of the two candies creates a complex texture and flavor experience that elevates this chocolate peanut butter cake above a simple chocolate dessert. This fusion is what makes the earthquake cake so special and contributes to its reputation as a truly unique baking recipe. If you’re a fan of diverse chocolate desserts, you might enjoy a quick Italian cream cake too.
Evenly distribute throughout batter
Once your chocolate chips and chopped Reese’s Peanut Butter Cups are ready, gently fold them into the chocolate cake batter. Use a rubber spatula to carefully incorporate them, ensuring they are evenly distributed throughout the mixture. Avoid vigorous stirring, as this can lead to overmixing the batter, which, as mentioned, can result in a tough cake. The objective is to have little pockets of peanut butter and chocolate scattered throughout the cake, so every forkful offers a delightful surprise. You don’t want all the candy to sink to the bottom, which is why a gentle folding technique is preferred. This careful distribution is essential for creating the characteristic “earthquake” effect and ensuring consistent flavor and texture across the entire homemade cake. This step transforms the basic chocolate cake batter into the exciting base for your indulgent Reese’s Earthquake Cake.
Assembling Your Earthquake Cake Layers
The unique characteristic of the Reese’s Earthquake Cake — its surprise gooey center — is created during the assembly phase. This isn’t a traditional layering of baked cakes, but rather a strategic pouring of ingredients into the baking pan that transforms during baking into a rich, molten core. Getting these earthquake cake layers right is crucial for achieving the signature “eruption” that makes this sweet treat so memorable and beloved. It’s an exciting part of the baking recipe where the magic truly begins to take shape.
Batter, milk, then more batter
Begin by pouring about half of your chocolate cake batter, filled with Reese’s Peanut Butter Cups and chocolate chips, into your prepared 9×13-inch baking pan. Spread it evenly to form the first layer. Next, and this is the crucial step for the gooey center, slowly and evenly pour the entire can of sweetened condensed milk over the batter. Do not stir or mix it in; simply pour it over the surface. The milk will naturally settle into crevices and pockets within the batter. Finally, carefully spoon or pour the remaining half of the chocolate cake batter over the sweetened condensed milk layer, spreading it gently to cover as much of the milk as possible. Again, resist the urge to mix. The goal is to create distinct layers that will perform their delicious magic in the oven. This method ensures that the sweetened condensed milk forms its own rich, gooey layer rather than fully incorporating into the cake batter.
Create the gooey center
The sweetened condensed milk is the secret ingredient behind the earthquake cake’s renowned gooey center. During baking, as the cake cooks, the milk sinks and caramelizes slightly, creating a wonderfully rich, syrupy, and molten layer beneath the top cake layer. This is why it’s imperative not to stir the sweetened condensed milk into the batter. If you mix it, the effect will be lost, and you’ll simply have a sweeter cake, not the distinctive “earthquake” texture. The pockets of Reese’s Peanut Butter Cups and chocolate chips also contribute to the delicious chaos, melting and adding to the richness. When the cake is baked and cut, this luscious, gooey core “erupts” from within, providing a delightful surprise and a truly indulgent texture that makes this homemade cake a standout dessert. Mastering these earthquake cake layers ensures a perfectly decadent sweet treat every time.
Baking Your Perfect Reese’s Cake
Successfully baking your Reese’s Earthquake Cake is the final hurdle before enjoying this incredible sweet treat. Getting the oven temperature and timing right is key to ensuring a moist chocolate cake with that signature gooey center, without over-baking the top or leaving the bottom undercooked. This section provides the essential guidance for the baking process of your homemade cake, helping you achieve a perfectly done dessert.
Oven temperature and timing
For most recipes, including this Reese’s earthquake cake, an oven preheated to 350°F (175°C) is ideal. This moderate temperature allows the cake to bake evenly, giving the batter time to rise and the sweetened condensed milk to transform into that luscious gooey center. Place your assembled baking dish in the center of the preheated oven. The baking time will typically range from 45 to 60 minutes, but this can vary depending on your oven’s calibration and the exact pan you’re using. Start checking around the 45-minute mark. Avoid opening the oven door too frequently during the first 30-40 minutes, as this can cause the cake to sink. Patience during baking is a virtue, especially for a delicate chocolate peanut butter cake like this one.
Check for doneness
Determining when your Reese’s cake is perfectly done requires a careful touch. While a traditional toothpick test works for the cake portion, you don’t want to probe too deeply into the gooey center. Insert a clean toothpick or skewer into the *cake* part, specifically towards the edges or areas that appear most baked, avoiding the very middle where the sweetened condensed milk resides. If the toothpick comes out clean or with moist crumbs attached, the cake portion is done. The center will still feel soft and perhaps slightly jiggly, which is exactly what you want for the gooey effect. The top should be golden brown and spring back lightly when touched. If the edges are browning too quickly, you can loosely tent the cake with aluminum foil for the last 10-15 minutes of baking. Once done, remove the cake from the oven to a wire rack to begin the cooling process, a vital step before serving this delightful homemade cake. For more main course dinner ideas to pair with your dessert, explore our main course recipes.
Cooling and Serving the Delicious Cake
After successfully baking your Reese’s Earthquake Cake, the next important phase is allowing it to cool properly before you can finally enjoy this incredible sweet treat. Rushing this step can compromise the texture and integrity of your homemade cake, especially its signature gooey center. Thoughtful cooling and serving methods will ensure your chocolate peanut butter cake is at its absolute best when it reaches the table.
Let it set properly
Once removed from the oven, resist the urge to cut into your Reese’s cake immediately. The cake, especially the gooey center, needs time to set and stabilize. Place the baking pan on a wire cooling rack and allow it to cool completely at room temperature, which can take anywhere from 2 to 3 hours. During this time, the residual heat will continue to cook the cake gently, and the sweetened condensed milk will thicken further, creating that perfect molten, caramel-like consistency. Attempting to serve it too warm might result in a very runny center and a cake that crumbles easily. For optimal gooiness and structure, some even prefer to let it cool completely and then warm individual slices slightly just before serving. This patient approach is crucial for any decadent homemade cake that relies on a specific internal texture.
Dust with powdered sugar
Once the Reese’s cake has cooled, it’s ready for its final touch before serving. A simple dusting of powdered sugar (confectioners’ sugar) over the top adds a beautiful aesthetic and a subtle sweetness that complements the rich chocolate and peanut butter flavors. You can use a fine-mesh sieve or a sugar shaker to create an even, delicate layer. This not only makes the cake look more appealing but also hints at the sweet indulgence within. Cut the cake into squares or rectangles. As you slice into it, you’ll witness the “earthquake” effect as the gooey center spills out slightly, creating a truly spectacular presentation. Serve this delicious chocolate peanut butter cake warm or at room temperature. It’s a versatile sweet treat that tastes fantastic either way. Consider pairing it with a scoop of vanilla ice cream for an extra special dessert experience, and for more cooking inspiration, check out our Pinterest!
Expert Tips for Best Earthquake Cake
Achieving the perfect Reese’s Earthquake Cake consistently goes beyond just following the recipe steps; it often involves incorporating a few expert tips. These small adjustments can significantly impact the texture, flavor, and overall success of your chocolate peanut butter cake. By paying attention to these details, you can ensure your homemade cake is always a show-stopping sweet treat. These insights are valuable for any baking recipe where precision and understanding ingredients are key.
Don’t overmix the batter
This is perhaps one of the most crucial tips for achieving a tender and moist chocolate cake. When combining the wet and dry ingredients, mix only until the flour streaks have disappeared and the batter is just smooth. Overmixing develops the gluten in the flour, which can lead to a tough, dense, and chewy cake rather than the light and airy texture you desire. Use a rubber spatula for the final folds to ensure everything is incorporated without overworking the batter. This rule applies particularly when adding the chopped Reese’s Peanut Butter Cups and chocolate chips; fold them in gently. A light hand with the mixer or spatula is your best friend when crafting the best earthquake cake. This simple discipline ensures the cake part of your Reese’s Earthquake Cake remains soft and delicate, complementing the gooey center beautifully.
Room temperature ingredients matter
While some recipes are forgiving, using room temperature ingredients is especially important for baking most cakes, including this chocolate peanut butter cake. Eggs, milk, and any other dairy should be brought to room temperature before mixing. Why? Room temperature ingredients emulsify more easily, creating a smoother, more homogenous batter. This results in a better texture and a more consistent rise in the oven. Cold ingredients, on the other hand, can cause the batter to seize up, leading to a lumpy mixture and a potentially dense cake. Plan ahead by taking your eggs and milk out of the refrigerator about 30 minutes to an hour before you start baking. This simple but effective tip is often overlooked but contributes significantly to the quality of your homemade cake and helps create the best earthquake cake imaginable.
Flavor Enhancements for Your Cake Recipe
While the classic Reese’s Earthquake Cake is undeniably delicious, there’s always room to personalize and introduce new flavor enhancements to your baking recipe. Experimenting with different ingredients can elevate your chocolate peanut butter cake to new heights, catering to various taste preferences or simply adding an exciting twist to a beloved sweet treat. These minor tweaks can make your homemade cake truly unique.
Try different oils and extracts
The type of oil you use can subtly affect the cake’s moisture and flavor. While vegetable oil is standard and creates a neutral base, you could experiment with other oils. For example, a light olive oil can add a nuanced, slightly fruity note, or melted coconut oil might introduce a hint of tropical sweetness. However, be mindful that strong-flavored oils can overpower the chocolate and peanut butter. Extracts are another excellent way to customize. Beyond vanilla, consider adding a touch of almond extract for a marzipan-like undertone, or even a few drops of coffee extract to intensify the chocolate flavor without making the cake taste like coffee. A small amount of peppermint extract could transform it into a mint-chocolate-peanut butter sensation, perfect for a holiday sweet treat. These subtle changes can make a big difference in your earthquake cake recipe.
Experiment with chocolate chips
The chocolate chips in your Reese’s earthquake cake recipe don’t have to be limited to standard semi-sweet or milk chocolate. Dark chocolate chips can add a deeper, more sophisticated bitterness that beautifully contrasts the sweetness of the Reese’s and sweetened condensed milk. White chocolate chips would introduce a creamy, vanilla-forward sweetness, creating a different dynamic with the peanut butter. You could even use a mix of different chocolate chip types to create a multi-layered chocolate experience. For instance, a combination of dark and milk chocolate chips could offer the best of both worlds. Additionally, consider miniature chocolate chips for a more even distribution throughout the batter, or larger chunks for more dramatic pockets of melted chocolate. Each variation will offer a fresh take on this delightful chocolate peanut butter cake, allowing you to tailor this homemade cake to your exact preferences.
Serving Ideas for Earthquake Cake
Presenting your perfectly baked Reese’s Earthquake Cake with thoughtful serving ideas can turn this already incredible sweet treat into an unforgettable dessert experience. While delicious on its own, a few simple additions can further enhance its flavors and textures, making it even more appealing. These suggestions will help you elevate your chocolate peanut butter cake from a simple slice to a truly gourmet experience.
Serve warm with sauce
One of the best ways to enjoy Reese’s Earthquake Cake is by serving it warm. Gently reheating individual slices in the microwave for 15-30 seconds can bring back that wonderfully molten, gooey center, making the chocolate and peanut butter flavors sing. To take it a step further, consider drizzling a warm sauce over each serving. A classic hot fudge sauce or a rich caramel sauce would complement the flavors beautifully. For an extra peanut butter kick, a warm peanut butter sauce, made by melting peanut butter with a touch of milk and sugar, would be absolutely divine. A scoop of vanilla bean ice cream or whipped cream melting into the warm cake creates a delightful contrast in temperature and adds a creamy dimension, transforming your homemade cake into a luxurious dessert. This is a common practice for many decadent desserts, like a warm creamy baked mac and cheese which is often served warm.
Add nuts for crunch
For those who appreciate textural contrast, adding a sprinkle of nuts can elevate your earthquake cake to another level. Finely chopped roasted peanuts or pecans can provide a satisfying crunch that plays wonderfully against the soft cake and gooey center. You can either sprinkle them over individual slices just before serving or, for a more integrated approach, lightly toast and fold some into the batter before baking (though be mindful not to overmix). Candied pecans or walnuts would add another layer of sweetness and a pleasant chewiness. The nutty flavor of the additions also harmonizes naturally with the peanut butter cups, enhancing the overall profile of this chocolate peanut butter cake. These simple serving ideas help customize the experience, making your Reese’s Earthquake Cake a versatile sweet treat that can be adapted to different preferences.
Quick Answers: Earthquake Cake Questions
Many home bakers often have practical questions about a baking recipe like the Reese’s Earthquake Cake. This section provides quick answers to common queries regarding preparation time, cooking duration, and how many servings you can expect from this decadent chocolate peanut butter cake. Knowing these details upfront helps in planning your baking schedule and managing expectations for this sweet treat.
Prep, cook, and total time
The preparation for this homemade cake is relatively straightforward. Expect to spend approximately 15-20 minutes on prep work, which includes gathering ingredients, preparing the pan, chopping Reese’s Peanut Butter Cups, and mixing the batter. The baking time in the oven typically ranges from 45 to 60 minutes, depending on your oven and pan. Crucially, don’t forget the cooling time; the cake needs at least 2 to 3 hours to cool completely at room temperature for the gooey center to set properly. Therefore, the total time from start to serving, including cooling, will be around 3 to 4 hours. While the active baking time is short, the cooling period is essential, so plan accordingly if you need it ready for a specific event. This delicious chocolate peanut butter cake is worth the wait.
Servings and portion size
A standard 9×13-inch pan of Reese’s Earthquake Cake typically yields 12 to 15 generous servings. If you cut the cake into smaller squares, you could even get up to 18-20 servings. Given the richness and decadence of this sweet treat, a moderate portion size is often sufficient. Each serving offers a substantial amount of moist chocolate cake, gooey peanut butter center, and delightful chocolate chip pockets. It’s a hearty dessert, making it perfect for feeding a crowd at parties, potlucks, or family gatherings. When considering portion size, remember that this chocolate peanut butter cake is quite indulgent, so a smaller piece can be just as satisfying. This information helps in planning how much to make for your guests and ensures everyone gets to enjoy a piece of this amazing homemade cake.