
Red velvet cookies with cream cheese frosting are a beloved classic, offering a perfect blend of rich cocoa and sweet tang. This recipe simplifies the baking process, ensuring you can create beautiful, blissful delight homemade red velvet treats for any occasion in no time.
Key Takeaways
- Gather ingredients and prepare your baking station efficiently for smooth cookie making.
- Combine dry and wet ingredients carefully to achieve the perfect red velvet dough texture.
- Bake cookies for the specified time, then cool completely before applying frosting.
- Whip up a smooth cream cheese frosting, then spread it evenly for an irresistible finish.
- Enjoy quick prep and bake times, serving delicious, vibrant red velvet cookies fresh.
Baking red velvet cookies brings immense joy. Simple steps lead to delicious results. Enjoy the vibrant color. Share these homemade red velvet treats. They are perfect for everyone.
Making Red Velvet Cookies Blissful Delight
Creating homemade red velvet cookies with cream cheese frosting is a truly rewarding experience, transforming simple ingredients into a blissful delight. These vibrant, rich cookies are perfect for celebrations, gifts, or simply indulging your sweet tooth. The distinct red hue and subtle cocoa flavor, paired with the tangy sweetness of cream cheese frosting, make these treats stand out. Getting started on this culinary adventure involves mindful preparation and a dash of excitement, ensuring that every step contributes to the ultimate enjoyment of these classic baked goods. For visual inspiration and more delightful baking ideas, be sure to check out our Pinterest account, where you’ll find a treasure trove of dessert recipes.
Gather Cookie Making Ingredients
Before you begin, ensure all your cookie making ingredients are measured and at room temperature, especially butter and eggs. This preparation, known as “mise en place,” streamlines the process and contributes to a consistent final product. You’ll need all-purpose flour, unsweetened cocoa powder (natural or Dutch-processed), baking soda, salt, unsalted butter, granulated sugar, an egg, red gel food coloring, vanilla extract, and buttermilk. For the iconic cream cheese frosting, gather softened cream cheese, unsalted butter, powdered sugar, and vanilla extract. Having everything ready prevents frantic searches mid-recipe and helps maintain the flow, especially when working with the vibrant color of red velvet dough.
Preheat Oven and Prepare Sheet
Preheating your oven to the specified temperature is crucial for even baking. For red velvet cookies, aim for 350°F (175°C). While the oven preheats, prepare your baking sheets. Line them with parchment paper or silicone baking mats. This prevents sticking, promotes even browning, and makes cleanup significantly easier. Avoid greasing the sheets directly, as this can cause cookies to spread too much. Adequate preparation of your baking surface is an often-overlooked step that plays a vital role in achieving perfectly shaped and baked homemade red velvet treats.
Mixing Dry Cookie Batter Ingredients
The foundation of any great cookie lies in the careful combination of its dry ingredients. For red velvet cookies, this step is particularly important to ensure the cocoa powder is evenly distributed, contributing to the distinct flavor and helping achieve that desirable vibrant color. Skipping steps or rushing through this stage can lead to an inconsistent texture or uneven taste in your blissful delight treats. Proper sifting and mixing ensure that leavening agents are thoroughly incorporated, which is essential for the cookie’s rise and tender crumb.
Flour, Cocoa Powder, Baking Soda
In a medium bowl, whisk together the all-purpose flour, unsweetened cocoa powder, and baking soda. The flour provides the structure for the cookies, while the cocoa powder gives red velvet its signature flavor and dark base, which enhances the red food coloring. Using unsweetened cocoa is key, as sweetened varieties would throw off the sugar balance. Baking soda acts as a leavening agent, reacting with the acidic buttermilk (added later) to create a soft, airy texture. Sifting these ingredients together can help remove any lumps and ensure a light, even mix, which is especially important for smooth red velvet dough. For more dessert inspirations and recipes that utilize precise dry ingredient mixing, browse our extensive desserts category.
Add Salt to Dry Mix
Don’t forget the salt! A small amount of salt, typically a half teaspoon, is a flavor enhancer, not just for savory dishes but also for sweet baked goods. In red velvet cookies, salt balances the sweetness of the sugar and the richness of the cocoa, making the overall flavor profile more complex and enjoyable. It also helps to bring out the subtle notes of vanilla and the tang of the buttermilk. Adding it to the dry mix ensures it’s evenly distributed throughout the cookie dough, rather than concentrating in one area. This small addition makes a significant difference, preventing your homemade red velvet treats from tasting flat and truly making them a blissful delight.
Creaming Butter, Sugar Until Fluffy
The creaming method is a fundamental baking technique, and for red velvet cookies, it’s paramount to achieving their tender, melt-in-your-mouth texture. This process involves incorporating air into the butter and sugar mixture, which contributes to the cookies’ lightness and ensures a delicate crumb. Properly creamed butter and sugar form the backbone of a successful cookie batter, influencing everything from spread to chewiness. Patience here pays off, as rushing this step can result in dense, heavy cookies that lack the characteristic softness of true red velvet treats. You can learn more about the scientific principles behind creaming and other baking techniques on Wikipedia’s baking page.
Add Egg, Red Color, Vanilla
Once your butter and sugar are light and fluffy, it’s time to incorporate the wet flavor components. Crack in one large egg, mixing until just combined. The egg adds moisture, richness, and acts as a binder, contributing to the cookie’s structure. Following the egg, introduce the star of the show: red gel food coloring. Using gel coloring is crucial for achieving that deep, vibrant color without adding excessive liquid that could thin the dough. A generous amount is usually needed to combat the brown of the cocoa powder and create the iconic red hue. Finally, stir in the vanilla extract, a classic flavor enhancer that complements the cocoa and helps create a balanced, aromatic profile in these homemade red velvet treats. Ensure all these additions are fully incorporated before moving to the next stage of your red velvet cookie making journey.
Combine Wet and Dry Cookie Mix
The moment of truth in cookie making often comes down to how wet and dry ingredients are brought together. For red velvet cookies, this step requires a gentle hand to prevent overmixing, which can lead to tough cookies due to overdevelopment of gluten. The goal is to just combine everything until no streaks of flour remain, ensuring a uniform and cohesive dough that will bake beautifully into a blissful delight. This delicate balance helps maintain the tender texture that is so characteristic of these homemade red velvet treats. Mastering this combination technique is a key part of successful baking.
Form Smooth Red Velvet Dough
Gradually add your dry ingredient mixture to the wet mixture, alternating with buttermilk, beginning and ending with the dry ingredients. Mix on low speed, or by hand with a spatula, until just combined. The dough should be thick, smooth, and a beautiful vibrant red. Be careful not to overmix! Overmixing develops the gluten in the flour too much, resulting in a tougher cookie. Stop mixing as soon as the flour streaks disappear. At this point, the smooth red velvet dough should be ready for chilling (if required by your specific recipe – some red velvet cookie recipes benefit from a short chill to prevent spreading) or immediate dropping onto baking sheets. This careful combining ensures your red velvet cookies have the perfect texture and appearance.
Baking Your Red Velvet Cookies
Baking is where the magic truly happens, transforming your carefully prepared smooth red velvet dough into perfectly formed, chewy, and flavorful red velvet cookies. The precision in oven temperature and bake time is critical to prevent overbaking, which can lead to dry, crumbly cookies, or underbaking, resulting in a soft, uncooked center. Achieving that ideal balance ensures each cookie is a blissful delight, with a slightly crisp edge and a tender interior. This stage demands attention to detail, making sure the heat is distributed evenly and the cookies are monitored closely for optimal doneness. For another delightful cookie recipe that emphasizes careful baking, try our Peanut Butter Brownie Swirl Cookies.
Drop Dough onto Sheet
Using a cookie scoop (about 1.5 to 2 tablespoons in size) helps ensure uniform cookie size, which promotes even baking. Drop spoonfuls of the red velvet dough onto the prepared baking sheet, leaving about 2 inches between each cookie. This spacing allows the cookies to spread without running into each other, creating distinct, beautifully shaped homemade red velvet treats. Avoid pressing the dough down; let it maintain its natural rounded shape. If you don’t have a scoop, two spoons can work effectively to portion out the dough. Consistent portioning is a small but significant detail in achieving a professional-looking batch of red velvet cookies.
Bake for 10-12 Minutes
Place your baking sheet into the preheated oven. Red velvet cookies typically bake for 10-12 minutes. The exact time can vary depending on your oven and the size of your cookies. You’ll know they’re ready when the edges are set, but the centers still look slightly soft. They will continue to set as they cool on the baking sheet. Overbaking is the enemy of a soft, chewy cookie, so err on the side of caution. Remove them from the oven promptly and let them cool on the baking sheet for a few minutes before transferring them to a wire rack. This brief period on the hot sheet helps them firm up without drying out, preserving their tender texture and vibrant color.
Cooling Cookies Before Frosting
The step of cooling cookies before frosting them is non-negotiable for achieving perfect red velvet cookies with cream cheese frosting. It might seem like a simple waiting game, but its importance cannot be overstated. Applying frosting to warm or even slightly warm cookies is a recipe for disaster; the heat will cause the frosting to melt, slide off, and create a messy, unappealing result. Furthermore, warm cookies release steam, which can affect the texture of the frosting, making it watery or separating its components. Proper cooling allows the cookies to fully set, firm up, and reach a stable temperature, creating the ideal canvas for the luscious cream cheese frosting. This ensures the integrity of both the cookie and the frosting, making each bite a truly blissful delight. Be patient and allow sufficient time for this crucial stage in your red velvet cookie making process. Placing them on a wire rack allows air to circulate around all sides, speeding up the cooling process and preventing sogginess.
Making Cream Cheese Frosting Smooth
The cream cheese frosting is the crowning glory of red velvet cookies, providing that signature tangy sweetness that perfectly complements the rich, subtle cocoa flavor of the cookies. Achieving a smooth, spreadable, and stable frosting is key to a professional-looking and tasting dessert. The technique primarily revolves around starting with properly prepared ingredients and using the right mixing method. This ensures a frosting that holds its shape, spreads beautifully, and doesn’t become too runny or lumpy. For more insights on the delightful ingredient cream cheese, its history, and uses, you can visit its Wikipedia page.
Soften Cream Cheese, Powdered Sugar
Begin by ensuring both your cream cheese and unsalted butter are at proper room temperature. This is perhaps the most critical tip for a smooth frosting. Cold cream cheese or butter will result in a lumpy frosting that’s impossible to spread. They should be soft enough to indent with a finger but not greasy or melted. In a large bowl, beat the softened cream cheese and butter together with an electric mixer until light, fluffy, and completely smooth, scraping down the sides of the bowl as needed. Once that base is perfect, gradually add the powdered sugar, a little at a time, beating on low speed until fully incorporated. Sifting the powdered sugar beforehand can prevent lumps, ensuring an even smoother consistency. Finally, mix in vanilla extract. Beat the frosting on medium-high speed for a minute or two until it’s wonderfully light and airy, ready to transform your red velvet cookies into truly blissful delight homemade red velvet treats.
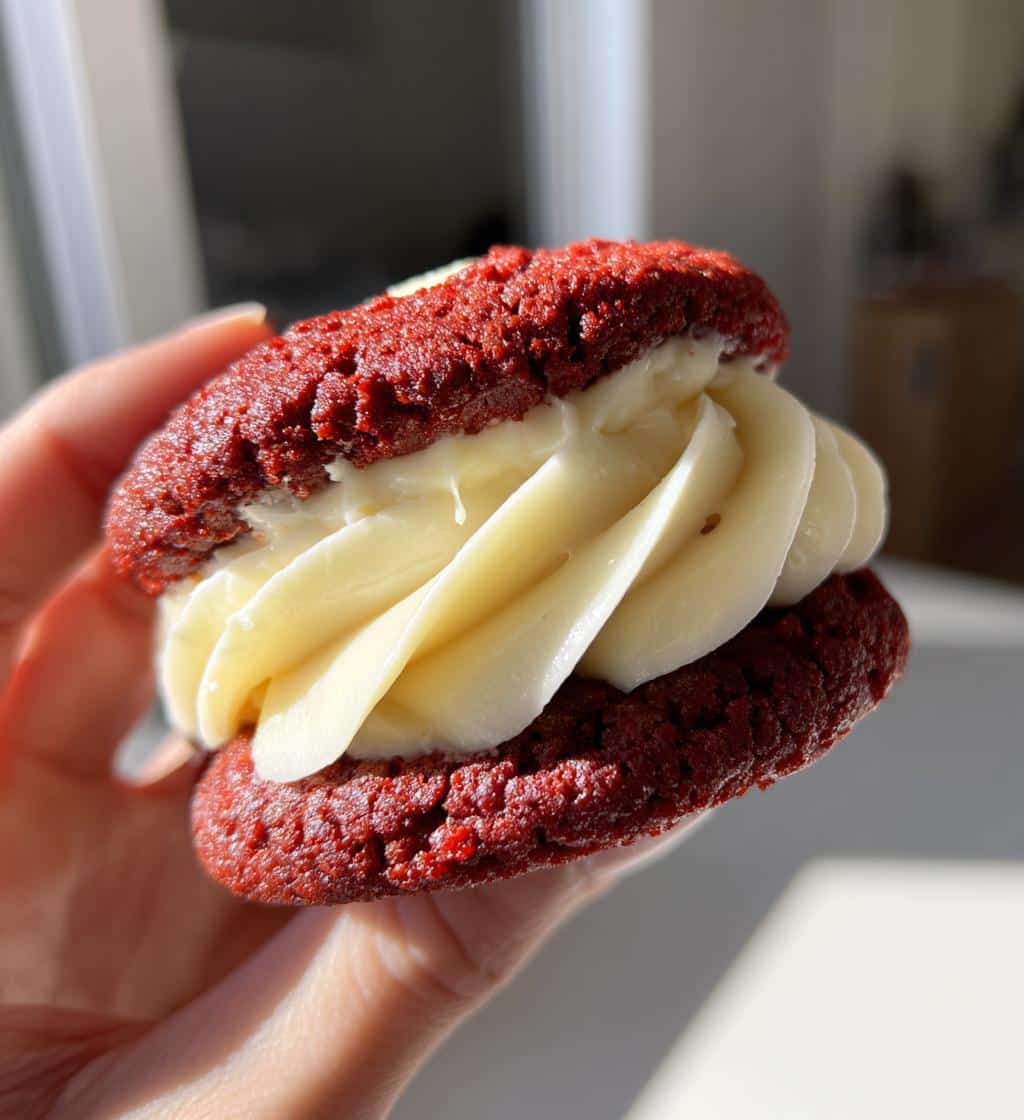
Frosting Red Velvet Cookies Perfectly
Once your red velvet cookies are completely cooled and your cream cheese frosting is smooth and ready, it’s time for the artistic touch: frosting! This final step brings all your hard work together, creating the iconic look and taste of these beloved treats. Perfect frosting enhances both the visual appeal and the flavor experience, turning a simple cookie into a decadent dessert. Whether you prefer a rustic dollop or a more refined swirl, the application matters for a truly blissful delight. Remember, practice makes perfect, but even imperfectly frosted homemade red velvet treats are delicious!
Spread Frosting on Cooled Treats
With your cookies thoroughly cooled, it’s time to spread that luscious cream cheese frosting. You can use a small offset spatula, a butter knife, or even the back of a spoon to apply the frosting. For a classic look, spread a generous dollop onto the center of each cookie and gently swirl it outwards, leaving a small border. You can also pipe the frosting using a pastry bag fitted with your favorite tip for a more decorative finish. Be sure to spread evenly, ensuring each bite gets a taste of that creamy, tangy goodness. The contrast between the vibrant red cookie and the bright white frosting is visually stunning. Once frosted, these homemade red velvet treats are ready to be admired and devoured. Share your beautifully frosted creations with us on Instagram!
Quick Prep and Bake Times
One of the many appealing aspects of making red velvet cookies is their relatively quick prep and bake times, making them an accessible baking project even for busy schedules. Unlike some more elaborate desserts, these blissful delight cookies don’t demand hours of attention, allowing you to whip up a batch of homemade red velvet treats in under an hour. This efficiency doesn’t compromise on flavor or quality; it simply means smart ingredient management and a straightforward process that gets delicious results to your table faster. Knowing you can achieve such a satisfying outcome in a short period adds to the joy of baking these vibrant red cookies. For another dessert that’s quick to prepare and bake, consider our Quick Italian Cream Cake.
Ready in Under 35 Minutes
From start to finish, you can realistically have these red velvet cookies ready for enjoyment in under 35 minutes, especially if you have your cookie making ingredients prepped. The active prep work, including measuring and mixing the dough, typically takes around 15-20 minutes. The baking process itself only accounts for 10-12 minutes per batch. While you’ll need to factor in cooling time before frosting, the sheer speed of getting the cookies baked is incredibly appealing. This quick turnaround makes them an ideal choice for last-minute cravings, unexpected guests, or simply when you want to satisfy your sweet tooth without a lengthy commitment. Their vibrant color and delicious taste make the speedy effort truly worthwhile.
Serving 12 Blissful Delight Cookies
These red velvet cookies with cream cheese frosting are designed to be a blissful delight, perfect for sharing and savoring. A typical recipe yields about 12 generous cookies, making them ideal for a small gathering, a family dessert, or simply enjoying throughout the week. The presentation of these vibrant red treats, especially with their contrasting white frosting, is inherently inviting and celebratory. Serving them thoughtfully enhances the experience, turning a simple homemade treat into a memorable moment. Consider how they will be enjoyed and who you are sharing them with to truly make them special.
Enjoy Homemade Red Velvet Treats
Present your homemade red velvet treats on a beautiful platter or in individual cupcake liners for an elegant touch. These cookies are perfect served alongside a cup of coffee, tea, or a glass of cold milk. Their rich flavor and tender texture make them a comforting indulgence, while their vibrant color makes them a festive addition to any dessert table. Encourage guests to admire the craftsmanship before diving in. These cookies are not just food; they are an expression of care and creativity in the kitchen. Enjoy the compliments and the joy these blissful delight cookies bring to everyone who tastes them, knowing you created them from scratch with love.
Storing Cookies, Vibrant Color Tips
Proper storage is crucial for maintaining the freshness, flavor, and visual appeal of your red velvet cookies, especially given their delicate cream cheese frosting. Ensuring they stay moist and the frosting remains intact will allow you to enjoy these blissful delight treats for several days after baking. Beyond storage, keeping the vibrant color of your red velvet cookies requires a specific approach to food coloring, which significantly impacts their iconic look. These practical tips will help you preserve both the taste and aesthetics of your homemade red velvet treats.
Airtight Container Storage
Due to the cream cheese frosting, these red velvet cookies must be stored in an airtight container in the refrigerator. Place a piece of parchment paper between layers of cookies to prevent the frosting from sticking together. They will stay fresh for up to 3-5 days when properly refrigerated. Allow them to come to room temperature for about 15-20 minutes before serving for the best flavor and texture. If storing unfrosted cookies, they can be kept in an airtight container at room temperature for 2-3 days, or frozen for up to 2-3 months. Always ensure the container is truly airtight to prevent them from drying out or absorbing other flavors from the fridge. Similar storage considerations apply to other baked goods, like a Snickerdoodle Cobbler, to maintain freshness.
Use Gel Food Coloring Best
For the most striking and vibrant color in your red velvet cookies, gel food coloring is highly recommended. Unlike liquid food coloring, which is water-based and can thin out your dough, gel coloring is concentrated and provides intense color without altering the consistency of your batter. A small amount goes a long way, ensuring a deep, rich red hue that truly stands out. Aim for a “true red” gel coloring. The cocoa powder in the recipe darkens the batter, so don’t be afraid to add enough gel coloring to achieve your desired vibrant color. This simple tip is essential for making your homemade red velvet treats visually as appealing as they are delicious.
Red Velvet Cookie Nutrition Facts
While precise nutrition facts for homemade red velvet cookies can vary widely based on exact ingredients and portion sizes, it’s generally understood that these sweet treats, especially with cream cheese frosting, are a delightful indulgence. Typically, a single cookie might contain approximately 150-250 calories, with varying amounts of fat, carbohydrates, and sugar. The fat content primarily comes from butter, cream cheese, and egg yolks, contributing to the rich texture. Carbohydrates and sugar are significant due to flour and sweeteners. Making your own red velvet cookies allows for some control over the nutritional profile; for instance, you could opt for reduced-fat cream cheese or slightly less sugar, though this may alter the classic taste and texture. It’s always recommended to consider these delicious blissful delights as an occasional treat, fitting into a balanced diet. For a detailed breakdown, you would need to calculate based on the specific brands and quantities of each ingredient used in your unique homemade red velvet treats recipe. Always check individual ingredient labels for the most accurate nutritional information.