
Pineapple Lemonade Candy Apples offer a vibrant twist on a classic snack, combining fruity tang with sweet crunch. This recipe details how to create these delightful treats from scratch. Follow our simple steps for a dessert that’s perfect for any occasion, ensuring a delicious outcome every time.
Key Takeaways
- Achieve perfect candy syrup with accurate temperature control.
- Select firm, crisp apples for the best dipping experience.
- Infuse your apples with bright pineapple lemonade flavor and color.
- Proper cooling ensures a hard, shiny candy coating.
- Enjoy fresh or store safely for later indulgence.
Homemade candy apples are truly rewarding. They offer a unique flavor profile. Kids and adults will surely love these. It’s a perfect sweet treat to share. Make them for a special day.
Gather Ingredients for Candy Apples
The journey to crafting irresistible homemade candy apples begins with gathering the right components. Having all your ingredients and tools prepared before you start ensures a smooth and enjoyable candy making process. This recipe focuses on creating a vibrant pineapple lemonade flavor, so attention to detail in your ingredient selection is key. From the crisp apples themselves to the specific extracts and sugars, each item plays a crucial role in achieving that perfect balance of sweet and tangy, with a satisfyingly hard candy coating. Preparing your workspace and having everything within reach will help prevent any last-minute rushes once the syrup starts to boil, which is essential for maintaining precise temperatures and avoiding mishaps. Think of this initial step as laying the foundation for a truly special sweet treat that everyone will adore.
Essential apples and extracts
Selecting the right apples is paramount for candy apple success. Opt for firm, crisp apples like Granny Smith, Fuji, or Honeycrisp. These varieties hold their shape well under the hot syrup and offer a delightful tartness that complements the sweetness of the candy. Ensure your apples are free of bruises and perfectly smooth for an even coating. For the distinctive pineapple lemonade flavor, you’ll need high-quality pineapple extract and lemon extract. These extracts provide the concentrated taste without adding excess liquid, which could compromise the syrup’s consistency. A good quality yellow food coloring is also vital to give your pineapple lemonade candy apples their characteristic sunny hue. Remember, fresh, blemish-free apples and potent extracts are the foundation of this delightful dessert. Consider visiting a local orchard for the freshest picks if possible.
Pantry staples for syrup
The candy syrup relies on a few fundamental pantry staples. Granulated sugar forms the bulk of the candy coating, providing the necessary sweetness and structure. Light corn syrup is another critical ingredient; it helps prevent crystallization, ensuring your candy remains smooth and clear, rather than grainy. Water is used to dissolve the sugar and corn syrup, forming the liquid base for your candy. A pinch of salt can also be added to balance the flavors, enhancing the overall taste without making the candy taste salty. Always use fresh, high-quality ingredients for the best results in your sweet dessert creations. Having these items measured out and ready to go will streamline the syrup-making process significantly, allowing you to focus on the precise cooking temperatures required for a successful hard crack stage. This attention to detail will pay off in the final product.
Tools needed for dipping
Having the correct tools makes candy making much easier and safer. A heavy-bottomed saucepan is essential for even heat distribution and preventing scorching. A reliable candy thermometer is absolutely non-negotiable for reaching the precise hard crack stage (300°F). Without it, achieving the correct candy consistency is nearly impossible. Wooden candy apple sticks are, of course, needed for holding and dipping the apples. Parchment paper or a silicone mat will be required for cooling the dipped apples without sticking. A basting brush, optionally, can be used to wash down sugar crystals from the sides of the pan during boiling. Finally, a heat-resistant spatula or spoon is useful for gentle stirring. Equipping your kitchen with these specific tools ensures you’re prepared for every step, from making the syrup to the final cooling of your delicious homemade desserts.
Prepare Apples for Dipping
Proper preparation of your apples is just as important as the syrup itself. Any residue or moisture on the apples can prevent the candy coating from adhering smoothly, leading to an uneven or bumpy finish. Taking the time to thoroughly clean and dry each apple ensures a pristine surface for dipping, resulting in beautifully shiny and perfectly coated treats. This step might seem simple, but its impact on the final aesthetic and texture of your pineapple lemonade candy apples cannot be overstated. By ensuring the apples are ready, you set the stage for a professional-looking and tasting result that will impress everyone who tries them. A small amount of effort here can make a significant difference in the overall success of your batch, so don’t rush this crucial preparatory phase.
Washing and drying apples
Begin by thoroughly washing your crisp apples under cool running water. Many apples have a natural wax coating, or sometimes a commercial wax applied, which must be removed for the candy to stick. You can gently scrub them with a clean cloth or vegetable brush. Some people prefer a quick dip in boiling water for 5-10 seconds, followed by an ice bath, to help remove wax. After washing, the most critical step is to dry the apples completely. Even a tiny drop of water can cause the candy coating to slide off or create imperfections. Use a clean, lint-free towel to meticulously dry each apple, ensuring there’s no moisture left on the skin. You can even let them air dry on a wire rack for an hour or so after towel-drying to be absolutely certain. This meticulous drying process is key for a flawless, hard candy coating.
Inserting wooden sticks
Once your apples are perfectly clean and dry, it’s time to insert the wooden sticks. Choose sturdy wooden candy apple sticks that are long enough to provide a good grip without being overly cumbersome. Carefully insert each stick into the stem end of the apple, pushing it down firmly about halfway through the core. This ensures the stick is secure and can support the weight of the apple once it’s coated in the heavy candy syrup. If the stick feels loose, try twisting it gently as you push, or select a slightly thicker stick. A well-inserted stick prevents the apple from spinning or falling off during dipping, making the entire process much easier and safer. Proper stick insertion also makes for easier handling and eating once your homemade candy apples are ready to enjoy.
Make Pineapple Lemonade Candy Apple Syrup
Creating the perfect candy apple syrup is a delicate balance of science and art. The pineapple lemonade flavor adds a refreshing twist to the traditional recipe, making these treats uniquely appealing. The key is to dissolve the sugar and corn syrup completely before the mixture comes to a boil, which prevents crystallization and ensures a smooth, glassy coating. This step is where the magic begins, transforming simple pantry staples into a delicious, vibrant syrup ready to encase your crisp apples. Paying close attention to the details here will ensure your syrup has the correct consistency and flavor profile. Remember, a well-made syrup is the heart of any successful sweet dessert, and this pineapple lemonade version is no exception.
Combine sugar and liquids
In your heavy-bottomed saucepan, combine the granulated sugar, light corn syrup, and water. It’s important to use the correct proportions as specified in the recipe to achieve the desired hard crack stage. The corn syrup is particularly crucial here, as it acts as an invert sugar, preventing the granulated sugar from recrystallizing once it’s dissolved and heated. This combination creates the stable base for your candy. Some recipes also suggest adding a small pinch of salt at this stage to enhance the overall flavor. Whisk these ingredients gently together until the sugar is just moistened. Avoid aggressive stirring at this point, as it can introduce air bubbles that might affect the final texture of the candy coating. Ensure everything is well-integrated before proceeding to the next step, setting the stage for a smooth and glossy finish on your homemade candy apples.
Gentle stirring until dissolved
Place the saucepan over medium-high heat. Begin to stir the mixture gently but consistently. The goal here is to help the sugar dissolve completely into the liquid before the syrup comes to a rolling boil. If sugar crystals remain undissolved when the syrup boils, they can act as “seeds” for crystallization, leading to a grainy or cloudy candy. Use a clean, damp pastry brush to gently wash down any sugar crystals that cling to the sides of the pan above the liquid line. This prevents them from falling back into the syrup and initiating crystallization. Continue stirring gently until you no longer feel any sugar granules at the bottom of the pan with your spoon. Once the sugar is fully dissolved and the mixture is clear, stop stirring. From this point forward, minimal stirring is required during the boiling process to prevent issues. This gentle approach is vital for perfect candy apple coatings.
Boil Syrup to Hard Crack Stage
This is arguably the most critical step in making candy apples. Achieving the “hard crack” stage is what gives the candy its characteristic brittle, crunchy texture. If the syrup doesn’t reach this precise temperature, your coating will be sticky and soft, rather than crisp. Patience and accuracy are key here. Rushing this process or guessing the temperature will almost certainly lead to disappointing results. The hard crack stage occurs when the sugar solution reaches a high concentration, meaning nearly all the water has evaporated. This leaves behind a nearly pure sugar solution that, when cooled, solidifies into a glass-like state. Mastering this stage is what truly elevates your homemade candy apples from good to spectacular.
Use a candy thermometer
A reliable candy thermometer is your best friend for this step. Clip it to the side of your saucepan, ensuring the tip is submerged in the syrup but not touching the bottom of the pan. This placement allows for an accurate temperature reading of the syrup itself. Begin heating the syrup over medium-high heat, allowing it to come to a rolling boil. Do not stir the syrup once it begins to boil vigorously. Stirring at this stage can introduce air bubbles, which can lead to crystallization, or cause the sugar to cool unevenly. Simply let the syrup boil undisturbed, monitoring the thermometer closely. The temperature will rise steadily, but the final ascent to 300°F can be quick, so stay vigilant.
Reach 300°F accurately
Continue boiling the syrup without stirring until your candy thermometer precisely registers 300°F (149°C). This temperature is the exact point for the hard crack stage. It’s crucial not to go much higher, as the sugar can burn quickly, resulting in a bitter taste and dark color. Conversely, if it doesn’t reach 300°F, your candy will be too soft and sticky. As soon as it hits 300°F, immediately remove the saucepan from the heat. Have everything else ready for the next steps, as the syrup will begin to cool and thicken quickly. Accuracy at this stage determines the success of your pineapple lemonade candy apples, ensuring a perfectly crisp and satisfying coating that holds its shape and provides that iconic candy apple crunch. For more fun recipes and tips, check out our dessert section.
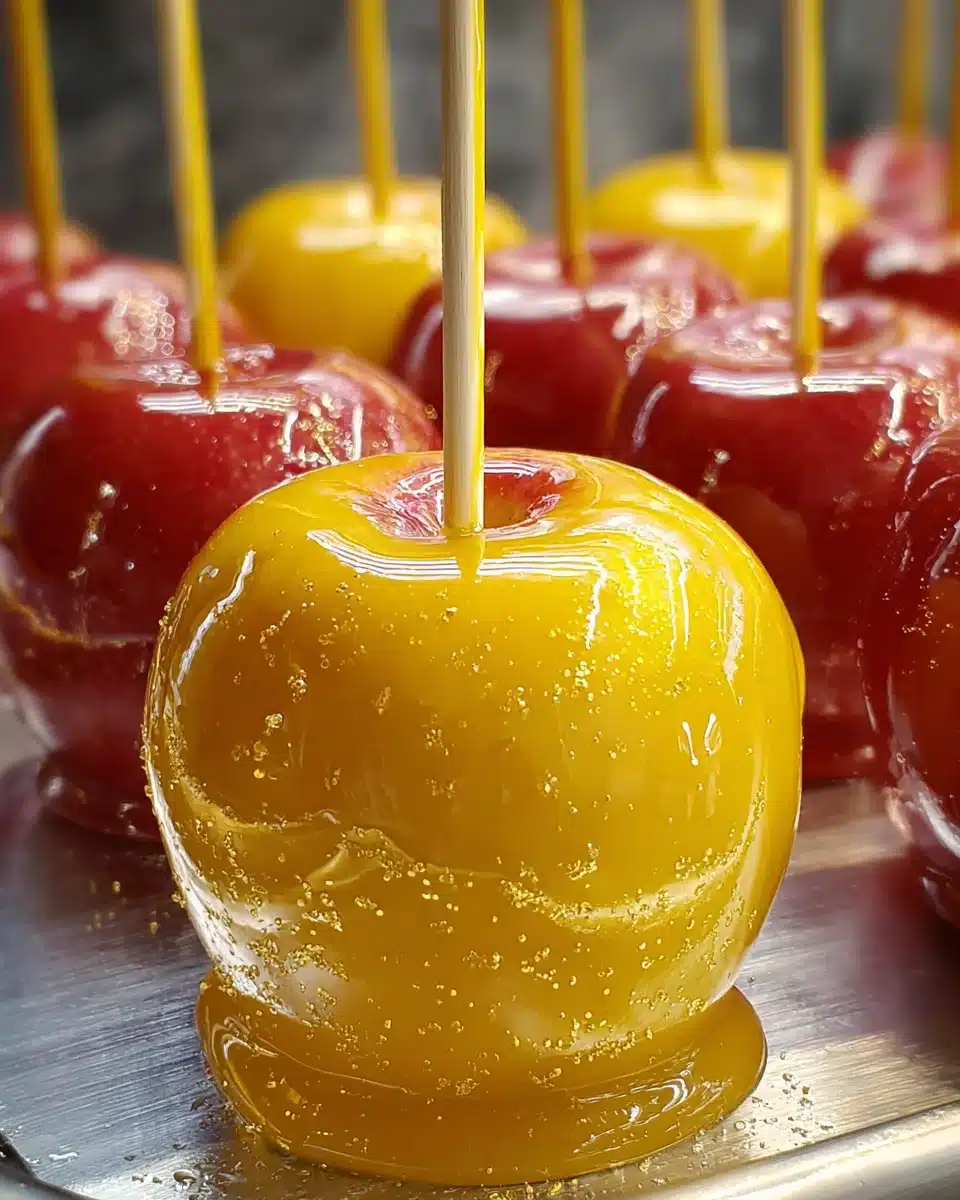
Add Pineapple Lemonade Flavors and Color
Once the syrup reaches the hard crack stage and is removed from the heat, it’s time to infuse it with the vibrant pineapple lemonade flavor and give it its signature sunny yellow hue. This step needs to be done quickly and carefully, as the syrup will begin to cool and thicken. The goal is to incorporate the extracts and coloring evenly without causing the syrup to crystallize or cool too much before dipping. The aroma of pineapple and lemon will immediately fill your kitchen, signaling the exciting transformation of plain sugar syrup into something truly special. This burst of flavor and color is what truly defines your homemade pineapple lemonade candy apples and makes them stand out from traditional versions.
Stir in extracts carefully
As soon as you remove the hot syrup from the heat, carefully stir in the pineapple extract and lemon extract. Use a heat-resistant spoon or spatula and mix them in gently but thoroughly. The extracts are highly concentrated, so a little goes a long way in delivering that refreshing pineapple lemonade flavor. Be mindful that adding liquids to hot sugar syrup can cause steam, so exercise caution. Avoid vigorous stirring, which can introduce air bubbles or encourage crystallization. The goal is to evenly distribute the flavorings throughout the syrup. Work quickly, as the syrup’s temperature will drop, and it will become harder to incorporate ingredients smoothly. This careful integration ensures every bite of your candy apple carries that delightful tangy sweetness.
Mix in yellow food coloring
Immediately after adding the extracts, mix in the yellow food coloring. Depending on the type of coloring (liquid, gel, or powder) and your desired intensity, you’ll need to add a few drops or a small amount at a time. Gel food coloring is often preferred for its vibrant results without adding much liquid. Stir gently until the color is evenly distributed throughout the syrup. Aim for a bright, cheerful yellow that evokes the feeling of sunshine and lemonade. Again, work quickly and avoid excessive stirring. The addition of color makes these sweet treats visually appealing and truly embodies the pineapple lemonade theme. Once the flavor and color are perfectly blended, your syrup is ready for the crucial dipping stage.
Dip Apples in Hot Candy Syrup
Dipping the apples is the most fun part of the process, but it requires swift and confident action. The syrup cools quickly, so you need to work efficiently to ensure all apples are coated before the syrup becomes too thick to manage. The goal is a uniform, thin, and glossy layer of candy coating on each apple. Having your prepared apples and cooling surface ready beforehand is absolutely essential. This is where all your careful preparation pays off, transforming simple fruit into dazzling homemade desserts. Embrace the excitement of seeing your pineapple lemonade candy apples come to life with their vibrant color and inviting aroma.
Tilt pan for easy coating
Once the flavored and colored syrup is ready, immediately tilt the saucepan to one side. This creates a deeper pool of syrup, making it easier to fully submerge each apple. Hold an apple by its wooden stick and carefully lower it into the hot syrup. Be cautious, as the syrup is extremely hot. Tilting the pan helps conserve the heat in a smaller area and allows for complete coverage without needing an excessively large amount of syrup, which could cool too fast. Work quickly, but deliberately, ensuring each apple gets a generous, even coating.
Swirl apples evenly
While the apple is submerged, gently swirl and rotate it to ensure it’s completely and evenly coated with the candy syrup. Lift the apple slowly, allowing any excess syrup to drip back into the pan. You want a relatively thin, smooth layer, not a thick, clumpy one. As you lift, gently scrape the bottom of the apple against the rim of the pan to remove any large drips, preventing a “foot” of candy from forming at the base. Work with one apple at a time, moving quickly. The heat of the syrup will maintain its liquidity for a short period, allowing you to coat several apples. If the syrup starts to thicken too much, you can briefly return it to very low heat for a few seconds to loosen it, but be careful not to re-boil it or change its temperature dramatically. Speed and smooth technique are your allies for beautiful, homemade candy apples.
Let Candy Apples Cool and Harden
After the exciting dipping phase, the next crucial step is allowing your pineapple lemonade candy apples to cool and harden properly. This is where the hard crack stage truly manifests, turning the liquid syrup into a brittle, shiny shell. Patience is key here; resisting the urge to touch them too soon ensures a perfect finish. Proper cooling prevents stickiness and allows the candy coating to achieve its full crunchy potential. This hardening process typically takes some time, but it is well worth the wait for that satisfying snap when you finally take a bite. Ensure they have ample space and are not touching each other to prevent them from fusing together as they cool, which could compromise their individual perfection.
Place on parchment paper
As each apple is dipped and excess syrup drained, immediately place it onto a sheet of parchment paper or a silicone baking mat. Do not use wax paper, as the hot candy will stick to it. The parchment paper provides a non-stick surface, allowing the candy apples to release easily once they are fully hardened. Arrange them with enough space between each apple to ensure air circulation, which aids in even cooling. Avoid placing them too close together, as they might stick to each other. A cooling rack placed over the parchment can also help air circulate around the entire apple, promoting faster and more uniform hardening of the main course dessert.
Allow complete cooling
Allow the candy apples to cool completely at room temperature. This can take anywhere from 30 minutes to an hour, or even longer, depending on your kitchen’s temperature and humidity. Do not refrigerate them, as this can cause the candy coating to become sticky or dull due to condensation. As they cool, the shiny, clear syrup will transform into a hard, brittle shell that audibly “cracks” when tapped. Once fully hardened, they will be ready to enjoy. A properly cooled candy apple should have a beautiful, glossy finish and a satisfying snap when bitten. Resist the temptation to handle them too much before they are completely set to prevent fingerprints or smudges on your perfect pineapple lemonade candy apples.
Enjoy Your Homemade Pineapple Lemonade Candy Apples
After all your careful preparation, precision cooking, and patient cooling, it’s finally time to savor the fruits of your labor! Your homemade pineapple lemonade candy apples are now ready to be enjoyed. These vibrant, zesty, and crunchy treats are a delightful twist on a classic, perfect for parties, special occasions, or simply a fun afternoon snack. The combination of the sweet, tangy pineapple lemonade coating with the crisp, tart apple inside creates a truly unforgettable flavor experience. Share them with friends and family, or keep them all to yourself – we won’t tell! Each bite offers a satisfying snap of candy followed by the refreshing juiciness of the apple, a perfect balance that makes these treats utterly addictive. There’s immense satisfaction in creating such a special and delicious dessert from scratch, knowing every step was handled with care to achieve perfection. These candy apples are not just a treat; they’re a celebration of flavor and a testament to the joys of home baking and candy making. Gather your loved ones and delight in these stunning, sweet creations.
Store Pineapple Lemonade Candy Apples Safely
Proper storage is essential to maintain the freshness and crispness of your homemade pineapple lemonade candy apples. While they are certainly best enjoyed fresh, knowing how to store them correctly means you can extend their delightful crunch for a little longer. Incorrect storage can lead to sticky coatings or soggy apples, which can quickly diminish the enjoyment of your hard work. By following a few simple guidelines, you can ensure that each candy apple remains a delicious and visually appealing sweet treat, ready to be enjoyed whenever a craving strikes. These storage tips focus on maintaining the integrity of both the candy shell and the apple itself.
Keep at room temperature
To preserve the hard, glossy candy coating, it’s crucial to store your candy apples at room temperature. Refrigeration can introduce condensation, causing the candy shell to become sticky and lose its crispness. Place the cooled and hardened candy apples individually in cellophane bags, tied securely with a ribbon, or in an airtight container. Make sure they are not touching each other to prevent them from sticking together, especially if there’s any slight humidity in the air. Store them in a cool, dry place away from direct sunlight. A pantry or countertop works perfectly. This method helps maintain the integrity of the hard crack candy and ensures your pineapple lemonade candy apples remain beautiful and crunchy.
Best eaten fresh
While you can store candy apples, they are undoubtedly at their absolute best when eaten fresh, ideally within 24-48 hours of making them. Over time, the moisture from the apple will eventually start to soften the candy coating, causing it to lose its snap. The crispness of the apple also begins to diminish after a couple of days. For the optimal experience, plan to make your homemade candy apples on the day you intend to serve them or the day before. This ensures you get that satisfying crunch and vibrant flavor that makes these treats so special. Enjoy the immediate gratification of your candy making efforts for the most delightful experience with your pineapple lemonade candy apples.
Key Tips for Perfect Candy Apples
Making candy apples can seem intimidating, but with a few key tips, you can achieve professional-looking and tasting results every time. These insights are born from common challenges faced in candy making and provide shortcuts to success. Focusing on these critical aspects will significantly improve your chances of creating flawless pineapple lemonade candy apples, ensuring a smooth, crisp coating and vibrant flavor. Understanding the science behind the process, particularly regarding sugar syrup, is fundamental. By adhering to these simple yet powerful rules, you’ll avoid common pitfalls and produce a sweet treat that is truly impressive and delicious.
Why a thermometer matters
We cannot stress this enough: a reliable candy thermometer is your most important tool for making perfect candy apples. Sugar syrup undergoes precise chemical changes at specific temperatures. Reaching the hard crack stage (300°F or 149°C) is not something you can eyeball. If the syrup doesn’t get hot enough, your coating will be gooey and sticky. If it gets too hot, it will burn, turning bitter and dark. Even a few degrees off can make a significant difference in texture and taste. Invest in a good quality thermometer and ensure it is calibrated correctly before use. This precision ensures your pineapple lemonade candy apples have that satisfying, brittle crunch every single time, making your candy making efforts worthwhile.
Don’t stir during boil
Once your sugar and liquids are combined and the sugar is dissolved, resist the urge to stir the syrup while it’s boiling. Stirring during this phase can cause sugar crystals to form on the sides of the pan. These crystals can then fall back into the boiling syrup, acting as “seeds” that initiate a chain reaction of crystallization throughout the entire batch. This results in a grainy, cloudy candy instead of a clear, smooth, and glossy coating. After the initial gentle stirring to dissolve the sugar, simply let the syrup boil undisturbed, monitoring the thermometer. If you see crystals forming on the sides, gently brush them down with a clean, damp pastry brush. This careful approach is vital for achieving that beautiful, professional finish on your delicious homemade desserts.
Quick Recipe Overview and Timing
Having a clear understanding of the recipe’s flow and timing can significantly help in planning your candy apple making session. This overview provides a concise summary of what to expect, from start to finish, allowing you to manage your time effectively and ensure a smooth process. Knowing the approximate preparation and cook times, along with the expected yield, helps you gauge the effort and output for your pineapple lemonade candy apples. This information is particularly useful if you’re making these for a specific event or gathering, ensuring you have enough time to get everything just right. It helps demystify the process and makes it more approachable for all skill levels.
Preparation and cook times
The preparation for pineapple lemonade candy apples typically takes around 20-30 minutes. This includes washing and drying the apples, inserting the sticks, and measuring out all your syrup ingredients. The actual cooking time for the candy syrup can vary slightly depending on your stovetop and saucepan, but generally ranges from 15-25 minutes to reach the hard crack stage (300°F). Remember, this cooking time requires constant monitoring of the thermometer. The dipping process itself is quite fast, usually taking 5-10 minutes for a batch of 6-8 apples. Finally, allow at least 30-60 minutes for the candy apples to cool and harden completely at room temperature. Factoring in these timelines will help you schedule your candy making adventure efficiently.
How many apples you get
This recipe typically yields 6-8 medium-sized candy apples. The exact number can depend on the size of the apples you choose and how thickly you coat them. If you plan to make a larger batch for a party or event, you can easily double or triple the recipe for the syrup, ensuring you have enough to coat all your apples without the syrup cooling too much. However, when increasing the batch size for the syrup, it’s often best to work in two separate batches to maintain optimal temperature control and prevent the syrup from crystallizing prematurely. Always ensure you have enough fresh, crisp apples on hand for your desired yield to create plenty of delicious pineapple lemonade candy apples for everyone to enjoy.
Nutrition Facts for Each Candy Apple
Understanding the nutrition facts for your homemade pineapple lemonade candy apples can be helpful, especially for those monitoring their dietary intake. While these are certainly a sweet treat, knowing the approximate calorie and sugar content allows you to enjoy them responsibly as part of a balanced diet. It’s important to remember that these are treats designed for indulgence, not a primary source of daily nutrients. The nutritional breakdown primarily reflects the sugar in the candy coating and the natural sugars in the apple, along with some fiber from the fruit. These details provide a simple overview, allowing you to make informed choices about enjoying your delicious creations.
Calories and sugar content
Each homemade pineapple lemonade candy apple, depending on the size of the apple and the thickness of the candy coating, typically contains around 200-250 calories. The majority of these calories come from the granulated sugar and corn syrup used in the candy shell. Expect approximately 40-50 grams of sugar per candy apple. This sugar content provides a quick energy boost, characteristic of most candy and dessert items. While apples themselves contain natural sugars, the added syrup significantly increases the overall sugar profile. These figures are estimates and can vary based on specific ingredient brands and preparation methods. Enjoying them in moderation is key to savoring this delightful homemade dessert.
Other simple details
Beyond calories and sugar, candy apples also provide a small amount of dietary fiber from the apple itself. They contain negligible amounts of fat and protein. The extracts used for flavoring contribute flavor but no significant nutritional value. These treats are primarily about indulgence and taste rather than nutritional benefits. Keep in mind that homemade versions allow for some control over ingredients, though the core nature of a candy apple means it will always be a sugar-rich item. Always consider these details as part of your overall dietary planning when enjoying these vibrant and crunchy pineapple lemonade candy apples.