
Homemade pineapple ice cream offers a delightful escape to tropical flavors right in your kitchen. Creating this refreshing dessert from scratch is surprisingly simple, yielding a creamy, vibrant treat that’s far superior to store-bought options. It’s perfect for summer gatherings or a sweet indulgence anytime.
Key Takeaways
- Crafting homemade pineapple ice cream offers superior taste and quality.
- The process is quick and involves straightforward steps using an ice cream maker.
- Selecting ripe, fresh pineapple is crucial for optimal tropical flavor.
- An ice cream maker ensures a smooth, creamy texture in your frozen dessert.
- Customization allows for adjusting sweetness and adding various fruit combinations.
This tropical dessert is a pure joy. Simple ingredients become a sweet dream. Your kitchen fills with a fruity scent. A refreshing treat awaits. Every scoop feels like sunshine.
Making Pineapple Ice Cream at Home
There’s nothing quite like the satisfaction of creating a homemade ice cream. When you choose to make homemade pineapple ice cream, you’re not just making a dessert; you’re crafting an experience. Unlike commercial versions that often rely on artificial flavors and excessive sugars, your homemade treat allows you to control every ingredient, ensuring a natural and authentic pineapple flavor. This results in a truly refreshing summer dessert that tastes vibrant and feels wholesome. It’s an opportunity to create a memorable sweet experience, perfect for sharing with family and friends.
Why Make Homemade Ice Cream?
Opting for homemade ice cream gives you complete authority over the quality of your ingredients. You can select the freshest dairy, choose your preferred type of sweetener, and, most importantly, pick the ripest, most flavorful pineapple. This level of control means your tropical dessert recipe will be free from preservatives, artificial colors, and unnecessary additives. The result is a richer, creamier, and more intensely flavored pineapple ice cream that store-bought varieties simply cannot match. It’s also a fun culinary project, allowing for personal touches and a sense of accomplishment.
Quick Prep, Easy Process
Despite its gourmet taste, the process for making pineapple ice cream at home is surprisingly simple and requires minimal active preparation time. Most of the work involves blending the ingredients and allowing your ice cream maker to do its magic, followed by a period of freezing. This makes it an ideal easy ice cream maker recipe for busy individuals or families looking for a delicious, yet uncomplicated, homemade treat. With just a few basic steps, you can have a delightful, creamy pineapple treat ready to chill, bringing tropical bliss straight to your table.
Gather Your Pineapple Ice Cream Ingredients
To create the most delicious homemade pineapple ice cream, starting with high-quality ingredients is key. The star of this dessert recipe is, of course, the pineapple, but the dairy and sweetener components are equally important for achieving that perfect creamy texture and balanced sweetness. Gathering everything before you begin will make the process smooth and enjoyable, setting you up for a successful batch of this delightful fresh fruit ice cream.
List of Fresh Pineapple Needs
For this recipe, fresh pineapple is highly recommended over canned options, as it provides a brighter, more intense flavor profile and a better texture. You’ll typically need one medium to large ripe pineapple. When selecting your pineapple, look for one that has a sweet aroma at its base, feels heavy for its size, and yields slightly to pressure. The skin should be golden-yellow, not green. Avoid pineapples with soft spots or mold. Once selected, you’ll peel, core, and chop the fruit, ensuring you get pure, sweet pineapple chunks ready for blending. This fresh choice truly makes a difference in the final taste of your creamy pineapple treat.
Other Dairy and Sweetener
Beyond the pineapple, the foundation of a rich, creamy ice cream lies in its dairy components and sweetener. You’ll typically need heavy cream, whole milk, and granulated sugar. The heavy cream contributes to the luscious, velvety texture that makes homemade ice cream so irresistible, while the whole milk helps balance the richness. The sugar not only sweetens the ice cream but also contributes to its smooth consistency, preventing it from freezing too hard. Some recipes might also include a touch of vanilla extract or a pinch of salt to enhance the overall flavor, creating a well-rounded and irresistible frozen dessert. For those interested in other sweet indulgence, try our peanut butter brownie swirl cookies.
Simple Steps for Tropical Bliss
Crafting your own homemade pineapple ice cream is a straightforward process, designed to deliver tropical bliss with minimal fuss. While there are a few distinct stages involved, from preparing the fruit to churning and freezing, each step is simple enough for even novice ice cream makers. Understanding the overall timeline and expected yield will help you plan your dessert preparation efficiently, ensuring a stress-free experience from start to finish. This easy ice cream maker recipe will quickly become a household favorite.
Total Time to Enjoy
The total time to enjoy your creamy pineapple treat is generally divided into three main phases: preparation, churning, and freezing. Active prep work, which includes peeling and blending the pineapple, along with mixing the base ingredients, usually takes about 15-20 minutes. The churning phase in your ice cream maker can range from 20-30 minutes, depending on your machine’s model and the desired consistency. Finally, the freezing phase, where the ice cream hardens to scoopable perfection, requires a minimum of 4-6 hours, though overnight freezing is often ideal. While it requires some patience, the hands-on time is quite brief, making it a relatively quick project to initiate for a delightful refreshing summer dessert.
Servings Per Batch
A typical batch of homemade pineapple ice cream, made with the ingredients outlined, usually yields around 6-8 servings. This makes it a perfect quantity for a family dessert, a small gathering, or for enjoying over several days. The exact number of servings can vary slightly depending on how generously you scoop and the size of your ice cream maker. If you’re planning for a larger crowd, consider doubling the recipe, provided your ice cream maker has the capacity. This ensures everyone gets to savor a generous portion of this delicious and simple fruit ice cream, bringing a taste of the tropics to all.
Preparing Your Pineapple for Ice Cream
The success of your homemade pineapple ice cream heavily relies on the quality and preparation of the pineapple itself. A truly exceptional tropical dessert recipe begins with selecting the finest fruit, ensuring its natural sweetness and vibrant flavor shine through. Proper preparation also ensures a smooth, consistent base that will churn beautifully into a creamy frozen dessert. Paying attention to these initial steps will significantly impact the final taste and texture of your irresistible treat.
Choosing the Best Pineapple
Selecting the right pineapple is paramount for a flavorful fruit ice cream. Look for a pineapple that smells sweet and fragrant at its base – a strong, sweet aroma indicates ripeness. It should also feel firm, but with a slight give when gently squeezed, and be heavy for its size. Avoid pineapples with soft spots, mold, or a sour smell. The color isn’t always the best indicator, as green pineapples can still be ripe, and yellow ones can be underripe. Trust your nose and touch. A perfectly ripe sweet pineapple will provide the ideal balance of tartness and sweetness for your ice cream, creating a truly refreshing summer dessert.
Blending Pineapple Smoothly
Once you’ve chosen your perfect pineapple, the next step is preparing it for the ice cream base. After peeling and coring, chop the fresh pineapple into small chunks. These chunks then need to be blended into a smooth puree. Use a blender or food processor to achieve a fine consistency. Some recipes suggest straining the puree through a fine-mesh sieve to remove any fibrous bits, which can result in an even silkier texture for your creamy pineapple treat. While straining is optional, it does contribute to a more refined mouthfeel. This perfectly blended pineapple forms the heart of your easy ice cream maker recipe, promising a delectable outcome.
Mixing the Pineapple Ice Cream Base
Once your fresh pineapple is pureed and ready, the next critical phase in making homemade pineapple ice cream is assembling the ice cream base. This involves carefully combining all the ingredients to create a homogeneous mixture that will churn into a smooth and creamy dessert. The correct mixing technique ensures that all flavors are well-integrated and that the sugar is fully dissolved, which is crucial for the final texture of your tropical treat. This simple recipe comes together quite quickly, leading you closer to a delightful frozen dessert.
Combining All Ingredients
To combine the ingredients for your pineapple ice cream base, start with a large bowl. Whisk together the heavy cream, whole milk, and the granulated sugar until the sugar begins to dissolve. Then, gently fold in your pureed sweet pineapple. Some recipes may also call for a touch of vanilla extract or a pinch of salt to enhance the overall flavor profile. Ensure all liquids are thoroughly combined, creating a uniform mixture. You might also consider chilling this mixture in the refrigerator for at least 30 minutes, or even a few hours, before churning. A well-chilled base churns more efficiently and results in a creamier, more consistent fruit ice cream. This pre-chilling step makes all the difference for an optimal outcome.
Dissolving Sugar Completely
The complete dissolution of sugar is a crucial step for achieving the perfect texture in your homemade pineapple ice cream. Undissolved sugar crystals can lead to a grainy, less pleasant mouthfeel in the final product. To ensure the sugar is fully incorporated, you can gently heat a portion of the milk and sugar mixture over low heat, stirring continuously until the sugar crystals are no longer visible. Make sure not to boil it. Once dissolved, remove it from the heat and combine with the remaining cold dairy and pineapple puree. This method guarantees a smooth, luxurious texture, preventing any crystallization and contributing to a truly creamy pineapple treat. For another delightful sweet treat, consider trying our quick Italian cream cake for your next gathering.
Churning Your Ice Cream Maker
The churning process is where the magic truly happens, transforming your liquid base into a creamy, scoopable homemade pineapple ice cream. Your ice cream maker is designed to aerate and chill the mixture simultaneously, preventing large ice crystals from forming and ensuring that signature smooth texture. Understanding how to properly use your machine will lead to the best results for your refreshing summer dessert.
Pouring Mixture into Machine
Before pouring, ensure your ice cream maker’s bowl is thoroughly frozen (if it’s a freezer-bowl type) and assembled according to its instructions. Once ready, carefully pour the chilled pineapple ice cream base into the ice cream maker’s frozen bowl, ensuring you do not overfill it. Most machines have a maximum fill line to allow for expansion as the mixture churns and aerates. Overfilling can prevent proper churning and potentially damage your machine. By following this simple rule, you guarantee an efficient churning process for your easy ice cream maker recipe, leading to a perfectly consistent creamy pineapple treat.
Following Maker Instructions
Every ice cream maker model has specific instructions, and adhering to them is key for achieving the best homemade ice cream. While the general principle of churning is the same, details like churning time, bowl freezing duration, and assembly can vary. Consult your owner’s manual for precise guidelines. Typically, the churning process for pineapple ice cream takes between 20 to 30 minutes. You’ll know it’s ready when the mixture has thickened to the consistency of soft-serve ice cream. At this point, it’s ready for its final freeze, promising a smooth and delightful frozen dessert experience.
Freezing for the Best Pineapple Ice Cream
After your homemade pineapple ice cream has been churned to a soft-serve consistency, it’s not quite ready for optimal enjoyment. The final crucial step is freezing, which allows the ice cream to firm up properly, developing that perfectly scoopable texture. This waiting period is essential for consolidating the flavors and ensuring your creamy pineapple treat reaches its peak deliciousness, becoming the best pineapple ice cream possible.
Transferring to a Container
Once your ice cream maker has finished churning, the pineapple ice cream will be soft and pliable. Gently transfer it from the ice cream maker bowl into an airtight freezer-safe container. Glass or shallow metal containers work well, as they help the ice cream freeze more quickly and evenly. Press a piece of parchment paper or plastic wrap directly onto the surface of the ice cream before sealing the container. This prevents the formation of ice crystals on top, which can lead to a less smooth texture. Proper transfer ensures your fresh fruit ice cream maintains its quality during the freezing process.
Minimum Freezing Time
For the best pineapple ice cream texture, a minimum freezing time of 4 to 6 hours is recommended. This allows the ice cream to harden sufficiently, making it easy to scoop and providing a more satisfying mouthfeel. For an even firmer and more stable consistency, especially if you prefer a harder scoop, freezing it overnight is ideal. While waiting can be hard when a delicious tropical dessert recipe is so close, this final freezing step is vital for achieving the luxurious creaminess and full flavor profile of your homemade treat. The patience will truly be rewarded with a refreshing summer dessert.
Enjoying Your Homemade Tropical Treat
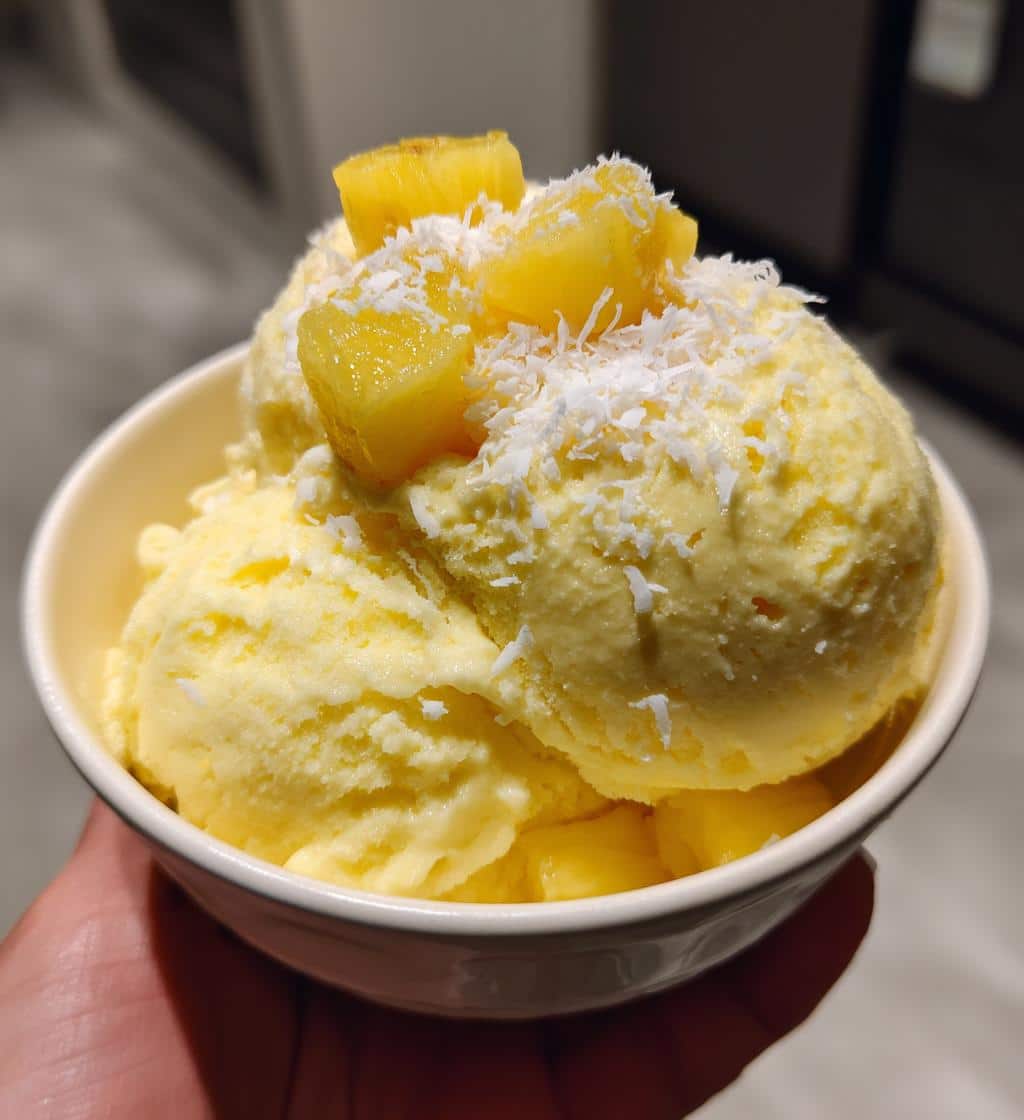
The moment has finally arrived! After all your efforts in preparation, churning, and freezing, it’s time to savor your delicious homemade pineapple ice cream. This vibrant, creamy pineapple treat is more than just a dessert; it’s a testament to the joy of making something wonderful from scratch. Each spoonful offers a refreshing burst of tropical flavor, making it the perfect conclusion to any meal or a delightful pick-me-up on a warm day. You’ve created a truly special frozen dessert.
Serving your homemade ice cream allows for creative touches. Scoop generous portions into chilled bowls or cones. For an extra touch of tropical flair, garnish with fresh pineapple chunks, a sprinkle of toasted coconut flakes, or a sprig of mint. A drizzle of honey or a sprinkle of lime zest can also enhance the bright flavors of the pineapple. The natural sweetness and subtle tartness of this fruit ice cream make it incredibly versatile. Whether enjoyed plain or adorned with toppings, your refreshing summer dessert is sure to bring smiles. Don’t forget to share your creations on social media! You can find inspiration and share your own recipes on Pinterest and Instagram, like the delightful Snickerdoodle cobbler.
Tips for Perfect Pineapple Ice Cream
Achieving the perfect pineapple ice cream involves more than just following the steps; it also means understanding how to fine-tune the recipe to suit your preferences and optimize for texture. These tips will help you create a truly exceptional creamy pineapple treat, ensuring every batch is as delightful as the last. Mastering these small adjustments can elevate your easy ice cream maker recipe to gourmet status, making your homemade treat truly shine.
Adjusting Sugar to Taste
Pineapples can vary significantly in sweetness, so adjusting the sugar content is crucial for a perfectly balanced fruit ice cream. Before churning, taste your ice cream base. If your fresh pineapple is particularly sweet, you might reduce the amount of added sugar. Conversely, if your pineapple is on the tart side, a little extra sugar can balance the flavors beautifully. Remember that ice cream tastes less sweet when frozen, so the base mixture should taste slightly sweeter than your desired final result. This customization ensures your homemade pineapple ice cream is always tailored to your preferred level of sweetness, making it a truly personal and refreshing summer dessert.
Churning for Creamier Texture
The duration and method of churning directly impact the creaminess of your pineapple ice cream. Always ensure your ice cream maker bowl is thoroughly frozen (usually 15-24 hours prior) for optimal chilling. Churn the mixture until it reaches the consistency of soft-serve. Over-churning can sometimes lead to a slightly grainy texture, while under-churning won’t incorporate enough air, resulting in a denser, icier product. The goal is to incorporate enough air to make it light and smooth without breaking the emulsion. For an extra creamy finish, some enthusiasts add a tablespoon of alcohol (like rum) or a tiny amount of cream cheese to the base; these ingredients help prevent large ice crystals from forming, contributing to an incredibly smooth and luxurious frozen dessert.
Nutritional Facts of Pineapple Ice Cream
When indulging in a delightful homemade pineapple ice cream, it’s natural to wonder about its nutritional profile. While this tropical dessert recipe is a sweet treat, making it at home gives you greater control over the ingredients, potentially making it a healthier option than many store-bought varieties. Understanding the basics of its caloric and macronutrient content can help you enjoy your creamy pineapple treat responsibly, especially if you’re mindful of your dietary intake.
Calories and Macronutrients
The caloric and macronutrient content of your pineapple ice cream will largely depend on the specific ingredients and their proportions. A typical serving made with full-fat dairy will contain calories primarily from fats (from heavy cream) and carbohydrates (from sugar and the natural sugars in fresh pineapple). Protein content will be relatively low, primarily from the milk solids. Using lighter dairy alternatives or reducing the added sugar can significantly impact these figures, potentially making it a more healthy ice cream option. For those monitoring their intake, a homemade version allows for precise tracking and modification, transforming a simple dessert recipe into a more mindful choice.
Sugar and Sodium Details
The sugar content in homemade pineapple ice cream comes from two main sources: the natural sugars present in the sweet pineapple and any added granulated sugar. While pineapple is a naturally sweet fruit, the added sugar is essential for both flavor and texture in ice cream. If you’re looking for a healthier dessert, you can reduce the amount of added sugar or explore natural sweeteners like honey or maple syrup, though these can affect the final texture. Sodium levels in homemade ice cream are typically very low, mostly originating from the dairy products themselves, unless salt is added to enhance flavor. Being aware of these details helps in making informed choices, allowing you to enjoy this refreshing summer dessert while managing your dietary goals.
Easy Variations for Your Ice Cream
One of the greatest joys of making homemade pineapple ice cream is the flexibility to experiment with easy variations, transforming a classic recipe into something uniquely yours. Your creamy pineapple treat can serve as a fantastic base for a multitude of other tropical dessert creations. Don’t be afraid to get creative and adapt this easy ice cream maker recipe to suit your preferences, or to use up other fruits you have on hand. It’s an excellent way to keep your homemade treat exciting and fresh, offering endless possibilities for a truly refreshing summer dessert.
Consider blending in other tropical fruits like mango, papaya, or passion fruit with your fresh pineapple for a multi-layered fruit ice cream experience. A swirl of toasted coconut flakes or a sprinkle of macadamia nuts during the final minutes of churning can add delightful texture and flavor. For an adult twist, a splash of coconut rum or a hint of ginger can elevate the tropical notes. If you’re looking for a dairy-free pineapple ice cream or vegan pineapple ice cream, simply substitute the heavy cream and milk with full-fat coconut milk or a blend of cashew and coconut cream. These alternatives create a rich, creamy texture without compromising on the delightful pineapple flavor. The possibilities are truly boundless, allowing you to continually enjoy new takes on this simple recipe.
Storing Leftover Pineapple Ice Cream
Even though your homemade pineapple ice cream is utterly delicious, there might be times when you have leftovers. Proper storage is crucial to maintain its creamy texture and prevent ice crystal formation, ensuring that every subsequent scoop is as delightful as the first. A little care in storage means your refreshing summer dessert remains a fantastic homemade treat for days to come, ready whenever a craving strikes.
To store your creamy pineapple treat effectively, transfer any leftover ice cream into an airtight, freezer-safe container immediately after serving. Try to choose a container that fits the remaining amount snugly, minimizing air exposure. For an extra layer of protection against freezer burn and ice crystals, press a piece of plastic wrap or parchment paper directly onto the surface of the ice cream before sealing the lid. Store the container in the coldest part of your freezer, typically at the back, away from the door, where temperature fluctuations are less severe. When stored correctly, your frozen dessert can maintain its quality for up to two weeks, allowing you to enjoy that sweet pineapple flavor whenever you desire.