
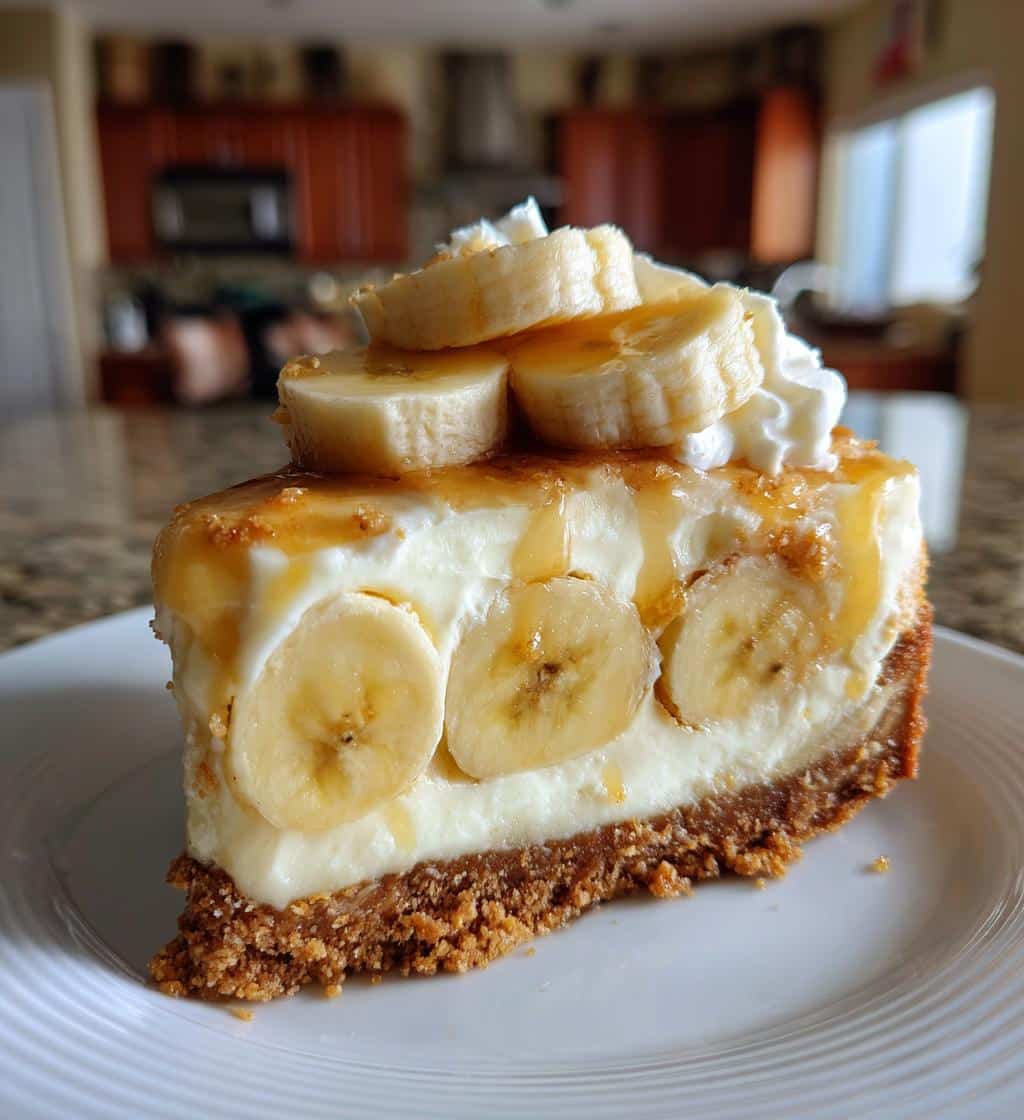
No bake banana pudding cheesecake offers a fantastic dessert experience without turning on the oven. This easy dessert features a luscious creamy texture, fresh ripe bananas, and a delightful graham cracker crust. It’s a quick treat, perfect for any gathering, promising simple, delicious layers that everyone will adore.
Key Takeaways
- This no bake dessert provides a simple and effortless way to enjoy a rich, creamy treat.
- Utilizing ripe bananas and a graham cracker crust creates a delightful flavor and texture combination.
- Layering components like the cheesecake filling and fresh bananas ensures a truly satisfying experience.
- Proper chilling time is crucial for achieving the perfect set and creamy texture.
- It’s an adaptable recipe, making it a family favorite and an ideal quick treat for various occasions.
This dessert is a true crowd-pleaser. It combines classic flavors perfectly. Enjoy sweet bananas and creamy cheese. No baking makes it super simple. Your guests will love every bite.
Making No Bake Banana Pudding Cheesecake Easily
Creating a no bake banana pudding cheesecake is remarkably straightforward, offering a delicious solution for those who love desserts but prefer to avoid using the oven. This easy dessert simplifies the baking process, transforming it into a fun, assembly-line task suitable for cooks of all skill levels. Its popularity stems from not only its incredible taste but also its convenience, making it a perfect quick treat for impromptu gatherings or busy weekdays. The appeal of a no bake approach means less cleanup and no need to worry about precise oven temperatures, allowing you to focus purely on flavor and presentation. This recipe delivers a satisfyingly rich and creamy texture that melts in your mouth, combining the best elements of banana pudding with the delightful tang of cheesecake.
Why this dessert is perfect
This dessert stands out as perfect for numerous reasons. Firstly, its no-bake nature makes it incredibly accessible, especially during warmer months when heating up the kitchen is undesirable. Secondly, it’s a wonderful make-ahead option, as it requires significant chilling time, which allows you to prepare it hours or even a day in advance. This flexibility is a huge plus for entertaining. Thirdly, it’s a surefire family favorite, appealing to both children and adults with its comforting flavors and rich, sweet profile. The combination of fresh ripe bananas, a buttery graham cracker crust, and a velvety smooth filling creates a harmonious blend that’s hard to resist. Its simple ingredients and quick assembly mean you can whip up an impressive dessert without any culinary stress, proving that delicious doesn’t always have to mean complicated.
Why This 7-Layer Delight Is Perfect
The allure of this 7-layer no bake banana pudding cheesecake lies in its simplicity and the delightful complexity of its combined textures and flavors. Each layer contributes uniquely to the overall experience, building from a sturdy base to a light, airy top. This layered dessert is a testament to how humble ingredients can come together to form something truly spectacular. The visual appeal of the distinct strata, showcasing the graham cracker crust, creamy filling, and fresh banana slices, adds to its charm, making it a centerpiece dessert that looks as good as it tastes. It’s the kind of treat that invites you to enjoy every spoonful, appreciating the thought put into each component without requiring hours in the kitchen.
No oven required
The primary advantage of this no bake banana pudding cheesecake is that absolutely no oven is required. This feature not only saves energy but also makes the recipe incredibly versatile. You can prepare this dessert in any kitchen, regardless of its oven capabilities, or even take it to a friend’s house to assemble without needing their baking facilities. For more no-bake inspirations, you might enjoy exploring other no-bake dessert options on Wikipedia. The lack of baking also minimizes the chance of common baking mishaps, like uneven cooking or burnt crusts, ensuring a consistently delicious outcome every time. This approach makes the entire process stress-free and enjoyable, highlighting the easy-to-follow steps that lead to a perfect final product.
Simple, delicious layers
The beauty of this cheesecake lies in its simple, delicious layers. From the moment you press down the graham cracker crust to the final flourish of whipped cream, each step is designed for ease and maximum flavor impact. The layers are not only easy to construct but also complement each other perfectly. You get the crunch of the crust, the smooth richness of the cheesecake, the softness of the bananas, and the light airiness of the whipped topping. This thoughtful construction ensures that every bite offers a harmonious blend of creamy texture and fruity sweetness. It’s a true testament to how straightforward ingredients can create a `layered dessert` that is both comforting and sophisticated, appealing to a wide range of palates and proving why it’s such a popular quick treat.
Gathering Items for Banana Pudding Cheesecake
Before you begin the exciting process of assembling your no bake banana pudding cheesecake, it’s crucial to gather all your ingredients and ensure they are ready to go. This simple step can significantly streamline your preparation, making the entire experience more enjoyable and efficient. Having everything laid out and measured prevents last-minute scrambles and ensures that you can move seamlessly from one step to the next. The beauty of this recipe lies in its reliance on simple ingredients that are readily available at most grocery stores, meaning you won’t need to hunt for exotic items. A well-stocked pantry and fridge are typically all you need to create this amazing dessert, a true testament to its accessibility and widespread appeal as a `family favorite`.
Full list of ingredients
To create this delightful `no bake banana pudding cheesecake`, you will need the following key `simple ingredients`:
- For the Crust: Graham cracker crumbs, granulated sugar, melted unsalted butter.
- For the Filling: Cream cheese (softened), granulated sugar, vanilla extract, instant banana pudding mix, cold milk, heavy whipping cream (or a pre-made whipped topping like Cool Whip).
- For the Layers and Topping: Fresh `ripe bananas`, additional graham cracker crumbs or vanilla wafers for garnish.
Ensuring you have these items on hand before starting will make the preparation process smooth and enjoyable, leading to a perfectly executed `layered dessert` that everyone will rave about. This careful preparation is part of what makes it such an easy dessert, allowing for a truly `creamy texture` in the final product.
Ensure ripe bananas
One of the most important components of this recipe, and often overlooked, is the ripeness of your bananas. To achieve the best flavor and `creamy texture` in your `no bake banana pudding cheesecake`, it is absolutely essential to use `ripe bananas`. Look for bananas that have developed several brown spots on their skin. These spots indicate that the starches have converted into sugars, resulting in a sweeter, more fragrant banana. Under-ripe bananas can be starchy and less flavorful, which will impact the overall taste of your dessert. Over-ripe bananas, while very sweet, might be too soft and mushy for neat slicing and layering. The ideal banana provides a perfect balance of sweetness, aroma, and firm-enough texture to hold its shape within the layers. This attention to detail with your main fruit will elevate your dessert from good to truly exceptional, making it a stand-out `quick treat`.
Preparing the Simple Crumb Base
Every magnificent `no bake banana pudding cheesecake` begins with a solid foundation, and in this case, it’s a simple yet incredibly flavorful `graham cracker crust`. This first layer provides a delightful contrast in texture to the smooth, creamy filling above it, offering a satisfying crunch with every bite. The ease of preparing this crust perfectly aligns with the `easy dessert` philosophy of the entire recipe. You don’t need any special baking skills or complicated techniques; just a few basic ingredients and a bit of pressing are all it takes. This step sets the stage for the rest of the dessert, contributing significantly to its overall appeal as a `family favorite` and ensuring a robust base for all the delicious layers to follow. Consider trying a similar dessert with a delightful crust, like these Vanilla Bean Creme Brulee Cheesecake Cupcakes.
Pressing graham cracker crust
To create your `graham cracker crust`, you’ll start by crushing graham crackers into fine crumbs. You can do this using a food processor for speed and consistency, or by placing them in a Ziploc bag and crushing them with a rolling pin for a more rustic texture. Once you have your crumbs, mix them thoroughly with granulated sugar and melted unsalted butter. The butter acts as a binding agent, helping the crumbs hold their shape once chilled. Press this mixture firmly into the bottom of your chosen springform pan. The key to a sturdy crust is even and compact pressing. Use the back of a spoon, the bottom of a glass, or your fingers to achieve a tight, uniform layer. A well-pressed crust will prevent crumbling when sliced and provide a clean foundation for your subsequent layers, ensuring the integrity of your `layered dessert` from bottom to top.
Creating the first layer
Once the graham cracker mixture is evenly pressed into your springform pan, you have successfully created the first, foundational layer of your `no bake banana pudding cheesecake`. This layer is more than just a base; it’s the starting point for the amazing combination of flavors and textures that will build upon it. After pressing, it’s a good idea to pop the crust into the refrigerator for at least 15-20 minutes while you prepare the filling. This brief chilling period helps the butter solidify, further firming up the `graham cracker crust` and preventing it from becoming soggy when the creamy filling is added. This simple step is crucial for achieving the perfect texture and stability for your `easy dessert`, contributing to the overall success of this `quick treat` and ensuring that it holds its shape beautifully when served.
Crafting Creamy Banana Pudding Cheesecake Filling
The heart of your `no bake banana pudding cheesecake` lies in its incredibly rich and `creamy texture` filling. This is where the magic truly happens, blending classic dessert flavors into a cohesive and irresistible component. Achieving the perfect consistency for this filling is key to the dessert’s success, ensuring each bite is smooth, luscious, and full of flavor. The process involves a few simple steps, combining dairy products with the delightful taste of banana pudding, making it an `easy dessert` to master. This filling is what ties all the layers together, providing that signature melt-in-your-mouth experience that makes this dessert a true `family favorite`. For more creamy dessert ideas, check out the wide range of options in our desserts category.
Mixing cream cheese smooth
The first step in creating your decadent filling is to ensure your cream cheese is perfectly smooth. Start with softened cream cheese – leaving it at room temperature for about 30 minutes to an hour before you begin makes a significant difference. In a large mixing bowl, beat the softened cream cheese with an electric mixer until it is light, fluffy, and completely free of lumps. This is crucial for achieving that silky, `creamy texture` that defines a good cheesecake. Once smooth, gradually beat in the granulated sugar and vanilla extract until well combined and the mixture is truly homogeneous. Taking your time with this initial step ensures a flawless base for the rest of your filling ingredients, contributing to the overall elegance of your `layered dessert`. You’ll want to aim for a consistency that is akin to a light, spreadable frosting.
Blending pudding and milk
Next, in a separate bowl, whisk together the instant banana pudding mix with cold milk. It’s important to use cold milk as it helps the pudding set faster and achieve a thicker consistency. Whisk vigorously for about two minutes, or until the pudding begins to thicken. It won’t be fully set at this point, but it should be noticeably thicker than when you started. This mixture brings the quintessential banana pudding flavor to your `no bake banana pudding cheesecake`, infusing it with that classic taste that everyone loves. Once thickened, gently fold this banana pudding mixture into your smooth cream cheese mixture. Be careful not to overmix, as you want to maintain the airy quality of the cream cheese. This combination forms the robust, flavorful core of your `easy dessert`. You might find similar techniques used in other delightful recipes, like these Peanut Butter Brownie Swirl Cookies.
Folding in whipped cream
The final component for your creamy filling is the whipped cream. If you’re using heavy whipping cream, beat it in a separate bowl until stiff peaks form. If using a thawed whipped topping (like Cool Whip), simply ensure it’s ready to use. Gently fold the whipped cream into the cream cheese and banana pudding mixture. The key here is “gently.” Overmixing can deflate the whipped cream, resulting in a less airy and `creamy texture`. The whipped cream lightens the entire filling, adding a wonderful fluffiness and delicate mouthfeel that perfectly complements the richer cream cheese base. This careful folding technique ensures your `no bake banana pudding cheesecake` filling is not only flavorful but also wonderfully light and smooth, making it an irresistible `quick treat`. It’s this final touch that contributes significantly to the delightful experience of this `layered dessert`.
Building Your 7 Delightful Layers
The construction of this `no bake banana pudding cheesecake` is where its visual appeal truly comes to life. Building the layers is an enjoyable process that transforms simple ingredients into an elegant and mouth-watering `layered dessert`. The arrangement isn’t just for aesthetics; it ensures that every slice offers a harmonious blend of textures and flavors – the firm `graham cracker crust`, the `creamy texture` of the filling, and the fresh, sweet `ripe bananas`. The care taken in this stage directly impacts the final presentation and overall enjoyment, making each serving a delightful experience. This attention to detail makes the dessert not just a meal-ender but a topic of conversation, a testament to its status as a `family favorite` and a truly special `quick treat`.
Arranging fresh banana slices
Once you have your chilled `graham cracker crust` and your luscious, `creamy texture` filling, it’s time to introduce the star fruit: the `ripe bananas`. Peel and slice your bananas into even rounds, about a quarter-inch thick. To prevent browning, you can lightly toss them in a little lemon juice, though for a dessert that will be eaten relatively quickly, this isn’t strictly necessary. Arrange a single layer of fresh banana slices directly over the chilled crust. Make sure they are placed closely together to ensure a good banana presence in every bite. This layer of `fresh banana slices` not only adds a burst of natural sweetness but also introduces a soft, yielding texture that contrasts beautifully with the other components. It’s a critical step in building the `layered dessert`’s iconic structure and flavor. For more insights on the fruit, consider reading about banana pudding on Wikipedia.
Pouring over banana layer
With your first layer of `fresh banana slices` meticulously arranged, it’s now time to add a generous portion of your `creamy texture` cheesecake filling. Carefully spoon about half of the prepared filling over the bananas, gently spreading it with an offset spatula or the back of a spoon to create an even layer. The goal is to fully cover the bananas without disturbing their arrangement. This step encapsulates the bananas, protecting them and allowing their flavor to meld beautifully with the cheesecake. Repeat this process: add another layer of `fresh banana slices` over the filling, then top with the remaining cheesecake mixture, spreading it smoothly across the top. This layering technique builds the dessert’s delightful height and ensures that each serving of your `no bake banana pudding cheesecake` showcases all the wonderful elements, promising an indulgent bite every time. It’s what transforms simple ingredients into a truly impressive `layered dessert`.
The Refrigeration Setting Process
The `refrigeration setting process` is arguably the most crucial step in creating a flawless `no bake banana pudding cheesecake`. While the assembly is quick and easy, allowing adequate `chilling time` is absolutely non-negotiable for achieving the desired `perfect texture` and structural integrity of this `layered dessert`. It’s during this period that the ingredients truly meld together, and the filling firms up into that distinct, sliceable cheesecake consistency. Rushing this stage can lead to a runny, disappointing dessert that doesn’t hold its shape, detracting from all your hard work. Patience here is a virtue, ensuring that your `easy dessert` is not only delicious but also beautifully presented. This is where the magic truly happens, transforming individual components into a cohesive, sliceable delight that is a true `family favorite`.
How long to chill
For your `no bake banana pudding cheesecake` to set properly and achieve its `perfect texture`, it needs a minimum of 4-6 hours of `chilling time` in the refrigerator. However, for the absolute best results, allowing it to chill overnight (8-12 hours) is highly recommended. This extended period ensures that the cream cheese mixture firms up completely, the flavors have ample time to meld, and the `graham cracker crust` softens just enough to be easily cut but remains distinct. The longer chilling also helps the `fresh banana slices` to integrate seamlessly into the `creamy texture` of the filling. Covering the cheesecake loosely with plastic wrap during chilling prevents it from absorbing any refrigerator odors and keeps the surface fresh. This dedication to chilling time will reward you with a dessert that is not only visually stunning but also holds its shape beautifully when sliced.
Achieving perfect texture
`Achieving perfect texture` is directly linked to sufficient `chilling time`. When properly refrigerated, your `no bake banana pudding cheesecake` will transform from a soft, spreadable mixture into a firm, yet wonderfully `creamy texture` that can be cleanly sliced. The cold temperature allows the fats in the cream cheese and whipped cream to solidify, and the pudding mix to fully set. The `graham cracker crust` will also become pleasantly firm but still crumbly. This contrast between the crunchy base, the smooth, cool filling, and the soft banana slices is what makes this dessert so incredibly satisfying. A perfectly set cheesecake should feel firm to the touch but still have a slight give, indicating its rich, indulgent consistency. If your cheesecake seems too soft after the recommended chilling period, simply return it to the refrigerator for a few more hours. This ensures your `easy dessert` is ready to impress with its ideal consistency and makes it a delightful `quick treat`.
Serving Your Amazing No Bake Dessert
After patiently allowing your `no bake banana pudding cheesecake` to chill to `perfect texture`, the moment of truth arrives: serving this amazing `layered dessert`. The presentation is almost as important as the taste, especially for a `family favorite` that’s meant to impress. Taking a few extra steps during serving can elevate the entire experience, making your `easy dessert` truly unforgettable. Whether it’s for a casual gathering or a special occasion, serving your cheesecake with flair will highlight its beauty and deliciousness, solidifying its place as a treasured `quick treat`. Be prepared for compliments, as this dessert is designed to delight both the eyes and the palate, a testament to its creamy texture and fresh ingredients. Share your beautiful creations with us on Pinterest!
Slicing for best presentation
To ensure the best presentation when slicing your `no bake banana pudding cheesecake`, a few tips can make all the difference. First, make sure the cheesecake is thoroughly chilled; a cold dessert is easier to slice cleanly. To remove the cheesecake from the springform pan, simply release the latch and carefully lift the ring away. Dip a sharp, thin-bladed knife in hot water and wipe it clean between each cut. This technique helps to create clean, precise slices without dragging the filling or disturbing the layers. For an extra touch, you can garnish each slice with a dollop of fresh whipped cream, a sprinkle of reserved graham cracker crumbs, or an additional `fresh banana slices`. These small details enhance the visual appeal and reinforce the `creamy texture` and banana flavor, making each portion a work of art. Presenting this `easy dessert` with such care will surely make it a memorable `quick treat` for your guests.
Tips for a Perfect Banana Cheesecake
Achieving a truly perfect `no bake banana pudding cheesecake` is well within reach with a few key considerations. While the recipe is inherently an `easy dessert`, paying attention to certain details can elevate your creation from good to absolutely outstanding. These tips focus on maximizing flavor, ensuring the `creamy texture` is just right, and guaranteeing a smooth, enjoyable preparation process. Implementing these suggestions will make your `layered dessert` a consistent success, reinforcing its status as a `family favorite` and a reliable `quick treat`. It’s all about enhancing the natural goodness of `simple ingredients` and ensuring every component shines through in the final product. Try some of these tips with other desserts like our Quick Italian Cream Cake for great results.
Keep it cold
The golden rule for any `no bake banana pudding cheesecake` is to `keep it cold`. This cannot be stressed enough. Coldness is what allows the cheesecake filling to set to its ideal `creamy texture` and prevents it from becoming a gooey mess. From the moment you assemble the `layered dessert` until it’s ready to be served, refrigeration is your best friend. Even after serving, any leftovers should be promptly returned to the fridge. Exposure to warm temperatures will cause the filling to soften rapidly, compromising its structure and delightful mouthfeel. If you’re serving this `quick treat` at an outdoor gathering or a warm indoor event, consider placing the serving platter on a bed of ice or returning it to the refrigerator between servings to maintain its optimal chill. This diligence will ensure every slice is as perfect as the first, maintaining its integrity and refreshing qualities.
Storing Leftovers for Freshness
While a `no bake banana pudding cheesecake` is often devoured quickly, it’s always good to know how to properly store any leftovers to maintain their freshness and delicious `creamy texture`. Proper storage ensures that you can enjoy this `easy dessert` for a few extra days, making it an even more convenient `quick treat`. The key is to protect it from air exposure and potential odors in the refrigerator, preserving its delicate flavor profile. By following simple storage guidelines, you can extend the life of your `layered dessert`, ensuring that each subsequent serving is as delightful as the first. This attention to detail is part of what makes this `family favorite` so enjoyable, allowing you to savor it over time. Don’t forget to follow us on Instagram for more delicious recipes and tips!
Refrigerate tightly covered
To keep your `no bake banana pudding cheesecake` leftovers fresh, it is imperative to `refrigerate tightly covered`. If your springform pan comes with a lid, use it. Otherwise, tightly wrap the remaining cheesecake with plastic wrap, ensuring that it makes good contact with the surface of the dessert to prevent a skin from forming and to minimize air exposure. An airtight container is another excellent option if the cheesecake slices can fit without being squashed. Proper covering prevents the bananas from browning excessively (though some browning is natural over time), keeps the `creamy texture` intact, and prevents the dessert from absorbing any unwanted flavors or odors from other foods in your refrigerator. Stored correctly, the cheesecake can remain fresh for 2-3 days. While it’s best enjoyed within the first day or two for optimal banana freshness, a well-covered leftover is still a delightful `quick treat`.
Kitchen Tools You Will Need
Preparing a `no bake banana pudding cheesecake` is a relatively low-fuss affair when it comes to kitchen tools, which aligns perfectly with its designation as an `easy dessert`. You won’t need specialized baking equipment, but having a few standard kitchen items on hand will make the process smooth and efficient. Gathering these tools before you start ensures a seamless progression through each step of creating your `layered dessert`, from the `graham cracker crust` to the final `creamy texture` filling. Being prepared saves time and effort, allowing you to focus on the joy of creating this `family favorite` without any interruptions. For more dessert tool recommendations, browse recipes like Snickerdoodle Cobbler on our site.
Springform pan essential
The most crucial kitchen tool for a `no bake banana pudding cheesecake` is a `springform pan`. An 8 or 9-inch springform pan is essential because its detachable sides make it incredibly easy to release the delicate `layered dessert` without damaging its structure. Unlike a regular cake pan, where you’d have to invert the cake, a springform pan allows you to simply unlatch the ring and lift it away, leaving your perfectly formed cheesecake freestanding on its base. If you don’t have a springform pan, a deep pie dish or a regular cake pan lined with parchment paper (with overhangs to lift the dessert out) can work, but the presentation won’t be as clean. Other useful tools include a large mixing bowl, an electric mixer (handheld or stand mixer) for achieving that smooth `creamy texture` in your filling, a whisk, a rubber spatula for folding ingredients, and a measuring cups and spoons. A food processor is also handy for making fine `graham cracker crust` crumbs.
No Bake Banana Pudding Cheesecake Nutrition
Understanding the nutritional aspects of your `no bake banana pudding cheesecake` can help you enjoy this `easy dessert` as part of a balanced diet. While this `layered dessert` is undeniably a delicious `quick treat` and a `family favorite`, it’s also important to be mindful of its components. Made with `simple ingredients` like cream cheese, sugar, and `ripe bananas`, it offers a rich and indulgent experience. Nutritional information can vary significantly based on specific ingredient brands, portion sizes, and any substitutions made. However, a general understanding of the facts can help in conscious consumption, allowing you to savor its `creamy texture` responsibly. This knowledge allows you to enjoy every bite with awareness, making it an even more satisfying part of your culinary repertoire.
Facts at a glance
At a glance, a typical serving of `no bake banana pudding cheesecake` will likely be a source of calories, fats (from cream cheese, butter, and whipped cream), and carbohydrates (from sugar, graham crackers, and bananas). The `ripe bananas` contribute natural sugars, potassium, and some dietary fiber, while dairy components like cream cheese and milk provide protein and calcium. The instant pudding mix and `graham cracker crust` add to the carbohydrate content, primarily from sugars and starches. As an indulgent `easy dessert`, it’s generally best enjoyed in moderation. If you’re looking to modify the nutritional profile, you might consider using low-fat cream cheese, sugar substitutes, or whole-grain graham crackers, though these changes might slightly alter the `creamy texture` and flavor. Always refer to the specific nutritional labels of the `simple ingredients` you use for precise information, making informed choices about this delightful `layered dessert`.