
Maple donut bars are a fantastic way to enjoy a sweet breakfast or snack. This simple baking project yields delicious homemade sweet treats perfect for sharing. With easy-to-follow steps, anyone can create these delightful glazed bars. Get ready to enjoy the rich maple flavor!
Key Takeaways
- Making maple donut bars at home is a simple and rewarding baking experience.
- Gathering precise ingredients ensures the best texture and flavor for your treats.
- Proper mixing techniques are crucial to achieve a light, fluffy donut bar.
- Cooling and glazing steps are essential for a perfect finish and delightful presentation.
- These homemade sweet treats are versatile, perfect as a snack, dessert, or sweet breakfast item.
Craving a cozy treat? These bars are simple. They offer rich maple flavor. Perfect for any sweet moment. Enjoy homemade sweet treats easily.
Why Make Maple Donut Bars?
Enjoy homemade sweet treats
There’s something uniquely satisfying about creating homemade sweet treats. The aroma filling your kitchen, the joy of serving something you’ve crafted yourself, and the unbeatable taste of fresh ingredients combine to make baking an incredibly rewarding experience. These maple donut bars offer all that and more. Forget the drive-thru; with this easy recipe, you can whip up a batch of soft, maple-infused bars that taste even better than store-bought. They’re perfect for a leisurely Sunday morning sweet breakfast, an afternoon pick-me-up, or a delightful dessert after dinner. The rich maple flavor brings a comforting warmth that appeals to all ages, making them an instant family favorite.
Beyond the delightful taste, making these bars allows for complete control over the ingredients, ensuring you know exactly what goes into your family’s snacks. It’s a healthier alternative to many processed options and a fantastic way to spend quality time in the kitchen, either by yourself or with loved ones. If you love baking sweet indulgences, you might also enjoy our Quick Italian Cream Cake or perhaps explore more dessert recipes on our site.
Simple baking for everyone
One of the best aspects of this recipe is its accessibility. It truly embodies simple baking, making it ideal for beginners and seasoned bakers alike. You don’t need fancy equipment or advanced techniques to achieve spectacular results. The steps are straightforward, designed to guide you smoothly from start to finish. This makes it a wonderful project for introducing children to the joys of baking or for a casual afternoon in the kitchen when you’re looking for a relaxing culinary activity. The process is forgiving, and the results are consistently delicious, guaranteeing a smile with every bite. These bars are a testament to how simple ingredients can come together to create a truly delicious dessert recipe that everyone will adore. Enjoy the ease and the incredible taste!
Gather Ingredients for Donut Bars
Pantry staples you will need
To embark on your maple donut bars journey, you’ll find that most of the required items are likely already in your kitchen pantry. This recipe cleverly utilizes common baking staples, ensuring a smooth and fuss-free preparation process. You’ll need all-purpose flour, granulated sugar, baking powder, and a pinch of salt for the dry components. For the wet ingredients, have milk, unsalted butter (melted), large eggs, pure vanilla extract, and, of course, the star ingredient: pure maple syrup. For the simple glaze, powdered sugar and a touch more milk are all it takes. Having everything measured out and ready before you begin, a technique often called “mise en place,” will significantly streamline your simple baking experience and help you avoid any last-minute scrambles. This careful preparation is key to creating consistently delightful homemade sweet treats.
Measuring all components accurately
Accuracy in measuring is paramount for baking success, especially when aiming for that perfect donut-like texture. While cooking often allows for a bit of improvisation, baking is a science where ratios matter. Using proper measuring cups for dry ingredients (leveling them off with a straight edge) and liquid measuring cups for wet ingredients (reading at eye level) will ensure your batter has the correct consistency. For precise results, especially with flour, consider using a kitchen scale. This prevents common issues like overly dense or dry bars. Pay particular attention to the maple syrup measurement; its quantity not only imparts the signature maple flavor but also contributes to the overall moisture content. Accurate measurements are the foundation of this delicious dessert recipe, setting you up for a batch of incredibly tasty maple donut bars.
Preheat Oven and Prepare Pan
Set oven temperature correctly
Before you even begin mixing ingredients for your maple donut bars, it’s crucial to preheat your oven to the correct temperature. For this easy recipe, you’ll typically be aiming for around 350°F (175°C). Ovens can fluctuate, so allowing ample time for the oven to reach and stabilize at this temperature is key to even baking. A properly preheated oven ensures that the leavening agents in your batter, such as the baking powder, activate immediately upon entering the heat, resulting in a light and airy texture. If the oven is not hot enough, your bars might not rise properly, leading to a denser, less appealing result. Always check your oven’s temperature with an oven thermometer for the most accurate reading, especially if you suspect your oven runs hot or cold.
This initial step might seem minor, but it plays a significant role in the success of your homemade sweet treats. An underheated oven can lead to bars that are doughy in the center, while an overheated one can cause them to brown too quickly on the outside before they’re fully cooked internally. Taking these few extra minutes to ensure your oven is perfectly ready will make all the difference in achieving those perfectly baked maple donut bars.
Grease your baking dish
Once your oven is preheating, your next task is to prepare your baking pan. For maple donut bars, an 8×8 or 9×13 inch baking dish (depending on desired thickness and yield) works wonderfully. It’s essential to grease the pan thoroughly to prevent the bars from sticking, which would make removal difficult and potentially ruin their beautiful presentation. You can use butter, shortening, or a non-stick baking spray. If using butter or shortening, ensure you coat all inner surfaces, including the corners and up the sides. For an extra layer of non-stick insurance and easier removal, consider lining the greased pan with parchment paper, leaving an overhang on two sides. This creates “handles” that allow you to lift the cooled bars out of the pan effortlessly before cutting. This simple preparation step is vital for ensuring your delicious dessert recipe not only tastes great but also looks perfect when served, whether it’s for a sweet breakfast or a special dessert.
Combine Dry Ingredients First
Flour, sugar, baking powder
The foundation of any good baking recipe often starts with properly combining the dry ingredients. For your maple donut bars, this means bringing together all-purpose flour, granulated sugar, and baking powder. The flour provides the structure for your bars, while the sugar contributes sweetness and helps with browning and moisture retention. The baking powder is a crucial leavening agent; it reacts with liquids and heat to produce carbon dioxide gas, which creates those lovely air pockets, giving your donut bars their characteristic light and fluffy texture. It’s important to use fresh baking powder, as its potency can diminish over time, affecting the rise of your baked goods. Before adding any wet ingredients, whisk these components together thoroughly in a large bowl. This initial mixing ensures that the leavening agents and sugar are evenly distributed throughout the flour, preventing pockets of unmixed ingredients and guaranteeing a uniform rise and consistent flavor in every bite of your homemade sweet treats.
Add salt to dry mixture
Don’t forget the salt! While it might seem counterintuitive to add salt to a sweet treat, a small amount of salt plays a critical role in enhancing the overall flavor of your maple donut bars. It doesn’t make the bars taste salty; rather, it brightens the sweetness of the sugar and maple syrup, creating a more balanced and complex flavor profile. Salt also helps to temper any bitterness from the baking powder. Adding it to the dry mixture ensures it’s fully dispersed, preventing any concentrated salty spots. After adding the salt, give the dry ingredients another good whisk to ensure everything is thoroughly combined. This attention to detail, even for seemingly minor ingredients, is what elevates an easy recipe from good to truly exceptional. These perfectly balanced flavors are key to a truly delicious dessert recipe that will have everyone asking for more.
Whisk Wet Ingredients Separately
Milk, butter, eggs, vanilla
With your dry ingredients standing by, it’s time to prepare the wet components for your maple donut bars. In a separate medium bowl, whisk together the milk, melted unsalted butter, large eggs, and pure vanilla extract. The milk adds moisture and helps activate the baking powder. Melted butter contributes richness and tenderness to the bars, giving them a delightful crumb. Eggs serve multiple functions: they provide structure, moisture, and help bind all the ingredients together, contributing to the overall rise and texture. Pure vanilla extract is essential for its aromatic qualities, enhancing the sweetness and complexity of the maple flavor without overpowering it. Whisk these ingredients vigorously until they are well combined and smooth. This creates a uniform liquid base that will integrate seamlessly with your dry ingredients, ensuring consistent moisture and flavor throughout your homemade sweet treats. Preparing wet ingredients separately is a standard baking practice that guarantees even distribution.
Include maple syrup now
Now for the star of the show: pure maple syrup! This is the moment when your maple donut bars truly begin to take on their signature maple flavor. Add the specified amount of high-quality maple syrup to your bowl of wet ingredients. Choose a good quality, pure maple syrup for the best results; artificial maple flavoring won’t deliver the same depth or natural sweetness. Whisk it in thoroughly with the milk, butter, eggs, and vanilla until everything is fully incorporated. The syrup not only imparts its distinct taste but also adds to the liquid content, contributing to the moist texture of the finished bars. This careful blending of wet ingredients ensures that every bite of your delicious dessert recipe will be infused with that irresistible maple goodness, making these bars a delightful sweet breakfast or snack. This step is crucial for defining the unique character of these homemade sweet treats.
Gently Mix Wet and Dry
Combine until just blended
This stage is where the magic truly begins to happen, transforming separate ingredients into a cohesive batter for your maple donut bars. Pour the wet ingredient mixture into the bowl containing your dry ingredients. Using a spatula or a wooden spoon, gently begin to fold them together. The key word here is “gently.” You want to mix just until the flour streaks have disappeared and the batter is homogeneous. It’s perfectly fine, and even desirable, for the batter to appear a little lumpy. Overmixing is the enemy of tender baked goods. When flour is overmixed, gluten develops too much, resulting in a tough, chewy texture that is undesirable for delicate homemade sweet treats like donut bars. Aim for minimal agitation to keep the gluten development in check and ensure a light and soft crumb for your delicious dessert recipe. This careful approach to mixing is a hallmark of simple baking that yields superior results.
Avoid overmixing the batter
Seriously, resist the urge to keep mixing! The moment you see the dry and wet ingredients come together into a unified batter, stop. Even an extra few seconds of stirring can impact the final texture of your maple donut bars. Overmixing can also cause the leavening agents, like baking powder, to lose some of their gas before the batter even hits the oven, leading to a poorer rise. A slightly lumpy batter is a sign of a well-mixed batter for many quick breads and bar recipes; those small lumps will usually smooth out during the baking process. Trust the process and your gentle technique. This mindful approach ensures that your sweet breakfast or dessert will be perfectly tender and moist, with that melt-in-your-mouth quality you expect from a great donut treat. Remember, less is often more when it comes to combining wet and dry ingredients in baking. This easy recipe relies on this delicate balance for its success.
Bake Your Maple Donut Bars
Pour batter into greased pan
With your perfectly mixed batter ready, carefully pour it into the greased (and possibly parchment-lined) baking pan you prepared earlier. Use a spatula to scrape out all the batter from the mixing bowl, ensuring you don’t leave any of that delicious goodness behind. Once the batter is in the pan, gently spread it out evenly using the back of your spatula, reaching into the corners. Try to create a smooth, level surface. This helps ensure uniform baking, so all your maple donut bars cook at the same rate and have a consistent height. Avoid pressing down too firmly, as this can compact the batter and affect its light texture. A gentle touch here is all that’s needed. Place the pan into your preheated oven immediately after filling it. Prompt transfer to the oven allows the leavening agents to work efficiently, contributing to the airy texture of these homemade sweet treats. This simple baking step is crucial for a great outcome.
Check for doneness with toothpick
The baking time for your maple donut bars will typically be around 25-30 minutes, but ovens vary, so it’s always best to rely on visual cues and a simple test for doneness. As the bars bake, your kitchen will fill with the irresistible aroma of maple flavor. Look for the edges to be lightly golden brown and the center to appear set. To confirm doneness, insert a clean wooden toothpick into the center of the bars. If it comes out clean or with only a few moist crumbs attached, your bars are ready. If there’s wet batter, continue baking for a few more minutes and test again. Be careful not to overbake, as this can lead to dry bars. Once baked to perfection, remove the pan from the oven. These delicious dessert recipe bars are now one step closer to being a delightful sweet breakfast or snack. This easy test ensures your homemade sweet treats are cooked just right.
Cooling Donut Bars Properly
Allow bars to cool fully
Patience is a virtue, especially when it comes to baking, and cooling your maple donut bars properly is no exception. Once removed from the oven, let the pan of bars cool on a wire rack for at least 15-20 minutes before attempting to lift them out. This initial cooling period allows the bars to set up further and become more stable. After this initial rest, use the parchment paper overhangs (if you used them) to gently lift the entire slab of bars out of the pan and transfer them directly to the wire rack to cool completely. This means waiting until they are entirely at room temperature, which could take an hour or more. Resist the urge to rush this step! Warm bars are fragile and can break easily if handled too soon. Proper cooling is crucial for achieving the ideal texture and ensuring they hold up well when sliced. This simple cooling phase is just as important as the baking itself for these homemade sweet treats.
Essential before adding glaze
Cooling fully is absolutely essential before adding glaze. If you apply the glaze to warm or hot maple donut bars, the heat will melt the powdered sugar, causing the glaze to become thin, runny, and translucent. Instead of a beautiful, opaque coating, you’ll end up with a watery mess that soaks into the bars rather than sitting elegantly on top. A fully cooled bar will allow the glaze to set properly, forming a smooth, slightly crisp shell that provides that delightful contrast in texture. This step ensures your delicious dessert recipe looks as good as it tastes. So, even though the aroma of fresh baking might be tempting you to dive in, give your homemade sweet treats the time they need to cool completely. This attention to detail will result in perfectly glazed maple donut bars, ideal for a sweet breakfast or a special snack.
Prepare the Simple Glaze
Mix powdered sugar, a little milk
A maple donut bar wouldn’t be complete without a luscious glaze. This easy recipe features a simple glaze that comes together in mere minutes. In a medium bowl, combine powdered sugar (also known as confectioners’ sugar) with a small amount of milk. The powdered sugar provides the body and sweetness, while the milk thins it to the desired consistency. You can use any type of milk you have on hand – whole milk will give a slightly richer glaze, while skim milk works just as well. Start with about 1 cup of powdered sugar and 1-2 tablespoons of milk, whisking vigorously until smooth. For an extra touch of maple flavor, you can even substitute a portion of the milk with a small amount of pure maple syrup in the glaze mixture, further enhancing these homemade sweet treats. This quick preparation is part of what makes this a truly simple baking project.
Adjust consistency as desired
The beauty of this simple glaze is how easily you can customize its consistency. After your initial whisking, assess the thickness. If you prefer a thinner, more translucent glaze that will lightly coat the maple donut bars, add a tiny bit more milk, half a teaspoon at a time, whisking well after each addition until you reach your desired pourable consistency. If you find the glaze is too thin, you can thicken it by adding a tablespoon or two more of powdered sugar until it reaches a richer, more opaque consistency. A good rule of thumb for a perfect donut glaze is that it should be thick enough to cling to a spoon but still flow off slowly. This adjustability ensures your delicious dessert recipe will have the perfect finishing touch, whether it’s a generous coating for a rich dessert or a delicate drizzle for a sweet breakfast. Get creative and find your ideal glaze! For other fantastic dessert ideas, check out our Snickerdoodle Cobbler.
Drizzle Glaze on Maple Donut Bars
Spread glaze evenly across
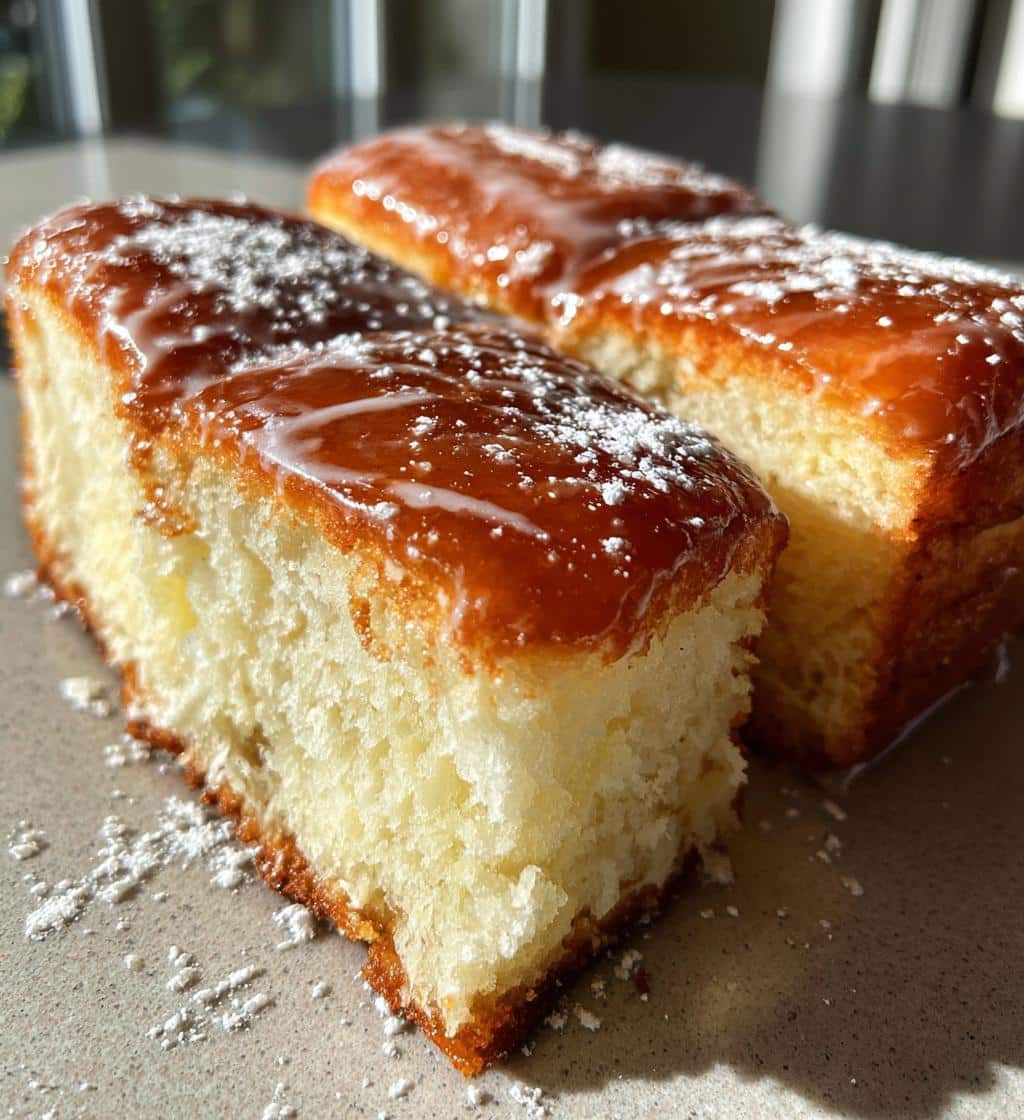
Once your maple donut bars are completely cool and your glaze is at the perfect consistency, it’s time for the final, delicious touch. You can apply the glaze in several ways. For an even coating, simply pour the entire batch of glaze over the center of the cooled bars. Then, using an offset spatula or the back of a spoon, gently spread the glaze evenly across the entire surface, making sure to cover all edges. The glaze should flow smoothly, creating a uniform, opaque layer that will set beautifully. This method ensures every single homemade sweet treat gets a generous topping of the sweet goodness, enhancing the maple flavor. If you prefer a more artistic, drizzled look, you can use a spoon to zig-zag the glaze over the bars or even transfer the glaze to a piping bag with a small round tip or a Ziploc bag with a corner snipped off for more controlled lines. This simple step elevates the presentation of your delicious dessert recipe.
Let the glaze set lightly
After applying the glaze, the final act of patience is required: allowing it to set. This usually takes about 15-30 minutes, depending on the thickness of your glaze and the humidity in your kitchen. As the glaze dries, it will transform from a wet, sticky coating into a slightly firm, matte, or subtly shiny shell. This firm set prevents the glaze from smudging when you cut and serve the bars, ensuring a clean presentation. You can even place the glazed bars in the refrigerator for a few minutes to speed up the setting process, especially if you’re in a hurry to enjoy your sweet breakfast or snack. Once the glaze is set to your liking, your maple donut bars are officially ready for slicing and enjoying. This careful attention to the final details ensures that your homemade sweet treats not only taste amazing but also look professionally baked, making them perfect for sharing.
Serving Your Homemade Treats
Cut into 12 perfect bars
With the glaze perfectly set, your magnificent maple donut bars are ready to be transformed from a slab into individual portions. For uniform and aesthetically pleasing bars, use a sharp knife and clean it between each cut to prevent the glaze from dragging. If you used an 8×8 inch pan, you can typically cut the bars into 3 rows by 4 columns to yield 12 perfectly sized bars. For a 9×13 inch pan, you might opt for 3 rows by 6 columns for 18 bars, or fewer larger ones if desired. Take your time with the cuts to ensure clean edges, showcasing your simple baking prowess. Each bar should reveal a tender, moist interior with that irresistible maple flavor, topped with a sweet, delicate glaze. These homemade sweet treats are now ready to be enjoyed as a delightful sweet breakfast, a satisfying snack, or a truly delicious dessert recipe. Share them on a platter for guests or keep them all to yourself!
Total time is about 45 minutes
One of the many appealing aspects of this maple donut bars recipe is its relative quickness. From start to finish, including prep, baking, and cooling (before glazing), the total active time you’ll spend in the kitchen is impressively short—roughly 45 minutes. This makes it an ideal easy recipe for when you crave homemade sweet treats but don’t have hours to dedicate to baking. While the cooling time adds a little extra wait, the hands-on work is minimal, making it a perfect weekend project or even a weeknight indulgence. The swift turnaround means you can go from craving to enjoying these flavorful bars in under an hour and a half, including the full cooling and setting time. It’s efficiency meets deliciousness, proving that amazing desserts don’t always require extensive effort. For more quick and easy dinner options, consider our Easy Honey Garlic Chicken. Or for a delightful breakfast, try our Hawaiian Roll French Toast.
Tips for Best Donut Bars
Store bars in airtight container
To keep your maple donut bars fresh and delicious for as long as possible, proper storage is key. Once the glaze has fully set, arrange the bars in a single layer inside an airtight container. If you need to stack them, place a piece of parchment paper or wax paper between layers to prevent the glaze from sticking. Store the container at room temperature for up to 3-4 days. While refrigeration can extend their shelf life, it sometimes affects the texture, making the bars a bit drier, and the glaze can become sticky. Enjoying them at room temperature will ensure the best texture and the most vibrant maple flavor. These homemade sweet treats are so good, they rarely last long enough to worry about extended storage!
Add nuts or chocolate chips
While these maple donut bars are phenomenal on their own, don’t hesitate to get creative with add-ins! Before baking, you can gently fold in half a cup of chopped walnuts or pecans into the batter for an added crunch and nutty flavor that complements the maple flavor beautifully. Chocolate chips, whether milk, semi-sweet, or white chocolate, are another fantastic addition for those who love a chocolatey twist on their sweet treats. You could also sprinkle some mini chocolate chips or toasted nuts over the top of the glaze immediately after applying it, allowing them to set along with the glaze for an appealing visual and textural element. These simple additions can transform an easy recipe into a gourmet delight, perfect for any dessert occasion. For more indulgent ideas, check out our Peanut Butter Brownie Swirl Cookies.
Quick nutritional overview
As homemade sweet treats go, maple donut bars are definitely an indulgence, perfect for a sweet breakfast or a special snack. While this delicious dessert recipe provides energy from carbohydrates and fats, they are best enjoyed in moderation as part of a balanced diet. Each bar contains natural sugars from the maple syrup and added sugars from the granulated sugar and glaze, along with fats from butter and some protein from eggs and milk. Making them at home gives you control over ingredient quality. For those mindful of caloric intake, portion control is key. Remember, they are a treat to be savored, not a primary nutritional source. For more healthy and fresh ideas, consider exploring our Beet Salad with Feta. For more culinary inspiration, visit us on Pinterest or Instagram!