
This delicious pineapple upside down cake is a beloved classic dessert, perfect for any gathering. With its sweet topping and moist cake, it promises a delightful taste of nostalgia. Making this easy pineapple cake at home is a rewarding experience for bakers of all skill levels.
Key Takeaways
- Learn to bake a delicious pineapple upside down cake from scratch.
- Simple steps ensure amazing, nostalgic flavors every time.
- The recipe covers sweet topping and moist cake batter details.
- Serve warm with a scoop of ice cream for the best dessert experience.
This cake offers pure joy. It brings back sweet, cherished memories. The flavors are simply delightful. Baking it at home is a true pleasure. Enjoy every single bite warm.
About This Delicious Pineapple Upside Down Cake
This pineapple upside down cake is more than just a dessert; it’s a culinary trip down memory lane. Known for its distinct appearance and irresistible taste, it holds a special place in the hearts of many. The beautiful caramelized pineapple slices and bright red cherries adorning the top make it visually appealing, while the moist, buttery cake beneath offers a comforting sweetness. It’s an ideal choice for family dinners, potlucks, or simply a treat for yourself on a quiet afternoon. The blend of fruit and cake creates a harmonious flavor profile that is both refreshing and deeply satisfying, truly embodying what a classic dessert should be. Its popularity stems from its unique presentation and the ease with which such a stunning result can be achieved in a home kitchen.
Classic Dessert for Everyone
The charm of a classic pineapple upside down cake lies in its universal appeal. Grandparents reminisce about making it, parents introduce it to their children, and new bakers find joy in perfecting its simple yet elegant technique. This dessert is a timeless favorite because it caters to various tastes, offering a balance of sweet and tangy notes. It’s a comforting food that evokes feelings of warmth and home, making it suitable for any occasion, from casual weeknight meals to festive celebrations. The familiarity of its flavors ensures that it’s always a welcome addition to any dessert table. For those who love baking traditional sweets, this recipe offers an opportunity to recreate a beloved confection with ease and confidence. You might also enjoy other classic sweets like this quick Italian cream cake.
Quick Look at Recipe Details
Before diving into the baking process, it’s helpful to get a snapshot of what this recipe entails. This delicious pineapple upside down cake involves preparing a simple caramelized topping with butter and brown sugar, arranging fruit slices, and then pouring a rich, moist cake batter over it. The baking process is straightforward, culminating in a beautiful cake that is inverted post-baking to reveal its signature fruit layer. The recipe emphasizes fresh, quality ingredients for the best flavor, ensuring that each slice is packed with sweetness and a subtle tartness from the pineapple. The steps are designed to be clear and concise, making this a fantastic option for both beginner bakers and seasoned pros looking for a reliable, impressive dessert. Get ready to bake a perfect cake that will impress everyone.
Why Make The Best Retro Cake?
There’s a special kind of satisfaction that comes from baking a retro cake. It’s not just about the taste; it’s about the experience, the nostalgia, and the shared joy it brings. This pineapple upside down cake stands out as a “best retro cake” because it combines timeless appeal with straightforward preparation. In an age of complex culinary trends, returning to a classic like this offers a refreshing simplicity. It’s a chance to connect with traditional baking methods and ingredients that have stood the test of time, producing a dessert that is consistently comforting and delicious. Making this cake allows you to create something truly special with your own hands, fostering a sense of accomplishment and culinary pride. Plus, serving a homemade cake instantly elevates any meal, making guests feel cherished.
Simple Steps, Amazing Taste
One of the most compelling reasons to make this particular pineapple upside down cake is its simplicity. Despite its impressive appearance, the steps involved are incredibly easy to follow, making it accessible for bakers of all skill levels. From preparing the sweet topping to mixing the cake batter, each stage is designed to be straightforward. This ease of preparation doesn’t compromise on taste; in fact, it highlights the quality of the ingredients, allowing their natural flavors to shine through. The result is a cake that is remarkably moist, tender, and bursting with the sweet, tangy notes of pineapple and the rich caramel. It’s proof that you don’t need complicated techniques to achieve an amazing taste that will have everyone asking for seconds. You can find more simple dessert recipes, like these peanut butter brownie swirl cookies, in our desserts category.
Enjoy Sweet, Nostalgic Flavors
This pineapple upside down cake offers more than just a sweet treat; it provides a delightful journey into nostalgic flavors. For many, this cake brings back cherished childhood memories of family gatherings, holiday meals, or special occasions. The combination of caramelized brown sugar, buttery cake, and juicy pineapple creates a flavor profile that is both familiar and comforting. These sweet, nostalgic flavors have a unique ability to transport us back to simpler times, creating a sense of warmth and happiness. It’s a dessert that speaks to the soul, offering a taste of tradition and a reminder of timeless pleasures. Share this wonderful taste with your loved ones and create new memories around this beautiful, easy pineapple cake.
Ingredients to Make The Best Retro Cake
Crafting the best retro cake begins with selecting the right ingredients. For this pineapple upside down cake, quality matters, as each component contributes significantly to the final flavor and texture. A successful cake relies on a harmonious blend of its sweet topping and a perfectly balanced cake batter. Paying attention to the freshness of your pineapple and the richness of your butter will truly make a difference. Opting for good quality ingredients ensures that your homemade cake will not only taste incredible but also live up to its classic reputation. This section breaks down everything you’ll need, making your shopping list straightforward and your preparation seamless. We’re aiming for a dessert that’s not just good, but truly memorable.
Sweet Topping Components
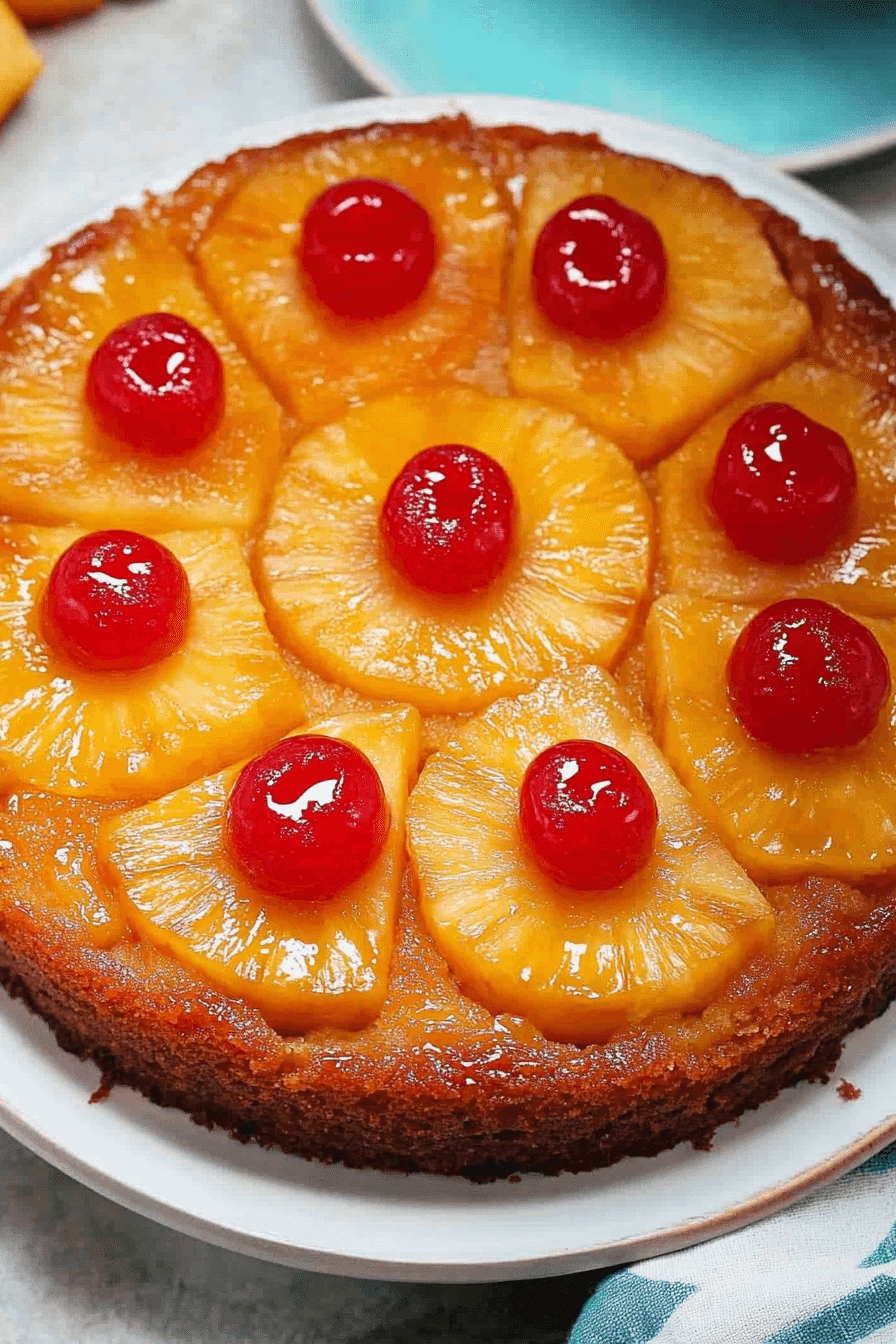
The signature sweet topping is what makes this pineapple upside down cake truly iconic. You’ll need unsalted butter, which will melt into a rich base, and light brown sugar, which caramelizes beautifully to form a sticky, golden layer. The star of the show, of course, is the canned pineapple slices (or fresh, see tips below) – make sure to drain them well, reserving the syrup for later. The rings will form the decorative pattern on the cake’s surface. Finally, maraschino cherries add a vibrant pop of color and a touch of extra sweetness, nestled in the center of each pineapple ring. These ingredients come together to create that irresistible caramelized fruit layer that defines this classic dessert, ensuring every bite is packed with sweet, nostalgic flavors.
Cake Batter Essentials
For the cake batter, you’ll need standard baking staples that contribute to its moist and tender crumb. Start with all-purpose flour, which provides the cake’s structure. Baking powder and a pinch of salt are crucial leavening agents that ensure a light, airy texture. Granulated sugar adds sweetness, complementing the caramelized topping. Unsalted butter, softened, brings richness and tenderness. Large eggs bind the ingredients and add moisture. Crucially, you’ll also use some of the reserved pineapple syrup from the canned pineapple, which infuses the cake with an extra layer of pineapple flavor and moisture, making this homemade cake truly exceptional. A splash of vanilla extract rounds out the flavors, adding warmth and depth to this easy pineapple cake.
Prepare Oven for Baking Retro Cake
Proper oven preparation is a fundamental step for any successful baking endeavor, especially when making a delicate cake like our pineapple upside down cake. Overlooking this stage can lead to uneven baking, affecting both the texture and appearance of your finished dessert. A preheated oven ensures that the cake starts baking at the correct temperature from the moment it enters, allowing the leavening agents to activate properly and preventing the cake from sinking or baking too slowly. This section guides you through the crucial initial steps of setting up your baking environment, making sure your oven and cake tin are perfectly ready for the delicious journey ahead. Careful preparation ensures you bake a perfect cake with ease.
Setting Oven Temperature (180°C)
The first and most vital step is to preheat your oven to the correct temperature. For this retro cake, you’ll want to set your oven to 180°C (350°F). It’s important to give your oven enough time to reach and stabilize at this temperature, typically about 15-20 minutes after it signals it’s preheated. An accurately preheated oven ensures that the cake batter begins to set immediately, creating a consistent crumb and preventing the cake from becoming dense or unevenly cooked. If your oven has hot spots, consider rotating the cake halfway through baking, but for now, focus on achieving that consistent temperature. This will help you achieve the best retro cake results possible, ensuring a beautifully baked pineapple upside down cake.
Preparing Your Cake Tin (20cm)
Next, prepare your cake tin. A 20cm (8-inch) round cake tin is ideal for this recipe. Start by generously greasing the bottom and sides of the tin with butter or non-stick cooking spray. This crucial step prevents the cake from sticking, especially when you’re ready to invert it later. After greasing, line the bottom of the tin with a circle of parchment paper. This provides an extra layer of non-stick protection and helps in the clean release of the caramelized topping. Some bakers even dust the greased and lined tin with a light coating of flour, tapping out any excess. Proper tin preparation is key to ensuring your pineapple upside down cake turns out perfectly, with its beautiful fruit topping intact, ready to be served warm.
Crafting Sweet Topping for Pineapple Cake
The sweet topping is arguably the most iconic part of any pineapple upside down cake. It’s the first thing you see when the cake is inverted, and its rich, caramelized flavors set the tone for the entire dessert. Crafting this layer with care ensures that your cake has that irresistible sheen and depth of flavor. This process involves a simple but magical transformation of butter and brown sugar into a bubbling, golden caramel, providing the perfect bed for your fruit. It’s where the “upside down” magic truly begins, creating a stunning visual and taste experience that defines this classic dessert. Pay close attention to these steps to create a truly delicious pineapple upside down cake.
Mixing Butter and Brown Sugar
To begin the sweet topping, melt 50g of unsalted butter directly in your prepared 20cm cake tin. You can do this gently on the stovetop over low heat, or in the microwave. Once melted, evenly sprinkle 100g of light brown sugar over the melted butter. Use a spoon or spatula to spread the brown sugar so it covers the entire bottom of the tin, mixing slightly with the butter. As it melts and combines, this mixture will form a sticky, luscious caramel base during baking. This step is fundamental for achieving that distinct caramelized flavor and beautiful golden-brown color that epitomizes a pineapple upside down cake. This sweet topping forms the foundation for your easy pineapple cake.
Arranging Pineapple and Cherries
With your butter and brown sugar base ready, it’s time for the artistic part: arranging the fruit. Carefully place your drained pineapple slices (usually 6-8, depending on size) over the brown sugar mixture. Arrange them in a single layer, ensuring they cover the bottom of the tin as much as possible. A common pattern is to place one slice in the center and then surround it with the remaining slices, overlapping slightly if necessary. Then, gently place a maraschino cherry in the center of each pineapple ring. These vibrant cherries not only add a lovely contrasting color but also a burst of juicy sweetness. This arrangement creates the beautiful pattern that will be revealed when your homemade cake is inverted, making it truly picture-perfect. For more baking inspiration, check out our Pinterest at Carina Recipes Pinterest.
Mix Together Your Cake Batter
While the sweet topping sets the stage, the cake batter is the heart of this delicious pineapple upside down cake. A well-mixed batter ensures a moist, tender crumb that perfectly complements the rich, fruity topping. This section focuses on achieving the ideal consistency and flavor for your cake, combining dry and wet ingredients carefully and incorporating a special secret ingredient. Precision in these steps will result in a perfectly balanced and flavorful cake that’s neither too dense nor too crumbly. Get ready to create a batter that promises an amazing taste and forms the foundation of your best retro cake. Proper mixing techniques are crucial for that simple steps, amazing taste promise.
Combining Dry and Wet Ingredients
In a medium bowl, whisk together your dry ingredients: 200g all-purpose flour, 2 teaspoons baking powder, and 1/4 teaspoon salt. Set aside. In a separate large bowl, cream together 100g softened unsalted butter and 150g granulated sugar until light and fluffy. Beat in 2 large eggs, one at a time, ensuring each is fully incorporated before adding the next. This creates a smooth, airy base for your wet ingredients. Gradually add the dry ingredients to the wet ingredients, alternating with 100ml milk, beginning and ending with the dry. Mix until just combined, being careful not to overmix, as this can lead to a tough cake. The goal is a smooth, homogenous batter that’s ready for the next special touch.
Using Reserved Pineapple Syrup
Here’s where a little trick enhances the pineapple upside down cake’s flavor profile. Remember that reserved pineapple syrup from the canned slices? Now is its time to shine. After combining your main batter ingredients, gently fold in 50ml of the reserved pineapple syrup along with 1 teaspoon of vanilla extract. This addition not only boosts the cake’s moisture content, ensuring a tender crumb, but also infuses the entire cake with a subtle yet distinct pineapple flavor. It ties the cake batter perfectly to the fruit topping, creating a cohesive and truly delicious pineapple upside down cake. This small step makes a significant difference, adding depth and authenticity to your homemade cake, making it one of the best retro cake recipes you’ll make.
Assemble Your Pineapple Cake Batter
With the sweet topping beautifully arranged and the cake batter perfectly mixed, the next step is to bring them together in the cake tin. This stage requires a gentle touch to ensure the fruit remains in place and the batter is evenly distributed. Proper assembly is key to achieving that perfectly layered look when the cake is inverted, showcasing the vibrant pineapple and cherries. It’s a moment where careful execution transitions your prepared ingredients into a cohesive structure, ready for the oven. This careful assembly will contribute to creating an easy pineapple cake that looks as good as it tastes, ensuring every slice is a masterpiece of sweet, nostalgic flavors.
Spoon Batter Over Pineapple
Once your cake batter is ready, carefully spoon it over the arranged pineapple slices and brown sugar mixture in the cake tin. It’s important to do this gently to avoid displacing the fruit. Start by spooning small dollops of batter evenly across the surface of the fruit, rather than pouring it all in one spot. This gradual approach helps to keep the pineapple slices firmly in their intended positions. The batter will be thick enough to hold its shape, so you don’t need to worry about it seeping through the gaps too quickly. This method ensures that the fruit layer remains distinct and visually appealing once the pineapple upside down cake is baked and inverted.
Smoothing Top Evenly
After spooning all the cake batter into the tin, use an offset spatula or the back of a spoon to gently smooth the top surface of the batter. The goal is to create an even layer, ensuring consistent thickness across the cake. This uniform layer is important for several reasons: it promotes even baking, prevents any part of the cake from being under or overcooked, and contributes to a flat base once the cake is inverted. While smoothing, still be mindful of the fruit underneath; a light touch is all that’s needed. A smooth, even surface on top will result in a perfectly level base for your best retro cake when it’s served, contributing to its overall professional appearance and delightful texture.
Bake Your Perfect Upside Down Cake
The moment of truth arrives when your carefully assembled pineapple cake enters the oven. Baking is where the magic truly happens, transforming raw ingredients into a golden, fragrant dessert. Achieving a perfect upside down cake requires not just the right temperature, but also the correct duration and a little bit of patience. This section guides you through the crucial baking process, ensuring your cake emerges from the oven beautifully golden, moist, and utterly delicious. Proper baking techniques are vital to fully capture those sweet, nostalgic flavors and deliver an easy pineapple cake that’s both a treat for the eyes and the palate. For other main course ideas, consider browsing our main course category.
Baking for 35 Minutes
Place your prepared cake tin into the preheated oven at 180°C (350°F). Bake your pineapple upside down cake for approximately 35 minutes. Baking time can vary slightly depending on your oven, so it’s always a good idea to keep an eye on it, especially towards the end of the suggested time. The cake should rise beautifully, and the edges will start to pull away slightly from the sides of the tin. The top of the cake, which will eventually be the bottom, should be golden brown and feel firm to the touch. This duration allows the cake batter to cook through thoroughly while the sweet topping caramelizes and melds with the pineapple, creating that classic dessert texture and flavor.
Testing for Doneness
To confirm your homemade cake is perfectly baked, perform the classic toothpick test. After 35 minutes, gently insert a clean wooden toothpick or a thin skewer into the center of the cake. If it comes out clean, with no wet batter clinging to it, your cake is done. If there’s still wet batter, return the cake to the oven for an additional 5-7 minutes, then test again. Avoid opening the oven door too frequently during baking, as this can cause the cake to sink. Once baked, remove the cake from the oven. The aroma filling your kitchen will be incredible, a clear sign that you’ve successfully created a truly delicious pineapple upside down cake. Your easy pineapple cake is almost ready!
Serving Your Best Retro Cake Warm
The final step in creating your best retro cake is serving it perfectly. A pineapple upside down cake is at its absolute peak when served warm, allowing the caramelized topping to remain gooey and the cake itself to be wonderfully moist and tender. The presentation of this classic dessert is also part of its charm, as the inversion process reveals the stunning fruit pattern. This section provides the simple yet crucial steps for cooling and turning out your cake, ensuring it looks as fantastic as it tastes. Get ready to impress your family and friends with this beautiful and incredibly satisfying homemade cake, bringing back sweet, nostalgic flavors with every bite. You can find more cooking ideas and delicious recipes on our Instagram at Carina Recipes Instagram.
Cooling Slightly in Tin
Once your pineapple upside down cake is out of the oven, do not attempt to invert it immediately. It’s crucial to let it cool slightly in the tin for about 5-10 minutes. This brief cooling period allows the caramelized topping to set just enough so that it doesn’t completely run off when inverted, but not so much that it sticks stubbornly to the bottom of the tin. It also gives the cake a moment to firm up slightly, preventing it from crumbling when handled. This short pause is essential for a clean release and a beautifully intact fruit topping, ensuring your delicious pineapple upside down cake looks as good as it tastes.
Turning Onto a Plate
After the slight cooling period, it’s time for the grand reveal! Place a serving plate (ideally one with a slight rim to catch any excess caramel) upside down over the cake tin. Using oven mitts, carefully but confidently invert the cake tin and plate together. Gently lift the cake tin away. If any fruit sticks to the bottom of the tin, carefully use a knife or spatula to loosen and place it back onto the cake. Remove the parchment paper if you used any. You will be greeted by the stunning display of golden-brown pineapple slices and vibrant red cherries. This moment is truly satisfying, revealing the iconic look of your perfect, homemade cake.
Serving with Ice Cream
While the pineapple upside down cake is delightful on its own, serving it warm with a scoop of vanilla ice cream (or even a dollop of whipped cream) takes it to another level. The cold, creamy ice cream melts slightly into the warm, fruity cake, creating an incredible contrast in temperatures and textures. This combination is particularly enjoyable, enhancing the sweet, nostalgic flavors and adding a luxurious touch to this classic dessert. Cut generous slices and serve immediately to enjoy the cake at its best. This easy pineapple cake is a comforting treat that’s perfect for any occasion, and the addition of ice cream makes it an unforgettable experience. For more information on cake types, consider visiting Wikipedia’s cake page.
Recipe Overview: Time and Servings
Understanding the time commitment and yield of a recipe is crucial for meal planning and ensuring you have enough for everyone. This section provides a concise summary of how long it will take to prepare and bake this delightful pineapple upside down cake, as well as how many servings you can expect. This information helps you integrate this best retro cake into your schedule, whether you’re whipping it up for a weeknight treat or a special gathering. The relatively quick overall duration makes it an accessible option even when you’re short on time, promising a homemade cake that’s both efficient to make and incredibly satisfying to enjoy. Baking should always be an enjoyable process, and this recipe makes it so.
Quick Preparation Time (20 min)
One of the fantastic aspects of this delicious pineapple upside down cake is its relatively quick preparation time. You can get all the components ready and assembled in just about 20 minutes. This includes melting the butter, arranging the fruit, mixing the dry ingredients, creaming the wet ingredients, and combining everything into a smooth batter. The straightforward steps and common ingredients contribute to this efficiency, making it an ideal choice for when you want an impressive dessert without spending hours in the kitchen. This quick prep time means you can easily fit making this classic dessert into a busy day, still enjoying the rewards of a homemade cake.
Total Recipe Duration (55 min)
From start to finish, the total recipe duration for this easy pineapple cake is approximately 55 minutes. This includes the 20 minutes of active preparation and roughly 35 minutes of baking time in the oven. The additional 5-10 minutes for cooling slightly in the tin post-baking are also accounted for. This efficient timeline means you can have a warm, fragrant, and perfectly baked pineapple upside down cake ready to serve in under an hour. It’s a rewarding project that delivers significant enjoyment for a relatively small time investment, making it a go-to for those seeking amazing taste with simple steps.
Serves Eight Slices
This recipe for the best retro cake, baked in a 20cm (8-inch) round cake tin, is designed to generously serve eight slices. Each slice is substantial enough to be a satisfying dessert, especially when paired with a scoop of ice cream. The serving size makes it perfect for a family dessert, a small gathering of friends, or even for having delicious leftovers to enjoy the next day. The rich flavors and comforting texture ensure that each of the eight slices is a delightful experience, bringing sweet, nostalgic flavors to everyone at the table. It’s a wonderful way to share a homemade cake that embodies classic dessert charm.
Tips for Making The Best Retro Cake
While the recipe for this pineapple upside down cake is straightforward, a few clever tips can elevate your baking experience and ensure truly exceptional results. These small adjustments can make a big difference in the flavor, texture, and overall presentation of your classic dessert. Whether you’re a seasoned baker or just starting out, incorporating these insights will help you craft a truly memorable homemade cake. Mastering these nuances helps guarantee that your easy pineapple cake is consistently perfect, enhancing those sweet, nostalgic flavors we all love. For more baking techniques, visit Wikipedia’s baking page.
Try Fresh Pineapple Slices
While canned pineapple slices are convenient and perfectly suitable for this recipe, using fresh pineapple slices can take your pineapple upside down cake to an even higher level. If opting for fresh pineapple, make sure to peel, core, and slice it into uniform rounds approximately 1/2 inch thick. You might also want to lightly poach the fresh slices in a simple sugar syrup for a few minutes to soften them slightly before arranging them in the tin. This extra step enhances their juiciness and ensures they caramelize beautifully. Fresh pineapple offers a brighter, more vibrant flavor profile that truly shines, adding an extra layer of gourmet quality to your best retro cake. Just remember to still reserve some of the poaching liquid to use in the cake batter for that full fruit flavor.
Nutrition Information for This Dessert
Understanding the nutritional aspects of your favorite treats can be helpful, especially when enjoying a delicious pineapple upside down cake. This section provides a basic overview of the calorie content per serving, giving you an idea of the energy provided by this classic dessert. While it’s a treat meant for enjoyment, having this information allows for informed choices. Remember that homemade cakes can often be adjusted to fit dietary preferences, though this recipe focuses on traditional flavors. Indulge in those sweet, nostalgic flavors knowing the general nutritional breakdown of your easy pineapple cake, allowing you to savor every bite guilt-free. Enjoy your perfectly baked homemade cake responsibly.
Calories Per Serving (320kcal)
Each delightful slice of this homemade pineapple upside down cake, when divided into eight servings, contains approximately 320 calories (320kcal). This calorie count provides a general idea of the energy content in one serving of this best retro cake. It’s important to note that this is an estimate and can vary slightly based on the exact ingredients used and portion sizes. This classic dessert offers a balance of carbohydrates, fats, and sugars, contributing to its rich flavor and satisfying texture. Enjoying a slice of this easy pineapple cake is a wonderful way to treat yourself, providing those beloved sweet, nostalgic flavors in a manageable portion.