
Butterfinger Caramel Candy Bars recipe offers a fantastic way to enjoy a classic flavor at home. These homemade candy bars feature a delightful blend of crispy peanut butter and sweet caramel, all topped with rich chocolate. This easy no-bake dessert is perfect for satisfying your sweet tooth or sharing with loved ones, promising a truly irresistible treat.
Key Takeaways
- Easy no-bake method for classic candy bars.
- Combines peanut butter crunch, caramel, and chocolate.
- Perfect for homemade treats or make-ahead desserts.
- Simple ingredients and clear steps for success.
Making homemade candy is truly rewarding. These bars are simple to create. They offer a delightful texture mix. Enjoy crispiness with sweet caramel. This recipe will surely impress everyone.
Making Irresistibly Delicious Butterfinger Bars
There’s something truly special about crafting your own sweet treats, and this Butterfinger Caramel Candy Bars recipe is no exception. Imagine a homemade candy bar that perfectly captures the iconic crunch and peanut buttery flavor of a Butterfinger, but with the added decadence of smooth caramel and a rich chocolate topping. This recipe brings that dream to life, offering a straightforward path to an incredibly satisfying dessert. It’s an ideal project for those who love to bake (or no-bake, in this case!) and want to share a unique, delicious dessert with friends and family.
What makes these bars so good?
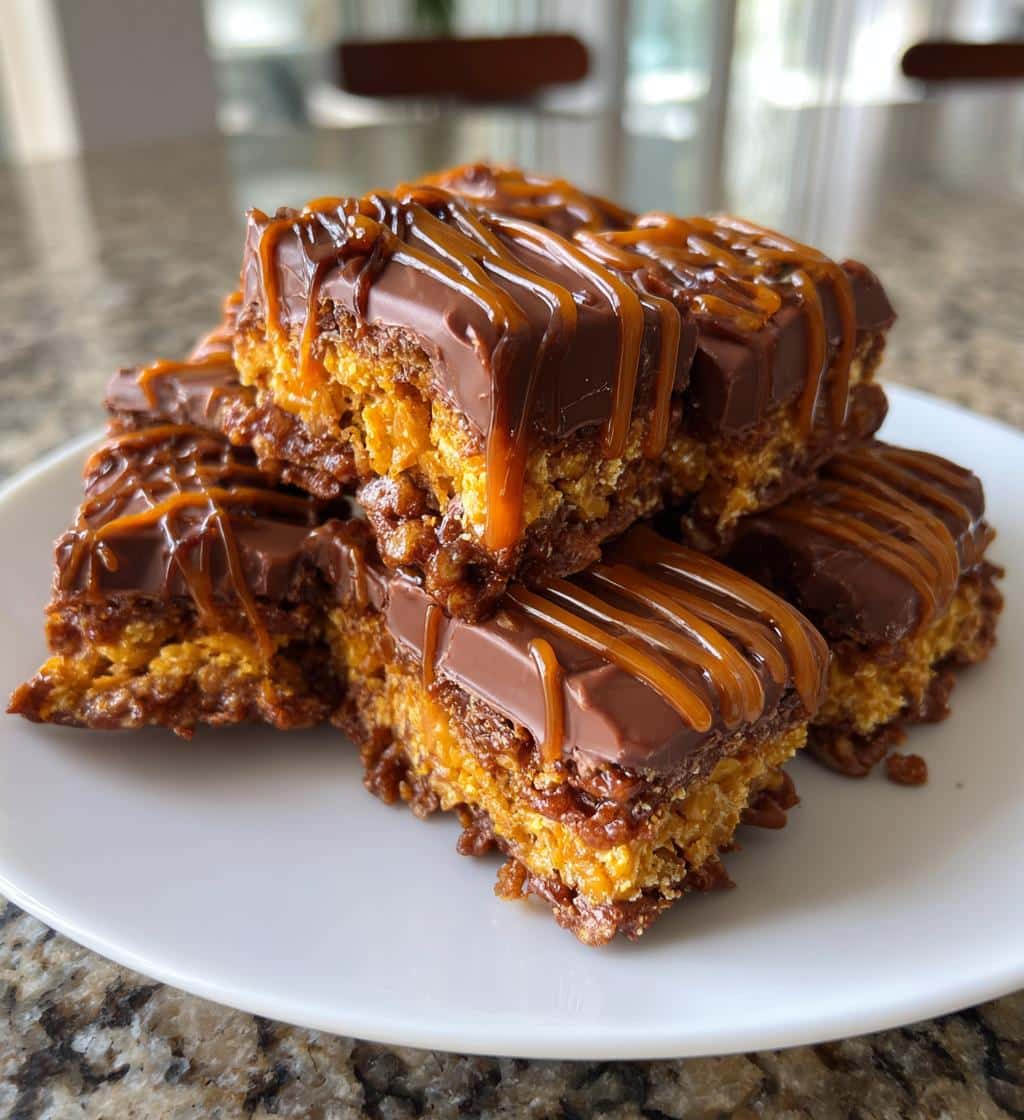
These homemade Butterfinger bars stand out for several reasons. First, the base layer combines crushed cornflakes with creamy peanut butter, mimicking the airy, crisp texture of a traditional Butterfinger candy. Then, a generous layer of gooey caramel adds a chewy counterpoint, complementing the crunch beautifully. Finally, a smooth blanket of melted chocolate chips seals the deal, providing a rich finish that ties all the flavors together. The contrast in textures and the harmony of sweet and savory notes make each bite an absolute delight, creating an irresistible snack that’s hard to put down. Plus, knowing you made them yourself adds to the charm!
A simple, joyful candy recipe.
Despite their gourmet appeal, these Butterfinger Caramel Candy Bars are surprisingly simple to make. You don’t need any complex techniques or special equipment, making this a joyful candy recipe even for novice confectioners. The steps are easy to follow, focusing on simple melting, stirring, and layering. This approach ensures that you spend less time fussing in the kitchen and more time enjoying the process and the delicious results. It’s a fantastic way to get creative with sweets, offering a rewarding experience as you watch your ingredients transform into stunning, tasty bars. You might also enjoy creating other easy desserts like Snickerdoodle Cobbler for another joyful baking experience.
Gathering Ingredients for Candy Bars
Before you begin the exciting journey of creating these delectable Butterfinger Caramel Candy Bars, it’s always a good idea to gather all your ingredients. This ensures a smooth and efficient candy-making process, allowing you to focus on the fun rather than scrambling for missing items. Most of the ingredients are likely staples in your pantry, making this a convenient recipe to whip up whenever a craving for a crunchy treat strikes. Having everything ready also helps maintain the flow, which is particularly important for recipes that involve melting and layering.
All you need from your kitchen.
You’ll be pleased to find that the components for these no-bake bars are quite common. For the signature Butterfinger crunch layer, you will need butter, granulated sugar, light corn syrup, creamy peanut butter, and cornflakes. The caramel topping typically calls for a store-bought caramel sauce, or you can make your own if you’re feeling ambitious, and a bag of chocolate chips for the top layer. A pinch of vanilla extract often adds a nice depth of flavor to the base. Make sure your butter is at room temperature for easier melting, and consider using good quality chocolate chips for the best finish. These simple butterfinger bars truly use everyday items.
Essential items for this sweet recipe.
Beyond the ingredients, having the right kitchen tools will make your candy-making experience much smoother. You’ll need a medium-sized saucepan for melting the base ingredients, a heat-resistant spatula or wooden spoon for stirring, and an 8×8 or 9×13 inch baking pan (depending on your desired bar thickness) for pressing and setting the bars. Parchment paper or foil is essential for lining the pan, which prevents sticking and makes lifting the finished bars out incredibly easy for slicing. A microwave-safe bowl for melting chocolate and a spreading knife or offset spatula will also come in handy. These essential items ensure you can execute each step precisely, leading to perfectly formed and incredibly tasty chocolate caramel bars.
Quick Prep and Cook Times
One of the many appealing aspects of this Butterfinger Caramel Candy Bars recipe is its relatively quick prep and cook times. Unlike many intricate desserts that demand hours of attention, these homemade candy bars are designed for efficiency. This makes them an excellent choice for a last-minute treat, a party dessert, or simply when you want something sweet without spending the entire afternoon in the kitchen. The active preparation time is minimal, focusing on straightforward steps that yield impressive results quickly.
Your fast journey to tasty treats.
The beauty of this recipe lies in its no-bake nature for most components. The initial cooking involves just a few minutes of melting and stirring on the stovetop for the base. After that, it’s all about assembly and patience while the layers set. Expect to spend about 15-20 minutes on active preparation, combining ingredients and pressing them into the pan. The longest part of the process will be the chilling time, allowing each layer to firm up properly. This fast journey to tasty treats ensures that even on a busy day, you can still enjoy the satisfaction of making your own delicious chocolate caramel bars.
How many delicious bars to expect.
The yield of your Butterfinger Caramel Candy Bars will depend largely on the size of your baking pan and how you choose to slice them. Using an 8×8 inch pan will typically result in thicker, more substantial bars, yielding around 16 squares. If you opt for a 9×13 inch pan, your bars will be thinner but you can expect to get anywhere from 24 to 36 pieces, perfect for sharing at a larger gathering or for smaller, individual servings. No matter the size, you’ll have plenty of sweet dessert to go around, making this recipe a fantastic choice for family treats or party platters. Adjust your pan size based on your desired serving portions and the thickness you prefer for your irresistible snack.
Starting Your Butterfinger Caramel Base
The foundation of these incredible Butterfinger Caramel Candy Bars is a rich, sweet base that perfectly emulates the crispy texture of the classic candy. This crucial first step sets the stage for the entire flavor profile and ensures that delightful crunch. It’s a simple process, but paying attention to the details here will make all the difference in the final product. Getting this base right is key to achieving that signature Butterfinger experience, transforming basic ingredients into something truly special for your homemade candy.
Gently melting butter in a pan.
Begin by taking a medium-sized saucepan and placing it over medium-low heat. Add the specified amount of unsalted butter to the pan. The key here is to melt the butter gently and slowly. Avoid rushing this step by using high heat, as this can cause the butter to burn or brown too quickly, which might alter the flavor of your base. Stir occasionally as the butter melts, ensuring it becomes a smooth, golden liquid. This gentle melting process ensures an even consistency, preparing the pan perfectly for the next ingredients. You want the butter to be fully liquefied, without any solids remaining, creating a perfect canvas for the sugar and corn syrup.
Stirring in sugar and corn syrup.
Once your butter is completely melted, it’s time to incorporate the granulated sugar and light corn syrup. Add these ingredients directly to the saucepan with the melted butter. Stir continuously with a heat-resistant spatula or wooden spoon until the sugar fully dissolves and the mixture is well combined. Continue to stir and heat the mixture just until it reaches a gentle boil. Let it boil for exactly one minute, no more, no less, while stirring constantly. This brief boiling period is essential for creating the right consistency for your butterfinger recipe base, ensuring it will firm up correctly without becoming too hard. This sweet, sticky concoction is the heart of your crunchy treat, ready for the next exciting additions. For another sweet treat, check out this Quick Italian Cream Cake.
Creating the Butterfinger Crunch Layer
With your sweet caramel base ready, the next exciting step is to infuse it with the characteristic crunch that makes these Butterfinger Caramel Candy Bars so irresistible. This layer is what truly transforms the mixture into something reminiscent of the beloved candy, providing that delightful texture contrast against the smooth caramel and chocolate. The combination of creamy peanut butter and crunchy cornflakes is a classic pairing that works magic in this homemade candy bar recipe, making it a truly unique and satisfying dessert. This step is where the “Butterfinger” aspect truly comes alive.
Adding creamy peanut butter smoothly.
Once the butter, sugar, and corn syrup mixture has boiled for the specified minute, remove the saucepan from the heat immediately. This is a critical point: you don’t want the mixture to continue cooking. Now, swiftly add the creamy peanut butter. Stir vigorously until the peanut butter is completely melted and smoothly incorporated into the hot sugar mixture. The warmth of the base will help the peanut butter melt effortlessly, creating a cohesive, rich, and slightly nutty paste. Ensure there are no streaks of unmixed peanut butter, as a uniform consistency is vital for an even crunch layer. This adds a fantastic depth of flavor that is central to a proper butterfinger recipe.
Folding in crunchy cornflakes carefully.
After the peanut butter is fully integrated, it’s time for the star of the crunch: cornflakes. Gently but quickly fold the cornflakes into the peanut butter mixture. The goal is to coat all the cornflakes evenly without crushing them too much. You want to maintain their flaky, crisp integrity to achieve that perfect airy, crunchy treat texture. Work quickly because the mixture will start to cool and thicken. Use a gentle hand to mix, ensuring the cornflakes are coated but not pulverized. This delicate balance ensures that every bite of your simple butterfinger bars will have that signature, satisfying snap. This completed crunch layer is now ready to be spread into your prepared pan, bringing you one step closer to delicious, homemade candy.
Spreading the Delicious Butterfinger Base
Once your crunchy Butterfinger base mixture is perfectly combined, the next step involves preparing your pan and evenly spreading this delectable layer. This stage is crucial for ensuring that each homemade candy bar has a uniform thickness and an appealing appearance. A well-spread base means a consistent texture throughout the entire batch, making every bite of your butterfinger caramel candy bars equally satisfying. Taking a little extra time here will lead to professional-looking and tasting results for your sweet dessert.
Preparing your pan for spreading.
Before you even begin mixing, make sure your baking pan is adequately prepared. Line an 8×8 or 9×13 inch baking pan (depending on your desired bar thickness and yield) with parchment paper or aluminum foil. It’s often helpful to leave an overhang of paper or foil on two opposite sides; this creates “handles” that will make it incredibly easy to lift the entire set of bars out of the pan once they’ve cooled. Lightly grease the paper or foil with a little butter or non-stick cooking spray to prevent any sticking, even though the mixture is quite oily. This preparation step is simple but critical for a clean removal and perfect slicing of your irresistible snack.
Pressing the mixture evenly.
Immediately after mixing in the cornflakes, transfer the warm Butterfinger mixture into your prepared pan. Use a spatula, the back of a spoon, or even your clean, lightly buttered hands to press the mixture down firmly and evenly across the bottom of the pan. It’s important to work quickly as the mixture will begin to cool and harden as it sits. Apply consistent pressure to ensure there are no loose spots and that the thickness is uniform from edge to edge. A flat bottomed glass or measuring cup can also be very useful for achieving a perfectly smooth and compact layer. This even pressing ensures a stable foundation for the caramel and chocolate toppings, promising delightful chocolate caramel bars.
Adding Caramel and Chocolate Topping
The Butterfinger crunch base is now perfectly set, laying the groundwork for the two layers that will elevate these homemade treats to extraordinary levels of deliciousness: the luscious caramel and the rich chocolate. These toppings not only add layers of flavor and texture but also contribute to the classic candy bar aesthetic. This stage transforms your simple Butterfinger bars into a truly decadent experience, making them an ultimate sweet dessert. The combination of sweet, chewy, and smooth is what makes these chocolate caramel bars so incredibly popular.
Drizzling sweet caramel sauce over.
Once the Butterfinger base has been pressed firmly into the pan, allow it to cool for a few minutes while you prepare your sweet caramel sauce. You can use a store-bought caramel sauce, which makes this an incredibly easy no-bake step, or prepare your own homemade caramel if you prefer. If using store-bought, gently warm it slightly in the microwave or a small saucepan to make it more pourable. Carefully and evenly drizzle or spread the warm caramel sauce over the entire Butterfinger base. Ensure the caramel covers the whole surface from edge to edge, creating a consistent layer. The caramel should be smooth and gooey, adding that perfect sweet chewiness that complements the crunch of the base. This layer is key to the “Caramel” in “Butterfinger Caramel Candy Bars recipe.”
Pouring melted chocolate chips on top.
After the caramel layer is in place, it’s time for the grand finale: a generous layer of melted chocolate. In a microwave-safe bowl, melt your chocolate chips (milk, semi-sweet, or dark, depending on your preference) in 30-second intervals, stirring well after each interval until smooth and fully melted. Be careful not to overheat the chocolate, as it can seize. Once melted, pour the chocolate evenly over the caramel layer, gently spreading it with a spatula to create a smooth, consistent top. This rich chocolate shell not only adds a decadent flavor but also helps to hold all the layers together once cooled. This final step seals in all the deliciousness, preparing your irresistible snack for its final transformation.
Cooling and Cutting Your Bars
After carefully layering all the delicious components of your Butterfinger Caramel Candy Bars, the waiting game begins! This crucial cooling period allows all the layers to firm up and meld together, ensuring a clean cut and a stable, delightful candy bar. Patience during this stage will be amply rewarded with perfectly structured and incredibly tasty homemade candy. Rushing the cooling process can lead to messy slices and a less cohesive treat, so give your chocolate caramel bars the time they need.
Letting the candy bars set firmly.
Once the chocolate topping is smoothly spread, place your pan of bars into the refrigerator. This cold environment will help the chocolate and caramel set firmly and quickly. The chilling time typically ranges from 1 to 2 hours, or until the chocolate is completely solid to the touch and the bars feel firm when gently pressed. If you’re not in a hurry, letting them set at room temperature for several hours or even overnight can also work, but refrigeration speeds up the process considerably. Ensure the bars are fully set before moving on to the next step; this is paramount for achieving those perfect bite-sized pieces. These easy no-bake bars are almost ready!
Slicing into perfect bite-sized pieces.
Once the candy bars are thoroughly chilled and firm, it’s time for the satisfying task of slicing them. Carefully lift the entire slab out of the pan using the parchment paper or foil overhangs. Place it on a clean cutting board. Using a sharp, large knife, score the chocolate topping first, and then firmly press down to cut through all the layers. Wiping the knife clean between cuts with a warm, damp cloth can help achieve cleaner edges, especially through the sticky caramel layer. You can cut them into traditional squares, rectangles, or even smaller bite-sized pieces for sampling or sharing. Aim for uniform slices to make them look as good as they taste, creating a beautiful platter of your homemade candy, a truly irresistible snack. For other great snack ideas, you might enjoy Chicken Bacon Ranch Tater Tot Casserole as a savory snack.
Storing Your Irresistibly Delicious Candy Bars
After putting in the effort to create these wonderful Butterfinger Caramel Candy Bars, proper storage is key to maintaining their freshness, texture, and delicious flavor. Whether you’re planning to enjoy them over several days or preparing them in advance for an event, knowing how to store them correctly will ensure every bite is as good as the first. These make ahead dessert bars are perfect for various occasions, and good storage practices will extend their life and appeal.
Keeping leftover bars fresh longer.
To keep your homemade candy bars fresh for as long as possible, store them in an airtight container. This prevents them from drying out, absorbing other odors from your refrigerator, or becoming too soft or sticky. You can layer them with parchment paper between each layer to prevent them from sticking together. Store the container in the refrigerator; this helps maintain the firmness of the chocolate and caramel, especially in warmer climates. They will typically stay fresh and delicious for up to a week when refrigerated. If you prefer a firmer texture, you can even store them in the freezer for up to a month, though they may need a few minutes to thaw slightly before eating. This is a great tip for any sweet dessert you want to preserve.
Tips for making treats ahead.
These Butterfinger Caramel Candy Bars are an excellent make ahead dessert. You can prepare an entire batch several days before an event, which alleviates last-minute stress. After cutting, arrange the bars in a single layer on a parchment-lined baking sheet and freeze them for about 30 minutes until solid. Then, transfer them to an airtight container or freezer bag, separating layers with parchment paper. This flash-freezing technique prevents them from sticking together in the container. When you’re ready to serve, simply take them out of the freezer an hour or two beforehand to allow them to come to a slightly softer, yet still firm, consistency. This flexibility makes this a perfect recipe for party planning or for having a ready supply of irresistible snack options on hand. Check out our Pinterest page for more make-ahead dessert ideas!
Nutrition Facts for Each Sweet Bar
When indulging in a delightful treat like these Butterfinger Caramel Candy Bars, it’s natural to be curious about their nutritional content. While homemade candy bars are certainly a special occasion sweet dessert, understanding the approximate nutrition facts can help you enjoy them mindfully. Please remember that these figures are estimates and can vary based on specific brands of ingredients used and the exact size of your portions.
Calories and sugar per serving.
Given the ingredients—butter, sugar, corn syrup, peanut butter, cornflakes, caramel, and chocolate—these bars are calorically dense and high in sugar. A typical serving (one medium-sized bar) might contain approximately 250-350 calories. The sugar content would likely be in the range of 25-40 grams, primarily from the granulated sugar, corn syrup, caramel, and chocolate chips. Peanut butter also contributes healthy fats and protein, while cornflakes add some carbohydrates. This butterfinger recipe, like most homemade candy, is best enjoyed in moderation as a sweet indulgence.
Important dietary information for you.
For those with dietary concerns, it’s worth noting that this Butterfinger Caramel Candy Bars recipe contains common allergens such as peanuts (peanut butter) and dairy (butter, caramel, chocolate). Depending on the cornflake brand, it may also contain gluten, though gluten-free cornflakes can be substituted. This sweet dessert is not suitable for vegan diets due to dairy. If you are tracking macros, these bars provide a good mix of carbohydrates and fats, with some protein from the peanut butter. Always consider your individual dietary needs and preferences when enjoying homemade treats. For a different type of sweet treat, consider a Peanut Butter Brownie Swirl Cookie.
Easy Recipe Variations to Try
One of the joys of making homemade candy is the freedom to experiment and customize. While the classic Butterfinger Caramel Candy Bars recipe is incredibly satisfying as is, there are plenty of easy recipe variations you can try to tailor these delicious bars to your personal taste or dietary needs. These simple changes can open up a whole new world of flavor and texture, making this crunchy treat even more versatile and enjoyable for everyone. Don’t be afraid to get creative in your kitchen!
Swapping peanut butter for almond.
For those with peanut allergies or simply looking for a different flavor profile, swapping peanut butter for almond butter is an excellent variation. Almond butter will provide a similar creamy texture and healthy fat content, with a slightly milder, nuttier flavor that pairs wonderfully with caramel and chocolate. You can also experiment with cashew butter or sunflower seed butter for a nut-free option, ensuring that more people can enjoy these irresistible snack bars. Just ensure your chosen butter is creamy and not overly thick, maintaining the desired consistency for the crunch layer. This simple substitution makes these easy no-bake bars accessible to a wider audience.
More fun ingredient change ideas.
Beyond nut butter, there are numerous ways to put your own spin on this candy bar recipe. Consider adding a pinch of sea salt to the chocolate topping for a popular salted caramel chocolate effect, enhancing the sweetness. You could also mix in some chopped nuts (like pecans or walnuts) to the cornflake layer for extra crunch and richness. For a richer chocolate experience, try using dark chocolate for the topping, or white chocolate for a different aesthetic and taste. A dash of cinnamon in the base mixture could add a subtle warmth. You might even experiment with different types of cereals, such as crushed rice krispies, though cornflakes are key to the Butterfinger-like texture. These small adjustments can dramatically alter the character of your homemade candy, making each batch a unique creation. For more inspiration, follow us on Instagram!
Enjoy Your Irresistibly Delicious Candy Bars Recipe!
Congratulations! You’ve successfully created a batch of truly irresistible Butterfinger Caramel Candy Bars. The satisfaction of making your own homemade candy, especially one that rivals store-bought treats in flavor and texture, is unmatched. These crunchy treat bars are more than just a dessert; they’re a labor of love that brings joy to both the maker and the eater. It’s time to sit back, relax, and savor the fruits of your sweet endeavor, knowing you’ve crafted something truly special.
Share this wonderful homemade treat.
These Butterfinger Caramel Candy Bars are practically begging to be shared! Package them up for friends, bring them to a potluck, or offer them as a delightful gift. They make a fantastic addition to any dessert table and are sure to be a crowd-pleaser at parties or family gatherings. Sharing homemade treats is a wonderful way to connect with others and spread a little happiness. Watch as faces light up with each bite of these incredible chocolate caramel bars. They are truly a family favorite, perfect for any occasion that calls for a sweet dessert.
Get ready to make them again!
Once you and your loved ones taste these delicious homemade candy bars, don’t be surprised if requests for another batch start rolling in almost immediately. This recipe is so simple and the results so rewarding that you’ll likely find yourself adding it to your regular rotation of dessert ideas. Whether for a special occasion or just to satisfy a craving for a quick treat, you now have a go-to recipe for an irresistible snack. The process is enjoyable, the ingredients are accessible, and the outcome is consistently spectacular. Get ready to enjoy the continuous joy of making and eating these delightful Butterfinger Caramel Candy Bars over and over again!