
Glazed Chocolate Donut Holes are a delightful homemade sweet treat. This recipe provides an easy method to bake perfect mini donuts, ideal for breakfast or dessert. Learn the simple secrets to creating fluffy donut holes with a smooth, sweet glaze everyone will love.
Key Takeaways
- Bake delicious chocolate donut holes at home with ease.
- Utilize simple ingredients for a quick, satisfying dessert.
- Master the art of creating a perfectly smooth, sweet glaze.
- Enjoy fresh, delectable treats in under 30 minutes from start to finish.
Baking donut holes is quite simple. Achieve great taste with minimal effort. Freshly baked treats are always superior. Share this homemade sweetness. Everyone will surely enjoy it.
Make Amazing Glazed Chocolate Donut Holes
There’s something uniquely satisfying about creating treats from scratch, and these glazed chocolate donut holes are no exception. Moving beyond store-bought options, baking at home allows you to control the quality of ingredients, adjust sweetness to your preference, and truly savor the fresh-baked aroma filling your kitchen. It’s a rewarding culinary adventure that results in warm, tender bites of chocolatey goodness, perfect for any time of day. This recipe simplifies the baking process, ensuring even novice bakers can achieve impressive results. Plus, making donut holes rather than full-sized donuts offers a fun, bite-sized indulgence that’s easy to share or enjoy solo.
Why Make Donut Holes at Home?
Choosing to make chocolate donut holes at home offers several distinct advantages. Firstly, the freshness is incomparable. Imagine biting into a warm, soft donut hole, still slightly warm from the oven, with a delicate glaze. Secondly, you gain complete control over ingredients, allowing for adjustments to suit dietary needs or flavor preferences. This means you can opt for high-quality cocoa powder for a richer chocolate flavor or use organic dairy for a purer taste. Lastly, it’s a wonderfully engaging activity, perfect for a cozy afternoon or a fun baking session with family. The process itself is part of the pleasure, leading to a truly personalized and delicious outcome that you simply cannot replicate with pre-packaged alternatives.
The 7 Secrets to Perfect Bliss
Achieving truly perfect glazed chocolate donut holes involves a few straightforward yet crucial steps. First, always use good quality cocoa powder; it makes all the difference in flavor intensity. Second, resist the urge to overmix your batter; a light hand ensures tender donut holes. Third, never overbake; keeping them moist is key to that melt-in-your-mouth texture. Fourth, allow the baked donut holes to cool slightly before glazing, preventing the glaze from melting off. Fifth, aim for a perfect glaze consistency—not too thick, not too thin. Sixth, be generous with your glaze; a good coating is essential for that classic sweet finish. Finally, serve them fresh for the ultimate indulgence, perhaps alongside a cup of coffee or milk.
Gather Ingredients for Chocolate Donut Holes
Creating these delightful glazed chocolate donut holes starts with assembling the right ingredients. The beauty of this recipe lies in its simplicity, utilizing common pantry staples that likely already reside in your kitchen. We’ll divide the ingredient list into dry components for the batter, wet components for the batter, and finally, the elements that will create our irresistible sweet glaze. High-quality ingredients, while simple, contribute significantly to the overall flavor and texture of your homemade treats, ensuring each bite is as delicious as you imagine.
Dry Ingredients for Donut Holes
For the foundation of our chocolate donut holes, you will need all-purpose flour, providing the structure. Granulated sugar sweetens the batter, while unsweetened cocoa powder infuses that rich chocolate flavor. Baking powder acts as the leavening agent, ensuring your donut holes are light and fluffy, rather than dense. A pinch of salt is crucial for balancing the sweetness and enhancing all the other flavors present in the batter. Sifting these dry ingredients together before combining them with the wet components helps to prevent lumps and ensures an even distribution, leading to a smoother, more consistent batter.
Wet Ingredients for Donut Holes
The wet ingredients bring moisture and richness to our donut hole batter. You’ll need whole milk to add tenderness and a delicate texture. A large egg acts as a binder, helping to hold the batter together and contributing to its structure. Pure vanilla extract is essential for adding a warm, aromatic depth that complements the chocolate beautifully. Lastly, melted unsalted butter provides a rich flavor and keeps the donut holes moist. Combining these wet ingredients thoroughly before mixing them into the dry ingredients ensures a homogenous mixture and helps in developing the desired texture for your baked goods.
Glaze Ingredients: Sweet and Smooth
The sweet, smooth glaze is what truly elevates these chocolate donut holes. You’ll primarily need confectioners’ sugar, also known as powdered sugar, which forms the base of the glaze and gives it its signature silky texture. A small amount of milk (or cream for a richer glaze) is used to achieve the desired consistency, allowing the glaze to coat the donut holes perfectly without being too thick or too runny. A dash of vanilla extract added to the glaze enhances its sweetness and adds another layer of delightful aroma. For other delicious dessert ideas, consider making Peanut Butter Brownie Swirl Cookies or a Quick Italian Cream Cake, also featuring simple, sweet glazes.
Begin Baking Your Chocolate Donut Holes
With all your ingredients measured and ready, it’s time to bring these delicious chocolate donut holes to life. The baking process for these treats is straightforward, making them an accessible project for bakers of all skill levels. Following these steps carefully will ensure your donut holes are perfectly baked, tender, and ready for their sweet glaze. Proper preparation of your oven and batter are foundational to achieving the best possible outcome, laying the groundwork for a truly delightful homemade treat. This stage is where the magic begins, transforming simple ingredients into something special.
Preheat Oven to 375°F (190°C)
Preheating your oven correctly is a crucial first step in any baking endeavor, especially for delicate items like donut holes. Set your oven to 375°F (190°C) and allow it ample time to reach and maintain this temperature. A properly preheated oven ensures that the donut holes begin baking immediately at the correct temperature, leading to a quick rise and an even cook. If the oven is not hot enough, the leavening agents won’t activate properly, resulting in dense, rather than light and airy, donut holes. Always wait for your oven’s preheat indicator to signal it’s ready before placing your baking pan inside.
Combine Wet and Dry Batters
Once your wet and dry ingredients are prepared, it’s time to bring them together to form the donut batter. In a large bowl, whisk together your dry ingredients (flour, sugar, cocoa powder, baking powder, salt). In a separate medium bowl, combine your wet ingredients (milk, egg, vanilla extract, melted butter). Gradually add the wet mixture to the dry ingredients, stirring just until everything is combined. Be careful not to overmix the batter. Overmixing can develop the gluten in the flour too much, leading to tough donut holes instead of light and tender ones. A few lumps are perfectly acceptable and even desirable.
Fill Donut Hole Baking Pan
Using a non-stick donut hole baking pan is recommended for this recipe. Lightly grease the pan cavities, even if it’s non-stick, to ensure easy removal. Spoon or pipe the batter into each cavity, filling them approximately two-thirds full. It’s important not to overfill, as the donut holes will rise during baking, and overfilling can cause them to overflow or lose their characteristic round shape. A pastry bag or a Ziploc bag with a corner snipped off can make this task neater and more efficient, ensuring each donut hole is uniformly sized and shaped, ready for baking and subsequent glazing.
Bake Your Delicious Chocolate Donut Holes
The anticipation builds as your chocolate donut holes enter the oven. This stage is relatively quick, but precision in baking time is key to achieving that perfect texture – moist on the inside and slightly firm on the outside. Monitoring your donut holes during this brief baking window will prevent them from becoming dry or overly browned. Remember, every oven can vary slightly, so paying close attention to visual cues and performing a quick doneness test will ensure consistently delightful results every single time. Get ready to enjoy the rich aroma filling your kitchen!
Bake for 10-12 Minutes
Place your filled donut hole baking pan into the preheated 375°F (190°C) oven. The baking time for these small treats is wonderfully short, typically ranging from 10 to 12 minutes. During this time, the donut holes will puff up, become golden brown around the edges, and develop a lovely, firm texture. Keep an eye on them, especially towards the end of the baking cycle, as oven temperatures can vary. The rich scent of chocolate will also become very prominent, signaling that your delicious bites are nearly ready to emerge from the heat.
Test Donut Holes for Doneness
To ensure your chocolate donut holes are perfectly baked, a simple test can be performed. Gently press the top of a donut hole; if it springs back lightly, it’s likely done. Alternatively, insert a toothpick into the center of one of the donut holes. If the toothpick comes out clean or with only a few moist crumbs attached, your donut holes are ready to be removed from the oven. Avoid leaving them in for too long past this point, as overbaked donut holes can become dry and crumbly, losing their desirable moist and tender interior.
Cool Baked Donut Holes Briefly
Once baked, remove the donut hole pan from the oven. Allow the donut holes to cool in the pan for just 5 minutes. This brief cooling period helps them to firm up slightly and makes them easier to remove from the pan without breaking. After 5 minutes, carefully transfer the warm donut holes to a wire rack to cool completely. Cooling on a wire rack allows air to circulate around all sides, preventing the bottoms from becoming soggy. This step is crucial before glazing, as applying glaze to hot donut holes would cause it to melt and run off, rather than set into a smooth, even coating. For more delightful dessert inspiration, explore our wide range of desserts.
Preparing the Sweet Donut Hole Glaze
The glaze is the crowning glory of these chocolate donut holes, adding a beautiful sheen and an irresistible sweetness. A perfectly smooth glaze enhances the flavor and texture, creating a delightful contrast with the rich chocolate cake. This section will guide you through the simple process of mixing your glaze ingredients and achieving the ideal consistency, ensuring your donut holes look as good as they taste. Paying attention to these details will result in a professional-looking finish that will impress anyone who tries them.
Mix Glaze Ingredients Smoothly
Creating the perfect glaze is surprisingly simple. In a medium bowl, combine the confectioners’ sugar, milk, and vanilla extract. Start by whisking these ingredients together gently. The powdered sugar might clump initially, but with continuous whisking, it will gradually smooth out. If you prefer a slightly thinner glaze, you can add a tiny bit more milk, a quarter teaspoon at a time, until you reach your desired consistency. Conversely, if the glaze is too thin, add a tablespoon more of confectioners’ sugar and whisk again until smooth. Consistency is key here for a beautiful finish.
Achieve Perfect Glaze Consistency
The ideal glaze consistency for your donut holes should be thick enough to coat the back of a spoon generously but still thin enough to drip slowly from it. It shouldn’t be so thick that it forms a heavy, pasty layer on the donut holes, nor so thin that it completely runs off, leaving only a faint trace. A well-balanced glaze will adhere beautifully, forming a smooth, slightly opaque layer that sets relatively quickly. This perfect balance ensures a delightful textural experience with every bite, enhancing the overall enjoyment of your homemade glazed chocolate donut holes.
How to Glaze Donut Holes Perfectly
Glazing your chocolate donut holes is the final, fun step that brings them to completion. This process is quick and rewarding, transforming plain baked goods into glistening, sweet delights. Achieving a perfect glaze coat involves a gentle technique and a little patience as they set. The goal is an even, smooth layer that enhances both the appearance and the flavor, making each donut hole an irresistible bite-sized treat. Get ready to turn your humble donut holes into sparkling gems!
Dunk Each Donut Hole Gently
Once your donut holes are completely cool and your glaze is ready, it’s time to dunk! Hold each donut hole by its side or use a fork to dip it into the glaze. Submerge it fully, ensuring the entire surface is coated. Lift it out gently, allowing any excess glaze to drip back into the bowl for a few seconds. This prevents a thick, clumpy layer of glaze and ensures a uniform coating. Work quickly but carefully to maintain the integrity of the donut holes. For another easy dessert that’s perfect for a crowd, try making Snickerdoodle Cobbler.
Set Glazed Donut Holes to Firm
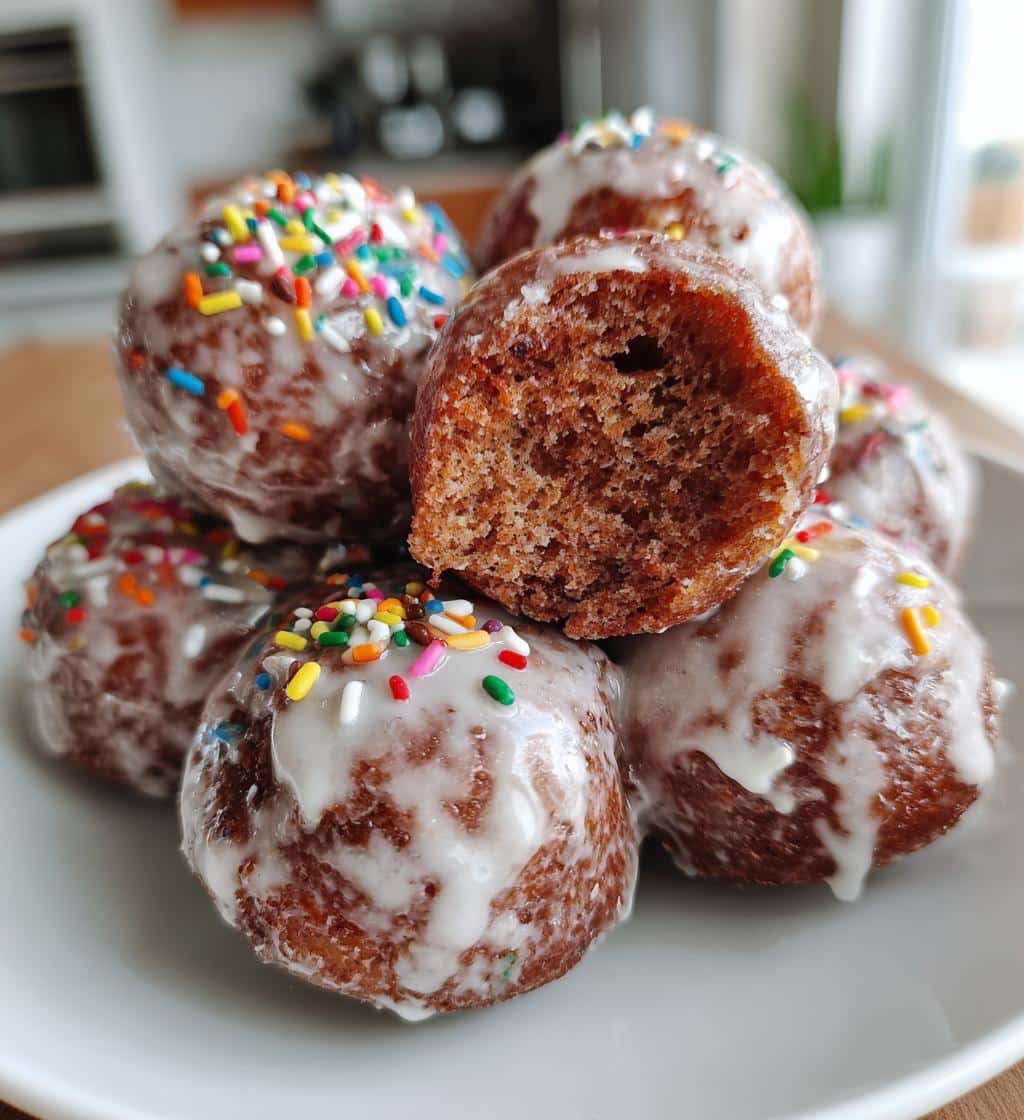
After dipping, carefully place each glazed donut hole back onto the wire rack, which you might want to place over a sheet of parchment paper or wax paper to catch any drips. This allows the excess glaze to continue dripping off and for the glaze to set properly. Depending on the humidity in your kitchen and the glaze consistency, this can take anywhere from 15 to 30 minutes. Once the glaze is firm to the touch, your beautiful glazed chocolate donut holes are ready to be served. If you want to add sprinkles, do so immediately after dunking, before the glaze sets.
Times for Perfect Donut Hole Bliss
One of the most appealing aspects of this glazed chocolate donut holes recipe is its efficiency. You don’t need to dedicate an entire afternoon to baking to enjoy fresh, homemade treats. The entire process, from gathering ingredients to the final glazing, is designed to be quick and manageable, fitting easily into even the busiest schedules. This rapid turnaround means you can satisfy those sweet cravings almost instantly, or whip up a delightful surprise for family and friends without extensive planning. The reward of fresh, warm donut holes is just minutes away.
Quick Preparation in 15 Minutes
The preparation phase for these chocolate donut holes is remarkably swift. With your ingredients laid out, combining the dry and wet components, mixing the batter, and filling the donut hole pan can all be accomplished within a mere 15 minutes. This quick prep time makes this recipe ideal for spontaneous baking sessions or when you need a delicious dessert in a hurry. The simplicity of the steps means less time spent on complicated techniques and more time anticipating the delightful aroma and taste of your homemade treats.
Efficient Baking Time of 12 Minutes
Once prepared, the donut holes require a very efficient baking time. Typically, they will be perfectly baked in just 10 to 12 minutes in a preheated oven. This short baking window is perfect for maintaining the moist interior while achieving a lightly golden exterior. The quick bake contributes significantly to the overall speed of the recipe, ensuring that you’re not waiting around for long. Just enough time for a quick cleanup or to prepare your glaze while they bake, optimizing your kitchen time.
Total Time: 27 Minutes Flat
Combining the quick 15-minute preparation with an efficient 12-minute baking time means you can have a batch of warm, freshly baked chocolate donut holes ready in an astonishing 27 minutes flat. This calculation doesn’t even fully account for the brief cooling and glazing, but even with those steps, the entire process is incredibly fast. This total time positions these donut holes as an excellent choice for a last-minute dessert, a quick breakfast treat, or an impromptu gathering. Homemade bliss has never been so accessible or so swift.
Serving and Storing Your Donut Holes
Once your glazed chocolate donut holes are ready, the next delightful step is serving them! These treats are best enjoyed fresh, but knowing how to properly store them ensures their deliciousness lasts a bit longer. Whether you’re planning a small gathering or simply want to enjoy them over a few days, understanding the yield and storage recommendations will help you manage your delicious creations effectively. From presentation tips to freshness preservation, this section ensures your donut hole experience is optimal from first bite to last.
Recipe Yields 24 Donut Holes
This recipe is designed to yield approximately 24 delightful chocolate donut holes. This generous amount makes them perfect for sharing with family and friends, bringing to a potluck, or simply having enough to satisfy your sweet cravings for a few days. The consistent yield ensures you can plan accordingly, whether you’re aiming for individual servings or a communal platter. The small, uniform size of the donut holes also makes portion control easy, allowing everyone to enjoy a perfect bite.
Store Donut Holes Airtight
To maintain the freshness and moistness of your glazed chocolate donut holes, proper storage is essential. Once the glaze has fully set, transfer the donut holes to an airtight container. This prevents them from drying out and helps preserve their tender texture. Storing them at room temperature is generally fine, especially if you plan to consume them within a day or two. Avoid refrigeration if possible, as it can sometimes dry out baked goods or make the glaze sticky. For more insights on baked goods, you can read about the general history of a doughnut on Wikipedia.
Keep Fresh for Up to 3 Days
When stored correctly in an airtight container at room temperature, your homemade glazed chocolate donut holes will remain wonderfully fresh and delicious for up to 3 days. While they are undoubtedly best enjoyed on the day they are baked, their quality holds up well, making them a fantastic make-ahead option for breakfast or dessert. If you find the glaze has softened slightly over time, a quick refresh in a very low oven (around 200°F/95°C) for a few minutes can sometimes help, though be mindful not to melt the glaze completely.
Understanding Donut Hole Nutrition Facts
While indulging in these delightful glazed chocolate donut holes, it’s helpful to have a general understanding of their nutritional contribution. Homemade treats, by their nature, allow for some control over ingredients, which can influence the final nutritional profile. However, it’s important to remember that these are sweet treats meant for enjoyment and moderation. The following provides an estimated overview, helping you make informed choices while still savoring every delicious bite of your hard work. Understanding these facts ensures balanced enjoyment.
Calories Per Serving: 80
On average, each glazed chocolate donut hole from this recipe is estimated to contain approximately 80 calories. This figure can vary slightly based on the exact ingredients used, such as the type of milk or butter, and the amount of glaze applied. Considering they are small, individual treats, this calorie count allows for mindful consumption, fitting into various dietary considerations. Enjoying one or two can be a perfectly balanced way to satisfy a sweet craving without overindulgence.
Key Nutritional Details
Beyond calories, these donut holes also provide other nutritional components. They contain carbohydrates primarily from the flour and sugar, offering a quick source of energy. Fats come from the butter and milk, contributing to the richness and texture. While they contain minimal protein and fiber, the primary purpose of these donut holes is to provide a delicious and satisfying sweet treat. For those interested in the main ingredient, a deeper understanding of chocolate can be found on Wikipedia. Always remember that homemade items provide the benefit of knowing exactly what ingredients are included.
Make Donut Holes Extra Special
While our glazed chocolate donut holes are inherently delicious, there’s always room to elevate them further. Adding a personal touch or a festive twist can transform them from a simple treat into a memorable highlight. Whether you’re celebrating a special occasion, catering to individual preferences, or simply want to experiment with flavors and textures, these simple additions can make a significant impact. Unleash your creativity and turn each batch into a unique and exciting experience that reflects your culinary flair.
Add Fun Sprinkles on Top
For an instant burst of color and a touch of celebratory flair, add fun sprinkles on top of your freshly glazed donut holes. Apply them immediately after dipping, while the glaze is still wet, to ensure they adhere properly. You can choose from a wide variety of sprinkles—classic rainbow jimmies, elegant pearlized sprinkles, festive holiday shapes, or even coarse sanding sugar for a beautiful sparkle. This simple addition makes the donut holes visually appealing and even more enticing, especially for children or for party platters. It’s a quick way to personalize each treat.
Explore New Flavor Variations
Beyond sprinkles, consider experimenting with new flavor variations to keep your donut holes exciting. A hint of orange zest added to the batter can provide a bright, citrusy counterpoint to the rich chocolate. For a wintery treat, a touch of peppermint extract can transform them into delightful chocolate-mint donut holes. You could also try different glazes – a powdered sugar glaze with lemon juice for tang, or a mocha glaze incorporating instant espresso powder. The possibilities are endless, allowing you to tailor the flavors to seasons, occasions, or personal preferences. Share your unique creations on Pinterest and Instagram!
Personalize Your Glazed Chocolate Donut Holes
Making a recipe your own is one of the joys of home baking. Even with a straightforward recipe like these glazed chocolate donut holes, there are subtle ways to personalize the flavor profile, enhancing the inherent deliciousness to suit your palate. These small adjustments can deepen the chocolate notes or add a layer of complexity that transforms the familiar into something extraordinary. Experimenting with these slight modifications allows you to craft a donut hole that is uniquely yours and incredibly satisfying.
Add Vanilla Extract to Batter
While vanilla extract is often included in the glaze, don’t underestimate its power when added directly to the batter. A good quality pure vanilla extract can significantly enhance the chocolate flavor, making it taste richer and more nuanced. The vanilla acts as a complementary base, bringing out the deeper notes of the cocoa powder without overpowering it. A teaspoon or two added along with your wet ingredients will infuse the entire donut hole with a warm, comforting aroma and a subtly elevated taste that will delight your senses.
Try Espresso for Richer Taste
For those who love an intensely rich chocolate flavor, adding a small amount of instant espresso powder to your batter is a game-changer. Espresso doesn’t make the donut holes taste like coffee; instead, it deepens and intensifies the chocolate notes, making them more pronounced and sophisticated. A teaspoon of instant espresso powder dissolved in a tablespoon of hot water and added with the wet ingredients can dramatically elevate the chocolate experience. This secret ingredient is a common chef’s trick for making chocolate desserts truly shine, bringing a complex depth to every bite.
Enjoy Your Homemade Chocolate Donut Holes
Finally, the moment arrives to savor the fruits of your labor. These homemade glazed chocolate donut holes are more than just a sweet treat; they’re a testament to the joy of baking and sharing. The warmth of fresh-baked goods, combined with the personal touch of a homemade recipe, creates a truly special experience. Whether enjoyed in quiet solitude or as part of a lively gathering, these donut holes are designed to bring smiles and happiness. So go ahead, pour yourself a cup of coffee or milk, and indulge in your delicious creation.
A Perfect Sweet Treat
These glazed chocolate donut holes are a perfect sweet treat for any occasion. Their bite-sized nature makes them ideal for breakfast alongside your morning coffee, a delightful afternoon snack, or a charming dessert after dinner. They are not overly heavy, allowing for guilt-free indulgence. The combination of moist chocolate cake and a sweet, smooth glaze creates a harmonious balance of flavors and textures that appeals to almost everyone. Serve them on a pretty platter, and watch them disappear!
Share Donut Hole Happiness
The joy of baking often extends to the joy of sharing. Your homemade chocolate donut holes are an excellent way to spread happiness among friends, family, and colleagues. Package them in decorative boxes for thoughtful gifts, bring them to a potluck, or simply lay them out for an impromptu get-together. The effort you put into making them from scratch will be appreciated, and the delicious taste will undoubtedly bring smiles. Sharing these sweet treats is a wonderful way to connect and create memorable moments around delicious food.