
Cinnamon Roll Cheesecake combines two beloved sweet treats into one incredible dessert. This homemade recipe guides you through each step, ensuring a rich, creamy texture with a delightful cinnamon swirl and luscious frosting. Get ready to bake a truly unforgettable dish.
Key Takeaways
- A stable crust is foundational for a successful cheesecake.
- Crafting a balanced cinnamon swirl delivers signature flavor.
- Using a water bath is crucial for preventing cracks and achieving a smooth, creamy texture.
- Proper cooling and chilling times are vital for the cheesecake to set perfectly.
- The homemade cream cheese frosting provides the perfect finish, mirroring traditional cinnamon rolls.
Baking this cheesecake is a joy. Each layer adds to the richness. The aroma fills your kitchen. Guests will adore this creation. It truly is a delightful sweet treat.
Gather Ingredients for This Recipe
Before beginning your culinary adventure, gathering all necessary ingredients ensures a smooth and enjoyable baking process. This homemade dessert requires distinct components for its crumb base, flavorful cinnamon swirl, rich batter, and decadent frosting. Having everything pre-measured and at room temperature, especially for the dairy products, is a crucial first step toward achieving a perfectly textured cheesecake.
Crumb base components
For the sturdy and delicious foundation of your cinnamon roll cheesecake, you will need classic ingredients that create a buttery, slightly crisp crust. This typically includes graham cracker crumbs, which offer a delightful sweetness and texture. Melted unsalted butter binds these crumbs together, providing richness and helping the crust set firmly. A touch of granulated sugar can enhance the sweetness, while a pinch of ground cinnamon adds a warm, aromatic note that complements the overall flavor profile of the dessert. Achieving the right balance here is key to a crust that supports the creamy filling without being too crumbly or too hard.
Swirl ingredients list
The signature “cinnamon roll” aspect comes alive with a luscious, spiced swirl woven throughout the cheesecake. This flavorful element typically calls for brown sugar, which provides a deeper molasses note than granulated sugar, pairing wonderfully with the spice. Ground cinnamon is, of course, the star here, delivering that unmistakable aromatic warmth. A small amount of all-purpose flour can be added to help thicken the swirl, preventing it from completely disappearing into the batter during baking. A touch of melted butter or milk can also be used to create a more pliable and spreadable paste, ensuring even distribution and a beautiful marbled effect.
Batter essentials
The heart of any good cheesecake is its creamy, rich batter. High-quality ingredients are paramount for a superior texture and flavor. You’ll need full-fat cream cheese, softened to room temperature, which is fundamental for a smooth, lump-free batter. Granulated sugar provides sweetness, while a hint of vanilla extract enhances the overall flavor. Sour cream or heavy cream adds moisture and contributes to the cheesecake’s characteristic tang and velvety texture. Large eggs, also at room temperature, are essential for structure and binding the batter without over-mixing. Ensuring all these components are ready sets the stage for a truly delightful homemade dessert.
Frosting necessities
No cinnamon roll-inspired dessert is complete without a rich, tangy cream cheese frosting. This final layer elevates the cheesecake, marrying it perfectly with the classic cinnamon rolls profile. You will need softened cream cheese, unsalted butter (also softened), powdered sugar (confectioners’ sugar) for sweetness and smooth consistency, and vanilla extract for flavor. A splash of milk or heavy cream can be added to achieve the desired spreadable consistency. For a lighter, airier frosting, some recipes call for folding in freshly whipped cream, making it exceptionally delightful and easy to spread over your cooled cheesecake. This creamy frosting is truly the crown jewel of this sweet treat.
Making Your Cheesecake Crust Base
The foundation of any spectacular cheesecake is its crust. A well-prepared crust not only provides structural integrity but also adds a delightful textural contrast to the creamy filling. For this cinnamon roll cheesecake, a buttery graham cracker crust is the ideal starting point, offering a subtle sweetness and a hint of spice that beautifully complements the cinnamon swirl and rich batter. Proper mixing, pressing, and a quick pre-bake are essential steps to prevent a soggy bottom and ensure a crisp, golden base. This attention to detail early in the process pays dividends in the final delicious outcome, guaranteeing a perfect first bite every time.
Mixing base ingredients
Begin by finely crushing your graham crackers. You can do this by placing them in a Ziploc bag and crushing them with a rolling pin, or for a quicker method, pulse them in a food processor until they resemble fine sand. Once your crumbs are ready, transfer them to a medium-sized bowl. Add the granulated sugar and ground cinnamon, stirring to combine them thoroughly. Next, pour in the melted unsalted butter. Use a fork or your hands to mix until all the crumbs are evenly moistened and resemble wet sand. It’s important that every crumb is coated, as this butter acts as the binder, ensuring your crust holds together well during baking and slicing. This step is straightforward but crucial for a cohesive crust.
Pressing into pan
Transfer the moistened graham cracker mixture into a 9-inch springform pan. For easier removal and cleanup, line the bottom of the pan with parchment paper before assembling. Using the bottom of a flat-bottomed glass or a measuring cup, firmly press the crumb mixture evenly across the bottom of the pan and slightly up the sides. Aim for a consistent thickness to ensure even baking. A well-pressed crust will be dense and compact, preventing crumbling when the cheesecake is sliced. The firm pressure ensures there are no gaps or loose crumbs, creating a solid base for the rich cheesecake batter you’ll be adding later. Taking your time here makes a big difference.
Quick bake process
Once the crust is firmly pressed into the pan, it’s time for a quick pre-bake. Place the springform pan into a preheated oven, typically at 350°F (175°C), for about 8-10 minutes. This brief baking period helps to set the crust, making it less prone to becoming soggy once the wet cheesecake batter is added. It also enhances the flavor of the graham crackers and butter, giving it a slightly toasted aroma and a firmer texture. After baking, remove the pan from the oven and let the crust cool completely on a wire rack before adding the cheesecake filling. A cooled crust prevents the warm crust from prematurely heating the cheesecake batter, which could affect the final texture. This step ensures a wonderfully crisp foundation.
Prepare Flavorful Cinnamon Swirl
The cinnamon swirl is what truly transforms this creamy dessert into a cinnamon roll cheesecake. This aromatic, spiced layer adds both visual appeal and a burst of warm, comforting flavor that perfectly complements the rich and tangy cream cheese batter. Creating the swirl is a simple yet impactful step that elevates the entire dish, ensuring every slice delivers that beloved sweet treat experience. The key is achieving a paste that is easy to dollop and swirl, maintaining its integrity during the baking process for those beautiful marbled patterns.
Combining swirl elements
In a small bowl, combine the brown sugar, ground cinnamon, and all-purpose flour. The flour helps to slightly thicken the mixture, preventing it from completely dissolving into the cheesecake batter during baking, thus preserving the distinct swirl. Whisk these dry ingredients together thoroughly to ensure the cinnamon and flour are evenly distributed throughout the sugar. Next, pour in the melted butter or milk. Mix until a thick, uniform paste forms. The consistency should be spreadable but not too liquidy; it should hold its shape when dolloped. If it’s too thick, add a tiny bit more milk or butter; if too thin, a pinch more flour. This cinnamon-sugar paste is the heart of your cinnamon roll flavor, ready to be layered into the rich cheesecake batter for an irresistible dessert. For more delectable baking ideas, browse our desserts category.
Mixing Smooth Cheesecake Batter
Crafting the perfect cheesecake batter is where the magic truly happens, laying the groundwork for that incredibly smooth, dense, yet creamy texture everyone adores. The secret lies in gentle handling and precise mixing of high-quality ingredients. Avoid over-mixing at all costs, as introducing too much air can lead to cracks and a less dense consistency. By carefully following these steps—beating cream cheese until airy, incorporating sugars and liquids smoothly, and gently folding in eggs—you’ll ensure your cinnamon roll cheesecake achieves its characteristic melt-in-your-mouth perfection. This process makes all the difference in achieving a truly luxurious homemade dessert.
Beating cream cheese
Start by placing your softened cream cheese in a large mixing bowl. It’s crucial that the cream cheese is at room temperature; cold cream cheese will result in a lumpy batter. Using an electric mixer on medium-low speed, beat the cream cheese for 2-3 minutes until it becomes completely smooth, light, and airy. Scrape down the sides of the bowl frequently to ensure uniform consistency. This initial step is vital for removing any lumps and creating a perfect, fluffy base for your cheesecake, which will contribute significantly to its final velvety texture. Do not rush this part, as a smooth cream cheese base is the key to a flawless batter.
Adding sugars and liquids
Once the cream cheese is smooth, gradually add the granulated sugar to the bowl, continuing to beat on low speed until it’s just combined and no sugar granules are visible, typically another 2-3 minutes. Next, incorporate the vanilla extract and sour cream (or heavy cream). Mix on low speed until these liquids are fully blended into the cream cheese mixture. Be careful not to overmix at this stage; the goal is simply to combine the ingredients until smooth. Excessive beating can incorporate too much air, which can cause the cheesecake to rise too quickly and then crack during cooling. A smooth, well-combined base is what you’re aiming for.
Gently folding eggs
The final step in preparing the batter is to add the eggs. Crack your room temperature eggs into a separate small bowl first, then add them to the cream cheese mixture one at a time. Beat on the absolute lowest speed, or even better, gently fold them in by hand with a spatula, just until each egg is incorporated. Stop mixing as soon as the yolk disappears. Over-mixing the eggs is the most common cause of cracks in cheesecakes because it develops too much air, which then collapses during cooling. Gentle handling of the eggs ensures a dense, uniform batter that will bake into a creamy, crack-free dessert. For more delightful sweet creations, consider trying our Peanut Butter Brownie Swirl Cookies.
Assemble Flavorful Cinnamon Roll Cheesecake
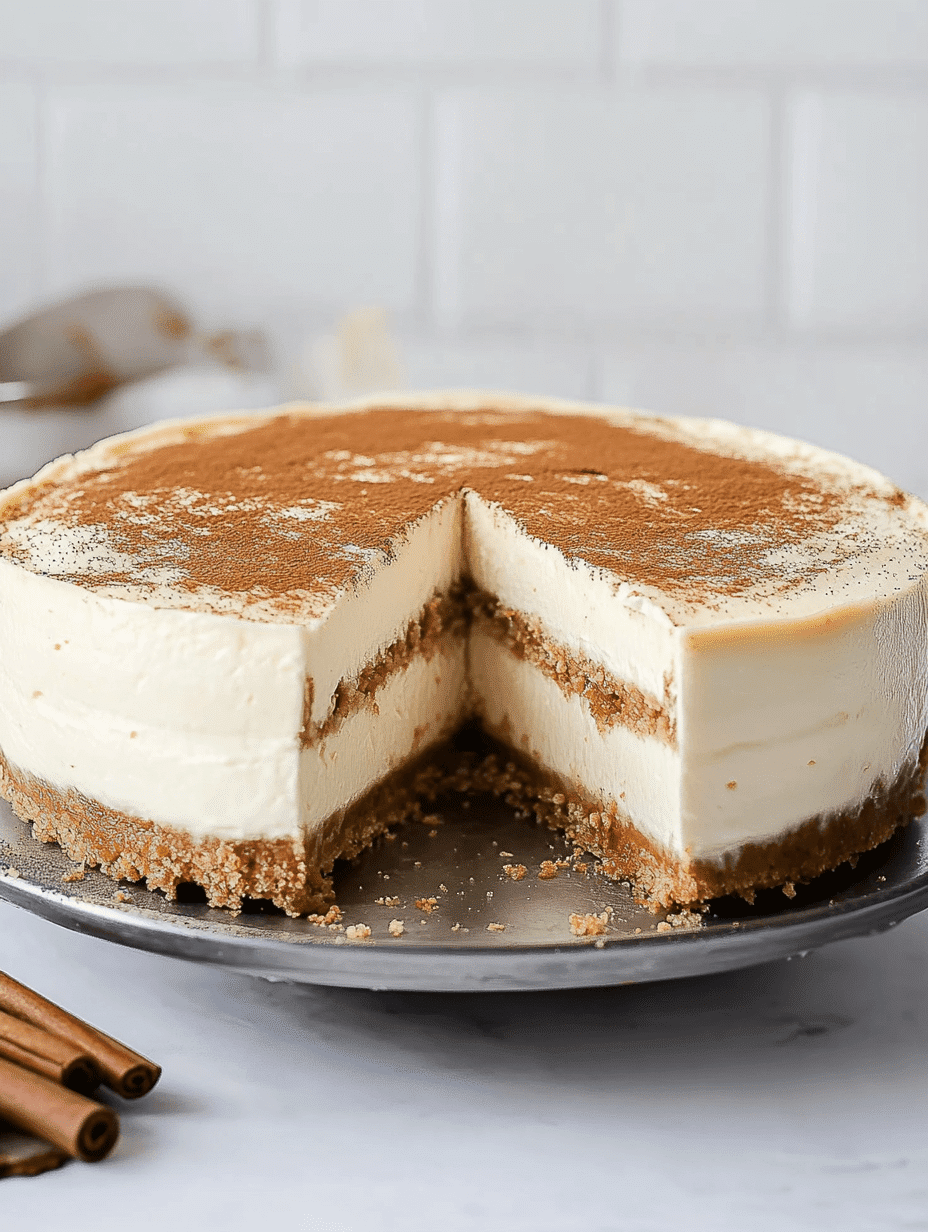
Assembling your Cinnamon Roll Cheesecake is where the visual magic truly begins, transforming individual components into a cohesive and stunning dessert. This stage requires a gentle hand to ensure the delicate layers are perfectly positioned, allowing the cinnamon swirl to create its beautiful marbled effect without fully blending into the creamy batter. The way you layer the batter and swirl directly influences both the aesthetic appeal and the distribution of flavor in every slice. Taking care during assembly ensures a homemade dessert that is not only delicious but also a feast for the eyes, promising a delightful surprise with each bite.
Layering batter and swirl
Pour about half of the prepared cheesecake batter over the cooled graham cracker crust in the springform pan. Spread it evenly using an offset spatula. Next, take spoonfuls of your cinnamon swirl paste and dollop them over the first layer of batter. Try to distribute the dollops somewhat evenly across the surface. Then, pour the remaining cheesecake batter over the cinnamon dollops, gently spreading it to cover them completely. Be careful not to disturb the swirl too much. For an even more pronounced swirl, use a butter knife or a skewer to gently swirl through the layers, creating beautiful patterns. Do not overmix or swirl too vigorously, as you want distinct streaks of cinnamon, not a fully integrated color. This technique ensures a striking visual and consistent flavor throughout your creamy dessert. We often use similar layering techniques in other baked goods, like our Vanilla Bean Creme Brulee Cheesecake Cupcakes, to achieve multi-layered deliciousness.
Bake Cheesecake in Water Bath
Baking your cinnamon roll cheesecake in a water bath is a non-negotiable step for achieving that signature smooth, creamy texture and preventing dreaded cracks on the surface. This gentle, moist cooking environment provides even heat distribution, allowing the cheesecake to bake slowly and uniformly. It mimics a steamed environment, which is ideal for delicate custards and creamy desserts like cheesecake. Understanding the correct oven temperature, precise water bath setup, and ideal baking duration details are critical for a perfectly cooked, beautifully unblemished cheesecake. This technique ensures your homemade dessert emerges from the oven flawless and ready for chilling, a testament to proper baking instructions.
Oven temperature settings
Preheat your oven to the recommended temperature, typically around 325-350°F (160-175°C). The exact temperature can vary slightly depending on your oven and recipe, but generally, cheesecakes benefit from a lower, more stable heat than many other baked goods. A lower temperature helps to cook the cheesecake slowly and evenly, reducing the risk of over-baking the edges before the center is set. Ensure your oven has reached and maintained this temperature for at least 15-20 minutes before placing the cheesecake inside, as consistent heat is key to preventing uneven baking and cracking. It’s often beneficial to use an oven thermometer to verify accuracy.
Water bath setup
To set up a water bath (bain-marie), first, wrap the exterior bottom and sides of your springform pan tightly with several layers of heavy-duty aluminum foil. This is crucial to prevent water from seeping into the crust. Place the foil-wrapped cheesecake pan inside a larger roasting pan. Carefully pour hot water into the larger roasting pan, making sure the water level comes about halfway up the sides of the springform pan. The hot water creates a humid environment in the oven, which prevents the cheesecake from drying out and cracking. Gently transfer the entire setup—roasting pan with water and cheesecake—into your preheated oven. This careful setup ensures optimal baking conditions.
Baking duration details
Bake the cheesecake for approximately 60-80 minutes, or until the edges are set and slightly puffed, but the center still has a slight wobble when gently shaken. The exact baking time will depend on your oven and the specific density of your batter. Avoid opening the oven door unnecessarily, as sudden temperature changes can also cause cracks. Once the cheesecake appears done, turn off the oven, leave the door ajar, and let the cheesecake cool inside the water bath for another hour. This gradual cooling prevents thermal shock, which is another common culprit for cracking. This meticulous attention to baking duration details and cooling ensures a perfectly creamy, crack-free cheesecake.
Cooling and Chilling Your Delicious Dessert
The journey to a perfect Cinnamon Roll Cheesecake doesn’t end when it comes out of the oven; in fact, the cooling and chilling phases are just as critical as the baking itself. These steps are vital for the cheesecake to fully set, develop its rich flavor, and achieve that signature dense yet creamy texture. Rushing this process can lead to a less stable, less flavorful, and potentially cracked dessert. By allowing for gradual cooling and sufficient refrigeration time, you ensure your homemade dessert reaches its peak of deliciousness and aesthetic appeal, ready to impress with its smooth consistency and delightful taste.
Gradual cooling process
After the initial cooling period in the oven with the door ajar, carefully remove the cheesecake from the water bath and the roasting pan. Remove the foil from around the springform pan. Place the cheesecake, still in its pan, on a wire rack at room temperature. Allow it to cool completely for at least 1-2 hours. This gradual cooling on the counter allows the internal temperature to drop slowly, further preventing cracks and ensuring the structure stabilizes. Resist the urge to move it to the refrigerator too soon, as a sudden change in temperature can still shock the cheesecake and lead to imperfections. Patience here is key to a smooth, unblemished surface.
Essential refrigeration time
Once the cheesecake has reached room temperature, cover it loosely with plastic wrap and transfer it to the refrigerator. This is perhaps the most critical step for cheesecake perfection. The cheesecake needs to chill for a minimum of 6-8 hours, but ideally overnight. During this time, the fats in the cream cheese solidify, the flavors meld and deepen, and the texture transforms into that wonderfully dense and creamy consistency that is characteristic of a well-made cheesecake. Attempting to slice or serve the cheesecake before it’s fully chilled will result in a messy, unset dessert. This essential refrigeration time guarantees a firm, sliceable, and intensely flavorful homemade dessert.
Whip Up Cream Cheese Frosting
No cinnamon roll-inspired dessert would be complete without a generous slathering of luscious cream cheese frosting. This sweet, tangy, and incredibly smooth topping is the perfect complement to the rich, spiced cheesecake, tying all the flavors together in a delightful symphony. Whipping up this creamy frosting is a simple process, but a few key techniques ensure a perfectly airy and spreadable consistency. It’s the crowning glory for your homemade dessert, adding that final touch of indulgence that transforms a great cheesecake into an extraordinary one, truly mimicking the beloved cinnamon rolls.
Making creamy base
Begin by ensuring both your cream cheese and unsalted butter are at proper room temperature, soft enough to easily dent with a finger but not melted. In a large mixing bowl, combine the softened cream cheese and butter. Using an electric mixer, beat them together on medium speed until the mixture is light, fluffy, and completely smooth, with no lumps remaining. This usually takes about 2-3 minutes, requiring occasional scraping down of the bowl sides. Once smooth, gradually add the powdered sugar (confectioners’ sugar) a cup at a time, beating on low speed until fully incorporated. Then, increase to medium speed and beat until the frosting is light and fluffy. Stir in the vanilla extract until just combined. The goal is a perfectly creamy, lump-free base that is ready for the next step.
Folding in whipped cream
For an extra light and airy frosting that melts in your mouth, gently fold in freshly whipped heavy cream. In a separate, chilled bowl, whip cold heavy cream until soft peaks form. Do not over-whip it into stiff peaks, as it will be harder to fold in. Once the cream cheese base is prepared, carefully add the whipped cream to it. Using a rubber spatula, gently fold the whipped cream into the cream cheese mixture until just combined. Over-mixing will deflate the whipped cream, losing its airy texture. This technique results in a frosting that is wonderfully light, cloud-like, and easy to spread, providing a delicate contrast to the dense cheesecake beneath. This enhances the overall experience of this sweet treat. Another fantastic recipe with cream components is our Quick Italian Cream Cake, which offers a similar indulgence.
Frost and Dust Your Cheesecake
The final touches are what truly complete your Cinnamon Roll Cheesecake, transforming it from a delicious baked good into a masterpiece. Once the cheesecake is perfectly chilled and the frosting is ready, the application process is all about creating that inviting, homemade dessert appearance. Spreading the creamy frosting evenly and adding a delicate dusting of cinnamon not only enhances the visual appeal but also reinforces the dessert’s signature flavor profile. This last step is crucial for delivering a beautiful and incredibly appetizing sweet treat that looks as good as it tastes.
Spreading creamy frosting
After your cheesecake has been thoroughly chilled for at least 6-8 hours, carefully remove it from the springform pan. Ensure it’s placed on a serving platter. With an offset spatula or the back of a spoon, evenly spread your prepared cream cheese frosting over the top surface of the cooled cheesecake. You can create decorative swirls or simply smooth it out for a clean finish. Take your time to cover the entire top, ensuring a consistent layer of frosting. The smooth, tangy frosting will provide a beautiful contrast to the subtle spice of the cheesecake and add another layer of creamy texture to every bite. Make sure the cheesecake is cold enough to prevent the frosting from melting.
Final cinnamon dusting
For the ultimate cinnamon roll aesthetic and an extra burst of aromatic flavor, lightly dust the top of the frosted cheesecake with ground cinnamon. A small fine-mesh sieve works perfectly for this. Hold the sieve over the cheesecake and gently tap it, allowing a fine, even layer of cinnamon to fall over the white frosting. This dusting not only adds a lovely visual appeal, mimicking the top of a fresh cinnamon roll, but also enhances the overall aroma and flavor profile of the dessert. This simple, final touch truly completes the Cinnamon Roll Cheesecake experience, making it irresistible. You can find more baking inspiration on our social media channels.
Tips for Perfect Cheesecake Results
Achieving a truly perfect Cinnamon Roll Cheesecake requires attention to a few critical details that can significantly impact its texture, appearance, and overall success. These key tips, ranging from ingredient preparation to specialized baking techniques, are essential for anyone aiming to create a creamy, crack-free, and flavorful homemade dessert. By understanding and implementing these pieces of advice, you’ll be well on your way to baking a cheesecake that rivals those from professional bakeries, ensuring every slice is a testament to your skill and dedication to delicious sweet treat making.
Room temperature ingredients
Always ensure your cream cheese, eggs, and sour cream (or heavy cream) are at room temperature before you begin mixing. Cold ingredients do not emulsify properly, leading to a lumpy batter and a less smooth final texture. Room temperature ingredients blend together effortlessly, creating a homogeneous, silky batter that bakes evenly and results in a wonderfully creamy cheesecake. Plan ahead and take these ingredients out of the refrigerator at least 30 minutes to an hour before you start, depending on their size and your kitchen’s temperature. This simple step is fundamental for a smooth batter and a perfect bake.
Avoid over-mixing batter
One of the most common mistakes in cheesecake baking is over-mixing the batter, especially after adding the eggs. Over-mixing incorporates too much air into the mixture, which causes the cheesecake to puff up excessively during baking and then collapse and crack as it cools. Beat the cream cheese until smooth and creamy initially, then mix in sugars and liquids until just combined. For the eggs, add them one at a time and mix on the lowest speed possible, or fold them in gently by hand, just until the yolk disappears. The less air you introduce, the denser, smoother, and less prone to cracking your cheesecake will be.
Why use water bath
A water bath (bain-marie) is arguably the most crucial technique for baking a perfect cheesecake. It surrounds the springform pan with a consistent, moist heat, which prevents the cheesecake from drying out and cracking on the surface. The steam created by the water bath also helps the cheesecake to cook more evenly and slowly, resulting in a silkier, creamier texture throughout. Without a water bath, cheesecakes are far more likely to develop large cracks due to rapid temperature changes and uneven baking. It’s a simple step that makes a profound difference in the final quality of your creamy dessert, making it an indispensable part of your baking instructions.
Serving This Delicious Dessert Easily
Presenting your Cinnamon Roll Cheesecake beautifully is the final step in showcasing your baking prowess. After all the effort in baking, cooling, and frosting, ensuring clean, elegant slices makes serving a joyous occasion. Proper slicing techniques not only make the dessert look professional but also enhance the overall eating experience, allowing each guest to enjoy a perfect portion of this delightful sweet treat. Following these recommendations will make serving your homemade dessert effortless and impressive, allowing everyone to savor the creamy texture and rich flavor.
Slicing recommendations
To achieve perfectly clean slices of your chilled cinnamon roll cheesecake, it’s essential to use a sharp, thin-bladed knife. For the best results, dip the knife in hot water and wipe it clean with a towel before each cut. This warms the blade, allowing it to glide smoothly through the creamy texture without sticking or tearing the frosting. Make a single, firm cut straight down through the cheesecake. After each slice, repeat the process of heating and wiping the knife. This method ensures crisp, neat edges and prevents the frosting from smearing. Serve your slices with a clean spatula and enjoy the satisfying presentation of your beautiful, homemade dessert.
Store Cheesecake for Freshness
Proper storage is key to maintaining the exquisite taste and creamy texture of your Cinnamon Roll Cheesecake for as long as possible. Whether you plan to enjoy it over a few days or save some for a special occasion later, understanding the best refrigeration and freezing guidelines will ensure your homemade dessert remains fresh and delicious. These storage tips are vital for preserving the integrity of this sweet treat, preventing it from drying out or absorbing unwanted odors, and ensuring every bite is as delightful as the first, making your baking efforts truly worthwhile.
Refrigeration guidelines
Once your cheesecake is frosted and served, any leftovers should be promptly refrigerated. Cover the cheesecake tightly with plastic wrap or place individual slices in an airtight container. This prevents the cheesecake from drying out, absorbing odors from other foods in the refrigerator, and helps maintain its creamy texture. Cheesecake can be stored in the refrigerator for up to 5-7 days. Always keep it covered to ensure maximum freshness and to protect its delicate flavor. Bringing slices to room temperature for about 15-20 minutes before serving can enhance their flavor and texture, though it’s perfectly delicious chilled as well.
Freezing for later
If you wish to extend the life of your cinnamon roll cheesecake, freezing is an excellent option. For best results, freeze individual slices or the entire unfrosted cheesecake. Wrap the cheesecake (or slices) tightly in several layers of plastic wrap, then an additional layer of aluminum foil. This double-layer protection prevents freezer burn. Frozen cheesecake can be stored for up to 1-2 months. To thaw, transfer the wrapped cheesecake to the refrigerator and let it thaw overnight. If freezing unfrosted, you can then whip up fresh cream cheese frosting before serving. This method allows you to enjoy your homemade dessert long after its initial creation, perfect for future sweet cravings.
