
No-Bake Strawberry Crunch Cheesecake is the perfect easy dessert for any occasion. This simple recipe brings together a buttery cookie crust, a luscious, creamy cheesecake filling, and an irresistible strawberry crunch topping. It’s a delightful treat that requires minimal effort but delivers maximum flavor, making it a true family favorite for everyone.
Key Takeaways
- Enjoy a delicious, creamy no-bake strawberry crunch cheesecake with minimal effort.
- Learn to create the perfect cookie crust, rich filling, and iconic strawberry crunch topping.
- Discover helpful tips for preparation, chilling, and serving for best results.
- Find inspiration for fun variations and effective storage methods.
This dessert is a true crowd-pleaser. Its vibrant flavor brings joy. The ease of preparation is unmatched. You will impress everyone. Simple steps yield delicious results.
Introducing Easy Strawberry Crunch Cheesecake
There’s something inherently delightful about a homemade dessert, especially when it promises ease and spectacular flavor. This easy strawberry crunch cheesecake is a prime example, offering a blend of textures and tastes that will captivate anyone lucky enough to take a bite. It’s a vibrant, sweet, and incredibly satisfying treat that doesn’t demand hours in the kitchen, making it ideal for busy individuals or impromptu gatherings. The combination of a crisp cookie crust, a smooth, creamy filling, and the signature strawberry crunch topping creates a symphony of sensations that makes this dessert truly special. It stands out as a fun, approachable, and delicious addition to any dessert table.
Why You’ll Love This Dessert
You’ll fall in love with this dessert for numerous reasons, starting with its undeniable appeal as a family favorite. It presents a beautiful aesthetic with its pink hue and textured topping, making it a showstopper without requiring advanced baking skills. Beyond its looks, the taste is simply divine. The subtle tang of the cheesecake filling perfectly balances the sweetness of the strawberry crunch, while the buttery crust adds a foundational richness. It’s a perfect dessert for celebrations, potlucks, or just a sweet ending to a weeknight meal. For another delightful baked treat, consider our Peanut Butter Brownie Swirl Cookies, another great option for satisfying sweet cravings.
The Joy of No-Bake Goodness
The true magic of this strawberry crunch cheesecake lies in its no-bake nature. No need to preheat an oven, worry about water baths, or fuss with cracked tops, which are common challenges with traditional baked cheesecakes. This aspect not only simplifies the process but also makes it an excellent choice for warmer months when turning on the oven is less appealing. The concept of a cheesecake that comes together with just a few mixing steps and some chilling time is incredibly liberating. It means you can spend less time cooking and more time enjoying the company of your loved ones, all while serving an impressive, homemade dessert that tastes as good as it looks.
Getting Ready for Your No-Bake
Preparation is key to any successful recipe, and this no-bake strawberry crunch cheesecake is no exception. While the process itself is straightforward, ensuring you have all your ingredients and tools at the ready will make the entire experience smooth and stress-free. Gathering everything beforehand prevents last-minute scrambles and allows you to focus on the joy of creating this delicious treat. This dessert is designed for convenience, so a little initial organization goes a long way in bringing this homemade treat to life.
All Ingredients You Will Need
To create this vibrant no-bake cheesecake, you’ll need a few simple yet essential ingredients. For the crust, gather vanilla cream sandwich cookies (like Oreos, but vanilla flavored) and unsalted butter. The creamy filling requires full-fat cream cheese, granulated sugar, strawberry gelatin mix, hot water, and heavy whipping cream. For the signature strawberry crunch topping, you’ll use strawberry wafer cookies and a bit more unsalted butter. Make sure your cream cheese is softened to room temperature for the smoothest filling possible – this is a critical step for a lump-free result. Having these items measured and prepared will set you up for success in crafting this easy dessert.
Quick Prep: Tools and Time
One of the many benefits of this recipe is the quick prep time and the minimal tools required. You’ll need a 9-inch springform pan (or a pie dish if you don’t mind not having tall sides), a food processor or a Ziploc bag and rolling pin for crushing cookies, a large mixing bowl, an electric mixer (stand or hand-held), and a whisk. The actual hands-on preparation takes roughly 30-40 minutes. The majority of the time is spent chilling, allowing the cheesecake to set beautifully. This efficiency makes it an ideal option when you need an impressive dessert without the lengthy commitment often associated with baking. It’s truly a testament to the simplicity and deliciousness of a no-bake recipe.
Crafting the Perfect Cookie Crust
The foundation of any great cheesecake is its crust, and for this no-bake recipe, we’re creating a simple yet incredibly flavorful cookie crust. The buttery, vanilla-infused base provides the perfect contrast to the creamy filling and the crunchy topping, setting the stage for a delightful textural experience. A well-made crust not only tastes amazing but also holds the cheesecake together, ensuring clean slices and a sturdy base for your masterpiece. It’s an easy step that makes a significant impact on the overall enjoyment of the dessert.
Crushing Vanilla Cream Cookies
The first step to a flawless crust is properly crushing your vanilla cream sandwich cookies. You want fine crumbs, almost like sand, to ensure the crust holds together well. A food processor is your best friend here; simply pulse the entire cookies (filling and all) until a fine crumb forms. If you don’t have a food processor, place the cookies in a large, sturdy Ziploc bag, seal it, and use a rolling pin to crush them. This method requires a bit more elbow grease but is just as effective. Once crushed, melt the unsalted butter and combine it thoroughly with the cookie crumbs. The butter acts as the binder, transforming the loose crumbs into a cohesive mixture that will form your sturdy crust.
Pressing Crust into Pan
With your buttered cookie crumbs ready, it’s time to press them into your pan. For best results, use a 9-inch springform pan, as it allows for easy removal of the cheesecake without disturbing the sides. Pour the crumb mixture into the bottom of the pan. Use the back of a spoon, a flat-bottomed glass, or your fingers to firmly and evenly press the crumbs across the bottom and slightly up the sides of the pan. Consistency is key here; an even crust will bake (or in this case, chill) more uniformly and provide a stable base for your filling. Take your time to get it as smooth and compact as possible.
Freezing to Set Firm
Unlike baked crusts that firm up in the oven, our no-bake crust relies on chilling. After pressing the crumbs into the pan, place the springform pan in the freezer for at least 15-20 minutes. This brief freezing period is crucial. It allows the butter to solidify and bind the cookie crumbs together firmly, preventing the crust from becoming crumbly or breaking apart when you add the filling or slice the cheesecake later. A well-chilled crust means a sturdy foundation for your creamy cheesecake, ensuring a perfect slice every time. This simple step truly makes a difference in the final presentation and integrity of your dessert, much like perfecting the crust for a Vanilla Bean Crème Brûlée Cheesecake Cupcakes.
Mixing the Creamy Cheesecake Filling
The heart of our no-bake strawberry crunch cheesecake is its luscious, creamy cheesecake filling. This is where the magic happens, transforming simple ingredients into a smooth, decadent layer that melts in your mouth. Achieving the perfect consistency is about careful mixing and ensuring each component is incorporated correctly. Pay attention to the details in this stage, as it directly impacts the texture and flavor of your finished dessert.
Dissolve Strawberry Gelatin
Begin by preparing your strawberry gelatin. This step is vital for both flavor and setting power. In a small bowl, whisk the strawberry gelatin mix with hot water until the gelatin is completely dissolved. Ensure there are no granules remaining, as these can affect the smooth texture of the filling. Set this aside to cool slightly to room temperature. It’s important that it’s not hot when added to the cream cheese mixture, as it could cause lumps or even melt the cream cheese. The gelatin not only provides that wonderful strawberry flavor but also acts as the primary setting agent for our no-bake creation.
Beat Cream Cheese, Sugar Smooth
In a large mixing bowl, combine your softened cream cheese and granulated sugar. Using an electric mixer, beat the mixture on medium speed until it is perfectly smooth and creamy, with no lumps visible. This might take 2-3 minutes. Scrape down the sides of the bowl occasionally to ensure everything is fully incorporated. The goal here is to achieve a light, airy, and uniform base before adding other liquids. Softened cream cheese is non-negotiable for this step; cold cream cheese will result in a lumpy filling that is difficult to smooth out.
Whip Heavy Cream to Stiff Peaks
In a separate, chilled bowl, pour in your cold heavy whipping cream. Using a clean electric mixer with whisk attachments, beat the cream on high speed until stiff peaks form. Stiff peaks mean that when you lift the whisk, the cream holds its shape firmly. Be careful not to overbeat, as this can turn the cream into butter. Whipped cream provides the lightness and airy texture to our cheesecake filling, contrasting beautifully with the density of the cream cheese. This step is crucial for the overall structure and delightful mouthfeel of your easy dessert.
Combine All Filling Ingredients
Once your cream cheese mixture is smooth, your gelatin is cooled, and your heavy cream is whipped to stiff peaks, it’s time to bring it all together. First, gently fold the cooled strawberry gelatin into the cream cheese mixture until just combined. Next, and most importantly, carefully fold in the whipped heavy cream. Use a spatula and a gentle hand, folding in batches to maintain as much air as possible in the whipped cream. Overmixing at this stage can deflate the whipped cream, leading to a denser, less airy filling. The goal is a uniform, light, and fluffy creamy cheesecake filling that’s ready for the next layer.
Adding the Strawberry Crunch Texture
The strawberry crunch layer is what truly elevates this no-bake recipe, giving it its distinctive name and a burst of flavor and texture that is irresistible. This crunchy element provides a delightful contrast to the smooth, creamy cheesecake filling, making every bite an exciting experience. It’s a key component that makes this dessert not just delicious, but also visually appealing and fun to eat, embodying the essence of a vibrant strawberry crunch treat.
Crushing Strawberry Wafer Cookies
To create the iconic strawberry crunch, you’ll start with strawberry wafer cookies. Much like with the crust, precision in crushing is important. Place the strawberry wafer cookies into a food processor and pulse until you have fine crumbs. Alternatively, use a Ziploc bag and a rolling pin. The finer the crumbs, the better they will integrate into the cheesecake, and the more uniform your crunch will be. Once crushed, add a tablespoon or two of melted unsalted butter to the crumbs and pulse or mix until just combined. The butter helps bind the crumbs slightly and enhances their rich flavor, ensuring they hold their texture when folded into the filling.
Folding Crunch into Filling
Now comes the moment to incorporate the star texture element into your cheesecake filling. Take about two-thirds of your prepared strawberry crunch mixture and gently fold it into the creamy cheesecake filling. The key word here is “gently.” Use a spatula and a folding motion rather than stirring vigorously. This technique helps to distribute the crunch evenly without deflating the whipped cream in the filling, preserving that light and airy texture. Folding also prevents the crumbs from breaking down too much, ensuring distinct pieces of strawberry crunch remain. The remaining one-third of the crunch will be saved for topping, creating a beautiful final flourish for your dessert. You can find more recipe inspiration and visual guides on our Pinterest page.
Layering Your Cheesecake Masterpiece
Assembling the cheesecake is a crucial step that brings all your hard work together, creating distinct layers that are both visually appealing and texturally harmonious. Proper layering ensures that each component—the crust, the creamy cheesecake filling, and the strawberry crunch—shines through in every slice. Taking care during this stage will result in a professional-looking dessert that’s ready to impress. It’s the final creative act before the chilling process begins, shaping your homemade treat.
Spread First Half of Filling
With your firm cookie crust waiting in the springform pan, carefully spoon about half of your creamy cheesecake filling (which now includes some of the strawberry crunch) onto the crust. Use an offset spatula or the back of a spoon to gently and evenly spread this first layer of filling. Be mindful not to press too hard, as you don’t want to disturb the crust below. Aim for a smooth and level surface. This initial layer establishes the primary bulk of your cheesecake and sets the stage for the subsequent layers, ensuring a balanced distribution of flavors and textures throughout.
Brief Freeze for Setting
After spreading the first half of the filling, place the springform pan back into the freezer for a brief period, typically 10-15 minutes. This quick freeze is a secret weapon for no-bake cheesecakes. It helps the first layer firm up slightly, creating a stable base. This temporary solidification prevents the top layers from sinking into the bottom, maintaining distinct and beautiful layers. It also makes it easier to add the remaining filling without causing any ripples or mixing between the layers, contributing to a cleaner, more defined appearance. This quick setting period is a small step that yields big results in the overall structure of your dessert.
Add Remaining Filling, Top
Once the first layer has had its brief freeze and is slightly firm, carefully spoon the remaining cheesecake filling on top. Gently spread it out to create a smooth, even surface. Again, avoid pressing too firmly. Once the top layer is level, take the remaining one-third of the reserved strawberry crunch mixture and sprinkle it generously over the entire surface of the cheesecake. This final topping adds an extra burst of flavor and texture, along with a beautiful, vibrant presentation. With all layers in place, your cheesecake masterpiece is now ready for its much-needed chilling period, which is crucial for achieving the perfect firm consistency of this easy dessert.
Chilling for Best Cheesecake Results
The chilling phase is arguably the most critical step in any no-bake recipe, especially for a cheesecake. It’s during this time that the gelatin and other ingredients firm up, allowing the cheesecake to set properly, develop its full flavor, and become sliceable. Rushing this stage will compromise the texture and integrity of your creamy cheesecake. Patience here is truly a virtue, guaranteeing a perfect outcome for your homemade treat.
Minimum Four Hours Chill
For your strawberry crunch cheesecake to set adequately, a minimum chilling period of four hours in the refrigerator is essential. During this time, the gelatin fully activates and creates the stable structure needed for the cheesecake to hold its shape. If you attempt to slice it before this minimum time, you risk a runny or messy consistency. While it might look ready on the outside, the core of the cheesecake needs sufficient time to firm up. This four-hour window allows the flavors to meld and intensify, resulting in a more delicious and cohesive dessert.
Overnight for Ideal Firmness
While four hours will give you a set cheesecake, for truly ideal firmness and the best possible texture, chilling your no-bake strawberry crunch cheesecake overnight (for 8-12 hours) is highly recommended. An extended chill ensures the cheesecake is thoroughly set throughout, making it incredibly easy to slice cleanly and preventing any wobbling. Overnight chilling also allows the flavors to deepen and harmonize even further, enhancing the overall taste experience. Planning ahead to chill your cheesecake overnight will yield the most impressive and delicious results, making your easy dessert a resounding success.
Helpful Tips for This No-Bake Recipe
Even the simplest no-bake recipe can benefit from a few expert tips to ensure flawless results every time. These pointers address common challenges and offer clever solutions, helping you achieve a perfectly smooth, firm, and sliceable strawberry crunch cheesecake. Following these small guidelines can make a big difference in the quality and presentation of your homemade treat, making the process even more enjoyable and rewarding.
Soften Cream Cheese Fully
This is perhaps the most crucial tip for a perfectly smooth cheesecake filling. Ensure your full-fat cream cheese is at true room temperature. This means taking it out of the refrigerator at least 1-2 hours before you plan to mix. Softened cream cheese beats up smoothly with the sugar, preventing any lumps from forming in your filling. Cold cream cheese will result in a lumpy, grainy texture that is difficult to fix, no matter how long you beat it. A fully softened cream cheese ensures a silky, creamy cheesecake base that will impress everyone.
Clean Slices Every Time
For those picture-perfect slices, a simple trick works wonders: use a hot, sharp knife. Before each slice, dip a long, thin knife into hot water, wipe it clean with a paper towel, and then make your cut. Repeat this process for every slice. The hot blade glides through the creamy cheesecake and the strawberry crunch topping, creating clean, crisp edges without dragging or sticking. This technique elevates the presentation of your dessert, making it look as professional as it tastes.
Quick Freeze for Rush Orders
If you’re pressed for time and need your cheesecake to set faster, a quick freeze can come to your rescue. After assembling, place the cheesecake in the freezer for 1.5 to 2 hours. While it won’t be as firm as an overnight chill in the refrigerator, it will be firm enough to slice and serve. Just be sure to transfer it back to the refrigerator for at least 30 minutes before serving to soften slightly for optimal texture and flavor. This method is a lifesaver for last-minute dessert needs. For more dessert ideas, browse our desserts category.
Fun Variations for Your Cheesecake
While the classic strawberry crunch cheesecake is undeniably delicious, this no-bake recipe is incredibly versatile, inviting you to experiment with different flavors and dietary preferences. Customizing your cheesecake can be a fun way to cater to various tastes or seasonal ingredients, ensuring this homemade treat remains a go-to dessert for any occasion. Don’t be afraid to get creative and make it truly your own!
Try Mixed Berry Flavors
Instead of solely relying on strawberry, you can easily adapt this recipe to include a medley of berry flavors. Substitute the strawberry gelatin with raspberry or cherry gelatin, or even a mix of berry gelatins for a layered effect. For the crunch, use vanilla wafers and a combination of freeze-dried raspberries, blueberries, and strawberries, crushed and mixed with a little melted butter. This creates a vibrant, multi-dimensional berry flavor profile that is equally refreshing and delicious. Consider serving this alongside our Easy Butter Chicken Recipe for a full meal.
Add Chocolate or Lemon
For those who love a different flavor twist, consider chocolate or lemon variations. To make a chocolate version, use chocolate sandwich cookies for the crust, fold mini chocolate chips or crushed chocolate wafers into the filling, and drizzle with chocolate ganache. For a zesty lemon cheesecake, swap the strawberry gelatin for lemon gelatin, add lemon zest to the cream cheese filling, and use lemon wafer cookies for the crunch. These changes offer a completely different but equally delightful dessert experience, perfect for changing up your routine.
Explore Vegan or Low-Sugar
With a few smart substitutions, this recipe can be adapted to accommodate specific dietary needs. For a vegan option, use dairy-free cream cheese, plant-based whipped topping, and vegan vanilla cookies for the crust and crunch. Agar-agar can be used as a gelatin substitute to help the filling set. For a low-sugar version, use sugar-free gelatin, a sugar substitute for the granulated sugar, and opt for low-sugar cookies for the crust and crunch. Always check ingredient labels to ensure they align with your dietary requirements. This flexibility ensures everyone can enjoy a slice of this easy dessert.
Storing Your Delicious Cheesecake Recipe
Proper storage is essential to maintain the freshness, flavor, and texture of your no-bake strawberry crunch cheesecake. After all the effort put into creating this homemade treat, you want to ensure it remains as delicious on day two (or three!) as it was on day one. Following these simple storage guidelines will help preserve your dessert and keep it ready for enjoyment.
Keep It Chilled and Covered
The best way to store your cheesecake is in the refrigerator, ensuring it remains chilled. Because it contains dairy products and relies on gelatin to set, it should never be left at room temperature for extended periods. Once sliced or after the initial chilling, cover the cheesecake tightly with plastic wrap or aluminum foil. If using a springform pan, you can place the entire pan (with the cheesecake) into a large, airtight container. This covering prevents the cheesecake from absorbing odors from other foods in the refrigerator and keeps it from drying out, maintaining its creamy cheesecake texture. Stored properly, it will stay fresh for 3-4 days.
Freezing Individual Slices
If you find yourself with leftover cheesecake or want to prepare portions for future enjoyment, freezing individual slices is an excellent option. Slice the cheesecake into individual portions, place each slice on a small piece of parchment paper, and then wrap each slice tightly with plastic wrap, followed by a layer of aluminum foil. This double wrapping helps prevent freezer burn. Store the wrapped slices in an airtight freezer-safe container for up to 1-2 months. To thaw, simply transfer a slice to the refrigerator for a few hours or overnight until it’s soft enough to enjoy. This method makes it easy to have a delightful easy dessert on hand whenever a craving strikes.
Answers to Common Recipe Questions
Even with a straightforward no-bake recipe, questions can arise during preparation or when contemplating variations. Addressing these common queries can help clarify any uncertainties, ensuring you feel confident and capable in creating your perfect strawberry crunch cheesecake. This section aims to provide quick, practical solutions to some of the most frequently asked questions about this delicious homemade treat.
Can I Use Fresh Strawberries?
While the recipe relies on strawberry gelatin and wafer cookies for its signature flavor and crunch, you can absolutely incorporate fresh strawberries. For the filling, you could purée fresh strawberries and reduce them slightly to concentrate their flavor, then combine with a little extra gelatin to ensure it sets, or simply fold in finely diced fresh strawberries at the end, before the final chill. For the topping, fresh strawberry slices are an excellent garnish that adds both visual appeal and a burst of natural freshness, as noted in our serving suggestions. Just be aware that fresh fruit can introduce more moisture, so balance is key.
Why is My Filling Runny?
A runny filling is a common issue with no-bake cheesecakes, and it usually boils down to a few factors. First, ensure your cream cheese was fully softened; cold cream cheese can prevent proper emulsification. Second, make sure your heavy cream was whipped to stiff peaks; soft peaks won’t provide enough structure. Third, and most importantly, confirm your gelatin was completely dissolved and then cooled before adding to the cream cheese mixture. If the gelatin is too hot, it can affect the cream cheese’s consistency. Finally, inadequate chilling time is a frequent culprit. Ensure you chill your cheesecake for at least 4 hours, or ideally overnight, for optimal firmness. Understanding the role of gelatin is key here.
Do I Need a Springform Pan?
While a 9-inch springform pan is highly recommended for this easy dessert because it allows for effortless removal and a beautiful presentation with clean, tall sides, it’s not strictly mandatory. You can certainly make this no-bake cheesecake in a regular 9-inch pie dish. However, if using a pie dish, you won’t be able to remove the cheesecake as a whole; you’ll need to serve it directly from the dish. Alternatively, you could line a regular round cake pan with parchment paper, leaving an overhang on the sides to create “handles” for lifting the cheesecake out once set. This offers a middle-ground solution. For visual inspiration, check out our Instagram page!
Serving Your Homemade Dessert
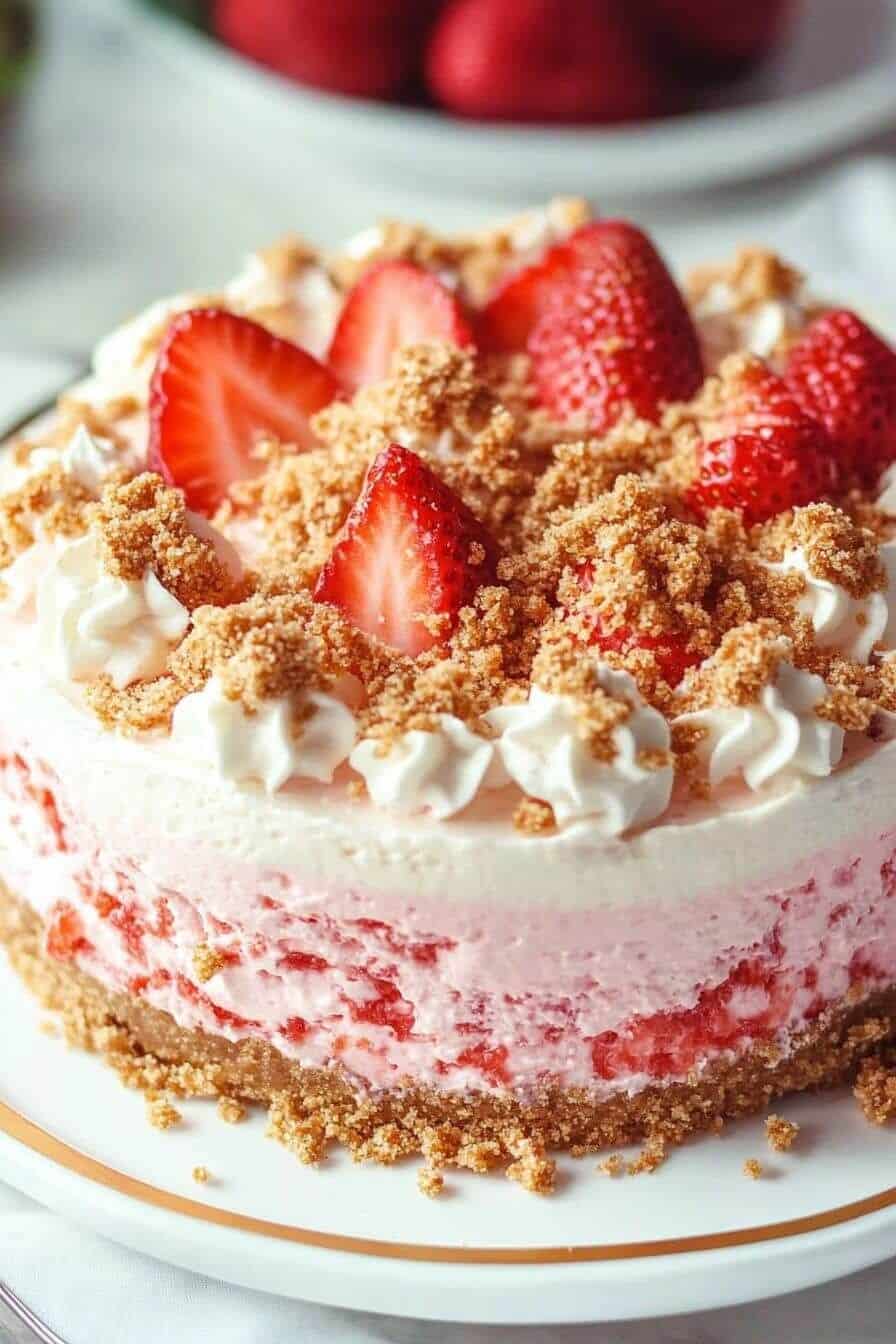
The moment has arrived to present your beautifully crafted no-bake strawberry crunch cheesecake. While the dessert is already a showstopper on its own, a few simple garnishes can enhance its visual appeal and add an extra layer of flavor and freshness. Thoughtful presentation elevates the entire dining experience, transforming a delicious homemade treat into an unforgettable masterpiece for your guests or family.
Add Whipped Topping Garnish
To give your cheesecake an extra touch of elegance and lightness, consider adding a dollop of fresh whipped topping just before serving. You can use homemade whipped cream (heavy cream, a touch of sugar, and vanilla extract, beaten to soft peaks) or a store-bought whipped topping. Pipe it decoratively along the edges or place a generous swirl on each individual slice. The delicate, airy texture of the whipped topping provides a lovely contrast to the rich, creamy cheesecake filling and the crunchy texture of the topping, making each bite even more delightful. It’s an easy addition that makes a big impact.
Fresh Strawberry Slices (Optional)
For a final flourish that adds both color and a burst of natural fruitiness, garnish your cheesecake with fresh strawberry slices. This is an optional but highly recommended step, especially since the dessert features strawberry crunch. Arrange whole or sliced fresh strawberries artfully on top of the cheesecake, perhaps alongside the whipped topping. The vibrant red of the fresh berries complements the pink hues of the cheesecake beautifully and provides a refreshing counterpoint to the sweetness. This simple addition elevates the visual appeal and enhances the overall fresh, fruity flavor profile, making your easy dessert even more enticing.