
Pecan Chewies are a delightfully simple and utterly delicious sweet treat. This easy recipe creates a chewy bar with a rich, nutty flavor that everyone will adore. Perfect for any occasion, these homemade chewies come together quickly, making them an ideal dessert. Get ready for a new family favorite.
Key Takeaways
- Quick and straightforward recipe for delightful pecan bars.
- Learn expert tips for enhancing flavor and texture.
- Explore creative variations to customize your chewies.
- Understand proper storage to keep your treats fresh longer.
Baking these bars is truly rewarding. Enjoy a simple, sweet kitchen process. The aroma fills your entire home. Each bite brings pure joy. Share this lovely dessert.
Easy Pecan Chewies: So Good To Eat
When it comes to simple, comforting desserts, Pecan Chewies stand out as a beloved classic. This easy recipe delivers a delightful bar cookie that perfectly balances sweet, buttery flavors with the satisfying crunch of pecans. Forget complicated baking projects; these chewy bars are designed for minimal fuss and maximum enjoyment, making them an excellent choice for beginner bakers and seasoned pros alike. They are incredibly versatile, fitting perfectly into a casual afternoon snack rotation or serving as a charming addition to any dessert table. Each bite of these gooey, nutty treats will remind you why homemade goodies are truly the best.
Quick Prep and Bake Time
One of the most appealing aspects of making Pecan Chewies is their remarkably quick preparation and baking time. From gathering your ingredients to pulling a golden-brown pan from the oven, you can have these delicious treats ready in under an hour. This efficiency makes them an ideal choice for last-minute cravings, unexpected guests, or simply when you want a homemade dessert without spending hours in the kitchen. The active prep work is minimal, primarily involving mixing a few simple ingredients, which means more time enjoying the delicious results and less time waiting around. It’s a truly rewarding baking experience.
Perfect Sweet Treat Servings
This recipe yields a generous batch of Pecan Chewies, typically cutting into 16-24 squares, depending on your preferred size. These individually portioned bars are perfect for sharing, packing into lunchboxes, or serving at gatherings. Their convenient size makes them easy to handle and enjoy without the need for plates and forks, though a fork might be tempting for the gooey center! Whether you’re hosting a party or just need a sweet pick-me-up throughout the week, these chewies provide plenty of servings to satisfy everyone’s sweet tooth. They also store well, ensuring you can enjoy them over several days.
Nutritional Snapshot Per Bar
While Pecan Chewies are undoubtedly a treat, understanding their general nutritional profile can be helpful. A typical bar contains calories primarily from carbohydrates and fats, with some protein from the eggs and pecans. Specific values will vary based on exact ingredient brands and portion sizes. Pecans themselves offer beneficial healthy fats, fiber, and antioxidants. These bars are best enjoyed as an occasional sweet treat rather than a dietary staple. For similar delightful desserts, you might also like our Peanut Butter Brownie Swirl Cookies, which offer a different flavor profile but the same homemade satisfaction.
Gathering Ingredients for Chewies
The beauty of this Pecan Chewies recipe lies in its simplicity, starting with a pantry-friendly list of ingredients. You won’t need any exotic items or special trips to gourmet stores; most likely, everything you require is already waiting in your kitchen. This straightforward approach makes the entire baking process stress-free and accessible to everyone. Having all your ingredients measured and ready before you begin is a common baking practice known as mise en place, which streamlines the process and helps prevent errors, ensuring your pecan bars turn out perfectly every time. This foundational step is crucial for any successful baking endeavor, from simple bars to elaborate cakes.
All You Need to Start
To create these wonderful pecan bars, you will need just a handful of basic ingredients: all-purpose flour, granulated sugar, light brown sugar, unsalted butter, eggs, vanilla extract, baking powder, and of course, plenty of chopped pecans. These humble components combine to create a chewy, rich, and utterly irresistible dessert. Quality ingredients make a noticeable difference in the final product, so opt for fresh eggs and a good quality vanilla extract if possible. The pecans are the star here, offering their distinct nutty flavor and delightful texture. Ensure your baking powder is fresh for optimal leavening results.
Ingredient Notes and Smart Swaps
While the recipe is fairly forgiving, a few notes on ingredients can elevate your Pecan Chewies. For instance, using room temperature eggs helps them incorporate more smoothly into the batter, leading to a more consistent texture. If you only have salted butter on hand, simply omit the pinch of salt that some recipes might call for, or reduce it slightly. When it comes to pecans, fresh, high-quality nuts are paramount for the best flavor; stale pecans can impart an off-taste. You can buy them pre-chopped to save time, or chop them yourself for a more rustic texture. For those with nut allergies, while these are Pecan Chewies, you could technically experiment with seeds like pumpkin or sunflower seeds for a similar crunch, though the flavor profile would obviously change significantly. Always check for freshness of your baking powder too; a simple test is to add a teaspoon to a half cup of hot water – if it bubbles vigorously, it’s good to go.
Simple Steps to Bake These
Baking Pecan Chewies doesn’t require advanced culinary skills. The process is broken down into straightforward, manageable steps that even novice bakers can follow with confidence. This approachable method ensures that anyone can achieve delicious results, transforming basic ingredients into a wonderfully rich and chewy bar cookie. Success in baking often comes down to careful measuring and following instructions, and this recipe is no exception. We’ve structured the instructions to be as clear and concise as possible, guiding you through each stage from start to finish. You’ll find that the satisfaction of baking something so delicious from scratch is incredibly rewarding.
Before you begin, it’s always a good idea to ensure you have all your tools and ingredients prepared. This includes setting out mixing bowls, measuring cups and spoons, a spatula, and your chosen baking dish. Having everything within reach minimizes stress and keeps the baking process smooth and enjoyable. Think of it as preparing your baking workspace for an efficient workflow. Good organization is key to preventing mistakes and ensuring that your Pecan Chewies come out perfectly. Remember, baking is a science as much as it is an art, so precise measurements and adherence to steps are crucial for the best texture and flavor. Take your time, enjoy the process, and soon you’ll be enjoying a batch of homemade goodness.
This baking journey is a fantastic way to create something special for family and friends. The aroma alone will bring warmth to your home. Plus, the joy of seeing happy faces when they taste your homemade Pecan Chewies is truly priceless. It’s a testament to the fact that sometimes, the simplest recipes yield the most profound pleasures. So, let’s get ready to mix, bake, and savor these delightful bars together.
Preparing for Delicious Pecan Chewies
Starting any baking project with the right preparations sets the stage for success. For Pecan Chewies, these initial steps are crucial for ensuring a smooth baking process and a perfectly cooked, easy-to-remove final product. Skipping these simple but vital actions can lead to frustration, such as bars sticking to the pan or uneven baking. Proper preparation ensures that when your batter is ready, your oven and baking dish are also perfectly prepared to receive it, allowing you to transition seamlessly from mixing to baking. This foundational stage impacts both the texture and the presentation of your finished chewies, making it worth a little extra attention before you even crack an egg or melt any butter.
Greasing the Baking Dish
To prevent your Pecan Chewies from sticking, thoroughly greasing and flouring (or lining with parchment paper) your baking dish is a non-negotiable step. For this recipe, an 8×8 or 9×9 inch square baking pan is typically recommended. You can use butter, a non-stick cooking spray, or even vegetable shortening to grease the pan generously. After greasing, if not using parchment, lightly dust the pan with a thin layer of all-purpose flour, tapping out any excess. The flour creates a barrier that helps the bars release cleanly once baked and cooled. Alternatively, lining the pan with parchment paper, leaving an overhang on two sides, is an excellent method for easy removal after baking. This way, you can simply lift the entire slab of chewies out of the pan before slicing. This simple step saves you from scraping and ensures beautiful, intact squares.
Preheating the Oven Correctly
Another critical preparatory step is preheating your oven to the correct temperature. While it might seem like a minor detail, a properly preheated oven ensures even baking from the moment your Pecan Chewies enter. Placing batter into a cold or insufficiently heated oven can lead to uneven cooking, dense centers, or bars that don’t set properly. Most recipes call for specific oven temperatures to activate leavening agents like baking powder effectively and to achieve the desired texture and browning. Give your oven at least 15-20 minutes to reach and stabilize at the specified temperature before placing your baking dish inside. Using an oven thermometer can help verify your oven’s accuracy, as many home ovens can run hot or cold. This meticulous approach to baking ensures consistent results every time.
Mixing Wet Ingredients Smoothly
The foundation of wonderfully chewy Pecan Chewies lies in the careful preparation and mixing of the wet ingredients. This stage builds the flavor and moisture base for your bars, so taking your time to ensure everything is incorporated smoothly and correctly is important. The goal is to create a cohesive, well-emulsified mixture that will distribute flavors evenly throughout the batter and contribute to the signature gooey texture once baked. Properly blended wet ingredients also ensure that the sugars dissolve adequately, preventing a grainy texture and promoting a uniformly sweet profile. Attention to detail here will truly pay off in the final taste and mouthfeel of your homemade treats.
Melting Butter Just Right
For this recipe, melting the butter is the first step in combining your wet ingredients. It’s best to melt the butter gently, either in a small saucepan over low heat or in a microwave-safe bowl in short bursts, until just melted. Avoid boiling or browning the butter unless the recipe specifically calls for it, as this can alter the flavor profile of your Pecan Chewies. Once melted, let it cool slightly for a few minutes before proceeding. This cooling step is important to prevent the butter from cooking the eggs when they are added later. A perfectly melted butter base is key to achieving that rich, tender crumb in your bars, providing both moisture and a delightful richness.
Adding Sugars and Vanilla
Once your butter is perfectly melted and slightly cooled, it’s time to introduce the sugars and vanilla extract. The combination of granulated sugar and light brown sugar contributes to both the sweetness and the chewy texture of the bars. Brown sugar, with its molasses content, adds a deeper flavor note and helps keep the bars soft and moist. Add both sugars to the melted butter and whisk them together until the mixture is smooth and glossy. Then, stir in the vanilla extract. A good quality vanilla can significantly enhance the overall flavor, adding a warm, aromatic depth that complements the pecans beautifully. Ensure the sugars are well-dissolved to avoid a gritty texture in the finished product.
Beating in Eggs Gently
The final step in preparing your wet ingredients is incorporating the eggs. It’s best to add the eggs one at a time, beating well after each addition until fully combined. This method helps to emulsify the mixture, creating a stable base for the batter. Using room temperature eggs is recommended as they blend more easily and evenly into the butter-sugar mixture. Avoid overbeating the eggs, as this can introduce too much air, which might lead to a less dense, less chewy bar. A gentle but thorough mix is all that’s needed to integrate the eggs, contributing to the rich flavor and structure of your Pecan Chewies. This creates a cohesive, uniform base for the dry ingredients to be folded into.
Combining Dry and Wet Mixes
The next crucial stage in crafting your Pecan Chewies involves bringing together the prepared wet and dry ingredients. This step requires a gentle touch to ensure a tender crumb and prevent overworking the gluten in the flour, which could result in tough bars. The goal is to achieve a uniformly combined batter without excessive mixing. This careful integration is what defines the delicate balance between chewiness and softness that makes these bars so appealing. Getting this stage right helps to evenly distribute the leavening agents and ensures that every bite of your homemade treat offers consistent texture and flavor. It’s where the magic truly starts to happen, transforming simple components into a cohesive, bakeable mixture.
Sifting Flour and Leavening
Before adding the dry ingredients to the wet mixture, it’s a good practice to sift together the all-purpose flour and baking powder. Sifting serves several purposes: it removes any lumps from the flour, aerates the dry ingredients, and ensures that the baking powder is evenly distributed throughout. This even distribution is vital for uniform leavening, which contributes to the desired texture of your Pecan Chewies. You can use a fine-mesh sieve for sifting, or simply whisk them together thoroughly in a bowl. While some recipes might skip sifting, it’s a small extra step that can make a noticeable difference in the lightness and consistency of your baked goods. Once sifted, gently add these dry ingredients to your wet mixture.
Folding in Chopped Pecans
With the dry ingredients just combined into the wet batter, it’s time for the star of the show: the chopped pecans. Gently fold the pecans into the batter using a spatula. The term “fold” means to carefully incorporate the ingredients with minimal stirring, which helps prevent overmixing. Overmixing can develop the gluten in the flour too much, leading to dense or tough bars. You want just enough mixing to evenly distribute the nuts throughout the batter. Feel free to use a generous amount of pecans; their crunchy texture and rich, earthy flavor are what give these chewies their name and character. A beautiful thing about this recipe is the abundance of nutty goodness in every bite. Once folded in, your batter is ready for the baking dish, awaiting its transformation.
Baking Your Perfect Pecan Chewies
With your batter prepared and lovingly folded with pecans, the next step is the eagerly anticipated baking process. This stage is where all your careful preparation comes to fruition, transforming the raw batter into golden, aromatic Pecan Chewies. Proper baking technique ensures not only that the bars are cooked through, but also that they achieve that desirable chewy yet slightly firm texture. The aroma that will fill your kitchen during this time is utterly irresistible, a sure sign that something delicious is on its way. Monitoring your oven and knowing what to look for are key to achieving perfectly baked bars that are moist, flavorful, and beautifully browned. Trust the process, and let your oven do its magic.
Spreading Batter Evenly
Once your batter is ready, carefully pour or scoop it into your greased and/or parchment-lined baking dish. Use a spatula or the back of a spoon to gently spread the batter evenly across the bottom of the pan. It’s important to distribute the batter as uniformly as possible to ensure even baking. If the batter is thicker in some areas than others, those spots might be undercooked while thinner areas become overbaked. Take your time to get a consistent layer from edge to edge. This attention to detail will result in a batch of Pecan Chewies where every square is equally delightful, with a uniform chew and perfect golden hue. Smooth batter distribution is a simple step that significantly impacts the final quality.
Checking for Doneness
Baking time for Pecan Chewies typically ranges from 25 to 35 minutes, but oven temperatures can vary, so it’s always best to rely on visual cues for doneness. The bars are ready when the edges are set and a beautiful golden brown, and the center appears lightly golden and still slightly soft. A common test for bars like these is to insert a wooden skewer or toothpick into the center; it should come out with moist crumbs attached, but not wet batter. If it comes out completely clean, the bars might be slightly overbaked, leading to a drier texture. If it’s still wet, they need more time. Avoid overbaking, as it can lead to a crumbly rather than chewy texture. Once done, remove the pan from the oven and prepare for the crucial cooling phase.
Cooling for Easier Pecan Chewies Slicing
After the delightful aroma of freshly baked Pecan Chewies fills your kitchen, the temptation to slice into them immediately is almost unbearable. However, patience is a virtue, especially when it comes to cooling these bars. The cooling period is a critical step that ensures your chewies firm up properly, allowing for clean, neat slices and preventing them from falling apart. During this time, the internal structure of the bars continues to set, and the flavors meld together beautifully. Rushing this stage can result in messy, crumbly squares that lose their appealing shape. A well-cooled bar is not just easier to slice; it also has a superior texture, offering that perfect balance of chewiness and richness.
Letting Bars Rest Completely
Once out of the oven, allow the Pecan Chewies to cool completely in the baking pan on a wire rack. This might take anywhere from 1 to 2 hours, or even longer if your kitchen is warm. Resist the urge to slice them while they are still warm! As they cool, the sugars and fats solidify, and the bars become much firmer and easier to handle. Attempting to cut warm bars will likely result in a sticky, crumbly mess, as the centers will still be too soft and gooey. The wire rack allows air to circulate around the pan, promoting even cooling and preventing condensation from making the bottom soggy. This resting period is essential for achieving the ideal texture and presentation of your finished treats, much like letting a cake cool before frosting.
Slicing Into Squares
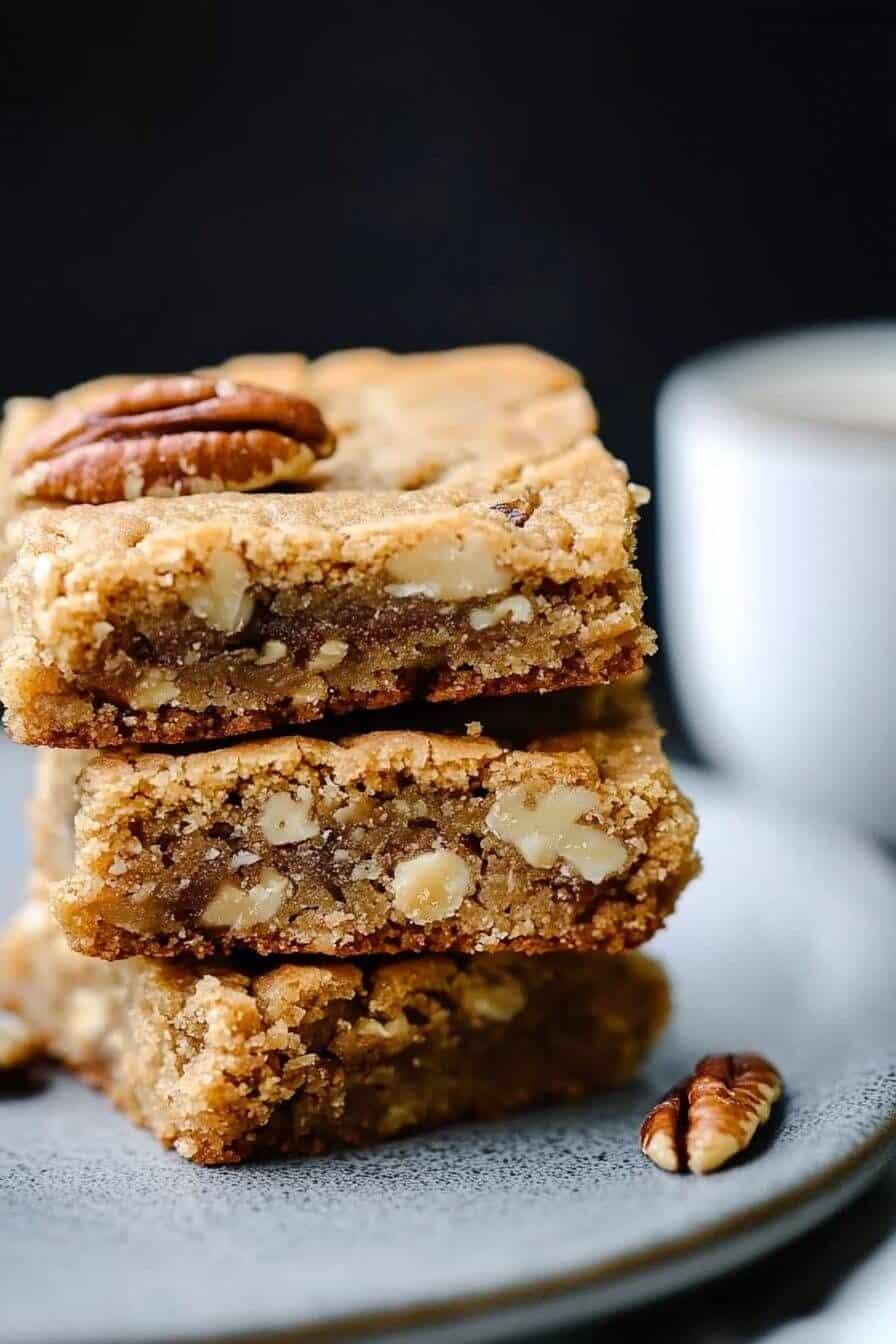
Once your Pecan Chewies are completely cooled, you can confidently proceed to slicing. If you lined your pan with parchment paper, simply lift the entire slab out of the pan and place it on a cutting board. If not, carefully run a thin knife around the edges of the pan before attempting to cut. Use a sharp, non-serrated knife for the cleanest cuts. For best results, wipe your knife clean between slices, especially if the bars are particularly gooey. You can cut them into traditional squares, rectangles, or even smaller bite-sized pieces for sampling. For a festive presentation, consider dusting them lightly with powdered sugar just before serving. Each perfectly sliced square reveals the beautiful pecan-studded interior, promising a delicious experience. This makes them easy to portion and share, perfect for any gathering or as a delicious treat for yourself.
Tips for Amazing Pecan Chewies
While the basic Pecan Chewies recipe is straightforward, a few expert tips can elevate your baking from good to truly extraordinary. These small adjustments and considerations can significantly enhance the flavor, texture, and overall appeal of your homemade bars. Think of these as secrets from experienced bakers, designed to ensure that every batch you make is consistently delicious and memorable. Implementing these simple techniques doesn’t add much extra time or effort but yields remarkable improvements, making your Pecan Chewies stand out. From intensifying the nutty notes to perfectly balancing the sweetness, these tips are your key to amazing results.
Toasting Pecans for Flavor
One of the simplest yet most impactful tips for enhancing your Pecan Chewies is to toast the pecans before adding them to the batter. Toasting pecans (or any nuts) brings out their natural oils, intensifying their nutty flavor and adding a depth that raw nuts simply can’t match. You can toast them in a dry skillet over medium-low heat for 5-7 minutes, stirring frequently until fragrant, or spread them on a baking sheet and toast in a preheated oven at 350°F (175°C) for about 8-10 minutes. Keep a close eye on them, as nuts can burn quickly. Allow them to cool completely before chopping and folding into the batter. This step adds a layer of rich, roasted flavor that makes a significant difference in the final taste of your chewies, transforming them into something truly special. It’s a game-changer for any dessert that features nuts.
Salted Butter Considerations
Most baking recipes, including Pecan Chewies, traditionally call for unsalted butter. This gives the baker precise control over the amount of salt in the final product. However, if you only have salted butter on hand, you can still use it. The key is to adjust or omit any additional salt called for in the recipe. Depending on the brand, salted butter can vary significantly in its sodium content. A good rule of thumb is to reduce the added salt by about 1/4 teaspoon for every 1/2 cup (1 stick) of salted butter used. Be mindful not to over-salt, as it can overwhelm the delicate sweetness and nutty flavor of the chewies. While a pinch of salt often enhances sweet flavors, too much can detract. Always taste your ingredients if you’re unsure, and err on the side of caution with salt. Proper measurement is a hallmark of good home baking.
Fun Variations for Pecan Chewies
While classic Pecan Chewies are undeniably delicious, their simple base recipe makes them an excellent canvas for creative culinary experimentation. Don’t be afraid to personalize your batch by adding extra ingredients or tweaking flavor profiles. These variations can transform your standard chewies into something uniquely yours, offering new textures and tastes that cater to different preferences. Whether you’re looking to indulge your sweet tooth further, introduce a contrasting flavor, or simply use up ingredients you have on hand, these suggestions will inspire you to think beyond the basic recipe. Customizing your treats is a fantastic way to make them even more special and show off your baking prowess. Feel free to mix and match these ideas or come up with your own!
Adding Chocolate Chips
For those who love the combination of nuts and chocolate, adding chocolate chips is a fantastic variation. Semi-sweet, milk, or even dark chocolate chips would all work wonderfully, providing pockets of melted chocolate goodness within the chewy pecan base. You could also try white chocolate chips for a sweeter, creamier contrast. Simply fold about 1/2 cup to 1 cup of chocolate chips into the batter along with the chopped pecans. The chocolate will melt slightly during baking, creating delightful gooey pockets that perfectly complement the nutty flavor of the pecans. This is a sure way to make your Pecan Chewies even more irresistible, especially for chocolate lovers.
Try Coconut or Maple
If you’re looking to introduce other complementary flavors, consider coconut or maple. To add a tropical twist, fold in about 1/2 cup of shredded coconut (sweetened or unsweetened) with the pecans. The coconut adds an extra layer of texture and a distinct flavor that pairs beautifully with the rich chewiness. For a warm, autumnal variation, replace a portion of the granulated sugar with maple sugar, or add a teaspoon or two of pure maple extract to the wet ingredients. You could even drizzle the cooled bars with a simple maple glaze (powdered sugar mixed with a little maple syrup) for an extra touch of sweetness and flavor. These additions provide a lovely depth that changes the character of the bars in a delightful way.
Spiced or Coffee Twists
For those who enjoy more complex flavor profiles, spiced or coffee twists can elevate your Pecan Chewies. Add 1/2 teaspoon of ground cinnamon, a pinch of nutmeg, or a dash of allspice to the dry ingredients for a warm, spiced rendition, particularly great during colder months. Alternatively, incorporate a teaspoon of instant espresso powder (dissolved in a tiny bit of hot water) into the wet ingredients to enhance the chocolate or pecan flavors, giving the bars a subtle coffee undertone without being overpowering. This brings out the depth of the nuts and sugars. These additions are perfect for a sophisticated twist that still maintains the comforting essence of the original recipe. Share your creative bakes on Instagram!
Storing Your Pecan Chewies Fresh
Once you’ve baked a batch of delicious Pecan Chewies, proper storage is key to maintaining their freshness, chewiness, and delightful flavor for as long as possible. Nobody wants stale or hardened bars! Different storage methods offer varying durations of freshness, allowing you to plan whether you’ll be enjoying them over a few days or saving some for a future treat. Understanding how to properly store your baked goods helps prevent spoilage and ensures that every bite is as enjoyable as the first. This section provides practical advice on keeping your homemade pecan bars in peak condition, so you can savor every single one.
Room Temperature Storage
For immediate enjoyment, Pecan Chewies can be stored at room temperature for up to 3-4 days. It’s best to place them in an airtight container to prevent them from drying out. A plastic container with a tight-fitting lid or a cookie tin works perfectly. Keep the container in a cool, dry place away from direct sunlight or heat, which can cause them to become greasy or stale more quickly. If you stack the bars, you might want to place a piece of parchment paper between layers to prevent them from sticking together, especially if they are particularly gooey. Enjoying them within this timeframe guarantees the best texture and flavor, offering that signature chewy richness.
Refrigeration for Longer
If you need to extend the shelf life of your Pecan Chewies, refrigeration is a good option. Stored in an airtight container in the refrigerator, they can stay fresh for up to a week. The cooler temperature helps to slow down spoilage and keeps the bars firm. Be aware that refrigeration can sometimes make baked goods a bit firmer or denser, so you might want to let them come to room temperature for about 15-30 minutes before serving to restore some of their original chewiness. This method is particularly useful if your kitchen tends to be warm or humid, which can accelerate the staleness of baked goods stored at room temperature. It’s a reliable way to ensure you have a sweet treat readily available for longer periods.
Freezing for Future Treats
Pecan Chewies freeze exceptionally well, making them perfect for meal prepping desserts or saving for a special occasion. To freeze, first allow the bars to cool completely and then slice them. Place the sliced bars in a single layer on a baking sheet and freeze until solid, about 1-2 hours. Once solid, transfer the frozen bars to an airtight freezer-safe container or a heavy-duty freezer bag, layering them with parchment paper if stacking. They can be stored in the freezer for up to 2-3 months without significant loss of quality. To enjoy, simply thaw them at room temperature for an hour or two, or briefly warm them in the microwave for a warm, gooey treat. This method ensures you always have a delightful homemade dessert on hand. For other delicious main course ideas that can be prepped, consider our Creamy Baked Mac and Cheese.
Common Questions About Pecan Chewies
Even with a straightforward recipe, bakers often have questions about common challenges or ways to adapt a recipe. This section addresses some of the most frequently asked questions about making Pecan Chewies, providing practical solutions and helpful advice. Understanding these common issues can empower you to troubleshoot problems and confidently customize your baking experience. From preventing sticking to exploring alternative ingredients and adjusting batch sizes, these answers will help you achieve perfect results every time. Armed with this knowledge, you can approach your next batch of pecan bars with greater confidence and creativity, ensuring a delightful outcome.
Preventing Bars from Sticking
One of the most common frustrations when baking bars is having them stick to the pan. The best way to prevent this is by thoroughly preparing your baking dish. As mentioned earlier, generously greasing and flouring the pan (or using a non-stick spray) creates a crucial barrier. Even better, lining the pan with parchment paper, allowing an overhang on two sides, virtually eliminates sticking. Once the bars are baked and completely cooled, you can easily lift the entire slab out using the parchment paper handles. Additionally, ensure the bars are fully cooled before attempting to slice them, as warm bars are much stickier and more prone to tearing. A sharp knife also aids in clean cuts, further minimizing sticky situations.
Pecan Alternatives and Swaps
While the recipe is called Pecan Chewies for a reason, you might wonder about alternatives if you have allergies, dietary restrictions, or simply want to experiment with different nuts or seeds. Walnuts are an excellent substitute for pecans, offering a similar texture and a slightly more robust, earthy flavor. Almonds, chopped hazelnuts, or even a mix of different nuts can also work well. For a nut-free option, consider using toasted pumpkin seeds (pepitas) or sunflower seeds, which provide a comparable crunch and a different but pleasant flavor profile. Just ensure they are chopped to a similar size as pecans. Remember that any substitution will alter the taste and texture somewhat, but it opens up a world of possibilities for customizing your treats to your liking and ensuring everyone can enjoy a delicious homemade bar.
Batch Size and Mixer Use
This recipe is typically designed for an 8×8 or 9×9 inch square pan, yielding a moderate batch of Pecan Chewies. If you need a larger quantity, you can easily double the recipe and bake it in a 9×13 inch rectangular pan. Just be aware that doubling the recipe might require a slightly longer baking time, so always rely on visual cues for doneness. When it comes to mixing, this recipe is simple enough to be made by hand with a whisk and spatula. However, if you prefer, you can use an electric mixer (handheld or stand mixer) on low speed for the wet ingredients. Be careful not to overmix, especially once the flour is added, as this can lead to tough bars. A gentle mix until just combined is all you need. Enjoy your baking process, however you choose to mix!