
Creamy vanilla pecan pralines are a cherished Southern confection, renowned for their irresistible sweetness and delicate texture. This recipe guides you through creating perfect homemade pralines, emphasizing precise cooking techniques and quality ingredients. Enjoy crafting these delectable treats for any occasion or simply as a delightful indulgence.
Key Takeaways
- Achieve perfect texture with soft-ball stage cooking.
- Quality ingredients like real vanilla and fresh pecans enhance flavor.
- Patience and an accurate thermometer are crucial for success.
- Proper cooling and storage keep pralines creamy.
- Customize with different nuts or a touch of sea salt.
Making pralines requires attention. The reward is truly worth it. These sweet treats bring joy. Enjoy the rich, buttery flavor. Share this delightful confection.
What are Creamy Vanilla Pecan Pralines?
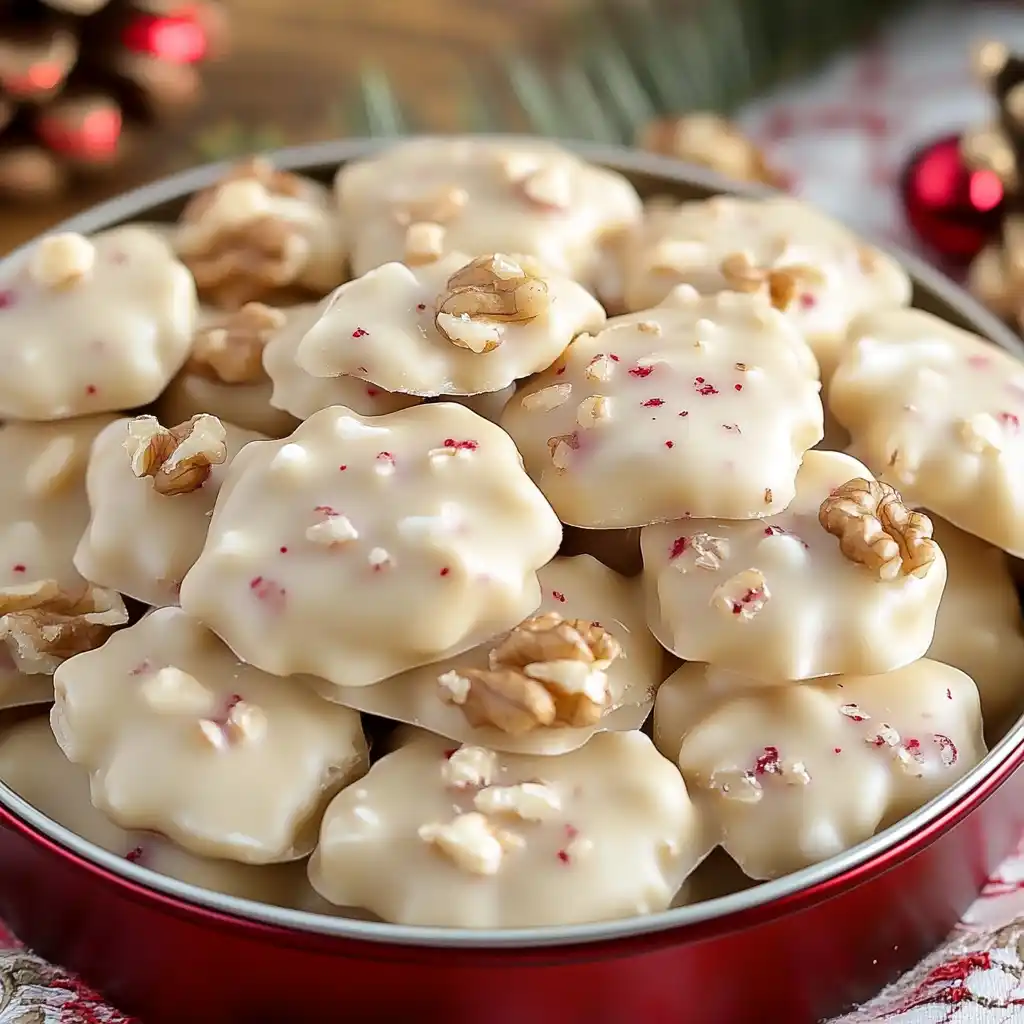
Creamy vanilla pecan pralines are a quintessential Southern delicacy, a cherished confection originating from New Orleans that has delighted palates for centuries. These sweet treats boast a unique blend of crunchy pecans enveloped in a rich, buttery, and melt-in-your-mouth vanilla-flavored candy. Unlike other types of pralines, the American version is typically a soft, slightly crumbly drop candy rather than a chocolate-covered nut or a paste. The magic lies in achieving the perfect balance of sugars, cream, and butter, cooked precisely to what is known as the soft-ball stage. This intricate process transforms simple ingredients into a sophisticated dessert, making homemade pralines a rewarding culinary endeavor. Each bite offers a harmonious texture contrast and a sweet, nutty flavor profile that is both comforting and indulgent. Many consider them a staple for holidays and special occasions, but they are equally delightful as an everyday dessert. Understanding the components of this classic treat sets the foundation for mastering its preparation.
Gather Ingredients for Pralines
The foundation of exceptional homemade praline recipe lies in selecting quality ingredients. While the list might seem simple, the freshness and type of each component play a significant role in the final flavor and texture of your pecan candy. Always ensure your ingredients are fresh and measured accurately for the best results. For more sweet creations, don’t forget to check out our peanut butter brownie swirl cookies recipe!
Granulated and brown sugars
You’ll need both granulated white sugar and light brown sugar for this recipe. The combination of these two sugars contributes to the praline’s characteristic depth of flavor and creamy texture. Granulated sugar provides the necessary crystalline structure for the candy to set, while brown sugar adds a subtle molasses note and helps keep the pralines moist and chewy. Ensure your brown sugar is soft and free from hard clumps for even melting.
Heavy cream and butter
Heavy cream and unsalted butter are non-negotiable for achieving that signature rich and creamy consistency. Heavy cream, with its high fat content, prevents the sugars from crystallizing too quickly and adds luxurious mouthfeel. Unsalted butter allows you to control the salt content in the recipe and contributes to the decadent, buttery flavor. Using high-quality dairy products will make a noticeable difference in the final taste of your sweet treat.
Pecans and vanilla extract
Of course, pecan candy wouldn’t be complete without pecans! Opt for fresh, unsalted pecan halves or large pieces. Toasting them briefly before adding them to the mixture will significantly enhance their nutty flavor, adding another layer of complexity to the praline. For the vanilla extract, choose pure vanilla extract over imitation for the best aroma and taste. An artisanal vanilla can truly elevate your pralines, providing a fragrant backdrop to the rich caramel notes. The quality of your vanilla can be a game-changer.
Prepare Your Praline Workspace
Before you even begin to cook, setting up your workspace effectively is paramount for praline success. Praline making is a process that moves quickly once the mixture reaches temperature, so having everything ready eliminates stress and ensures a smooth operation. A well-organized kitchen can make all the difference when dealing with hot sugar mixtures, allowing you to focus on the precise steps required for a perfect batch of these delicious desserts.
Line baking sheet ready
You will need a clean baking sheet lined with parchment paper or a silicone baking mat. Do not use wax paper, as the hot sugar mixture will stick to it. Having this ready before you start cooking is crucial because once the praline mixture is stirred and thickened, it needs to be dropped onto the sheet immediately. This preparation ensures that your pralines cool properly without sticking and are easy to remove once firm.
Essential candy thermometer
An accurate candy thermometer is arguably the most vital tool for making pralines. Achieving the perfect soft-ball candy stage requires precise temperature control (240°F), and guesswork simply won’t yield consistent results. Calibrate your thermometer by placing it in boiling water; it should read 212°F (100°C). If it doesn’t, adjust your target temperature accordingly. A digital instant-read thermometer or a classic clip-on candy thermometer will work, as long as it’s reliable. This tool prevents both undercooked, runny pralines and overcooked, brittle ones, making it indispensable for cooking precise temperature treats.
Cook Praline Mixture to Stage
The cooking phase is where the magic truly happens, transforming simple ingredients into a luscious candy base. This stage requires patience and constant attention to ensure the sugars dissolve properly and the mixture cooks evenly without scorching. Rushing this process can lead to grainy pralines, so take your time and follow the steps carefully for the best homemade praline recipe.
Combine sugars, cream, butter
In a large, heavy-bottomed saucepan, combine the granulated sugar, brown sugar, heavy cream, and butter. A heavy-bottomed pan is recommended because it distributes heat more evenly, reducing the risk of burning the bottom of the mixture. Stir these ingredients together over low heat until the butter is fully melted and the sugars begin to dissolve. This initial gentle stirring is important to prevent crystallization later on.
Use medium heat setting
Once the sugars are mostly dissolved, increase the heat to medium. Avoid using high heat, as this can cause the mixture to cook too quickly on the outside while remaining uncooked in the center, leading to an inconsistent texture. Medium heat allows for a steady, controlled boil, which is essential for proper sugar crystallization and achieving the desired consistency.
Stir constantly while cooking
After reaching a boil, it’s crucial to stir the mixture constantly. This continuous stirring prevents the sugars from sticking to the bottom of the pan and burning. It also helps to ensure even cooking throughout the mixture. Use a heat-resistant spatula or wooden spoon for this task. As the mixture cooks, it will thicken and change color, indicating it’s progressing towards the correct stage. Consistent stirring is key for a truly creamy vanilla pecan praline.
Achieve Soft-Ball Stage Precisely
This step is the most critical for achieving the characteristic chewy yet firm texture of perfect pralines. The soft-ball candy stage is defined by a specific temperature, and any deviation can significantly alter the final consistency. Precision here ensures your pralines are neither too sticky nor too brittle, but just right. This is where your cooking precise temperature skills really shine.
Monitor temperature carefully (240°F)
Once the mixture is boiling steadily and you’re stirring constantly, insert your candy thermometer without letting it touch the bottom of the pan. Continue to cook, stirring, until the mixture reaches precisely 240°F (116°C). This temperature indicates that the sugar concentration is at the correct level for the soft-ball stage. It means that when a small amount of the hot mixture is dropped into cold water, it forms a soft, pliable ball that can be flattened easily between your fingers. Do not rush this process; allow the temperature to rise gradually.
Do not overcook mixture
Overcooking is a common pitfall that can result in hard, crumbly, or grainy pralines. If the mixture goes beyond 240°F, even by a few degrees, it will progress to the firm-ball or hard-ball stage, making your pralines too brittle. Conversely, undercooking will leave them too soft and runny, unable to set properly. As soon as your thermometer hits 240°F, remove the pan from the heat immediately. This swift action is vital for preserving the desired creamy texture of your southern confection.
Add Vanilla, Pecans, and Salt
Once the mixture has reached the soft-ball stage and been removed from the heat, it’s time to incorporate the flavor stars: vanilla, pecans, and a hint of salt. This step infuses the candy base with the rich, nutty, and sweet-savory notes that define creamy vanilla pecan pralines. Timing is important here; adding these ingredients too early could compromise their flavor or the candy’s setting process. A touch of salt balances the sweetness beautifully, ensuring a complex and satisfying taste.
Remove from heat first
It is absolutely crucial to remove the saucepan from the heat source before adding the vanilla extract and pecans. The high temperature of the boiling sugar mixture can cause the alcohol in the vanilla to evaporate quickly, diminishing its flavor. Additionally, continuing to cook after adding the nuts might make them too oily or affect their texture. Placing the pan on a heat-proof surface like a trivet ensures the cooking process stops, allowing you to integrate the remaining ingredients safely and effectively.
Toast pecans for flavor
For an extra layer of flavor, briefly toast your pecans before adding them to the praline mixture. You can do this by spreading them in a single layer on a baking sheet and toasting them in a preheated oven at 350°F (175°C) for about 5-7 minutes, or until fragrant. Alternatively, toast them in a dry skillet over medium heat for a few minutes, stirring frequently. Toasting deepens their nutty flavor and adds a satisfying crunch, which significantly enhances the overall taste profile of your pecan candy. Once toasted, let them cool slightly before adding to the mixture.
Stir Pralines Until Thickened
This stage is where the magic of crystallization truly begins, transforming the glossy sugar syrup into a creamy, opaque praline mixture ready for molding. It requires patience and a good arm, but the results—smooth, luscious pralines—are well worth the effort. Proper cooling and vigorous stirring are key to achieving the desired texture, ensuring your homemade praline recipe yields perfect results every time. For another amazing dessert that requires careful stirring, try our quick Italian cream cake.
Cool for five minutes
After adding the vanilla, pecans, and salt, resist the urge to stir immediately. Allow the mixture to cool undisturbed for about five minutes. This brief cooling period is vital because it allows the temperature to drop slightly, initiating the crystallization process. If you stir too early when the mixture is still very hot, it can lead to larger sugar crystals forming, resulting in a grainy or crumbly texture rather than the smooth, creamy praline you desire. Set a timer to ensure accuracy.
Vigorously stir until cloudy
After the five-minute cooling period, begin to stir the mixture vigorously and continuously. You’ll notice a dramatic transformation: the mixture will change from a shiny, translucent syrup to a dull, opaque, and thicker consistency. It will become noticeably lighter in color, often described as “cloudy” or “sandy.” This change indicates that sugar crystals are forming rapidly and evenly throughout the mixture. Continue stirring until the mixture reaches a thick, fudge-like consistency that holds its shape when dropped from a spoon. This vigorous stirring ensures a uniform texture and prevents the pralines from being too sugary or crumbly, creating the perfect sweet treat.
Forming Your Vanilla Pecan Pralines
The final step in making your creamy vanilla pecan pralines is forming them into individual candies. This stage requires speed, as the mixture sets quickly once it starts to thicken. Having your lined baking sheet ready and working efficiently will help you create beautifully shaped pralines before the mixture hardens completely. This is where all your precise temperature cooking pays off!
Quickly drop spoonfuls
Once the praline mixture has thickened to the desired consistency (cloudy and fudge-like), work quickly to drop spoonfuls onto your prepared parchment-lined baking sheet. Use two spoons if necessary: one to scoop the mixture and the other to push it off onto the sheet. Aim for uniform sizes, typically about 2-3 inches in diameter, but you can adjust based on your preference. Speed is of the essence, as the mixture will continue to set as it cools, becoming harder to work with.
Space pralines on sheet
As you drop the spoonfuls, ensure you leave adequate space between each praline. They don’t spread significantly, but a little room prevents them from running into each other, especially if some parts of the mixture are still slightly warm and fluid. Proper spacing allows for even cooling and makes it easier to remove the individual pralines once they are firm. If your mixture begins to harden too much in the saucepan before you’ve finished, you can gently warm it over very low heat for a few seconds (do not re-cook) to make it more pliable, but this should be done sparingly to avoid over-crystallization and maintain the desired soft-ball candy stage texture. Continue until all the mixture is used, creating an array of these delightful sweet treats.
Cool and Store Pralines Properly
After all your hard work, proper cooling and storage are essential to maintain the delicious texture and flavor of your creamy vanilla pecan pralines. Rushing the cooling process or storing them incorrectly can lead to sticky, grainy, or dry candies. Taking these final steps seriously ensures that your homemade pralines remain a delightful indulgence for as long as possible.
Cool completely until firm
Allow the pralines to cool completely and undisturbed on the lined baking sheet. This typically takes at least 1-2 hours at room temperature, or even longer depending on your kitchen’s humidity and temperature. Do not attempt to move or touch them until they are fully firm to the touch. Rushing this can cause them to break or lose their shape. Patience during this cooling phase is crucial for the pralines to set correctly, developing their characteristic snap on the outside and creamy chewiness within. Once firm, they should lift easily from the parchment paper.
Store in airtight container
Once completely cooled and firm, transfer your pecan candy to an airtight container. Layer them between sheets of parchment paper to prevent sticking. Store the container at room temperature. Pralines are best enjoyed within a week, as their texture can begin to change over time, especially in humid conditions. Avoid refrigerating them, as the moisture can make them sticky and compromise their texture. For longer storage, you can freeze them in an airtight container for up to a month; just be sure to thaw them gradually at room temperature before serving to preserve their delicate consistency. Proper storage ensures you can savor these delicious southern confection treats for days to come.
Expert Tips for Praline Success
Mastering the art of making creamy vanilla pecan pralines comes with practice, but a few expert praline tips can significantly improve your chances of success from your very first batch. These insights address common challenges and highlight best practices, turning potential frustrations into perfect confections. Keep these pointers in mind for a smooth and rewarding dessert making experience. For more dessert inspirations, follow our creations on Instagram!
Use accurate thermometer
We cannot stress this enough: an accurate candy thermometer is your best friend in praline making. Calibrate it periodically by checking its reading in boiling water (should be 212°F or 100°C). A thermometer that is off by even a few degrees can lead to either runny or overly hard pralines. Investing in a good quality digital thermometer can save you a lot of heartache and ensure you consistently hit that crucial 240°F mark for the perfect soft-ball candy stage.
Organize your workspace
As mentioned earlier, mise en place (everything in its place) is key. Once the sugar mixture is cooking, things move quickly. Have all your ingredients measured, your baking sheets lined, and your stirring spoon ready. A chaotic kitchen can lead to missed steps or burnt sugar, which no one wants. A well-organized workspace fosters calm and efficiency, making the process more enjoyable and the outcome more successful. This is a fundamental aspect of efficient dessert making.
Be patient with cooling
After the strenuous stirring, it’s tempting to want to taste your creations immediately. However, patience during the cooling and setting phase is paramount. Allow the pralines to cool completely and naturally. Disturbing them too early can interrupt the crystallization process, leading to a less firm or less creamy texture. Resist the urge to refrigerate them to speed up cooling, as this can introduce moisture and make them sticky. A slow, steady cool yields the best results for your homemade praline recipe.
Creamy Pralines Recipe You’ll Love
This recipe is designed to yield truly delightful and consistently creamy vanilla pecan pralines. Beyond the basic steps, a few thoughtful considerations can elevate your pralines from great to absolutely unforgettable, making them a true testament to fine dessert making. Pay attention to the subtle nuances in ingredients and technique, and you’ll soon be crafting pralines that everyone raves about.
Consider artisanal vanilla
While standard pure vanilla extract works well, upgrading to an artisanal or high-quality vanilla bean paste can dramatically enhance the depth and complexity of your pralines. These premium products often have a more robust, nuanced vanilla flavor that shines through the rich butter and sugar. The tiny flecks of vanilla bean themselves can also add a beautiful visual appeal. Think of it as investing in the primary flavor note that sets these specific pralines apart. A good vanilla is worth the slight extra cost for this sweet treat.
Keep thermometer clean
A clean thermometer ensures accurate readings. Sugar can stick and build up on the probe, which can insulate it and cause it to read inaccurately low. After each use, wipe your thermometer thoroughly. If sugar has crystallized on it during cooking, you can soak it in warm water to dissolve the sugar before cleaning. A clean and properly functioning thermometer is critical for hitting the precise 240°F required for the soft-ball candy stage and guarantees successful cooking precise temperature results every time.
Praline Recipe Twists You’ll Love
While classic creamy vanilla pecan pralines are undeniably delicious, there’s always room for creative variations to suit different tastes or occasions. Experimenting with additional flavors or textures can add a personalized touch to your homemade praline recipe, making each batch uniquely yours. These simple twists allow you to customize this classic southern confection and keep things interesting for your guests and family.
Try different nuts
Pecans are traditional, but you can certainly experiment with other nuts. Walnuts, almonds, or even a mix of nuts can offer a different flavor profile and texture. For example, a batch made with toasted almonds might lean more towards a subtle marzipan-like essence. Just ensure to toast any alternative nuts to bring out their fullest flavor before incorporating them into the mixture, just as you would with pecans. This simple change can refresh the entire experience of your pecan candy.
Add a sea salt sprinkle
A tiny sprinkle of flaky sea salt on top of the freshly dropped pralines can provide a wonderful contrast to their sweetness. The savory notes of the salt cut through the rich sugar, creating a sophisticated sweet-and-salty balance that is incredibly appealing. Add the salt immediately after dropping the pralines, while they are still warm and slightly sticky, so it adheres well. This small addition can transform a familiar sweet treat into something truly gourmet.
Adjust sweetness as desired
If you find traditional pralines a bit too sweet, you can subtly adjust the sugar content. Reducing the total sugar by a tablespoon or two might be possible without drastically altering the structure, though it requires careful monitoring of the mixture’s consistency and temperature. Alternatively, incorporating a slightly bitter element, like a small amount of finely ground cocoa powder (unsweetened) into the mixture before cooking, can also balance the sweetness. Remember that major reductions in sugar can affect the candy’s ability to set, so start with small adjustments.