
This no-bake chocolate peanut butter pie is a dream come true for dessert lovers. It combines the irresistible flavors of rich chocolate and creamy peanut butter in a quick and easy recipe. You’ll love how simple it is to prepare this chilled pie, making it a perfect family favorite for any occasion or a spontaneous sweet treat.
Key Takeaways
- Enjoy a delicious no-bake chocolate peanut butter pie.
- Simple ingredients and quick prep make it an easy dessert.
- Perfect chilling ensures a creamy, firm texture.
- Ideal for entertaining, serving eight people.
- Learn secrets for a smooth filling and rich chocolate layer.
This pie offers pure indulgence. Minimal effort yields big flavor. Creamy peanut butter meets rich chocolate. A perfect chilled delight awaits. Everyone will truly love this treat.
Your Chocolate Peanut Butter Pie
Why This Pie is a Treat
There’s something truly magical about the combination of chocolate and peanut butter. This particular chocolate peanut butter pie elevates that classic pairing into a luscious, creamy dessert that’s impossible to resist. It’s a treat that satisfies deep cravings, blending the salty goodness of peanut butter with the sweet bitterness of chocolate in every bite. Imagine a rich, smooth filling nestled in a crisp crust, crowned with a decadent chocolate topping. This no-bake dessert offers a delightful texture contrast and a flavor profile that appeals to nearly everyone, making it a guaranteed crowd-pleaser for family gatherings, potlucks, or just a special weeknight indulgence. It brings comfort and joy, much like a warm bowl of homemade wonton soup on a cold day, but in a sweet, chilled form. It’s a dessert that speaks to the soul, promising pure, unadulterated enjoyment with minimal fuss.
Quick and Easy Dessert
One of the most appealing aspects of this chocolate peanut butter pie is its incredible simplicity. Forget about turning on the oven or dealing with complex baking techniques. This is a quick and easy dessert designed for busy lives, allowing you to create something extraordinary without spending hours in the kitchen. The entire active preparation time is remarkably short, meaning you can whip up the filling and topping in mere minutes. It’s an ideal recipe for those who want to impress guests or treat their family to something special, even on short notice. The process is straightforward, requiring basic ingredients and minimal kitchen skills. This makes it a perfect make ahead treat, as it needs time to chill, freeing you up to focus on other tasks. If you appreciate simple yet delicious desserts, this pie will quickly become one of your go-to desserts, much like how you might turn to an easy recipe for snickerdoodle cobbler.
Gathering Your Pie Ingredients
Creating this irresistible chocolate peanut butter pie starts with assembling a few simple ingredients. The beauty of this recipe lies in its accessible components, many of which you might already have in your pantry or refrigerator. Focusing on quality ingredients will significantly enhance the final taste and texture of your pie, ensuring every bite is as delicious as possible. Think fresh, creamy peanut butter and good quality chocolate for the best outcome. Having everything measured and ready before you begin the mixing process will make the preparation even quicker and more enjoyable, embodying the true spirit of an easy dessert. This approach ensures a seamless cooking experience, much like preparing for a creamy baked mac and cheese dish where ingredient prep is key.
Pre-Made Crust Saves Time
For a truly quick and easy dessert, a pre-made graham cracker crust is your best friend. While you could certainly make one from scratch, opting for a store-bought crust drastically cuts down on preparation time and effort. These crusts are readily available in most grocery stores and provide a sturdy, sweet, and perfectly crumbly base for your creamy filling. Using a pre-made crust means no baking, no crushing crackers, and no messy butter mixtures. It’s a simple ingredient that immediately streamlines the entire recipe, allowing you to get to the delicious part faster. This choice is especially helpful when you’re making the pie for a party or a quick gathering, where time is of the essence. Just unwrap and you’re ready to fill!
Essential Sweet and Creamy Items
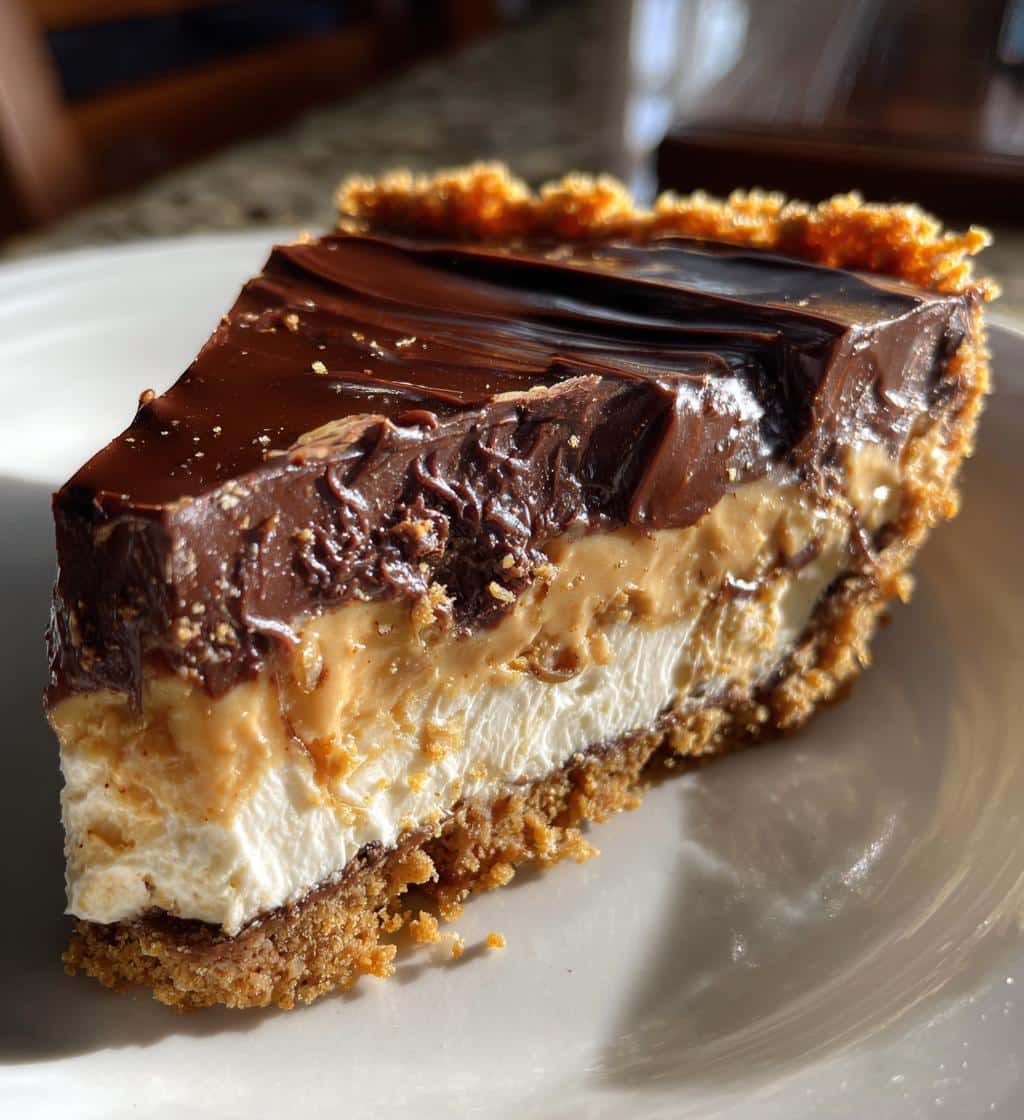
The heart of this easy peanut butter pie lies in its rich, smooth filling, which relies on a few key sweet and creamy items. You’ll need softened cream cheese, which provides the foundational tang and creaminess, helping the pie set beautifully. High-quality creamy peanut butter is non-negotiable for that signature flavor; avoid crunchy varieties for this recipe to ensure a velvety texture. Powdered sugar sweetens the filling and helps achieve that smooth consistency without grittiness. A tub of whipped topping (or freshly whipped cream, if you prefer) is folded in to lighten the filling, making it airy and delightful. Finally, for the chocolate topping, you’ll want chocolate chips or a good quality chocolate bar, along with a touch of milk or cream for melting. These ingredients come together to create a harmonious blend of flavors and textures, making this no-bake dessert truly special.
Simple Steps for Peanut Butter Pie
Crafting this delicious no-bake chocolate peanut butter pie is incredibly straightforward, making it an ideal recipe for cooks of all skill levels. The process involves just a few key stages that are easy to follow, ensuring a perfect pie every time. The most important thing is to gather all your ingredients beforehand, as this smooths out the entire assembly process. You’ll find that the steps are not only simple but also quite satisfying, as you watch the creamy filling come together and the rich chocolate topping blanket your dessert. This dessert truly is a testament to how fantastic an easy recipe can be.
Mixing the Creamy Filling
The foundation of your pie is the creamy filling. Begin by beating the softened cream cheese in a large bowl until it’s light and fluffy. This step is crucial for achieving a smooth, lump-free texture. Next, add the creamy peanut butter and powdered sugar, continuing to beat until everything is well combined and beautifully smooth. Scrape down the sides of the bowl to ensure no lumps are left behind. Once this base is ready, gently fold in the whipped topping. The key here is to be delicate; you want to incorporate the whipped topping without deflating its airy texture. Use a spatula to fold it in slowly, moving from the bottom of the bowl upwards, until no streaks remain. This gentle technique ensures your pie filling remains light, fluffy, and utterly delightful. Once mixed, spread this creamy mixture evenly into your pre-made graham cracker crust, smoothing the top with the back of a spoon or spatula. This step completes the primary filling, setting the stage for the delicious chocolate layer.
Adding the Chocolate Topping
With the peanut butter filling securely in the crust, it’s time for the crowning glory: the rich chocolate topping. In a microwave-safe bowl, combine your chocolate chips (dark chocolate is highly recommended for depth of flavor) with a small amount of milk or cream. Microwave in 30-second intervals, stirring well after each, until the chocolate is completely melted and smooth. Be careful not to overheat it, as this can make the chocolate seize. Once melted, let it cool for a few minutes; it should still be pourable but not piping hot, which could melt the peanut butter filling. Carefully pour the melted chocolate over the peanut butter layer, spreading it gently and evenly across the entire surface. You can use an offset spatula or the back of a spoon for this. For a decorative touch, you might swirl it slightly or create patterns. This layer not only adds a beautiful visual appeal but also provides that irresistible chocolate flavor that perfectly complements the peanut butter, completing your chilled pie.
Quick Prep: No Baking Needed
One of the most appealing features of this no-bake chocolate peanut butter pie is its incredibly straightforward preparation. The phrase “no baking needed” isn’t just a catchy descriptor; it’s a promise of simplicity and convenience. This recipe is perfect for those who are new to dessert making, or for anyone looking for a foolproof option that doesn’t require an oven. Without the need for baking, you eliminate several potential pitfalls, such as over-baking or under-baking, making this pie consistently perfect. It’s also a fantastic dessert option for warmer months when you want to avoid heating up your kitchen. The entire process focuses on mixing and chilling, providing a refreshing break from traditional baked goods. This commitment to ease is what makes it a stellar no-bake dessert option for any occasion.
Twenty Minutes of Active Work
Imagine creating a show-stopping dessert with just twenty minutes of active work. That’s the reality with this chocolate peanut butter pie. Your time in the kitchen will be spent on a few quick steps: softening the cream cheese, beating the filling ingredients together, gently folding in the whipped topping, and melting and spreading the chocolate. Each of these steps is quick and requires minimal effort. This short active preparation time makes the pie incredibly accessible for busy individuals or spontaneous gatherings. You can easily fit the mixing process into a lunch break or an evening when you have just a little spare time. The efficiency of this recipe means you get to enjoy a truly decadent dessert without the usual time commitment, allowing you more time for things like exploring main course recipes on CarinaRecipes.com or just relaxing.
Let the Fridge Do the Rest
After your swift active work, the magic truly happens in the refrigerator. This is where the pie transforms from a luscious mixture into a firm, sliceable, and utterly delicious dessert. Let the fridge do the rest is not just a suggestion; it’s an instruction for perfection. The chilling period allows the cream cheese and peanut butter filling to firm up, creating that desirable dense yet creamy texture. It also helps the chocolate topping set beautifully, ensuring clean slices when serving. This hands-off setting time means you can prepare the pie well in advance, making it an excellent make ahead treat. Simply assemble it, pop it in the fridge, and forget about it until it’s time to serve. The anticipation builds as it chills, promising a rewarding dessert experience that required minimal fuss from you. The cool temperature also enhances the flavors, making this a truly delightful chilled pie.
The Secret of Perfect Chilling
While the active preparation for this easy peanut butter pie is wonderfully quick, the secret to its success and signature texture lies in the chilling process. This isn’t just a suggestion; it’s a crucial step that allows all the components to meld, firm up, and reach their optimal state. Proper chilling ensures that your pie slices are neat and hold their shape, preventing a runny or messy presentation. Moreover, the cool temperature enhances the rich flavors of both the peanut butter and chocolate, making each bite even more satisfying. Think of chilling as the final, silent chef in your kitchen, perfecting the pie without any additional effort from you. It truly transforms the individual ingredients into a harmonious, sliceable, and utterly delectable dessert. Neglecting this step can lead to a less-than-ideal experience, so patience here is certainly a virtue.
Set for Four Hours Minimum
To achieve a beautifully set no-bake dessert, aim to set for four hours minimum in the refrigerator. This duration allows the cream cheese, peanut butter, and whipped topping mixture to sufficiently firm up, creating a stable and creamy filling. During this time, the ingredients also have an opportunity to meld their flavors, deepening the overall taste profile of the pie. A four-hour chill is typically enough to ensure that when you cut into the pie, you get clean, defined slices rather than a soft, collapsing mess. It’s the minimum amount of time to guarantee a pleasant eating experience and ensure the pie holds its structural integrity. If you’re planning this as a dessert for parties, ensure you factor this crucial chilling time into your schedule.
Overnight Chill for Best Results
While four hours will give you a good pie, an overnight chill for best results is highly recommended. Letting your chocolate peanut butter pie rest in the refrigerator overnight allows the filling to become perfectly firm, almost like a cheesecake in texture, and intensifies the flavors even further. The chocolate topping will set completely, making it easier to slice without cracking or dragging. This extended chilling period also gives the graham cracker crust a chance to slightly soften and absorb some moisture from the filling, creating a more integrated and less crumbly base. If you have the luxury of time, preparing the pie the day before you plan to serve it will yield the most impressive and satisfying results. It’s a simple trick that elevates a great pie to an absolutely spectacular one, making it a truly memorable sweet treat.
Serving and Storing Your Pie
Once your exquisite chocolate peanut butter pie is perfectly chilled, the next delightful step is serving it. Presenting this dessert beautifully adds to its appeal, making it a true centerpiece. Knowing how to properly serve and store your pie ensures that every slice is as fresh and delicious as the first, and that you can enjoy it for days to come. This careful attention to serving and storage is what distinguishes a good host, whether you’re serving a simple ground turkey and peppers dinner or a special dessert. Proper handling maintains both the taste and texture of your hard work.
Slices for Eight People
This generous chocolate peanut butter pie is typically designed to yield slices for eight people. A standard 9-inch pie plate provides ample space for a rich filling, allowing for substantial, satisfying portions. When cutting, use a sharp knife that has been run under hot water and wiped clean between each slice; this will help you achieve clean, neat cuts through both the firm chocolate topping and the creamy filling. For special occasions or if your guests prefer smaller portions, you could potentially get up to ten slices, though eight is ideal for a fulfilling dessert experience. This makes it an excellent choice for a family dinner, a small gathering, or as a welcome addition to a larger dessert buffet, ensuring everyone gets a taste of this delightful sweet treat.
Keep Pie in the Refrigerator
Due to its creamy, dairy-based filling, it is absolutely essential to keep pie in the refrigerator. This chilled pie must be stored in an airtight container or tightly covered with plastic wrap to prevent it from absorbing any odors from other foods in your fridge and to maintain its freshness and texture. Proper refrigeration is key to preventing spoilage and ensuring the pie remains safe to eat. When stored correctly, your chocolate peanut butter pie will stay fresh and delicious for 3-4 days. While it might be tempting to leave it out for extended periods, especially during a party, it’s best to return any uneaten portions to the fridge promptly. This ensures that every subsequent slice is as delightful as the first, preserving the integrity of this delicious no-bake dessert. This preservation method is similar to how you would store a quick Italian cream cake to maintain its freshness.
Understanding Pie Nutrition Facts
When indulging in a delicious dessert like this no-bake chocolate peanut butter pie, it’s natural to be curious about its nutritional content. While specific values can vary significantly based on the brands of ingredients used, portion sizes, and any modifications made to the recipe, we can provide a general understanding. Homemade desserts often offer the advantage of knowing exactly what goes into them, allowing for some control over sugar and fat content if desired. Remember that this pie is designed as a treat, meant to be enjoyed in moderation as part of a balanced diet. It’s a delightful indulgence, much like enjoying a rich piece of chocolate cake or a creamy cheesecake.
Calories and Sugar Per Slice
Given the sweet and creamy nature of this pie, calories and sugar per slice will be a notable component. A typical slice of chocolate peanut butter pie will likely contain a moderately high calorie count, primarily from the sugars in the powdered sugar, whipped topping, and chocolate, as well as the fats from the peanut butter and cream cheese. Sugar content can be particularly high, contributing to the pie’s overall sweetness and energy density. If you are monitoring your sugar intake, you might consider using reduced-sugar peanut butter or a sugar substitute in the filling, though this could alter the texture slightly. The graham cracker crust also contributes a small amount of carbohydrates and sugars. Enjoying this pie in sensible portions is key to fitting it into a healthy eating plan, making it a well-deserved sweet treat rather than an everyday staple.
Protein and Fat Details
This easy peanut butter pie also provides significant protein and fat details, primarily due to its star ingredient: peanut butter. Peanut butter is known for being a good source of plant-based protein and healthy fats, though it’s also calorie-dense. The cream cheese and whipped topping contribute dairy fats, which add to the pie’s luxurious mouthfeel and richness. The chocolate topping further adds both fats and a small amount of protein. While this pie is not a primary source of protein for dietary needs, the peanut butter does offer a satisfying element that contributes to its overall substance. The fats present are crucial for achieving the creamy texture and carrying the deep flavors of both the chocolate and peanut butter. Understanding these components helps you appreciate the richness of this delicious dessert for parties.
Secret 1: Softened Cream Cheese
Achieving a truly professional and incredibly smooth peanut butter pie filling hinges on a deceptively simple yet critical step: using softened cream cheese. This isn’t just a suggestion; it’s the foundation for the entire pie’s texture and overall success. Cold cream cheese is stiff and difficult to blend uniformly, leading to undesirable results. Taking the time to properly soften your cream cheese ensures a silky-smooth base that perfectly cradles the other ingredients. This fundamental step prevents textural issues and allows the flavors to integrate beautifully, making your pie a standout creamy filling success. It’s a secret that chefs use, and now you can apply it to your own easy peanut butter pie.
Avoid Lumps for Smoothness
The primary reason for using softened cream cheese is to avoid lumps for smoothness. When cream cheese is cold, it has a firm, almost crumbly consistency. Trying to beat it with other ingredients in this state will inevitably result in small, stubborn lumps that refuse to fully incorporate. These lumps can mar the otherwise velvety texture of your pie filling, creating an unpleasant mouthfeel. By allowing the cream cheese to come to room temperature, it softens significantly, becoming pliable and easy to whip into a smooth, uniform consistency. This ensures that when you add the peanut butter and powdered sugar, everything blends seamlessly, resulting in a perfectly smooth and delightful creamy filling that is a joy to eat. This attention to detail is what makes a good pie a truly great pie.
Get a Creamy Texture
Beyond lump avoidance, properly softened cream cheese is essential to get a creamy texture. The pliable nature of room-temperature cream cheese allows it to aerate more effectively when beaten, incorporating tiny air bubbles that contribute to a lighter, richer, and more luxurious mouthfeel. This aeration is vital for creating a filling that isn’t just smooth, but also wonderfully fluffy and decadent. Without this step, the filling can feel dense and heavy, losing some of its inviting appeal. Softened cream cheese blends harmoniously with the peanut butter and powdered sugar, creating a cohesive, almost mousse-like consistency that is the hallmark of a truly exceptional no-bake dessert. This attention to the initial state of your cream cheese makes all the difference in the final product’s elegance and taste, cementing its status as a family favorite.
Secret 2: Gentle Folding Technique
After perfecting the creamy base of your peanut butter pie with softened cream cheese, the next critical secret for an unbelievably light and airy texture is mastering the gentle folding technique. This step is where you incorporate the whipped topping, and it’s arguably as important as the initial mixing. Harsh stirring or vigorous beating at this stage can undo all your previous efforts, resulting in a dense, heavy filling instead of the delightful fluffiness you’re aiming for. This careful approach is what elevates your homemade pie from good to extraordinary, ensuring that every spoonful feels like a cloud of peanut butter bliss. It’s a technique that takes seconds to learn but makes all the difference in the finished creamy filling.
Keep Whipped Topping Fluffy
The primary goal of gentle folding is to keep whipped topping fluffy. Whipped topping, whether store-bought or homemade, has air incorporated into it, which gives it its characteristic lightness and volume. If you stir it too vigorously into the peanut butter and cream cheese mixture, you’ll inevitably deflate those air bubbles. This loss of aeration leads to a significantly denser filling. Instead, use a spatula and a “cut and fold” motion: cut down through the center of the mixture, sweep the spatula across the bottom of the bowl, and then fold the bottom portion over the top. Rotate the bowl and repeat until just combined. This method preserves the delicate airiness of the whipped topping, ensuring that your pie filling remains light and delightful, rather than heavy and compacted. This subtle skill is a hallmark of an expertly made easy peanut butter pie.
Light and Airy Filling
Employing a gentle folding technique directly contributes to a truly light and airy filling. The air pockets retained from the whipped topping create a mousse-like consistency that is incredibly pleasing to the palate. This delicate texture contrasts beautifully with the richness of the peanut butter and cream cheese, preventing the pie from feeling overly heavy or cloying. A light filling makes each bite refreshing and allows you to savor the flavors without feeling weighed down. It also contributes to the pie’s overall appeal as a refreshing no-bake dessert, especially welcome during warmer weather. By diligently folding rather than mixing, you ensure that the pie’s filling is not only flavorful but also possesses an exquisite, melt-in-your-mouth texture that will impress anyone who tries a slice of this exceptional sweet treat.
Secret 3: Rich Chocolate Choice
The final touch that elevates this already fantastic peanut butter pie to a gourmet level is the rich chocolate choice for the topping. While any chocolate will work, being intentional about the type you use can dramatically impact the overall flavor profile and decadent experience. The chocolate layer is not just for aesthetics; it’s a crucial component that balances the sweetness and richness of the peanut butter filling, creating a harmonious and unforgettable dessert. Selecting the right chocolate ensures a luxurious finish that beckons with its deep, glossy appeal. This small decision makes a big difference in crafting a truly memorable sweet treat that everyone will rave about.
Use Dark Chips for Flavor
For an unparalleled depth of flavor in your chocolate topping, we highly recommend you use dark chips for flavor. While milk chocolate can be too sweet and sometimes overpower the peanut butter, a good quality dark chocolate (around 60-70% cacao) provides a sophisticated bitterness that perfectly cuts through the richness of the peanut butter and cream cheese. This creates a more balanced and complex taste experience, allowing both the chocolate and peanut butter notes to shine without one eclipsing the other. The intensity of dark chocolate adds a luxurious quality that makes each bite feel indulgent and refined. If dark chocolate is too intense for your palate, a semi-sweet variety is a good compromise, but avoid overly sweet options if you want that sophisticated balance. This thoughtful selection transforms a simple dessert into a truly remarkable family favorite.
Melted Chocolate Spreads Easily
Beyond flavor, the choice of chocolate impacts the ease of application. When melted correctly, a good quality chocolate, especially chips designed for melting, melted chocolate spreads easily. The key is to melt it gently and thoroughly, often with a tiny bit of milk or cream, until it’s completely smooth and pourable. This liquid consistency allows you to effortlessly spread an even layer over your chilled peanut butter filling, creating that beautiful, glossy finish without disturbing the delicate filling beneath. If your chocolate is too thick or seized, it will be difficult to spread evenly and may clump. A smooth, even chocolate topping not only looks professional but also ensures a consistent flavor in every slice. This seamless application contributes to the overall aesthetic and enjoyment of your perfect no-bake dessert.
Secret 4: Freezing Your Chocolate Peanut Butter Pie
One of the most valuable secrets for any dessert lover, especially with a delectable creation like this chocolate peanut butter pie, is knowing how to freeze it effectively. Freezing allows you to extend the enjoyment of your pie, making it an ideal option for meal prepping desserts or ensuring you always have a quick treat on hand for unexpected guests. This strategy transforms your pie from a perishable delight into a convenient, freezer-friendly option that can be savored weeks or even months later. Properly freezing your pie means you can enjoy that perfect creamy texture and rich flavor whenever the craving strikes, making it a truly versatile and smart make ahead treat.
Store for Longer Freshness
To store for longer freshness, freezing is an excellent method for your chocolate peanut butter pie. Once the pie has fully chilled and set in the refrigerator, you can prepare it for the freezer. For best results, cover the entire pie with a layer of plastic wrap, pressing it gently against the chocolate topping to minimize air exposure. Then, add a second layer of aluminum foil for extra protection against freezer burn. This double-layer approach creates a strong barrier against moisture and odors, preserving the pie’s delicate flavors and creamy texture for up to two months. Freezing not only extends its shelf life but also allows you to enjoy a perfect slice long after its initial creation, making it a fantastic option if you’ve made too much or want to save some for a later date. This is particularly useful when preparing for a holiday or special occasion in advance, ensuring a delicious dessert for parties is always at your fingertips.
How to Freeze Slices
If you prefer to have individual portions readily available, learning how to freeze slices is a fantastic trick. After your pie is completely set, cut it into individual slices. Place each slice on a parchment-lined baking sheet and freeze for about an hour, or until firm. This prevents them from sticking together. Once firm, wrap each individual slice tightly in plastic wrap, then place them all into a freezer-safe, airtight container or a heavy-duty freezer bag. This method makes it incredibly convenient to grab just one slice whenever you desire a quick indulgence. To enjoy, simply remove a slice from the freezer and let it thaw in the refrigerator for a few hours, or at room temperature for about 30-60 minutes, until it reaches your desired consistency. This approach offers ultimate flexibility and ensures your chilled pie remains a delicious and accessible sweet treat.
Enjoying Your Best Peanut Butter Pie
After all your efforts in preparation and careful chilling, the moment finally arrives: it’s time to enjoy your masterpiece. This section focuses on how to best present and experience your extraordinary chocolate peanut butter pie, ensuring that every bite is as memorable as possible. This dessert isn’t just about the taste; it’s about the entire sensory experience, from its inviting appearance to its satisfying texture. Following these simple serving tips will help you and your guests fully appreciate the deliciousness of this homemade creation, making it a truly special occasion, much like serving a carefully prepared crispy parmesan chicken for dinner.
Serve This Treat Chilled
To truly appreciate the texture and flavor profile of this no-bake wonder, it is imperative to serve this treat chilled. The cold temperature ensures the pie maintains its firm, sliceable structure and enhances the refreshing quality of the creamy filling and set chocolate topping. A pie served at room temperature will lose its desirable firmness and might become too soft, impacting both its appearance and mouthfeel. For optimal enjoyment, remove the pie from the refrigerator just before slicing and serving. You can even place the pie plate on a bed of ice for outdoor events if you anticipate it being out for a while, though it’s always best to return it to the fridge as soon as possible. The coolness brings out the contrasting flavors and makes this chilled pie a delightful end to any meal, especially on a warm day.
A Dessert Everyone Will Love
With its universally adored combination of creamy peanut butter and rich chocolate, this pie is truly a dessert everyone will love. Its indulgent flavors and smooth, inviting texture appeal to a wide range of palates, from children to adults. The fact that it’s a no-bake dessert also means it’s often a lighter option than traditional baked pies, making it even more broadly appealing. Whether you’re hosting a large gathering, bringing a dish to a potluck, or simply making a special treat for your family, this chocolate peanut butter pie is guaranteed to be a hit. Expect requests for the recipe and plenty of compliments. It’s more than just a dessert; it’s a moment of shared joy, an instant family favorite that creates sweet memories. You can always find more inspiration for family-pleasing meals and treats by visiting Carina Recipes on Instagram.