
Key Takeaways: Quick Recipe Summary
- Requires only five core ingredients for a simple assembly.
- The “poke cake” method ensures a moist, caramel-infused base.
- Adding sour cream and chocolate chips makes the boxed mix taste homemade.
- It is best served chilled after at least 30 minutes in the refrigerator.
- A delicious dessert is always perfect for potlucks or weekend enjoyment.
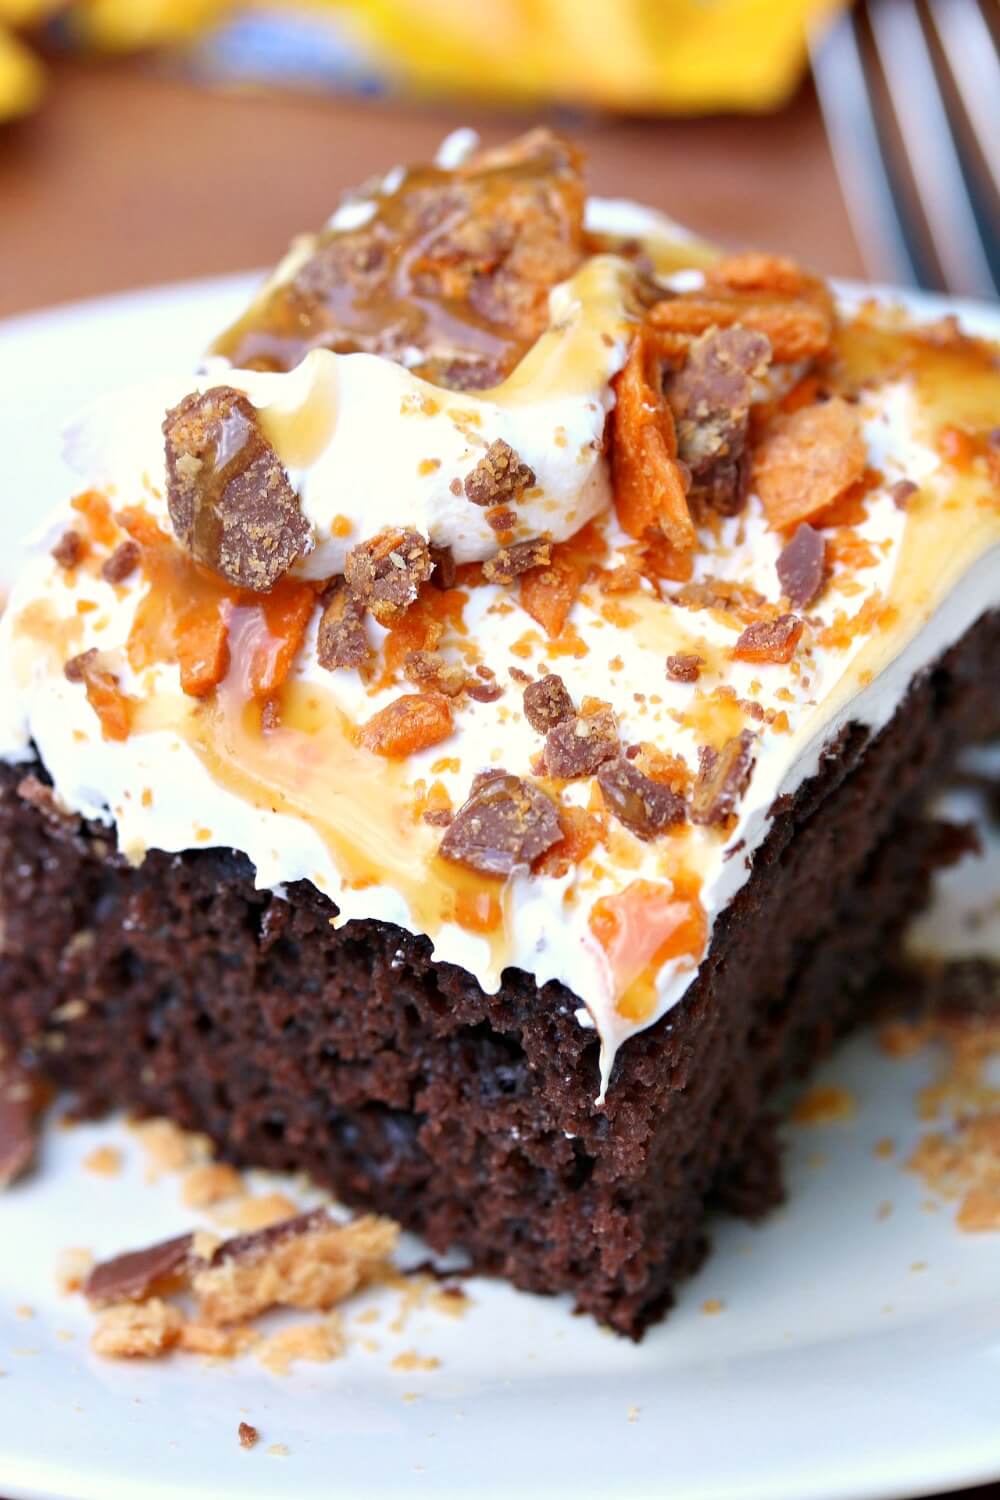
A Butterfinger Bomb Cake is an incredibly rich and moist poke cake dessert made from a chocolate cake mix that is enhanced with sour cream and chocolate chips. The warm cake is infused with caramel sauce before being chilled, then finished with a layer of vanilla frosting and a generous sprinkle of crushed Butterfinger candies. It is the perfect sweet treat for anyone.
Butterfinger Bomb Cake Base
Butterfinger Bomb Cake starts with a chocolate base, making it incredibly appealing and easy to prepare. You should always choose a high-quality cake mix and follow the package directions exactly for the best results. Adding a few simple ingredients to the mix is a great way to improve the final texture. This technique ensures that your cake will be rich, moist, and perfectly structured to absorb the delicious caramel filling later on.
To truly upgrade a standard boxed cake, you need to incorporate two key additions: sour cream and chocolate chips. The sour cream introduces a wonderful richness and moisture, yielding a finer crumb that feels homemade. Meanwhile, the chocolate chips melt slightly during baking, creating pockets of intense flavor throughout your cake. You will immediately notice the difference these simple steps make in the overall quality.
Selecting Your Chocolate Cake Mix
You can use any brand of 15.25-ounce chocolate cake mix you prefer, ensuring it is a flavor you enjoy. Look for varieties like Devil’s Food or triple chocolate mix if you want a deeper, richer chocolate taste. Be sure to gather all the wet ingredients the box calls for, such as eggs and oil, to start the mixing process correctly. A standard 9×13-inch pan is the optimal size for baking this dessert.
You must always follow the specific instructions on the cake mix box regarding the oven temperature and baking time. Mixing the batter carefully avoids overmixing, which can lead to a dry or tough cake texture. When you mix, ensure the additional sour cream and chocolate chips are evenly distributed within the batter before pouring it into your prepared baking pan. Always use a pan that has been properly greased.
Why Add Sour Cream to the Batter?
Adding one cup of sour cream to your cake batter is a clever way to dramatically increase the cake’s moisture level. Sour cream’s high fat content keeps the cake incredibly tender, preventing it from drying out during the baking process. This addition helps create a luxurious, velvety crumb that stands up well to the caramel soaking step you will do next. You will absolutely love the soft texture.
Beyond moisture, the subtle tang of the sour cream also helps to balance the overall sweetness of the cake and the toppings. It is a simple, professional baker’s trick that elevates a basic cake mix into something extraordinary. This simple addition ensures you always get rave reviews when you serve your cake to family and friends. For more delicious dessert ideas, check out this post on Peanut Butter Brownie Swirl Cookies.
The Art of the Poke Cake Infusion
The “poke cake” technique is what makes the Butterfinger Bomb Cake so moist and flavorful, creating a dessert that is truly irresistible. This step involves poking numerous holes into the warm cake right after it comes out of the oven. These holes act as channels, allowing the liquid caramel to seep deep into the cake layers. You are essentially creating a self-saucing cake through this clever method.
It is important that you poke the holes while the cake is still warm because the heat helps the caramel absorb more thoroughly. For the best results, use the blunt end of a wooden spoon or a skewer to make holes that are about one inch apart across the entire surface. Remember that a generous amount of caramel will be flowing into these openings, ensuring every single bite is gooey. This infusing is the bomb.
Caramel Preparation and Poking Technique
Before you begin poking, you need to set aside about five tablespoons of the caramel ice cream topping. This reserved caramel will be used later for a final decadent drizzle over the whipped topping. Once that small amount is saved, you should pour the remaining caramel topping slowly and evenly over the warm, poked cake surface. Be patient and watch as the rich sauce slowly soaks into the cake base.
You should aim to pour the caramel gradually, giving it time to pool and soak down into the holes you created. This slow process is vital to avoid having the caramel simply run off the sides of the cake. Make sure that the entire cake surface receives an even distribution of the sweet, sticky sauce. This is the main reason why your cake is so incredibly delicious and decadent.
Chilling the Caramel-Soaked Cake
After you have completely infused the cake with caramel, you must immediately transfer it to the refrigerator for a chilling period. This critical step allows the warm cake to cool completely and, more importantly, permits the caramel to fully set within the cake’s structure. You need at least 30 minutes for this chilling process, but longer is perfectly acceptable if you have the time.
Do not be tempted to skip or shorten this chilling time, as it prevents the whipped topping from melting into a sticky mess when applied. A well-chilled cake provides a firm, cold base for the vanilla frosting or whipped topping, ensuring clean, beautiful layers. This waiting period is the hardest part, but it guarantees the best texture and structure for your dessert.
The Perfect Butterfinger Topping Layer
The final, irresistible layer of the Butterfinger Bomb Cake is the creamy topping, which provides a light contrast to the dense, rich cake below. The recipe calls for a 16-ounce container of vanilla frosting, which you will spread gently over the completely cooled and set cake base. You should ensure that you use a container of frozen whipped topping, often labeled as “Cool Whip” or a similar product, and make sure it is completely thawed before spreading.
Using a flexible offset spatula is the easiest way for you to achieve a smooth, even layer of whipped topping across the entire cake surface. Work slowly, applying gentle pressure to avoid disturbing the caramel-soaked cake underneath. The goal is a light, cloud-like blanket that covers every inch of the rich, chocolate base. This airy layer is one of the most important elements of the final presentation.
Preparing the Crushed Candy Bars
The star of the show is the crunchy, peanut-butter-flavored Butterfinger candy. The recipe recommends using ¾ cup of crumbled Butterfinger cups, minis, or fun-size bars, which you can easily crush yourself. To make this step easy and mess-free, place the candy bars in a large resealable plastic bag and gently crush them using a rolling pin or the flat side of a meat tenderizer. You must avoid turning them into a fine powder.
You are looking for a mix of textures—some fine crumbs and some slightly larger chunks—to maximize the crunch in every bite. Once crushed, you will generously sprinkle the candy pieces evenly over the top of the freshly applied whipped topping layer. This provides both the iconic flavor and the signature textural contrast that this dessert is famous for. Find more delicious ideas on our Pinterest account.
Adding the Final Caramel Drizzle
The finishing touch is the reserved five tablespoons of caramel topping, which you saved earlier. You should warm this small amount slightly in the microwave for a few seconds to make it easier to drizzle. This thin stream of caramel adds a beautiful visual appeal and an extra layer of sweetness and sticky texture to the finished dessert. You want to make sure the drizzle looks appealing.
You can use a spoon to drizzle the caramel in a decorative zigzag pattern across the candy-covered surface. This final step helps to visually tie together the layers and adds a professional flourish to your homemade cake. Once drizzled, your Butterfinger Bomb Cake is complete and ready for its final chill before serving. You will be so proud of the presentation.
Ingredient Swaps and Customizations for Your Cake
If you want to personalize your Butterfinger Bomb Cake, there are several easy substitutions and additions you can make. While the chocolate cake base is traditional, you can easily swap it out for a different flavor if you prefer. A white cake mix or a yellow cake mix works wonderfully and offers a milder contrast to the bold caramel and peanut butter flavors. You should always feel free to experiment with the base.
You can also try different candy bars if Butterfinger is not your favorite, or if you have a peanut allergy. Heath bars, Snickers, or even chopped Butterfinger Balls make fantastic crunchy alternatives for the topping. The flexibility of this poke cake recipe allows you to tailor it perfectly to your own flavor preferences. These simple swaps make the recipe adaptable for almost anyone.
Substituting the Caramel Sauce
If you want to create a richer, deeper flavor, you can certainly substitute the store-bought caramel ice cream topping with homemade caramel sauce. While the store-bought jar is convenient and fast, making your own sauce allows you to control the thickness and sweetness. A salted caramel would provide an excellent counterpoint to the sweetness of the candy and the cake. You need to always keep the caramel warm for the infusion step.
Alternatively, some recipes call for a combination of sweetened condensed milk and caramel, or even hot fudge sauce, to create an even gooier base. If you use condensed milk, it is important to mix it with the caramel before pouring, which ensures a more uniform soak. The key to this poke cake is introducing enough liquid to keep the cake incredibly moist. A simple search online will provide many excellent homemade caramel recipes.
Making a Homemade Whipped Topping
Instead of the frozen vanilla frosting, you can definitely make your own fresh whipped cream for an even lighter and fluffier topping. To make homemade whipped cream, you will need cold heavy whipping cream, a little powdered sugar, and a splash of vanilla extract. You should beat these ingredients together until stiff peaks form, being careful not to over-beat it into butter. This simple upgrade tastes amazing.
For an authentic peanut butter experience, you can mix a couple of tablespoons of creamy peanut butter into your homemade whipped cream. This provides an additional layer of peanut butter flavor that truly enhances the Butterfinger theme of the cake. This homemade topping is lighter and less sweet than the packaged vanilla frosting, making the cake feel less dense. You will find that this homemade option is a superior and refreshing choice.
Baking and Serving Tips for Optimal Results
Proper preparation is key to ensuring your Butterfinger Bomb Cake turns out perfectly moist and beautiful every single time you bake it. Always grease and flour your 9×13-inch baking pan to prevent the cake from sticking to the sides and bottom. You should also ensure all your ingredients are measured accurately, especially the sour cream, as too much can make the cake heavy or dense. Use level measurements when baking.
Once the cake is baked, the timing of the poke and pour step is crucial for success. You must pour the caramel over the cake while it is still warm, allowing the heat to assist in the soaking process. After the caramel is poured, the cake needs to be chilled for a minimum of 30 minutes, or even longer, before you apply the whipped topping. This ensures the creamy topping does not melt when it touches the cake.
The Importance of Chill Time
The time the cake spends chilling in the refrigerator is vital, not just to prevent the whipped topping from melting, but also to allow the caramel to fully set. As the cake cools, the caramel filling thickens slightly within the poked holes, creating a wonderfully gooey texture that holds its shape when you slice it. If you rush this step, the cake may be overly soft and messy when you cut it. You must commit to the full chilling period.
You can make this cake a day in advance, which is perfect for parties or events, because the flavors deepen and the cake becomes even moister overnight. Just cover the finished cake lightly with plastic wrap and keep it chilled until you are ready to serve. This advance preparation simplifies entertaining and guarantees a perfect dessert presentation for your guests. It’s a great idea for any potluck.
Serving and Storage Suggestions
When you are ready to serve the Butterfinger Bomb Cake, use a sharp, thin knife to cut clean, even slices. You should wipe the knife clean between cuts for the best presentation, particularly if you are trying to impress your guests. This dessert pairs beautifully with a glass of milk or a cup of hot coffee, making it perfect for an afternoon treat or an after-dinner indulgence. You will want to serve this immediately.
Due to the whipped topping and the caramel, you need to store any leftovers in an airtight container in the refrigerator. The cake will stay fresh and delicious for up to three or four days, provided it is kept cool. The Butterfinger topping may lose some of its crunch over time, but the cake itself will remain incredibly moist thanks to the caramel infusion. For more inspiration, please follow our Instagram page.
Troubleshooting Common Cake Issues
Sometimes things do not go exactly as planned, even with a simple recipe, but you can usually fix any issues. If your cake turns out dry, this usually means you overbaked it, or you may have forgotten to add the sour cream. You should always use an oven thermometer to verify your oven’s temperature, as incorrect temperatures are a frequent cause of baking errors. Remember that the caramel infusion should correct a little dryness.
If the caramel seems to just sit on top of the cake instead of soaking in, it is likely that the cake was too cool when you poured the sauce over it. Make sure you poke the holes and pour the caramel within minutes of removing the cake from the oven while it is still very warm. If the caramel is too thick, you can warm it gently in the microwave for 10-15 seconds to make it more fluid and easy to pour into the holes.
Preventing a Soggy or Sticky Cake
While the goal is a moist cake, you do not want it to be soggy or excessively sticky. This is usually caused by using too much caramel or not chilling the cake long enough. You should strictly adhere to the suggested amount of caramel topping, reserving the extra five tablespoons for the final drizzle. Using too much liquid can compromise the cake’s structure, causing it to become overly dense and wet.
Ensuring your cake is properly chilled is the best defense against stickiness. The cold temperature helps the caramel set and integrate with the cake crumb, giving it a stable, gooey quality instead of a runny, sticky texture. Make sure you slice the cake with a clean knife for the best results. You can read more about Main Courses to balance out your dessert menu.
Dealing with Crushed Candy Consistency
If your Butterfinger pieces seem to be too fine or powdery, you may have crushed them too vigorously. The crunch is an essential part of the “bomb” experience in this cake, so you need a mix of textures. If they are too fine, you can gently mix them with a tablespoon of coarse sugar or even a few peanuts to add back some crunch. You want to have small, irregular pieces.
Conversely, if your pieces are too large, they can be difficult to eat or cut through when slicing the cake. Place the pieces back in the bag and give them a few more gentle taps with your rolling pin until they are a more manageable size. Always sprinkle the candy just before the final chill to maintain the maximum possible crunch. This small attention to detail makes a big difference in the finished dessert.
The History and Popularity of Poke Cakes
The concept of the poke cake, of which the Butterfinger Bomb Cake is a delicious modern variation, has its roots in mid-20th century American baking. The first officially recognized poke cake was the original Jell-O Poke Cake, introduced in 1969 by the Jell-O company. This original version used colorful gelatin poured into the holes of a white cake, creating a fun, vibrant, and extremely moist dessert that was easy to make. This simple design made the poke cake instantly popular across the United States.
You can appreciate how the design of the poke cake perfectly addresses the common issue of dry cake, ensuring a tender and flavorful result every time. Over the years, the method evolved beyond gelatin, incorporating other liquids like pudding, sweetened condensed milk, and, in this case, caramel and candy bars. This simple technique allows you to transform a basic box mix into a rich, layered dessert, making it a staple for home bakers who want maximum flavor with minimal effort. You can find more information about the history of cakes on Wikipedia.
Perfect Dessert Pairings for Butterfinger Cake
Butterfinger Bomb Cake is an extremely rich and sweet dessert, so you will want to pair it with beverages or sides that offer a contrasting balance. A simple glass of cold milk is a classic pairing that cuts through the richness and complements the chocolate and peanut butter flavors beautifully. Strong black coffee or a shot of espresso is another excellent choice, as the bitterness of the coffee offers a sophisticated contrast to the intense sweetness of the cake layers. You want to choose something that cleanses the palate.
If you are serving this for a party, consider offering a light, slightly tart fruit option on the side. A bowl of fresh raspberries, strawberries, or even a simple scoop of vanilla bean ice cream provides a cool, refreshing element. The tartness of the berries offers a necessary break from the caramel and chocolate, refreshing your palate between bites. The light fruit enhances the cake without competing with its main flavors.
Using the Recipe for Holiday and Special Occasions
This simple Butterfinger Bomb Cake recipe is highly versatile and perfect for celebrating any holiday or special gathering you may host. Since it is a chilled dessert and tastes better when made ahead, it significantly reduces your stress on the day of the event. You can easily bake and decorate the cake the day before, leaving you free to focus on other tasks or enjoying time with your guests. This makes the cake a total lifesaver for busy hosts.
For seasonal parties like Halloween or Christmas, you can customize the decorations to fit the theme. For Halloween, try sprinkling a few spooky edible sprinkles or using plastic spider rings on the whipped topping, as suggested by the recipe’s original author. For a winter holiday, you could drizzle white chocolate over the caramel and candy for a snowy effect. You will find that this cake is a huge hit for all occasions.
Creative Ideas for Presentation and Garnishing
Presenting your Butterfinger Bomb Cake beautifully is easy because the dessert already looks so impressive with its layered toppings. For a striking visual, slice the chilled cake into squares and serve each piece individually on a small plate. Before placing the slice, you can swipe a thin line of caramel sauce across the plate for a restaurant-quality look. You should always wipe away any drips for the cleanest presentation possible.
To enhance the chocolate flavor, you could shave a few curls of dark chocolate over the top of the cake, or you can add a tiny dollop of fresh whipped cream to the corner of each slice. If you want to emphasize the peanut butter, consider drizzling a thin stream of melted peanut butter over the final caramel and candy layers. These small garnishes take only minutes but make a huge impact on the final look. You will love how professional your finished dessert appears.
The Financial Advantage of Simple Baking
One of the biggest advantages of making a Butterfinger Bomb Cake is the low cost and minimal ingredient list, which saves you both time and money. You are relying on a simple box cake mix and affordable pantry staples, keeping the total cost significantly lower than baking a cake completely from scratch. This makes the cake an ideal choice when you need to bring a large, impressive dessert to a potluck or party without breaking your budget. You can easily find all the ingredients at any local grocery store.
The fact that you only need five core ingredients—cake mix, sour cream, chocolate chips, caramel, and a topping—simplifies your grocery shopping dramatically. This quick ingredient list means less time spent searching the aisles and less money spent on specialty items. When you consider the huge size of the finished cake, which yields many servings, the cost per slice is remarkably low. This recipe provides an excellent value for your dessert efforts.
Why This Butterfinger Bomb Cake is a Crowd-Pleaser
Butterfinger Bomb Cake is a guaranteed crowd-pleaser because it perfectly combines nostalgic flavors with an irresistible texture. The base is moist and tender, the middle is gooey with caramel, and the top provides a wonderful crunch from the candy. The combination of chocolate, peanut butter, and caramel is universally loved, making this dessert a hit with both children and adults. You will find that the cake disappears quickly.
The fact that the recipe is incredibly easy to follow and requires no complicated baking techniques makes it popular with hosts. You can achieve a professional-quality, layered dessert with minimal fuss, which gives you confidence in your baking abilities. The rich flavor and easy preparation make this cake one of the best choices for any gathering. You should not be surprised when you are asked for the recipe.
Substituting Butterfinger for Other Candy Bars
If you have a peanut allergy in your group or simply prefer another candy, you can easily adapt this recipe by substituting the Butterfinger candy. You should choose a crispy, crunchy chocolate bar to maintain the essential textural element of the original recipe. Crunch bars, Heath bars (for a toffee flavor), or even crushed pretzels mixed with a chocolate coating would work wonderfully. Always ensure that your chosen substitution is safe for those with allergies.
Using a non-peanut butter based candy allows you to enjoy the same gooey caramel poke cake experience without the specific peanut flavor. If you choose a plain chocolate candy, you might consider adding a bit of vanilla extract to the whipped topping to enhance the overall flavor profile. This simple flexibility is one of the greatest aspects of this type of dessert. Your guests will still love this wonderful, caramel-soaked cake.
Making the Cake Peanut-Free
For a completely peanut-free version, you must ensure both the candy and the cake mix are free of peanuts and peanut cross-contamination. You can swap the Butterfinger candy for a chocolate-covered toffee bar, like Heath, or a crispy chocolate wafer. You should also be mindful of the cake mix you choose, as some chocolate mixes may be processed on equipment that handles nuts. Always check the ingredient labels carefully before baking.
You may also consider adding a different flavor extract, such as almond or peppermint, to your vanilla frosting to introduce a new layer of complexity. This will create a completely different but equally delicious “bomb” cake experience. A coconut-flavored candy bar can also be a unique and delightful choice for your topping. You will be able to serve a safe and delicious dessert to all of your guests.
Adding a Chocolate Ganache Layer
For an even more decadent finish, you should consider adding a thin layer of chocolate ganache over the caramel-infused cake before applying the whipped topping. Ganache is a simple mixture of melted chocolate and heavy cream, which sets into a fudgy, rich layer that locks in the moisture. This creates a triple-layer experience: chocolate cake, caramel soak, fudgy ganache, and then the creamy topping. You can make this easy addition in minutes.
To make the ganache, simply heat about half a cup of heavy cream until simmering, then pour it over one cup of chopped chocolate chips. Let the mixture sit for five minutes, then whisk until it is smooth and glossy. Pour this over the cooled caramel-soaked cake and let it set for about 15 minutes before adding the whipped topping. This extra step elevates the cake to a truly gourmet level, increasing its richness.
Baking Tools You Need for This Simple Cake
You only need a few essential kitchen tools to successfully create this easy Butterfinger Bomb Cake, making it accessible for even the most beginner baker. The most important items you require are a 9×13-inch baking pan, a large mixing bowl, and an electric hand mixer or stand mixer for combining the cake batter. You should ensure your baking pan is the correct size to achieve the right cake thickness for the poke cake method. These tools simplify the process.
You will also need a wooden spoon or a skewer for poking the holes into the warm cake, a critical step for the caramel infusion. An offset spatula is highly recommended for smoothly spreading the whipped topping without tearing the cake surface. Having a good rubber spatula for scraping the batter out of the bowl will also help you avoid waste and ensure all the sour cream and chocolate chips get into the pan. You will be able to complete this recipe with standard kitchen items.
Conclusion: Your New Favorite Butterfinger Bomb Cake
Butterfinger Bomb Cake is truly the simple, yet decadent, dessert you have been searching for, combining five easy ingredients into a spectacular treat. You will love how the added sour cream creates a moist, rich chocolate base that is perfectly complemented by the gooey caramel soak. This poke cake design guarantees a delicious texture in every single bite. Go ahead and treat yourself to this fantastic, easy-to-make dessert today.
Remember to always allow enough time for the cake to properly chill after the caramel infusion, as this is the secret to its clean slices and perfect texture. Whether you serve it for a holiday, a party, or just a quiet evening, this cake is sure to earn you rave reviews and requests for the recipe. You can now confidently create a dessert that is both stunning and incredibly simple to execute. Enjoy every single layer of this amazing chocolate and caramel treat.
Print
Butterfinger Bomb Cake
- Total Time: 1 hour 15 minutes
Description
This Butterfinger Bomb Cake is an incredibly easy and moist poke cake that starts with a chocolate cake mix. You will infuse it with a gooey caramel sauce and then top it with a light layer of vanilla frosting and a generous helping of crunchy Butterfinger candy pieces. It’s the perfect, decadent dessert for any gathering or sweet craving.
Ingredients
For the Cake
-
- 1 (15.25 oz.) box Chocolate Cake Mix
- Additional cake mix ingredients (i.e. eggs, oil, water)
- 1 cup Sour Cream
- 1 cup chocolate chips
For the Topping
- 1 Jar Caramel Ice Cream Topping
- 1 (16 oz.) container vanilla frosting (or whipped topping)
- ¾ cup crumbled Butterfinger Cups minis, Butterfinger Bites, or Butterfinger Fun-Size
Instructions
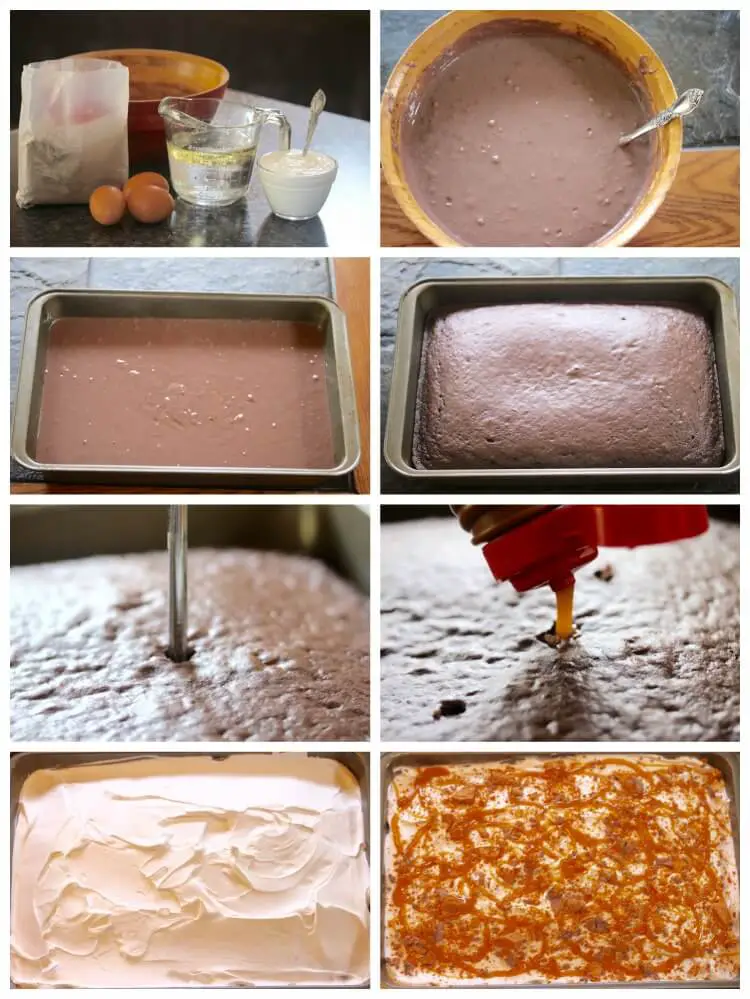
- Prepare Cake: Mix the cake ingredients according to package instructions, and add in the cup of sour cream and chocolate chips.
- Bake: Bake the cake in a 9 x 13 pan, according to the cake package instructions.
- Poke Holes: Remove the cake from the oven and poke holes in the cake while it’s still warm (use the end of a wooden spoon or skewer).
- Infuse with Caramel: Save 5 tablespoons of the caramel and pour the rest of the jar into the holes, spreading it evenly across the cake.
- Chill: Chill the cake in the fridge for at least 30 minutes, allowing the caramel to set.
- Top: Spread the vanilla frosting (or whipped topping/Cool Whip) on top of the chilled cake.
- Garnish: Top the cake with the crumbled Butterfinger pieces and then drizzle the remaining 5 tablespoons of caramel over the top.
- Serve: Slice and enjoy this decadent treat!
Notes
Pro-Tip: The sour cream addition ensures the cake is extra moist and rich, almost tasting homemade. For the best flavor and texture, make this cake a day ahead and allow it to chill fully overnight.
Substitution Note: The user-provided ingredient list mentioned “vanilla frosting” but the instructions mentioned “whip cream.” For the purpose of the recipe card, “vanilla frosting” is listed, but many similar recipes use a container of frozen whipped topping (like Cool Whip) as an alternative.
- Prep Time: 15 minutes
- Cook Time: 30 minutes
Nutrition
- Serving Size: 12 servings
- Calories: 496kcal
- Sugar: 61g
- Sodium: 177mg
- Fat: 49g
- Saturated Fat: 16g
- Carbohydrates: 61g
- Fiber: 0g
- Protein: 6g
- Cholesterol: 130mg
Keywords: Butterfinger, Poke Cake, Caramel, Chocolate, Dessert