
Easy pecan pie bars offer a delightful dessert experience, merging convenience with rich flavor. This recipe provides a simple way to create a classic favorite. You’ll learn to make a buttery shortbread crust and a sweet pecan filling, perfect for sharing. Get ready to bake a treat everyone will love.
Key Takeaways
- Master the best pecan pie bars recipe, featuring a simple shortbread crust and a rich, sweet pecan filling.
- Learn techniques for perfect baking, cooling, and storing your homemade pecan bars for maximum enjoyment.
- Discover creative variations and helpful tips to customize your pecan bars for any taste or dietary need.
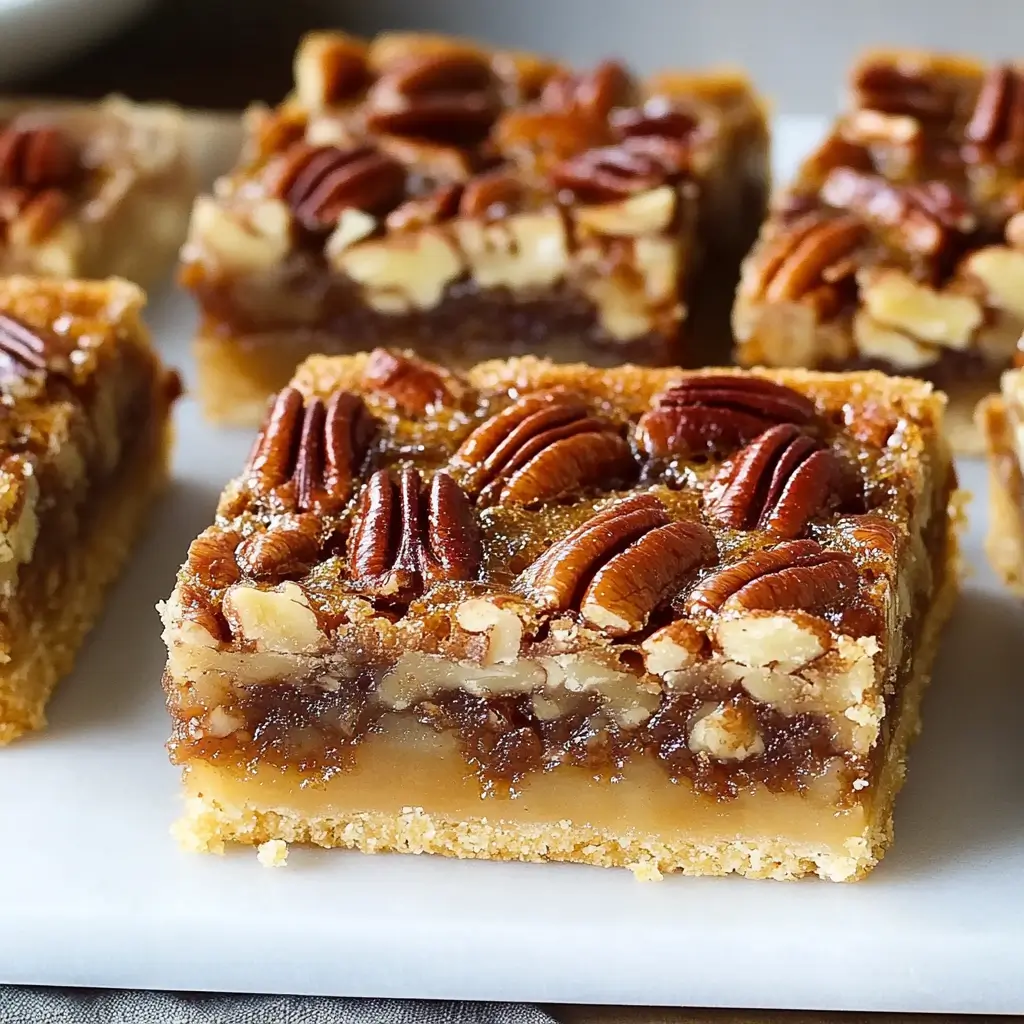
Pecan pie bars are truly delightful. They are easier than a traditional pie. The buttery crust is a perfect base. Sweet pecan filling adds rich flavor. These bars are always a crowd-pleaser.
Enjoy Best Pecan Pie Bars Recipe
A Twist on Classic Pecan Pie
If you love the rich, sweet flavor of traditional pecan pie but desire something simpler to serve and prepare, these easy pecan pie bars are your answer. This recipe offers all the beloved elements of the classic dessert—namely, the warm, caramelized pecan filling—but presented in a convenient bar format. No need for crimping pie crusts or worrying about slices falling apart; these bars are inherently stable and ideal for any occasion. The sturdy, buttery shortbread crust provides a delightful contrast to the gooey filling, making each bite a symphony of textures and flavors. It’s a modern take on a beloved classic, proving that sometimes, a twist can make a good thing even better. For those who enjoy baking but are short on time, this pecan dessert recipe minimizes fuss while maximizing delicious results. We aim to show you how to create the best pecan pie bars that will impress everyone.
Perfect for Any Gathering
Whether you’re hosting a casual get-together, preparing for a holiday feast, or simply craving a sweet treat for your family, these homemade pecan bars fit the bill perfectly. Their grab-and-go nature makes them superior to traditional pies for parties and potlucks, as they are much easier to handle and eat standing up. Imagine a platter of these golden, glistening bars disappearing quickly at your next event! They are especially popular during the fall and winter months, serving as an ideal holiday dessert idea. The rich, nutty flavor pairs wonderfully with coffee or tea, making them suitable for brunch or an afternoon snack. Plus, their impressive appearance belies their straightforward preparation, allowing you to present a beautiful dessert without spending hours in the kitchen. Make these a new family favorite recipe, offering a delightful alternative to cakes or cookies. If you’re looking for other easy dessert ideas, consider our quick Italian cream cake for another crowd-pleaser.
Simple Ingredients for Delicious Bars
Creating truly delicious pecan pie bars doesn’t require an extensive shopping list. Most ingredients are likely pantry staples. The recipe’s beauty lies in its simplicity, using common items to produce an extraordinary dessert. High-quality ingredients are always recommended for the best flavor and texture, ensuring you achieve the perfect balance of sweet, salty, and nutty goodness that defines the best pecan pie bars.
What You Need for the Crust
The foundation of these amazing bars is a buttery shortbread crust. It’s wonderfully crumbly, yet firm enough to hold the rich filling. You’ll need just a few basic items:
- All-purpose flour: Provides the structure for the crust.
- Granulated sugar: Adds a touch of sweetness to balance the butter.
- Cold unsalted butter: Crucial for that signature tender, crumbly shortbread texture. Make sure it’s very cold, cut into cubes.
- A pinch of salt: Enhances all the flavors and provides a subtle contrast to the sweetness.
Using cold butter prevents the crust from becoming tough and helps create steam pockets during baking, resulting in a light and airy texture. This straightforward list ensures you can whip up the base for your quick pecan bars without hassle.
What You Need for the Filling
The sweet pecan filling is where the magic happens, transforming simple ingredients into a rich, gooey caramel-like layer packed with nuts. Here’s what you’ll gather:
- Whole pecans: The star of the show. Opt for fresh, plump pecans for the best flavor. We’ll discuss toasting them later for an enhanced taste. Pecans are not only delicious but also offer a lovely texture.
- Brown sugar: Gives the filling its deep, molasses-rich sweetness and contributes to the caramelization.
- Corn syrup (light or dark): Essential for the classic gooey texture and to prevent crystallization.
- Eggs: Act as a binder, helping the filling set properly.
- Melted unsalted butter: Adds richness and helps emulsify the filling ingredients.
- Vanilla extract: A must-have for warmth and depth of flavor.
- A pinch of salt: Balances the sweetness and highlights the nutty notes of the pecans.
Each ingredient plays a vital role in crafting the perfect caramel pecan bars. Having everything measured and ready before you begin will make the assembly process incredibly smooth, leading to delicious homemade pecan bars.
Prepare the Buttery Shortbread Crust
The buttery shortbread crust is the foundational layer that gives these easy pecan pie bars their distinct charm. It’s simple to make, yet its tender, crumbly texture perfectly complements the rich, gooey filling. A well-prepared crust ensures that your bars hold together beautifully and offer a delightful textural contrast with every bite. Paying attention to the details during this stage will result in a perfectly golden and flavorful base for your homemade pecan bars.
Mixing Your Crust Dough
Achieving the perfect shortbread crust starts with proper mixing. For this recipe, you’ll want to combine the dry ingredients—flour, granulated sugar, and salt—in a medium bowl. Once whisked, it’s time to incorporate the cold, cubed unsalted butter. The key here is to work the butter into the dry ingredients until the mixture resembles coarse crumbs. You can do this using a pastry blender, a fork, or even your fingertips. Avoid overworking the dough, as this can develop the gluten in the flour and lead to a tough crust. The goal is a light, sandy texture. Once combined, press the dough evenly into the bottom of a parchment-lined 9×13-inch baking pan. Ensure it’s compact and smooth, especially around the edges, creating a uniform base for your sweet pecan filling. This method is crucial for delicious quick pecan bars.
Baking the Crust Until Golden
After pressing the dough into the pan, the crust needs a preliminary bake to set it and create that delightful crispness before the filling is added. Preheat your oven to the specified temperature (usually around 350°F or 175°C). Bake the pressed crust for approximately 15-20 minutes, or until the edges are lightly golden brown and the center appears set. This blind baking step is important because it prevents the crust from becoming soggy once the wet pecan filling is poured over it. It also helps to develop a deeper, richer flavor in the shortbread. Keep a close eye on it, as ovens can vary. Once baked, remove the crust from the oven and let it cool slightly while you prepare the filling. This partial bake makes sure your best pecan pie bars have a sturdy foundation.
Crafting the Sweet Pecan Filling
The sweet pecan filling is truly the heart of these pecan pie bars, delivering that irresistible gooey texture and rich, nutty flavor everyone loves. It’s a harmonious blend of caramel sweetness and toasted pecans, creating a depth of flavor that is both comforting and decadent. Making this filling correctly ensures that your homemade pecan bars are not just good, but truly exceptional. The steps are straightforward, but a little care in preparation will yield the most satisfying results.
Toasting Pecans for Best Flavor
While you can certainly use raw pecans, taking a few extra minutes to toast them will significantly enhance the flavor profile of your easy pecan pie bars. Toasting brings out the natural oils in the nuts, intensifying their nutty aroma and adding a subtle depth that raw pecans simply can’t match. To toast, spread your whole pecans in a single layer on a baking sheet. Bake them in a preheated oven (around 300°F or 150°C) for 7-10 minutes, or until they are fragrant and lightly browned. Alternatively, you can toast them in a dry skillet over medium heat, stirring frequently, until aromatic. Be careful not to burn them, as burned nuts can impart a bitter taste. Once toasted, let them cool completely before adding them to the filling mixture. This simple step elevates the entire pecan dessert recipe.
Mixing the Rich Caramel Base
With your pecans toasted and cooling, it’s time to create the luscious caramel base for your filling. In a large bowl, whisk together the brown sugar, corn syrup, melted unsalted butter, and vanilla extract until well combined and smooth. Then, crack in the eggs and whisk thoroughly until the mixture is uniform and slightly frothy. The eggs act as a binder, helping the filling to set beautifully during baking, while the corn syrup prevents the sugar from crystallizing, ensuring a perfectly smooth and gooey texture. Finally, fold in your cooled, toasted pecans. Ensure the pecans are evenly coated with the rich caramel base. This creates a balanced distribution of nuts throughout each bar, making every bite of your caramel pecan bars consistently delicious. For a similar delightful caramel experience, you might enjoy our peanut butter brownie swirl cookies.
Assembling Your Easy Pecan Bars
The assembly phase of creating your easy pecan pie bars is where all your diligent preparation comes together. It’s a simple, quick step that transitions your separate components—the baked shortbread crust and the rich pecan filling—into a cohesive unit ready for its final bake. Proper assembly ensures an even distribution of the filling and a professional-looking finished product. This stage is particularly satisfying as you see your dessert taking shape, moving closer to becoming the delicious homemade pecan bars you envisioned.
Pouring Filling Over Baked Crust
Once your shortbread crust has been pre-baked and allowed to cool slightly, it’s ready to receive the sweet pecan filling. Carefully pour the entire pecan mixture over the warm, baked crust in the 9×13-inch pan. Use a spatula to gently spread the filling evenly across the entire surface of the crust, making sure the pecans are distributed uniformly. You want a consistent layer so that every bar has a good amount of both crust and filling. Avoid pressing down too hard on the pecans, as they should remain suspended within the gooey caramel base rather than sinking to the bottom. This even layer is crucial for achieving uniform texture and flavor in your quick pecan bars. The slight warmth of the crust can help the filling spread more easily. Your pecan pie bars are now almost ready for their final transformation in the oven, poised to become a family favorite recipe.
Baking Your Best Pecan Pie Bars
Baking is the magical step where your assembled easy pecan pie bars transform from a raw mixture into a golden, bubbling, and aromatic dessert. This stage requires a bit of patience and careful observation to ensure the filling sets perfectly without the crust burning. The goal is to achieve a beautiful caramelization on top of the sweet pecan filling, while the interior remains wonderfully gooey but firm enough to hold its shape when cooled. Proper baking is key to the overall success and texture of your homemade pecan bars.
How to Check for Doneness
Knowing when your pecan pie bars are perfectly baked is crucial. Typically, they will bake for about 30-40 minutes in a preheated oven (usually 350°F or 175°C). Here are a few signs to look for:
- Golden Brown Top: The surface of the pecan filling should be beautifully golden brown and appear slightly set. The pecans on top will be toasted and glistening.
- Slight Jiggle in the Center: When you gently shake the pan, the edges of the filling should be set, but the very center might still have a slight, subtle jiggle. This indicates a perfectly gooey center that will firm up as it cools. If it’s too liquid, it needs more time.
- No Raw Spots: Ensure there are no visibly raw or overly wet spots in the filling, especially around the pecans.
Overbaking can lead to a dry, hard filling, while underbaking will result in a runny mess. Trust your judgment and these visual cues. Once baked, carefully remove the pan from the oven. The aroma of these delicious best pecan pie bars will fill your kitchen, a delightful indicator of the treat to come. For another delightful dessert that bakes to perfection, try our blueberry muffin cookies with streusel.
Cooling and Slicing Bars Neatly
While the tempting aroma of your freshly baked pecan pie bars might make you want to dig in immediately, patience is a virtue—especially when it comes to cooling and slicing. This crucial step ensures that your bars set properly, allowing for clean, neat cuts and preventing a gooey, crumbly mess. Rushing this process is a common mistake that can compromise the texture and presentation of your otherwise perfect homemade pecan bars. Trust the cooling process; it’s essential for a truly enjoyable experience.
Let Bars Cool Completely
After removing your easy pecan pie bars from the oven, resist the urge to cut into them right away. The sweet pecan filling needs ample time to cool down and firm up. Place the baking pan on a wire rack and allow the bars to cool at room temperature for at least 2-3 hours, or even longer. For the cleanest cuts and best texture, many bakers prefer to let them cool completely and then chill them in the refrigerator for an additional hour or two. This firming-up process allows the caramel base to solidify, making slicing much easier and preventing the filling from oozing out. Once thoroughly cooled and chilled, carefully lift the entire slab of bars out of the pan using the parchment paper overhangs. Place it on a cutting board. Use a sharp, non-serrated knife to cut the bars into your desired squares or rectangles. For extra neatness, wipe the knife clean with a damp cloth between each cut. This attention to detail will ensure your best pecan pie bars look as good as they taste.
Storing Your Pecan Pie Bars
Once you’ve mastered baking and cooling your delicious easy pecan pie bars, knowing how to store them properly is key to preserving their freshness and flavor. Whether you plan to enjoy them over a few days or save them for a special occasion, appropriate storage methods will ensure that your homemade pecan bars remain just as delightful as when they first came out of the oven. This information is particularly useful if you are making them ahead as a make ahead dessert for a gathering.
Room Temperature Storage
For short-term enjoyment, your sweet pecan filling bars can be stored at room temperature for up to 2-3 days. Make sure they are in an airtight container to prevent them from drying out. Placing a piece of parchment paper between layers of bars can also prevent them from sticking together. Choose a cool, dry spot in your kitchen away from direct sunlight or heat sources. While they are delicious at room temperature, some people find that the buttery shortbread crust retains its crispness better if the bars are stored in the refrigerator, especially in warmer climates. Always inspect for any signs of spoilage before serving, though properly stored pecan bars are generally quite stable.
Freezing for Longer Enjoyment
Pecan pie bars are an excellent candidate for freezing, making them a fantastic make ahead dessert option for holidays or unexpected guests. To freeze, ensure the bars are completely cooled. You can freeze them whole as a slab, or cut into individual squares. If freezing individually, arrange them in a single layer on a baking sheet and freeze until firm (this prevents them from sticking together). Then, transfer the frozen bars to an airtight freezer-safe container or heavy-duty freezer bag, layering them with parchment paper if needed. They can be stored in the freezer for up to 2-3 months without a significant loss in quality. When ready to enjoy, thaw them at room temperature for several hours or overnight in the refrigerator. This method ensures you always have a delightful treat on hand, extending the enjoyment of your best pecan pie bars.
Tips for Best Pecan Pie Bars Recipe
Achieving the best pecan pie bars often comes down to a few clever tricks. These tips can help you streamline baking, customize flavors, and ensure every batch of your homemade pecan bars succeeds. From preparing ahead to experimenting with layers, these suggestions enhance your baking experience and the final delicious outcome. Incorporating these techniques truly elevates your pecan dessert recipe.
Make Ahead Crust Ideas
To save time, especially for a big event or holiday, prepare the buttery shortbread crust in advance. You have options:
- Chill Unbaked Crust: Cover the pan tightly and refrigerate for up to 2-3 days. Bake as directed when ready.
- Pre-bake and Freeze Crust: Bake the crust, cool completely, then wrap tightly and freeze in the pan for up to 1 month. Thaw before adding filling.
These options reduce last-minute stress, allowing focus on the sweet pecan filling closer to serving. It’s a smart strategy for quick pecan bars.
Substituting Different Nuts
While pecans are traditional, these bars are versatile. Substitute other nuts or a combination for a unique twist:
- Walnuts: Offer a slightly more bitter, earthy flavor.
- Hazelnuts: Provide a rich, toasted flavor.
- Almonds: Add a delicate, buttery crunch.
- Mixed Nuts: A blend can create a complex flavor.
Ensure nuts are chopped to a similar size for even distribution. This is a great way to personalize your family favorite recipe.
Adding a Caramel Layer
For an extra decadent treat, consider adding an additional caramel layer. Drizzle store-bought or homemade caramel sauce over the pre-baked shortbread crust before pouring the pecan filling. This creates an even richer, gooier bar, intensifying caramel notes. Alternatively, swirl caramel into the pecan filling itself. Just be mindful of liquid quantity. This extra step transforms them into truly indulgent caramel pecan bars, perfect for a special holiday dessert idea.
Creative Pecan Pie Bar Variations
Once you’ve mastered the classic recipe for easy pecan pie bars, you might find yourself inspired to experiment with creative variations. These adaptations can cater to different tastes, dietary needs, or simply add an exciting new dimension to your beloved homemade pecan bars. Don’t be afraid to personalize this family favorite recipe, as it’s quite forgiving and receptive to various additions and substitutions. Exploring these creative twists will show you just how versatile this pecan dessert recipe can be.
Try Chocolate or Maple Pecan
One of the most popular and delicious ways to vary your pecan bars is by introducing chocolate or maple flavors:
- Chocolate Pecan Bars: Before pouring the pecan filling, sprinkle a generous layer of semi-sweet or dark chocolate chips over the partially baked shortbread crust. The chocolate will melt into a luscious layer beneath the pecan filling, creating a decadent, Fudgy counterpoint to the sweetness. Alternatively, you can swirl some melted chocolate directly into the pecan filling for a marbled effect.
- Maple Pecan Bars: Replace a portion of the corn syrup or brown sugar in the filling with pure maple syrup. Maple syrup adds a wonderful, complex sweetness and an earthy aroma that complements the pecans beautifully, making them ideal for fall gatherings or as a distinctive holiday dessert idea. Adjust the sweetness slightly if needed, as maple syrup is intensely flavorful.
These variations offer simple yet impactful changes to create entirely new flavor profiles for your best pecan pie bars.
Spiced or Gluten-Free Options
You can also adapt your pecan pie bars to be spiced or gluten-free:
- Spiced Pecan Bars: Add warm spices like cinnamon, nutmeg, a pinch of cloves, or even a touch of ginger to the pecan filling mixture. These spices enhance the overall warmth and depth of flavor, making the bars even more comforting, especially during cooler months. Start with a quarter to half a teaspoon of each spice and adjust to your preference.
- Gluten-Free Pecan Bars: To make these bars gluten-free, substitute the all-purpose flour in the crust with a 1:1 gluten-free baking flour blend that contains xanthan gum. Ensure all other ingredients are naturally gluten-free. The rest of the recipe generally remains the same, allowing those with dietary restrictions to enjoy these delicious treats.
These adaptations demonstrate the flexibility of the classic pecan pie twist, ensuring there’s a version for everyone to enjoy.
Common Questions About Pecan Bars
Even for experienced bakers, questions often arise when tackling a new recipe or adapting an old favorite. Here, we address some common inquiries about easy pecan pie bars to help you troubleshoot, plan ahead, and ensure your baking process is as smooth as possible. Understanding these aspects will build your confidence in making the best pecan pie bars, turning any potential uncertainty into informed decision-making for your homemade pecan bars.
Can I Prepare Them Ahead?
Absolutely! Pecan pie bars are an excellent make ahead dessert, which is one reason they are such a popular choice for holiday gatherings and special events. Here’s how you can prepare them in advance:
- Bake and Refrigerate: You can bake the entire batch of bars, let them cool completely, and then store them in an airtight container in the refrigerator for up to 3-4 days. They actually slice more cleanly when chilled.
- Bake and Freeze: As discussed in the storage section, fully baked and cooled bars can be frozen for up to 2-3 months. Thaw them at room temperature or in the refrigerator before serving. This is ideal for planning far in advance.
- Prepare Components Separately: As also mentioned earlier, the shortbread crust can be prepared and even partially baked a day or two in advance. You can also mix the wet ingredients for the filling (excluding eggs) and store them in the fridge, adding the eggs and pecans just before assembly and baking. This strategy is perfect for a quick pecan bars preparation on the day of serving.
Preparing them ahead not only saves time on the day of your event but also allows the flavors to meld and deepen, often resulting in an even more delicious treat. This flexibility makes them a true family favorite recipe.
Why This is Best Pecan Pie Recipe
Among the myriad of dessert options, this recipe for easy pecan pie bars stands out as a true winner. It combines the nostalgic flavors of a classic pecan pie with the practical benefits of a bar cookie, making it an incredibly appealing choice for bakers of all skill levels. What truly sets this recipe apart is its ability to consistently deliver outstanding results without requiring complex techniques or hard-to-find ingredients. This isn’t just a recipe; it’s a reliable pathway to creating truly memorable homemade pecan bars that consistently garner rave reviews.
Easy Steps, Delicious Results
The beauty of this best pecan pie bars recipe lies in its straightforward nature, proving that simple steps can indeed lead to spectacularly delicious results. From the moment you start mixing the buttery shortbread crust, you’ll appreciate the ease with which it comes together. The sweet pecan filling, equally simple to prepare, requires minimal effort for maximum flavor payoff. There’s no fussy pie dough to contend with, no intricate lattice work, just a press-in crust and a pour-over filling. This simplicity makes it an accessible pecan dessert recipe for beginners, while seasoned bakers will appreciate the efficiency. The outcome is a perfectly balanced treat: a crisp, flavorful crust complementing a rich, gooey, and nutty filling. It’s a classic pecan pie twist that delivers on taste and convenience, solidifying its place as a family favorite recipe suitable for any occasion, from a casual afternoon snack to a grand holiday dessert idea. Don’t forget to share your creations with us on Instagram!
