
Homemade coffee ice cream offers a refreshing cold dessert, far superior to store-bought options. This recipe guides you through making a rich, creamy coffee treat, from selecting quality ingredients to tempering eggs for smooth custard. Prepare for a sweet delight that will impress any coffee lover with its intense coffee flavor.
Key Takeaways
- Craft a rich, creamy coffee ice cream at home with quality dairy ingredients.
- Utilize precise tempering techniques to achieve a perfectly smooth custard base.
- Optimize chilling and churning processes for an ideal, luxurious creamy texture.
- Explore diverse serving suggestions and creative customization options.
- Implement proper storage methods to maintain freshness and prevent freezer burn.
Making ice cream is rewarding. Fresh ingredients truly make a difference. The process is simpler than imagined. Your homemade dessert will taste amazing. Enjoy this sweet cold treat.
Start Your Best Coffee Ice Cream Journey
There’s a special satisfaction that comes from making your own desserts, and homemade coffee ice cream is no exception. Beyond the sheer joy of creating something delicious from scratch, crafting this creamy coffee confection allows you complete control over the quality of ingredients, ensuring a superior coffee flavor and perfectly smooth texture that commercial brands often can’t match. It’s not just about the taste; it’s about the experience, the aroma of brewing coffee mingling with sweet cream, and the anticipation of that first perfect scoop. For any coffee lover, this dessert is a dream come true, offering a refreshing cold treat that stands out.
Why make homemade coffee ice cream?
Making homemade coffee ice cream gives you the power to customize every aspect. You can choose premium dairy products, adjust the coffee strength to your preference, and ensure there are no artificial flavors or preservatives. The result is an intensely flavorful, rich, and naturally creamy coffee ice cream that truly melts in your mouth. Unlike pre-packaged options, your homemade version will boast an unparalleled freshness, making it a star dessert for any occasion. Imagine serving a dessert that’s not only incredibly tasty but also a testament to your culinary prowess. For more delightful sweet treats, check out our recipe for Snickerdoodle Cobbler.
Quick overview of the recipe
This recipe for homemade coffee ice cream follows a classic custard base method, ensuring a wonderfully rich and creamy texture. The process begins with creating a milky coffee base, followed by tempering egg yolks to form a smooth custard. This mixture is then cooked gently until it thickens, establishing the foundation for your sweet treat. After proper chilling, it’s churned in an ice cream maker, transforming into a soft, luxurious dessert, ready for final freezing. This traditional approach, thoroughly detailed, guarantees an ice cream of exceptional quality, embodying the true essence of a delicious ice cream.
Gather Ingredients for Coffee Ice Cream
The foundation of any outstanding dish lies in its ingredients, and homemade coffee ice cream is no different. Selecting high-quality components ensures a delightful coffee flavor and a creamy texture that will make every spoonful a luxurious experience. Before you begin your culinary adventure, take the time to gather everything you need, paying attention to the freshness and type of each item. This careful preparation is key to achieving that rich taste and smooth consistency you desire in your cold dessert.
All items you will need
To create your rich and creamy coffee ice cream, you’ll need a few essential dairy ingredients and, of course, the star flavor: coffee. Here’s a detailed list:
- Whole Milk: Provides the liquid base and contributes to creaminess.
- Heavy Cream: Essential for the rich, decadent texture of the ice cream.
- Granulated Sugar: Sweetens the ice cream and helps with its texture.
- Egg Yolks: Crucial for the smooth custard base, adding richness and preventing ice crystals.
- Instant Espresso Powder or Strongly Brewed Coffee: The source of your delicious coffee flavor. Instant espresso powder often yields a more concentrated and consistent taste.
- Vanilla Extract: Enhances all the flavors, adding a touch of warmth.
- A Pinch of Salt: Balances the sweetness and amplifies the coffee notes.
Choosing quality for best flavor
The quality of your ingredients directly impacts the final coffee flavor and overall experience of your homemade coffee ice cream. Opt for full-fat dairy products; whole milk and heavy cream with a higher fat content will yield a significantly creamier and more luxurious texture. For the coffee component, consider using a good quality instant espresso powder for an intense coffee flavor without adding too much liquid. If using brewed coffee, make sure it’s very strong and freshly brewed from high-quality beans to ensure a rich taste. Fresh, large egg yolks also contribute to a better, smoother custard. Investing a little more in quality ingredients ensures your sweet treat will be truly exceptional.
Making the Creamy Coffee Base
The heart of your homemade coffee ice cream is its flavorful and creamy coffee base. This initial step is critical for infusing that delicious coffee flavor throughout the entire mixture and ensuring a smooth foundation. Taking your time here will pay dividends in the final product’s rich taste and luxurious texture. This is where the magic begins, transforming simple dairy ingredients into the starting point for an extraordinary cold dessert. Pay close attention to these steps to ensure your coffee base is perfectly prepared.
Combining milk, cream, and sugar
Begin by combining the whole milk, heavy cream, and granulated sugar in a medium saucepan. Place the saucepan over medium heat. Stir the mixture occasionally, just until the sugar is completely dissolved. You don’t want to bring it to a boil at this stage, merely warm it enough for the sugar to melt thoroughly into the dairy. This creates a sweet, rich liquid that will form the backbone of your ice cream. The gentle heat helps to marry the flavors and prepares the mixture for the addition of coffee and eggs, contributing to the overall creamy texture of the final ice cream.
Dissolving coffee granules
Once the milk, cream, and sugar mixture is warm and the sugar is dissolved, it’s time to incorporate the coffee. If using instant espresso powder or instant coffee granules, add them directly to the warm dairy mixture. Whisk vigorously until the coffee granules are completely dissolved. This step is crucial for achieving an even and intense coffee flavor throughout your ice cream base. If you’re using strongly brewed coffee, simply stir it into the warm dairy mixture. Ensure it’s well combined. The warmth of the liquid helps to extract and blend the coffee notes seamlessly, laying down the perfect coffee base for your smooth custard.
Tempering Eggs for Smooth Custard
Tempering eggs is a vital technique in making a perfect homemade coffee ice cream. This process ensures that your egg yolks are gently heated and incorporated into the warm dairy mixture without scrambling, resulting in a beautifully smooth custard. Skipping or rushing this step can lead to a lumpy texture, compromising the overall quality of your sweet treat. It’s a foundational skill for many creamy desserts, and mastering it here will guarantee a luxurious and professional-grade ice cream. Take your time, and the reward will be a velvety smooth texture.
Whisking egg yolks until smooth
In a separate medium bowl, place your egg yolks. Using a whisk, beat the egg yolks vigorously until they are pale yellow and completely smooth. This whisking action lightens their color and slightly increases their volume, preparing them to accept the warm liquid without cooking too quickly. Ensuring the egg yolks are smooth and well-mixed is the first critical step in preventing a lumpy custard. A little effort here goes a long way in achieving the desired creamy coffee texture for your homemade ice cream.
Slowly adding warm liquid
Once your egg yolks are smoothly whisked, it’s time for the tempering process. While continuously whisking the egg yolks, slowly drizzle a small amount (about half a cup) of the warm coffee-infused milk and cream mixture into the egg yolks. Keep whisking vigorously as you add the warm liquid. This gradual addition slowly raises the temperature of the egg yolks, preventing them from cooking instantly when they are fully combined with the hot mixture. Continue adding small amounts, one ladle at a time, until about a third of the warm liquid has been incorporated into the egg yolks. This careful step ensures your smooth custard base will be free of scrambled egg bits.
Cooking Your Perfect Coffee Custard
With the tempering complete, the next crucial step is to cook your coffee custard until it reaches the ideal thickness. This process is key to developing the rich flavor and achieving the right consistency that will translate into a wonderfully firm and creamy coffee ice cream after chilling and churning. Precision and patience are vital here to avoid overcooking or scorching the custard. A perfectly cooked custard forms the luxurious backbone of your homemade coffee ice cream, ensuring a superior cold dessert experience. This careful cooking contributes significantly to the final creamy texture and delightful coffee flavor.
Heating mixture until thick
After tempering, pour the warmed egg yolk mixture back into the saucepan with the remaining coffee-infused dairy. Place the saucepan back over medium-low heat. Stir constantly with a wooden spoon or spatula, scraping the bottom and sides of the pan to prevent scorching. Continue to cook the mixture until it thickens enough to coat the back of your spoon, meaning when you draw a line across the spoon with your finger, the line remains clear. This stage is often referred to as “nappe.” This typically occurs around 175-180°F (79-82°C) on an instant-read thermometer. Do not let the mixture boil, as this can curdle the eggs. This careful heating ensures a rich, creamy coffee base for your sweet treat.
Straining for a smooth texture
Once your coffee custard has reached the desired thickness, immediately remove it from the heat. To guarantee a truly smooth custard and eliminate any tiny bits of cooked egg that might have formed despite your careful tempering, strain the entire mixture through a fine-mesh sieve into a clean bowl. Press any remaining solids in the sieve to extract all the flavorful custard. This step is non-negotiable for achieving that luxurious, velvety texture in your homemade coffee ice cream. It ensures every scoop will be perfectly smooth, highlighting the rich coffee flavor without any unwanted interruptions, contributing to the perfect scoop. For another amazing dessert, try our Peanut Butter Brownie Swirl Cookies.
Chilling for Best Ice Cream Results
The chilling process is often overlooked, but it is an absolutely critical step for achieving the best homemade coffee ice cream. Proper chilling ensures that the custard base is cold enough for your ice cream maker to churn it effectively, leading to a smoother, creamier texture and preventing the formation of large ice crystals. This stage also allows the coffee flavor to fully develop and meld with the other dairy ingredients, resulting in a more harmonious and rich taste. Patience during this phase is truly rewarded with a superior cold dessert. It directly impacts the final firm and perfect scoop.
Stirring in vanilla extract
After the custard has been strained, allow it to cool slightly for a few minutes. Then, stir in the vanilla extract. Adding vanilla after the cooking process preserves its delicate flavor, as high heat can diminish its potency. Vanilla perfectly complements and enhances the rich coffee flavor, adding another layer of complexity to your creamy coffee ice cream. Ensure it is thoroughly mixed into the smooth custard base.
Covering to prevent a skin
Once the vanilla is incorporated, it’s essential to cover the surface of the custard directly with plastic wrap. This prevents a “skin” from forming as the custard cools, which can lead to an undesirable texture in your finished ice cream. The plastic wrap should be pressed directly onto the surface of the custard, ensuring no air is trapped between the plastic and the custard. This small but important step helps maintain the smooth texture of the coffee base during the chilling process.
Thoroughly chilling the mixture
With the custard covered, transfer the bowl to the refrigerator. The custard needs to be thoroughly chilled, ideally for at least 4-6 hours, or preferably overnight. The colder the mixture, the better it will churn in your ice cream maker, resulting in a smoother, more stable homemade coffee ice cream. A properly chilled base will thicken further and allow the flavors to deepen, yielding a more intense and satisfying coffee flavor. This extended chilling process is vital for the optimal creamy texture and overall success of your sweet treat, preparing it perfectly for the next step.
Churning Your Best Coffee Ice Cream
Once your coffee custard base is thoroughly chilled, it’s time for the exciting part: churning! This process is where the liquid custard transforms into a soft, luxurious, homemade coffee ice cream. Churning incorporates air into the mixture while simultaneously freezing it, preventing the formation of large ice crystals and resulting in that characteristic smooth, creamy texture. An ice cream maker is an indispensable tool for achieving a truly professional-quality cold dessert. Adhering to the manufacturer’s specific guidelines will ensure the best possible outcome for your rich taste experience.
Using your ice cream maker
Before you begin, ensure your ice cream maker’s bowl is frozen solid, typically requiring 12-24 hours in the freezer. Attach the paddle and lid according to your machine’s instructions. Slowly pour the well-chilled coffee custard base into the frozen bowl of your ice cream maker. The machine will begin to churn immediately, and you’ll notice the mixture gradually thickening and expanding as air is incorporated and it starts to freeze. This methodical rotation and freezing action is crucial for creating the perfect creamy coffee texture.
Following manufacturer’s instructions
Every ice cream maker model can vary slightly, so it’s paramount to follow your specific manufacturer’s instructions regarding churning time. Generally, churning takes anywhere from 20 to 30 minutes, but this can depend on the machine’s power and the initial temperature of your custard. You’ll know it’s ready when the ice cream has the consistency of soft-serve, thick and creamy but still pliable. At this point, the homemade coffee ice cream is perfect for immediate gratification, though a brief freeze will firm it up further for a perfect scoop. For more delightful sweet options, explore our desserts category.
Freezing for Firm Homemade Coffee
After churning, your homemade coffee ice cream will be delightfully soft, similar to soft-serve. While tempting to enjoy immediately, an additional freezing period is essential to achieve the firm, scoopable consistency that makes for the perfect scoop. This final freezing time allows the ice cream to harden properly, ensuring it holds its shape and provides that satisfying texture you expect from a premium cold dessert. Proper storage during this phase is key to preventing freezer burn and maintaining the rich taste of your creamy coffee treat.
Transferring to a container
Once your ice cream maker has finished churning and the mixture has reached a soft-serve consistency, carefully transfer the homemade coffee ice cream into a freezer-safe container. An airtight container is ideal as it helps to minimize exposure to air, which can lead to ice crystal formation and freezer burn. You can use a loaf pan, a specialized ice cream container, or even a sturdy plastic container with a tight-fitting lid. Gently smooth the top surface with a spatula to ensure even freezing.
Minimum freeze time before serving
After transferring, place the container into the freezer. For the best results and a truly firm homemade coffee ice cream, allow it to freeze for a minimum of 4-6 hours. For an even firmer consistency, or if your freezer runs a bit warmer, chilling overnight is highly recommended. This allows the ice cream to fully set and harden, ensuring a perfect scoop that is firm, creamy, and holds its shape beautifully. Before serving, you might want to let it sit at room temperature for 5-10 minutes to soften slightly for easier scooping and optimal creamy texture. This freezing time is vital for enjoying the full sweet treat experience.
Tips for Best Homemade Coffee Ice Cream
Crafting the perfect homemade coffee ice cream involves a blend of science and art. While the core recipe provides a fantastic foundation, a few expert tips can help you fine-tune the coffee flavor, explore alternatives if you don’t own an ice cream maker, and achieve an unparalleled extra creaminess. These adjustments allow you to personalize your sweet treat, ensuring it meets your exact preferences for a truly rich taste and perfect scoop. Embrace these suggestions to elevate your cold dessert to new heights.
Adjusting coffee strength
The beauty of homemade ice cream is customization. If you prefer a bolder, more intense coffee flavor, consider increasing the amount of instant espresso powder or using an extra shot of strong brewed coffee in your base. Conversely, if you like a milder note, reduce the amount slightly. Experiment with different types of coffee beans or roasts to find your preferred profile. Remember, the flavors will mellow slightly when frozen, so it’s often better to start with a slightly stronger coffee base than you might initially think. This flexibility ensures your creamy coffee ice cream is tailored perfectly to your palate.
No ice cream maker alternatives
Don’t have an ice cream maker? You can still enjoy homemade coffee ice cream! One popular method involves pouring the chilled custard into a shallow freezer-safe pan (like a metal baking dish). Freeze for 30-45 minutes until the edges start to set. Then, remove and vigorously stir or whisk the mixture to break up ice crystals. Repeat this stirring process every 30-45 minutes for 3-4 hours, or until the ice cream is firm and creamy. Another method is using a stand mixer: freeze the mixture in ice cube trays, then blend the frozen cubes in a powerful stand mixer until smooth and creamy. While these methods require more manual effort, they can still yield a delicious creamy texture. For other inventive dessert ideas, discover our Vanilla Bean Crème Brûlée Cheesecake Cupcakes.
Achieving extra creaminess
For an even richer, more luxurious creamy texture, there are a few tricks you can employ. Adding a tablespoon of corn syrup or a tiny amount (about a quarter teaspoon) of guar gum or xanthan gum to your custard base can help prevent ice crystal formation and boost creaminess. Another trick is to slightly increase the proportion of heavy cream to whole milk, though this can make the ice cream very rich. A small amount of cream cheese (about 1-2 tablespoons per batch), melted into the warm base, can also contribute to an incredibly smooth and decadent mouthfeel, enhancing the overall sweet treat experience.
Serving Your Delicious Coffee Ice Cream
Once your homemade coffee ice cream has properly frozen, the final step is to serve it in a way that truly celebrates its rich taste and creamy texture. Presentation can significantly enhance the enjoyment of any dessert, turning a simple sweet treat into a memorable experience. Whether you’re enjoying it solo or sharing it with guests, these suggestions will help you present your cold dessert at its best, ensuring every perfect scoop is as visually appealing as it is delicious.
Perfect pairing suggestions
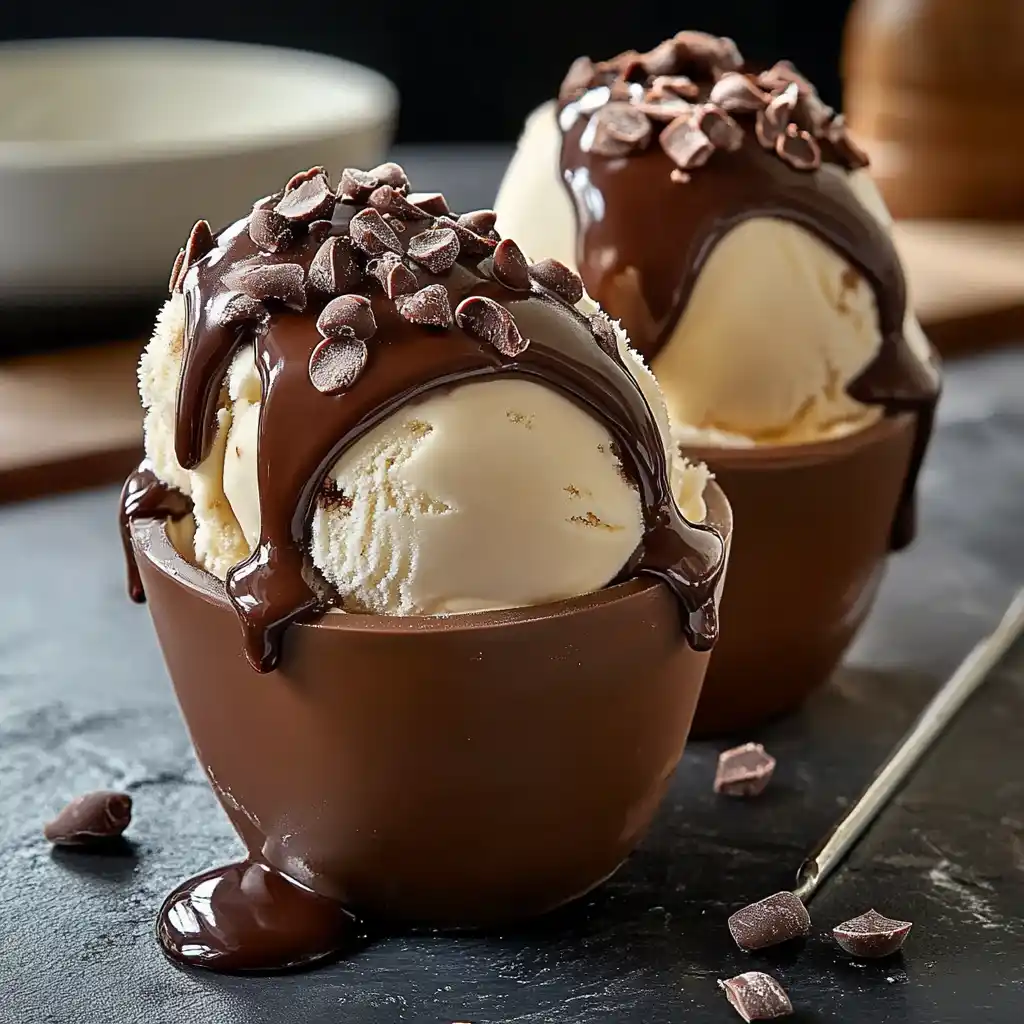
Coffee ice cream is versatile and pairs wonderfully with a variety of accompaniments. For a classic combination, serve it with a drizzle of warm chocolate fudge sauce or a spoonful of salted caramel. A sprinkle of chocolate-covered espresso beans or crushed shortbread cookies adds delightful crunch and complementary flavors. It also makes an excellent affogato: place a scoop in a mug and pour a hot shot of espresso over it for an adult-friendly espresso twist. Consider pairing it with a slice of apple pie or a brownie for a rich, comforting dessert. Visit Carina Recipes on Pinterest for more visual inspiration.
Presentation for aesthetic appeal
Elevate your homemade coffee ice cream’s aesthetic appeal with thoughtful presentation. Use a warmed ice cream scoop to create perfectly round, smooth scoops. Serve in elegant dessert bowls, clear glass dishes, or even small coffee cups to play on the coffee theme. Garnish with a sprig of mint, a dusting of cocoa powder, a few chocolate shavings, or a delicate coffee bean for a sophisticated touch. For a more whimsical look, add a dollop of whipped cream and a cherry. The visual charm makes the rich taste even more enticing.
Creative Twists for Your Coffee Ice Cream
While classic homemade coffee ice cream is a delight in itself, its robust coffee flavor provides an excellent canvas for creativity. Experimenting with various mix-ins, swirls, and flavor additions can transform your cold dessert into an entirely new experience, catering to different tastes and occasions. Don’t be afraid to innovate and make this sweet treat truly your own, enhancing its rich taste and creamy texture with unique touches. These creative twists can make your perfect scoop even more exciting and memorable for any coffee lover.
Adding mix-ins and swirls
Once your ice cream is churned to a soft-serve consistency, it’s the perfect time to fold in mix-ins. Think mini chocolate chips, chopped nuts (like pecans or walnuts), crushed Oreos, or even finely chopped toffee bits for added texture and flavor. For swirls, gently spoon in melted fudge, caramel sauce, or a berry puree, then swirl lightly with a knife or spoon, creating beautiful patterns. Be careful not to overmix, as you want distinct streaks rather than a fully incorporated blend. These additions make each perfect scoop a delightful surprise.
Spiced coffee flavor additions
To add another dimension to your coffee flavor, consider infusing your custard base with warm spices. A pinch of cardamom, cinnamon, or even a tiny grating of nutmeg can beautifully complement the coffee notes, creating a spiced coffee flavor that is both comforting and exotic. Add these spices along with the coffee granules to the warm dairy mixture, allowing them to steep and release their aromas. This slight adjustment can transform a familiar sweet treat into an adventurous culinary delight, offering a rich taste with an aromatic twist.
Adult-friendly espresso twist
For an adult-only version of your homemade coffee ice cream, consider adding a splash of your favorite liqueur. A tablespoon or two of Kahlúa, Baileys Irish Cream, coffee liqueur, or even a good quality dark rum stirred into the chilled custard base before churning can add a sophisticated and spirited kick. Be mindful not to add too much alcohol, as it can prevent the ice cream from freezing properly. This espresso twist creates a more complex flavor profile, making it a perfect after-dinner cold dessert for grownups, combining the creamy texture with a delightful boozy note.
Storing Your Best Coffee Ice Cream
To enjoy your homemade coffee ice cream at its peak, proper storage is crucial. Even the best homemade ice cream can fall victim to freezer burn or lose its creamy texture if not handled correctly after freezing. Effective storage techniques ensure that every perfect scoop remains as delicious and fresh as the day it was made, preserving its rich taste and delightful coffee flavor. Following these steps will help you keep your sweet treat in prime condition for as long as possible, preventing freezer burn and maintaining its excellent quality.
Keeping ice cream fresh
The key to keeping ice cream fresh is to minimize its exposure to air. Always store your homemade coffee ice cream in an airtight container. Specialty ice cream containers are designed with this in mind, often having narrow, tall shapes that reduce the surface area exposed to air. If using a wider container, press a piece of parchment paper or plastic wrap directly onto the surface of the ice cream before securing the lid. This creates an extra barrier against air and helps maintain the creamy texture and vibrant coffee flavor of your cold dessert. Store it at the back of the freezer, where temperatures are most consistent.
Preventing freezer burn
Freezer burn is the enemy of all homemade ice cream, causing a dry, icy texture and a loss of flavor. It occurs when moisture evaporates from the ice cream and forms ice crystals on the surface. To prevent freezer burn, ensure your container is genuinely airtight, as mentioned above. Avoid repeatedly letting the ice cream melt and refreeze, as this also encourages crystal formation. When serving, scoop quickly and return the container to the freezer promptly. Keeping the ice cream consistently cold in a well-sealed container, away from the freezer door, will significantly extend its shelf life and maintain its perfect scoop quality, preserving that rich taste. Stay connected for more delicious recipes by following Carina Recipes on Instagram.