
The Best Homemade Brownies Recipe offers an easy path to creating rich, fudgy chocolate squares that will impress everyone. With simple ingredients and clear instructions, you can master these classic treats and even experiment with seven irresistible variations to suit any craving. Get ready for deliciousness!
Key Takeaways
- Simple pantry ingredients create incredible homemade brownies.
- Achieve fudgy perfection by following precise baking and cooling steps.
- Explore diverse variations, from nutty additions to different chocolate types.
- Proper cooling and storage ensure your brownies stay fresh and delightful.
- This recipe yields 24 servings, perfect for sharing or special occasions.
Baking brownies is a joy. The aroma fills your home. Simple steps lead to delicious results. Everyone loves a warm, fudgy brownie. Share the sweetness with family.
Getting Ready for Best Brownies
Preparing your baking environment correctly is the first crucial step towards achieving the best homemade brownies. A little attention to detail here ensures a smooth process and a perfectly baked product. Think of it as setting the stage for a delightful culinary performance. These initial steps are not just suggestions; they are foundational for creating those irresistible, fudgy squares you crave. Neglecting them can lead to uneven baking or sticking, issues no baker wants to encounter, especially when delicious chocolate is on the line.
Preheat oven to 350°F (175°C)
Always preheat your oven. This ensures the brownie batter hits the ideal temperature from the moment it enters, promoting even cooking and the desired fudgy texture. If your oven isn’t fully preheated, the baking time will be inconsistent, and you risk a brownie that’s either underbaked in the middle or overbaked and dry at the edges. A steady temperature is key for that perfect rise and internal texture. Give your oven at least 15-20 minutes to reach and stabilize at 350°F (175°C).
Grease a 9×13 inch baking pan
A well-prepared pan prevents sticking and makes cutting your brownies a breeze. For the best homemade brownies, generously grease a 9×13 inch baking pan with butter or baking spray. For an even easier removal and cleaner cuts, consider lining the pan with parchment paper, leaving an overhang on the sides. This “sling” allows you to lift the entire slab of cooled brownies out of the pan, making slicing effortless. A properly prepared pan is a small step that yields big rewards in the final presentation and ease of serving.
Ingredients for Best Homemade Brownies Recipe
Crafting the best homemade brownies starts with selecting the right ingredients. While a brownie may seem simple, the quality and type of your pantry staples significantly influence the final taste and texture. Our goal is a rich, fudgy, and intensely chocolatey experience, which hinges on a few key components. You don’t need exotic items; just good quality, everyday ingredients will bring these delicious brownies to life. Consider this your foundation for a truly satisfying sweet treat. For even more dessert ideas, you might like our Quick Italian Cream Cake recipe.
Simple pantry staples needed
The beauty of this best homemade brownies recipe lies in its simplicity. You likely already have most of these items in your kitchen. We’re talking about basic ingredients like all-purpose flour, granulated sugar, large eggs, vanilla extract, and salt. These form the backbone of the brownie structure and sweetness. Using fresh, high-quality versions of these staples will always yield a better result. For example, fresh eggs contribute to a richer texture and better rise, while good quality vanilla extract deepens the overall flavor profile without overpowering the chocolate.
Unsalted butter and cocoa powder
These two ingredients are the stars of our chocolate show. Unsalted butter is preferred because it gives you control over the overall saltiness of the brownies. Different brands of salted butter vary in their salt content, which can lead to unpredictable flavors. For the cocoa powder, opt for a good quality unsweetened variety. Dutch-processed cocoa powder will give you a darker, milder chocolate flavor, while natural unsweetened cocoa powder offers a more intense, slightly acidic chocolate kick. Both work wonderfully, but a quality cocoa powder, which you can learn more about on Wikipedia’s cocoa powder page, is non-negotiable for truly rich and delicious brownies. These components ensure a deep chocolate flavor that defines a perfect homemade brownie.
Preparing the Brownie Base
The foundation of your best homemade brownies begins with carefully combining the wet ingredients. This step is where the rich, fudgy texture starts to take shape, so attention to detail is paramount. Creating a smooth, emulsified base before adding dry ingredients ensures a consistent and luxurious brownie. This process is relatively quick but impacts the ultimate chewiness and density of your final product. Take your time here to set your brownies up for success, leading to a perfectly balanced sweet treat.
Melt butter over low heat
Begin by gently melting the unsalted butter. It’s crucial to do this over low heat to prevent the butter from browning or scorching, which can impart an undesirable nutty or burnt flavor to your brownies. You want it just melted, not simmering or sizzling. A slow melt allows the butter to fully incorporate with the sugar and other wet ingredients without breaking the emulsion. This ensures a smooth, glossy base for your batter. Once melted, remove it from the heat immediately to avoid any further cooking. This careful approach to melting butter is a small but significant step in achieving that perfect, moist homemade brownie texture.
Stir in sugar, eggs, vanilla
Once your butter is melted and slightly cooled (just enough so it won’t cook the eggs), it’s time to stir in the remaining wet ingredients. Add the granulated sugar to the warm butter and whisk until it’s well combined and slightly dissolved. The sugar helps create that desirable crackly top and chewy texture. Next, beat in the large eggs, one at a time, ensuring each is fully incorporated before adding the next. This step adds richness and helps bind the batter. Finally, stir in the vanilla extract. A good quality vanilla enhances the chocolate flavor, adding depth and warmth to your best homemade brownies. Whisk until the mixture is light in color and airy, creating a beautiful, glossy base for your batter.
Mixing Your Best Homemade Brownies Batter
Once your wet ingredients are perfectly combined, the next stage is to carefully integrate the dry components to form your delicious brownie batter. This step is where many bakers can go wrong, as overmixing is the enemy of fudgy brownies. The key is to be gentle and efficient, ensuring everything is just combined without overdeveloping the gluten in the flour. This attention to technique will result in a tender crumb and a rich, moist texture for your best homemade brownies. It’s the moment where the separate elements truly become a cohesive, decadent mixture, ready for the oven.
Add flour, cocoa, salt gently
In a separate bowl, whisk together your all-purpose flour, cocoa powder, and salt. This pre-mixing ensures these dry ingredients are evenly distributed throughout the batter. Then, gradually add the dry mixture to your wet ingredients. The golden rule here is to mix gently until *just* combined. Overmixing flour develops gluten, which can lead to tough, cake-like brownies instead of the desired fudgy texture. Use a spatula or wooden spoon and fold the ingredients together until no streaks of flour remain. The batter should be thick and glossy. This gentle approach is fundamental for truly excellent homemade brownies, preserving their tender and moist quality.
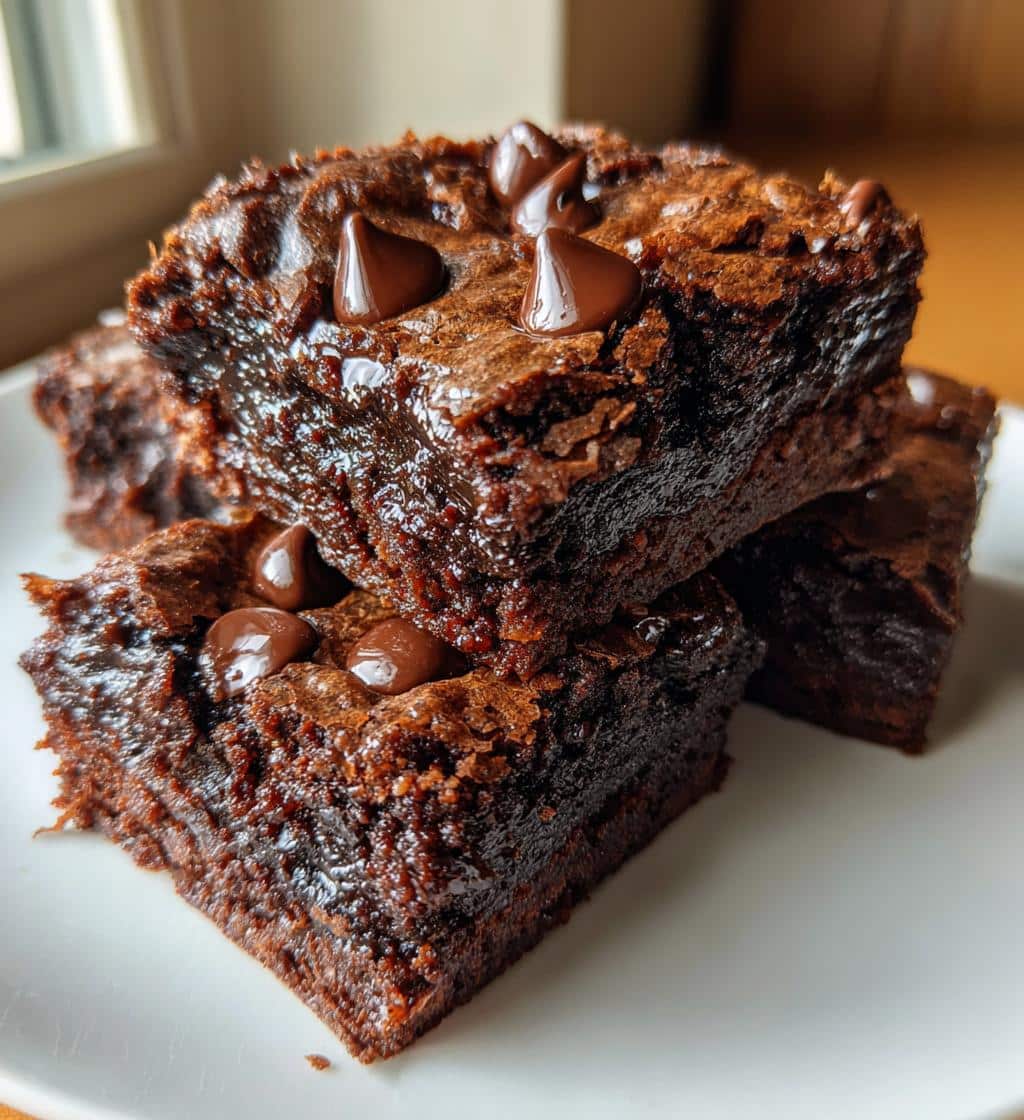
Fold in delicious chocolate chips
The final touch to your best homemade brownies batter involves folding in those irresistible chocolate chips. This step is optional but highly recommended for an extra burst of chocolate in every bite. Whether you choose semi-sweet, dark, or milk chocolate chips, they add pockets of melted chocolate goodness that elevate the brownie experience. Gently fold them into the batter until they are evenly distributed. Be careful not to crush them or overmix at this stage. You want them to retain their shape as much as possible for those delightful melted morsels throughout your baked treat. This simple addition turns a great brownie into an extraordinary one, ensuring every serving is a delightful, chocolate-filled adventure.
Baking Your Best Homemade Brownies
With your perfectly mixed batter ready, the moment arrives to transform it into delectable brownies. Baking is a critical stage where temperature and timing play starring roles in achieving that ideal fudgy consistency. A consistent oven temperature and careful monitoring are key to preventing an overbaked, dry brownie. This section will guide you through the process of pouring and baking, ensuring your efforts in ingredient selection and mixing culminate in a truly irresistible sweet treat. Prepare to fill your kitchen with the wonderful aroma of baking chocolate. For more inspiration, check out our collection of desserts.
Pour batter evenly into pan
Once your rich, chocolatey batter is ready, carefully pour it into the greased and/or parchment-lined 9×13 inch baking pan. Use a spatula to scrape every last bit of that delicious batter from the bowl—no crumb left behind! Then, gently spread the batter evenly across the pan using the back of your spatula. Ensure the thickness is consistent from edge to edge to promote uniform baking. An even layer means all parts of your brownie will bake at the same rate, resulting in a cohesive texture rather than some parts being overdone and others underdone. This meticulous spreading is essential for consistent and delightful homemade brownies.
Bake for 25-30 minutes
Place your pan into the preheated 350°F (175°C) oven. The initial baking time for these best homemade brownies is typically between 25 and 30 minutes. Keep a close eye on them, especially as they near the 25-minute mark. Ovens can vary, so your brownies might be ready a little earlier or later. You’ll notice the edges beginning to set and look slightly puffed, while the center will still appear a bit soft. This slight softness in the middle is exactly what you want for a fudgy brownie. Trust the process, but don’t wander far, as the difference between perfectly fudgy and slightly dry can be just a few minutes.
Knowing When Brownies Are Done
Determining the perfect doneness for your homemade brownies is a delicate art, especially if you’re aiming for that coveted fudgy center. It’s a common pitfall to overbake brownies, turning a potential masterpiece into a dry, cake-like disappointment. Understanding the visual cues and performing a simple test will ensure your brownies are precisely as they should be: moist, rich, and incredibly decadent. This section provides the critical insights needed to pull your brownies from the oven at the absolute prime moment, guaranteeing a delightful texture every time.
Toothpick test for perfect crumbs
The toothpick test is your best friend when it comes to checking brownie doneness. Insert a toothpick into the center of the pan. For fudgy brownies, you don’t want it to come out completely clean like with a cake. Instead, it should emerge with moist crumbs attached, but no wet batter. If it’s still completely liquid, it needs more time. If it comes out perfectly clean, you’ve likely overbaked them. The presence of moist, sticky crumbs indicates that the brownies are set around the edges but still beautifully fudgy in the middle. This balance is what makes these homemade brownies truly irresistible.
Avoid overbaking for fudgy center
The most important rule for achieving a truly fudgy brownie is to avoid overbaking at all costs. As mentioned, the center should still look a little moist and soft when you pull them out of the oven. Remember that brownies continue to cook slightly from residual heat even after they’ve been removed from the oven, a phenomenon known as “carryover cooking.” If you wait until they look completely set in the oven, they will be dry by the time they cool. Embrace the slightly underbaked look; it’s the secret to those intensely fudgy, melt-in-your-mouth homemade brownies that everyone loves. Be brave and pull them out a minute or two earlier than you think they might need.
Cooling and Cutting Brownie Squares
The journey to perfect homemade brownies doesn’t end when they come out of the oven. Proper cooling is just as vital as baking for achieving that ideal fudgy texture and clean, neat squares. Rushing this stage can lead to crumbly, messy brownies that are hard to slice and don’t hold their shape well. Patience is truly a virtue here, allowing the brownies to set up completely, enhancing both their texture and their presentation. Follow these steps for beautifully firm yet delightfully fudgy brownie squares that are a joy to serve and eat.
Cool in pan for 10-15 minutes
Once your best homemade brownies are out of the oven, resist the urge to immediately transfer or cut them. Allow them to cool in the baking pan for at least 10-15 minutes. This initial cooling period is crucial for several reasons. It allows the brownies to continue setting up from the residual heat, further solidifying their structure. It also makes them less delicate and easier to handle when you eventually move them. If you try to remove them too soon, they might fall apart or stick to the pan. This brief rest is a small wait for a big reward in structural integrity and deliciousness.
Transfer to wire rack to cool
After the initial cooling in the pan, if you used a parchment sling, gently lift the brownies out of the pan and transfer the entire slab (still on the parchment) to a wire rack. If you didn’t use parchment, you can carefully invert the pan onto a wire rack, then flip the brownies right-side up onto another rack. Allow the brownies to cool completely on the wire rack. This can take several hours, but it’s essential for achieving that dense, fudgy texture and for easy, clean cuts. Cooling on a wire rack allows air to circulate around all sides, preventing condensation that could make the bottom soggy. A fully cooled brownie is a perfectly set brownie, ready for slicing into those beautiful, irresistible squares.
Best Homemade Brownies Recipe Variations
One of the most exciting aspects of making the best homemade brownies is the endless potential for customization. While a classic fudgy brownie is a delight on its own, adding different ingredients can transform it into an entirely new sweet treat. These variations allow you to cater to different tastes, celebrate seasonal flavors, or simply add an element of surprise to your baking. Don’t be afraid to experiment and make these brownies truly your own. Each addition promises to elevate the already delicious experience, offering unique textures and flavor profiles that will keep everyone coming back for more.
Add different types of chocolate
The chocolate base of our best homemade brownies is perfect for layering with even more chocolate goodness. Instead of just one type of chocolate chip, try mixing in a combination! White chocolate chips add a creamy contrast, while milk chocolate chips bring a sweeter, milder flavor. For an extra rich and sophisticated brownie, swirl in some melted dark chocolate or chunks of your favorite gourmet chocolate bar. You could even use different chocolate forms, like chocolate chunks instead of chips, for bigger, gooey pockets. Imagine a blend of semi-sweet and peanut butter chips for a delightful twist. Speaking of peanut butter, you might also enjoy our Peanut Butter Brownie Swirl Cookies.
Mix in nuts or other treats
Beyond chocolate, a plethora of ingredients can be folded into your brownie batter to create exciting variations. Nuts are a classic addition; toasted walnuts or pecans provide a wonderful crunch and earthy flavor that pairs beautifully with chocolate. For a decadent twist, consider adding caramel bits, chopped marshmallows (especially delicious when slightly toasted on top), or even crushed pretzels for a salty-sweet crunch. Other popular mix-ins include dried cherries, espresso powder for a mocha flavor, or a swirl of cream cheese for a cheesecake brownie. Feel free to get creative; a little goes a long way in making these homemade brownies a unique and memorable dessert. Our Snickerdoodle Cobbler also offers another fantastic sweet indulgence for your baking repertoire.
Time Details for Your Brownies
Understanding the time commitment for any recipe is key to successful baking, and our best homemade brownies are no exception. While the active preparation is relatively quick, it’s important to account for both hands-on time and the crucial baking and cooling periods. This section breaks down the timeline, allowing you to plan your baking adventure effectively, ensuring you have enough time to create these delicious sweet treats without feeling rushed. You’ll be surprised how quickly you can go from craving to enjoying a warm, fudgy brownie.
Preparation takes 15 minutes
One of the best features of this best homemade brownies recipe is its efficiency. The active preparation, from melting butter to mixing the batter and folding in chocolate chips, can be completed in approximately 15 minutes. This quick prep time makes it an ideal recipe for when you’re short on time but still want to whip up a delicious homemade dessert. Gathering your ingredients beforehand (mise en place) will help streamline this process even further, ensuring you move through each step smoothly and without interruption. Fifteen minutes is all it takes to assemble a truly delightful chocolate batter.
Total time is 45 minutes
While preparation is swift, the total time from start to finish is approximately 45 minutes. This includes the 15 minutes of active preparation and an additional 25-30 minutes for baking in the oven. It’s important to note that this total time does not include the essential cooling period. However, knowing the combined prep and bake time allows you to estimate when your kitchen will be filled with the irresistible aroma of baking brownies and when they’ll be ready for their initial cool-down. This makes planning your baking session straightforward and ensures a timely delivery of your delicious homemade brownies.
How Many Brownies You Get
When you put in the effort to bake the best homemade brownies, it’s good to know how many delightful servings you can expect. This recipe is designed to yield a generous batch, making it incredibly versatile for various occasions. Whether you’re planning a small family gathering or a larger event, these brownies are sure to be a crowd-pleaser. The ample yield ensures there’s enough to go around, satisfying everyone’s sweet tooth and perhaps even leaving a few extra for future cravings. It’s a truly rewarding recipe that offers both quantity and quality.
Yields 24 delicious servings
This recipe for the best homemade brownies is perfectly scaled to yield a substantial batch: 24 delicious servings from a standard 9×13 inch pan. When cut into reasonable 2×2 inch squares, you’ll have plenty to share. This generous yield makes it an excellent choice for potlucks, bake sales, school events, or simply ensuring you have enough treats to last through the week. Each serving promises a rich, fudgy experience, making every one of the 24 pieces a delightful indulgence that captures the essence of homemade goodness.
Perfect for sharing or parties
Given the impressive yield, these homemade brownies are undeniably perfect for sharing. Their universal appeal makes them an ideal dessert for parties, celebrations, or any social gathering. Imagine bringing a tray of these fudgy delights to a family picnic or a holiday event – they’re guaranteed to disappear quickly! Beyond formal gatherings, they’re also wonderful for sharing with neighbors, coworkers, or simply as a thoughtful gift. Their robust nature means they travel well, making them a convenient and always appreciated contribution to any festive occasion. The joy of baking these best homemade brownies is truly amplified when shared.
Nutrition Facts Per Brownie
While the focus is often on the delicious taste and fudgy texture of the best homemade brownies, understanding their general nutritional profile can also be helpful. It’s important to note that homemade recipes can vary greatly based on specific ingredients and portion sizes. The information provided here offers a general estimate for a single serving, helping you make informed choices without detracting from the joy of indulging in a sweet treat. These are approximations, not exact figures, but they give a good idea of what each delicious square contains.
Calories and fat content
Typically, a single serving (one 2×2 inch square) of these best homemade brownies can range from approximately 150-200 calories. This can fluctuate based on the specific brand of chocolate chips, the amount of butter used, and any added variations like nuts or caramel. The fat content generally falls between 8-12 grams per serving, with a portion of that being saturated fat from the butter and chocolate. These figures highlight that brownies are indeed an indulgent sweet treat, best enjoyed in moderation or as part of a balanced diet. Always remember that home-baked goods offer the advantage of knowing exactly what ingredients are included.
Carbohydrates and protein info
For carbohydrates, a standard homemade brownie serving typically contains about 20-25 grams, primarily from sugar and flour. This makes them a good source of quick energy. Dietary fiber content is generally low, around 1-2 grams per serving. As for protein, you can expect approximately 2-3 grams per brownie, mainly coming from the eggs and a small amount from the flour and cocoa. While brownies are not a significant source of protein, these estimates provide a rounded view of their nutritional contribution. Enjoying these delicious treats thoughtfully allows for a wonderful balance of pleasure and awareness.
Storing and Serving Brownies
You’ve baked the best homemade brownies, and now it’s time to enjoy them! Proper storage is crucial to maintain their fudgy texture and delicious flavor for as long as possible. And of course, how you serve them can elevate the experience even further. Whether you prefer them fresh from the oven or perfectly chilled, these brownies are versatile. This section will guide you on how to keep your brownies fresh and offer some delightful serving suggestions, ensuring every bite is as good as the first, making them a truly memorable sweet treat. Don’t forget to share your creations!
Keep leftovers in airtight container
To preserve the freshness and fudginess of your homemade brownies, store any leftovers in an airtight container at room temperature. This will prevent them from drying out and will keep them perfectly moist for 3-4 days. If you need to store them longer, they can be refrigerated for up to a week, or even frozen for up to 2-3 months. When freezing, wrap individual brownies tightly in plastic wrap before placing them in an airtight freezer-safe container to prevent freezer burn. Proper storage ensures that every time you reach for a brownie, it’s as fresh and delicious as the day it was baked.
Enjoy warm or at room temp
These best homemade brownies are incredibly versatile in how they can be enjoyed. While delicious at room temperature, a brief warm-up in the microwave (10-15 seconds) can bring out their gooey, fudgy center and intense chocolate aroma. Serve them warm with a scoop of vanilla bean ice cream for a classic, decadent dessert, or with a dollop of whipped cream. They’re also fantastic alongside a hot cup of coffee or a glass of cold milk. For more serving ideas and baking inspiration, be sure to follow us on Pinterest and Instagram! Whether you prefer them cool and dense or warm and gooey, these homemade brownies are a true delight.