
creamy baked mac and cheese, the same principle of accurate preheating applies for a perfectly cooked dish. Getting this foundational step right sets you up for success, leading to a truly irresistible batch of bars. This initial attention to detail guarantees that the rich flavors of the caramel and buttery cookie base will shine through exactly as intended, providing a wonderful baking experience for any home cook.
Gather Cookie Bar Ingredients
All items you will need
Before you dive into the delightful process of baking cookie bars, gathering all your ingredients is a smart move that streamlines the entire process. This “mise en place” approach ensures a smooth, stress-free baking experience, allowing you to focus on the technique rather than scrambling for a missing item. For these salted caramel bars, you’ll need a combination of pantry staples and a few special additions that contribute to their rich, balanced flavor profile.
Your shopping list will include all-purpose flour, granulated sugar, light brown sugar (packed), unsalted butter (softened to room temperature), large eggs, vanilla extract, baking soda, and a pinch of salt. For the star of the show, you’ll need a high-quality caramel sauce—either homemade or a good store-bought variety—and sea salt flakes for that iconic sweet-and-salty contrast. Don’t forget your favorite chocolate chips, as they will add another layer of sweetness and texture. Having your butter softened is particularly important for the creaming step, as it incorporates air much more efficiently than cold butter, leading to a lighter, more tender crumb in your final dessert bars. Consider these ingredients the building blocks for creating a genuinely memorable and delightful treat.
Mix Wet for Cookie Bars
Creaming butter and sugars
The foundation of a great cookie bar begins with properly mixing the wet ingredients, particularly the creaming of butter and sugars. This initial step is vital for achieving that signature chewy texture and delicate crumb in your salted caramel cookie bars. Start by placing the softened unsalted butter into a large mixing bowl. Add both granulated sugar and packed light brown sugar. The brown sugar not only adds a lovely molasses flavor but also contributes significantly to the chewy quality of the bars.
Using an electric mixer, beat the butter and sugars together on medium speed until the mixture becomes light, fluffy, and pale yellow. This process incorporates air into the butter, creating tiny pockets that will expand during baking, resulting in a tender and aerated base. Scrape down the sides of the bowl frequently to ensure all ingredients are evenly combined. This creaming process should take about 3-5 minutes, transforming the dense mixture into a smooth, creamy concoction that promises a fantastic buttery crust. For similar delightful desserts, proper creaming techniques are key.
Adding eggs and vanilla
Once your butter and sugars are perfectly creamed, it’s time to introduce the eggs and vanilla extract. These ingredients add richness, moisture, and binding power to your cookie bar dough. Crack the large eggs into a separate small bowl first to ensure no shell fragments enter your mixture. Add the eggs one at a time to the creamed butter and sugar mixture, beating well after each addition until fully incorporated. This gradual addition helps maintain the emulsification and prevents the mixture from separating.
After the eggs are well blended, stir in the pure vanilla extract. Vanilla is a flavor enhancer that complements the sweetness and richness of the other ingredients, elevating the overall taste of your homemade caramel bars. Mix until just combined, being careful not to overmix at this stage, as excessive agitation can develop gluten in the flour too much, leading to tougher bars. The wet ingredients should now be a smooth, fragrant, and cohesive base, ready for the addition of the dry components. This careful attention to mixing ensures the perfect balance of flavors and textures, making your cookie bars truly irresistible.
Combine Dry for Cookie Bars
Flour, baking soda, salt
With your wet ingredients perfectly prepared, the next step in creating your delectable salted caramel bars is to thoughtfully combine the dry components. This step is equally important for the structure and flavor balance of your cookie bars. In a separate medium-sized bowl, whisk together the all-purpose flour, baking soda, and salt. The flour provides the main structure for the bars, while baking soda acts as a leavening agent, helping them to rise slightly and achieve a tender crumb. The salt, even in a sweet recipe, is crucial—it enhances all the other flavors and helps to balance the sweetness, particularly with the rich caramel.
Whisking these dry ingredients together thoroughly before adding them to the wet mixture ensures that the leavening agent and salt are evenly distributed throughout the dough. This prevents pockets of unmixed baking soda or uneven saltiness, guaranteeing a consistent taste and texture in every bite. Once combined, gradually add the dry ingredients to the wet mixture, mixing on low speed until just combined. Be careful not to overmix; over-developing the gluten in the flour can lead to tough, dense bars rather than the desired soft and chewy texture. Stop mixing as soon as no streaks of flour remain. This careful approach to combining dry ingredients sets the stage for a truly magnificent batch of cookie bars, a real sweet treat.
Fold in Chocolate Chips
Sweetness for cookie bars
The addition of chocolate chips is where these salted caramel cookie bars get an extra layer of decadence and irresistible appeal. While the caramel provides a luscious gooeyness, chocolate chips introduce pockets of melty sweetness and a delightful textural contrast. You can choose your favorite type of chocolate chips—semi-sweet are a classic choice, offering a balanced sweetness that complements the rich caramel and buttery crust. However, for a more intense flavor, you might consider using dark chocolate chips, especially if you’re a fan of deeper, less sweet profiles, as hinted at in our tips section.
Once your wet and dry ingredients are just combined to form the cookie dough, it’s time to gently fold in the chocolate chips. Use a rubber spatula to incorporate them evenly throughout the dough. The key here is to fold, not to stir vigorously, which can lead to overmixing. Distribute the chips well so that every slice of your cookie bar offers a satisfying burst of chocolate. This step not only adds a wonderful sweetness but also enhances the overall complexity of these already incredible dessert recipes. The chocolate chips are truly the cherry on top, making these family favorite bars even more special and appealing to all sweet treat lovers.
Layer Salted Caramel Cookie Dough
Spread half the dough
The art of layering is what truly makes these salted caramel cookie bars stand out, creating distinct, delicious strata of flavor and texture. Begin by preparing a 9×13 inch baking pan, lining it with parchment paper so that the paper extends over the edges. This creates handy “slings” for easy removal of the baked bars later, a tip that will save you much frustration! Take about half of your prepared cookie dough and press it evenly into the bottom of the lined pan. You might find it easiest to lightly flour your hands or use a piece of plastic wrap on top of the dough to help press it smoothly and uniformly across the entire base of the pan. This forms the essential buttery crust that will cradle the luscious caramel filling. Ensure the layer is relatively flat and even, as this consistency will contribute to uniform baking and a beautiful final presentation.
Drizzle luscious caramel
Once your first layer of cookie dough is firmly in place, it’s time for the star of the show: the luscious caramel. Whether you’re using a high-quality store-bought caramel sauce or your own homemade caramel, ensure it’s at a consistency that can be easily drizzled. If it’s too thick, you can gently warm it for a few seconds in the microwave to make it more pourable. Carefully drizzle the caramel sauce over the entire surface of the pressed cookie dough layer, leaving a small border around the edges to prevent excessive bubbling over during baking. You want a generous amount of caramel to infuse every bite with its rich, buttery sweetness. This layer is crucial for the signature rich flavor of these dessert bars, creating a gooey, irresistible center that perfectly contrasts with the chewy cookie. For another delightful dessert, you might enjoy our snickerdoodle cobbler, though it calls for a different kind of gooey center!
Sprinkle Sea Salt on Bars
Top with remaining dough
After the caramel has been generously drizzled over the bottom layer of cookie dough, it’s time to bring in the element that gives these bars their iconic name and flavor profile: the sea salt. Before you add the final layer of dough, a light sprinkling of coarse sea salt flakes over the caramel is paramount. This isn’t just for decoration; it’s a critical flavor component that provides a delightful counterpoint to the intense sweetness of the caramel and cookie dough. The salt enhances the caramel’s depth, creating that addictive sweet and salty dynamic that makes these bars so popular.
Following the sea salt, the remaining half of your cookie dough will form the top layer. This can be a bit trickier than the bottom layer, as the dough needs to be spread over the sticky caramel. The best technique is to take small, flattened pieces of the remaining dough and gently place them over the caramel, then carefully spread and patch them together until the caramel is mostly covered. It doesn’t need to be perfectly smooth; a slightly rustic, crumbled top adds to the charm and creates wonderful texture once baked. This careful layering ensures that each bite delivers a balanced combination of the soft cookie, gooey caramel, and satisfying crunch of salt, making these salted caramel cookie bars a true masterpiece of dessert recipes. The final product should be ready for the oven, promising a delightful treat.
Bake Cookie Bars to Golden
Achieving perfect timing
Baking these salted caramel cookie bars to perfection requires careful attention to timing and visual cues. Your preheated oven, as established earlier, is now ready to transform the raw dough and caramel into a glorious golden brown dessert. Place the prepared pan into the center of the preheated oven. The baking time will typically range from 25 to 35 minutes, but ovens can vary significantly, so it’s essential to keep a close eye on your bars.
The goal is to achieve a beautiful golden-brown color on the top and edges of the bars. The center should appear set, though it will still be soft and slightly jiggly, indicating the caramel is warm and gooey. You might notice some caramel bubbling around the edges, which is perfectly normal. Avoid overbaking, as this can lead to a hard, dry cookie base rather than the desired soft and chewy texture. If the edges are browning too quickly, you can loosely tent the pan with aluminum foil for the last 10 minutes of baking. A toothpick inserted into the cookie dough portion (avoiding the caramel layer) should come out with moist crumbs, not wet batter. Achieving this perfect timing ensures a delightful balance of cookie and caramel, making these easy cookie bars a delightful baking success.
Cooling and Cutting Bars
Wait before slicing
Patience is truly a virtue when it comes to cooling and cutting your freshly baked salted caramel cookie bars. While the aroma filling your kitchen is incredibly tempting, resisting the urge to slice into them immediately is crucial for achieving clean, neat portions and maintaining their structural integrity. As soon as the bars emerge from the oven, their caramel center is still molten and very hot, and the cookie base is soft. Attempting to cut them at this stage will result in a messy, crumbling disaster, with gooey caramel oozing everywhere and uneven pieces.
Allow the bars to cool completely in the pan on a wire rack. This cooling process allows the caramel to firm up and set, and the cookie base to stabilize. Depending on your kitchen’s temperature, this could take anywhere from 2 to 4 hours, or even longer. For best results and the cleanest cuts, some bakers even recommend chilling the bars in the refrigerator for 30-60 minutes once they’ve reached room temperature. Once fully cooled and firm, use the parchment paper slings to carefully lift the entire slab of bars out of the pan. Place it on a cutting board, and with a sharp, warm knife (you can warm it under hot water and wipe it dry), slice your dessert bars into your desired size. Wiping the knife clean after each cut will help prevent sticking and ensure beautiful, precise slices. This step guarantees that your efforts in baking salted caramel result in perfect, ready-to-serve portions.
5 Irresistible Tips for Bars
Storage tips for freshness
To keep your salted caramel cookie bars tasting their best, proper storage is key. Once completely cooled and cut, store them in an airtight container at room temperature for up to 3-4 days. If you prefer a firmer texture or are in a warm climate, refrigerating them can extend their freshness and firmness. Layer parchment paper between rows of bars to prevent sticking. For longer storage, these bars freeze wonderfully for up to 2-3 months. Just thaw them at room temperature before serving.
Dark chocolate chip idea
While semi-sweet chocolate chips are a classic choice, consider elevating the rich flavor of your dessert bars with dark chocolate chips. The deeper, more intense cocoa notes of dark chocolate create an exquisite contrast with the sweet caramel, offering a sophisticated twist that appeals to palates seeking a less overtly sweet profile. This variation can make your sweet treats even more complex and satisfying.
Adjusting caramel sauce
The amount of caramel sauce is a matter of personal preference. If you love an extra gooey center, feel free to add a little more than specified, ensuring it doesn’t seep too much into the edges of the pan. Conversely, if you prefer a more subtle caramel presence, you can use slightly less. For a truly luxurious experience, try making your own homemade caramel; it adds an unparalleled depth of flavor. Always ensure the caramel is pourable for easy drizzling.
Pan Lining for Easy Removal: Always line your baking pan with parchment paper, leaving an overhang on the sides. This creates “handles” to easily lift the entire slab of bars out of the pan once cooled, preventing sticking and making cutting much simpler.
Don’t Overmix the Dough: After adding the dry ingredients, mix just until combined. Overmixing can develop the gluten in the flour too much, leading to tough, dense bars rather than the desired soft and chewy texture. A light hand here ensures a tender buttery crust.
Cookie Bars Nutrition Info
Serving size details
Understanding the nutrition information for your salted caramel cookie bars can help you enjoy them responsibly as part of a balanced diet. Since homemade recipes can vary widely based on specific ingredients and precise measurements, the details provided here are general estimations. For these particular dessert bars, a typical serving size might be considered one square, roughly 2×2 inches, depending on how you cut your 9×13 inch pan into 12, 16, or 24 pieces. Adjusting your serving size will directly impact the nutritional intake per portion, allowing you to tailor your indulgence.
Calories and fats
Given the ingredients like butter, sugars, chocolate chips, and caramel, these sweet treats are naturally rich in calories and fats. An estimated serving (e.g., 1/16th of the pan) could contain approximately 250-350 calories. This includes a significant amount of saturated fat from butter and chocolate, as well as sugars from the cookie dough and caramel. While precise values would require a nutritional calculator with exact ingredient quantities, it’s safe to assume these bars are an indulgent treat meant for occasional enjoyment rather than a daily staple. They are a fantastic source of joy and a perfect reward, but awareness of their caloric and fat content helps in mindful consumption. For more details on general nutrition, refer to reliable health resources.
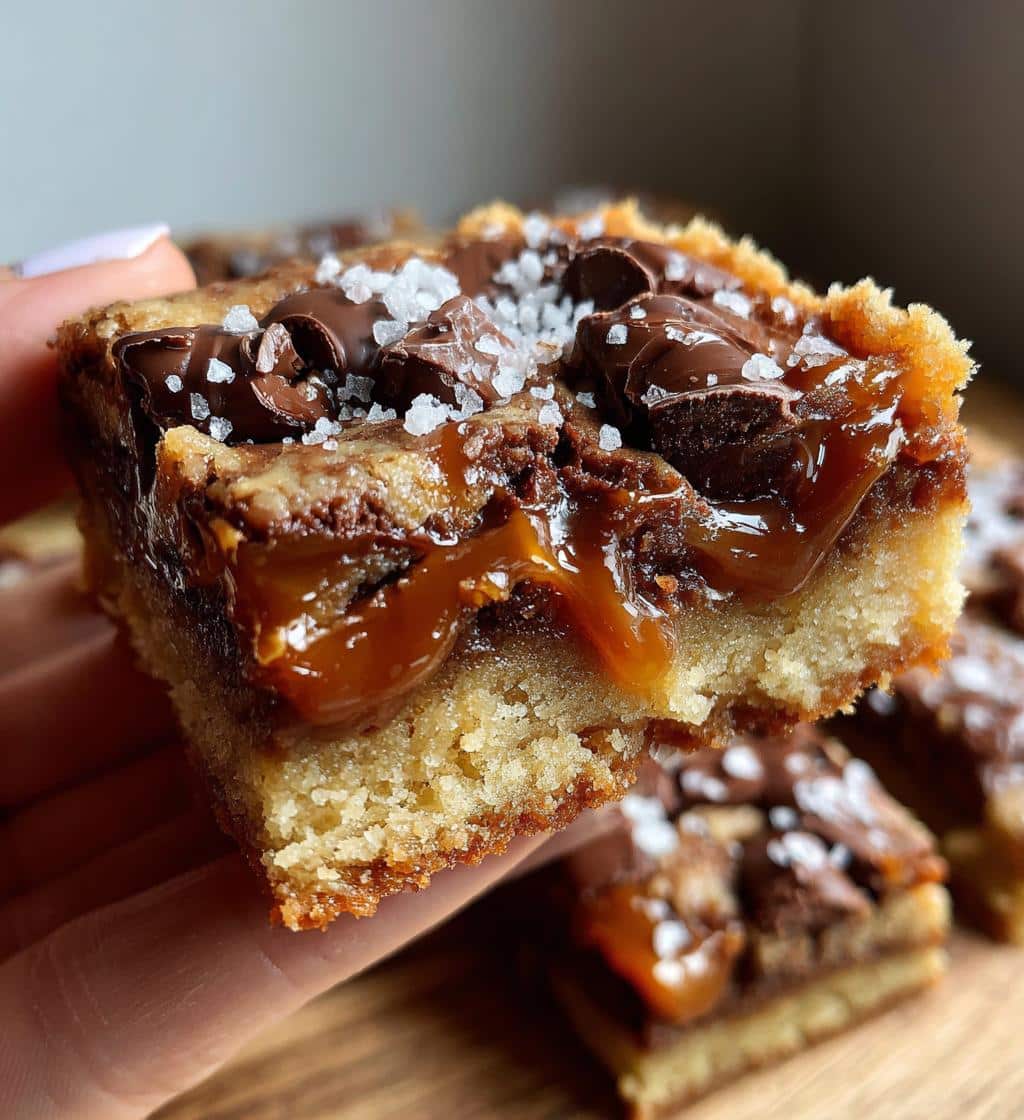
Enjoy Your Delicious Cookie Bars
Congratulations! You’ve successfully baked a batch of incredibly delicious salted caramel cookie bars. These bars are a true testament to the magic of combining sweet and salty, creating a truly irresistible family favorite. Whether you’re sharing them with loved ones, bringing them to a potluck, or simply enjoying a quiet moment with a cup of coffee, they are guaranteed to bring smiles.
The rich, gooey caramel, the tender buttery crust, the perfect hint of sea salt flakes, and the pockets of melted chocolate chips all come together in a symphony of flavors and textures. Remember the joy of creating something so wonderful from scratch, and take pride in your baking salted caramel accomplishment. Now, go ahead, take a bite, and savor every moment of these exceptional sweet treats. They are more than just a dessert; they are a celebration of homemade goodness.