
Delightful Christmas candy is a cherished homemade treat, perfect for holiday gatherings. This recipe shows you how to create beautiful, flavorful candy with simple ingredients. Follow our steps for achieving the perfect hard crack stage, ensuring a truly sweet indulgence. Enjoy sharing these easy-to-make candies with family and friends this festive season.
Key Takeaways
- Utilize precise temperature control for ideal hard crack candy texture.
- Simple ingredients like sugar, corn syrup, vanilla, and nuts form the base.
- Optional chocolate drizzles and various nut additions allow for customization.
- Preparation is quick, making it a great last-minute holiday dessert.
- Proper cooling and storage are vital for perfect candy pieces.
Making candy is a sweet art. Simple ingredients yield amazing results. Precision cooking ensures success. Cool completely before breaking. Share these festive treats.
Delightful Christmas Candy Ingredients List
Creating delightful Christmas candy begins with understanding the core ingredients. Each component plays a vital role in achieving that perfect, crunchy texture and rich flavor. From the sweet foundation to aromatic additions, selecting quality ingredients will significantly impact your final delicious product. This section outlines what you’ll need to gather before you start your homemade holiday treat project, ensuring you have everything on hand for a smooth candy-making process.
Sweeteners: Sugar and Corn Syrup
The backbone of any good brittle or hard candy lies in its sweeteners. For this delightful Christmas candy, you will primarily use granulated sugar, which provides the bulk of the sweetness and crystalline structure. Complementing the sugar is corn syrup. Corn syrup is crucial as it helps prevent sugar crystallization, resulting in a smoother, clearer, and more stable candy. It acts as an invert sugar, ensuring your candy remains perfectly glossy and doesn’t turn grainy. Always measure these ingredients precisely for the best results, as ratios are key to achieving the desired hard crack stage.
Flavor Boosts: Vanilla and Nuts
While sugar provides the sweetness, vanilla extract and nuts infuse your candy with its signature flavor. A good quality pure vanilla extract is indispensable; it adds warmth and depth that truly elevates the overall taste profile. For nuts, pecans or walnuts are traditional choices for their buttery flavor and satisfying crunch. However, feel free to experiment with almonds, cashews, or even a mix to find your favorite combination. Toasting the nuts lightly before adding them can enhance their flavor further, bringing out a richer, more complex taste that complements the sweet candy base beautifully. This step is where you can truly personalize your homemade holiday treats.
Optional: Chocolate Chips
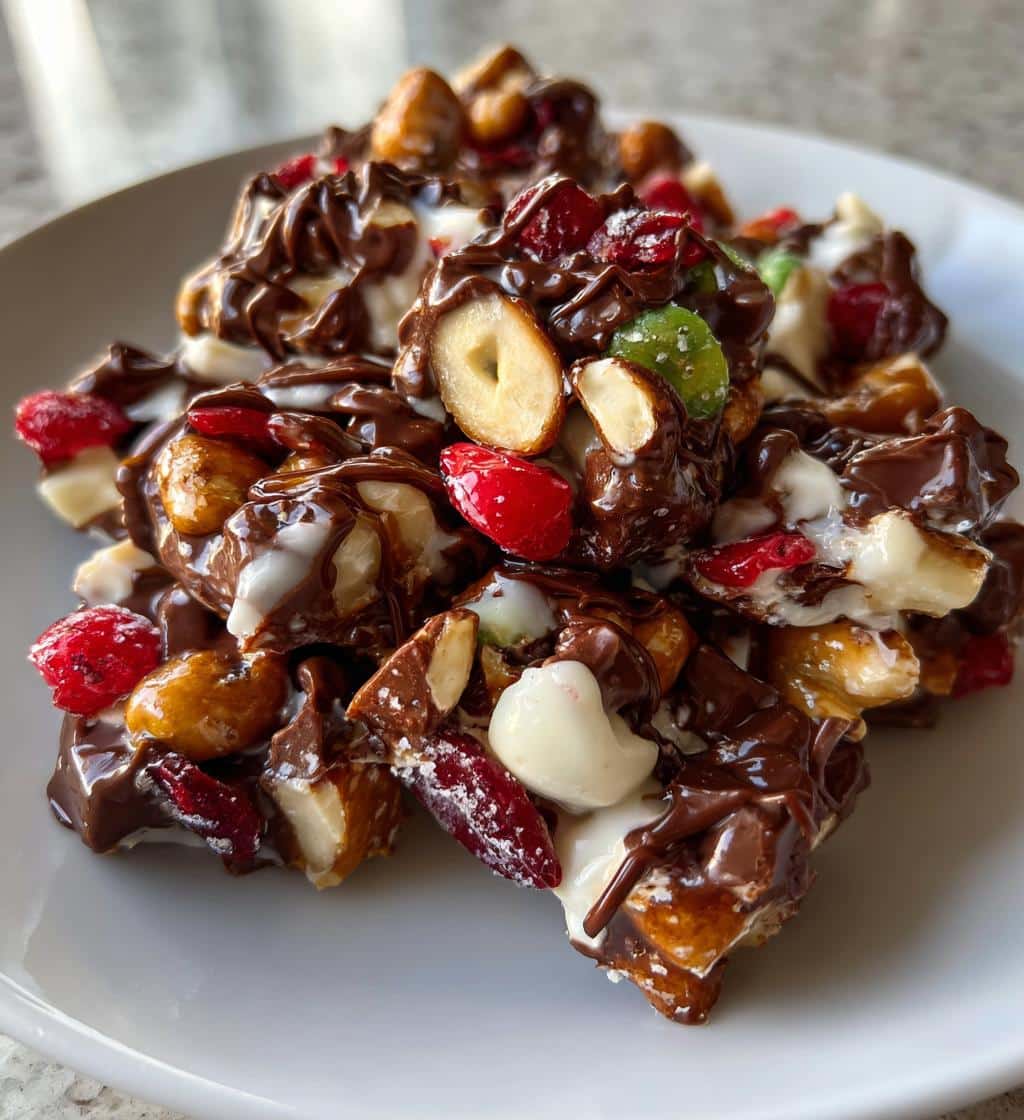
For an added layer of indulgence, chocolate chips are an excellent optional addition. Once your candy has cooled and broken into pieces, a drizzle of melted chocolate can transform it into an even more decadent treat. Dark, milk, or white chocolate chips can be used, depending on your preference. The chocolate adds a creamy counterpoint to the brittle texture of the candy and provides an extra burst of flavor. This simple addition can make your delightful Christmas candy feel even more special and festive, perfect for gifting or serving at holiday gatherings. You might find this similar to how a drizzle enhances other baked goods like peanut butter brownie swirl cookies, adding a gourmet touch.
Preparing Your Candy Base Mixture
The initial steps in preparing your candy base are critical for the success of your delightful Christmas candy. Proper mixing and dissolution of sugar ensure a smooth, clear, and uniform texture, preventing graininess in the final product. Taking your time during this stage will pay off, leading to a much more satisfying candy-making experience. A heavy-bottomed saucepan is recommended to help distribute heat evenly and prevent scorching, which is crucial when working with sugar.
Combining Liquids in Pan
Start by gathering your measured sugar, corn syrup, and water (if applicable, depending on the recipe variation). Carefully combine these ingredients in a large, heavy-bottomed saucepan. The size of the pan is important; ensure it is large enough to accommodate the mixture as it boils and expands without overflowing. A larger surface area can also help the mixture heat more evenly. Some recipes might call for butter at this stage as well, adding a richness from the start. Gently stirring them together initially ensures all ingredients are well-incorporated before heat is applied, setting the stage for even cooking.
Stirring Until Sugar Dissolves
Once your ingredients are in the pan, place it over medium heat. It is vital to stir the mixture continuously until all the sugar crystals have completely dissolved. You can test this by rubbing a small amount of the mixture between your fingers (once it’s cool enough to touch safely, or against the side of the pan with a spoon). If you feel any grittiness, continue stirring. Undissolved sugar crystals can act as “seed” crystals later on, causing the entire batch to crystallize and become grainy, rather than smooth and brittle. Resist the urge to increase the heat too quickly during this phase; patience ensures proper dissolution and a flawless texture for your homemade candy.
Cooking Candy to Hard Crack Stage
Achieving the hard crack stage is arguably the most crucial step in making successful brittle or hard candy. This stage dictates the texture of your delightful Christmas candy, ensuring it snaps cleanly rather than bends or chews. Precision and attention to detail are paramount here, as even a few degrees can make a significant difference. Using a reliable candy thermometer is non-negotiable for accurate results and to consistently create the perfect hard crack candy.
Boiling Mixture on Medium Heat
After the sugar has fully dissolved, stop stirring. Continue to cook the mixture over medium heat. Boiling too rapidly can lead to uneven cooking and scorching, while too slow might take excessively long. Allow the mixture to boil steadily without agitation. Sugar syrup can be prone to crystallization on the sides of the pan. To combat this, you can use a pastry brush dipped in water to wash down any sugar crystals that form on the pan’s edges. This technique prevents unwanted crystallization, ensuring a smooth, clear syrup that will set into beautiful, hard crack candy. Maintain a vigilant eye on the thermometer as the temperature begins to rise.
Reaching 300°F Accurately
The hard crack stage is typically reached when the candy mixture hits a temperature between 300°F and 310°F (149°C to 154°C). For most recipes, 300°F is the sweet spot. Attach a candy thermometer to the side of your pan, ensuring the bulb doesn’t touch the bottom. Watch the temperature carefully. Once it reaches 300°F, remove the pan from the heat immediately. Overcooking even slightly can lead to a burnt taste and a very dark color. At this temperature, a small amount of the syrup dropped into cold water will form brittle, hard threads that snap easily – this is the definitive test for the hard crack stage. Accuracy here guarantees that your homemade holiday treats will have the ideal snap and texture.
Adding Flavor: Vanilla and Nuts
The addition of flavors is a pivotal moment in the candy-making process. Timing is everything when incorporating vanilla and nuts, as they need to be stirred in quickly and efficiently to evenly distribute without significantly cooling the hot sugar mixture. This step infuses your delightful Christmas candy with its signature taste and texture, ensuring every bite is rich with flavor and satisfying crunch. Be prepared to work quickly once the pan is off the heat.
Removing Pan from Heat
As soon as your candy mixture accurately reaches 300°F and you’ve confirmed it’s at the hard crack stage, immediately remove the pan from the heat source. This is a critical step to prevent the sugar from cooking further and potentially burning. Residual heat in the pan will continue to cook the candy, so prompt removal is essential. Place the hot pan on a heat-resistant surface, such as a trivet or cooling rack, to protect your countertop. Having your vanilla extract and nuts pre-measured and ready to go will make the subsequent steps seamless and help maintain the ideal temperature for incorporation.
Gently Stirring in Additions
With the pan off the heat, swiftly add your vanilla extract and prepared nuts. Stir gently but quickly with a heat-resistant spatula or wooden spoon. The goal is to evenly distribute the flavorings and nuts throughout the hot candy mixture without incorporating too much air or allowing the candy to cool unevenly. Stirring too vigorously can introduce air bubbles, which can make the candy cloudy, or cause crystallization. The heat from the candy will help the vanilla release its aroma and the nuts to fully integrate, ensuring that each piece of your homemade holiday treats carries a consistent, delightful flavor. Work fast, as the candy will begin to thicken as it cools.
Pouring and Cooling Candy Pieces
After achieving the perfect hard crack stage and incorporating your flavors, the next critical phase involves pouring and cooling your delightful Christmas candy. This stage dictates the final shape, thickness, and ease of breaking your candy. Proper preparation of your baking surface and careful spreading of the hot mixture are essential for uniform pieces and the characteristic brittle texture. Patience during the cooling process is key to ensuring your candy sets correctly, making it easy to handle and enjoy.
Greasing Your Baking Sheet
Before you even begin cooking your candy, ensure your baking sheet is properly prepared. You will need a large, heavy-duty baking sheet, preferably with a rim. Line it with a silicone baking mat (like Silpat) or parchment paper. If using parchment paper, you should also lightly grease the paper with a neutral oil or non-stick cooking spray. This crucial step prevents the hot, sticky candy from adhering to the surface, making it much easier to remove once it has cooled and hardened. A well-greased surface ensures a clean release, which is vital for maintaining the integrity of your hard crack candy pieces.
Evenly Spreading the Hot Mix
Working quickly, immediately pour the hot candy mixture onto your prepared baking sheet. As the candy cools rapidly, it will begin to thicken. Use an offset spatula or the back of a spoon (lightly greased, if necessary, to prevent sticking) to gently and evenly spread the mixture into a thin layer. Aim for a consistent thickness across the entire sheet. A thinner layer will result in more delicate, crisper pieces of brittle, while a thicker layer will yield a more substantial, harder candy. Speed is of the essence here; the mixture will become increasingly difficult to spread as it cools, so act swiftly but carefully to avoid burns.
Waiting for Full Cooling
Once spread, resist the urge to touch or move the candy. Allow it to cool completely and harden at room temperature. This process can take anywhere from 30 minutes to an hour or even longer, depending on the thickness of your candy and the ambient temperature and humidity. Do not try to speed up the cooling process by placing it in the refrigerator or freezer, as this can introduce moisture, which can make the candy sticky or cloudy. Full cooling ensures the candy achieves its characteristic brittle texture and will snap cleanly when broken. This waiting period is crucial for the final success of your homemade holiday treats, ensuring they are firm and ready for the next step.
Breaking and Enjoying Your Candy
After the essential cooling period, the moment arrives to transform your sheet of delicious hardened mixture into individual, delightful Christmas candy pieces. This is where your patience pays off, resulting in crisp, snap-able segments ready for enjoyment. Breaking the candy might seem daunting, but with the right approach, it’s a satisfying final step before you can indulge in your hard crack candy creations. These homemade holiday treats are designed to be shared and savored.
How to Break Candy Easily
Once your candy is completely cool and firm, it’s time to break it into manageable pieces. You can do this in a few ways. One common method is to simply lift the parchment paper or silicone mat and gently snap the brittle with your hands. For more stubborn or thicker sections, you can place a clean kitchen towel over the candy and lightly tap it with a rolling pin or the blunt side of a heavy kitchen utensil. The goal is to create irregular, rustic pieces that are bite-sized and easy to handle. Avoid excessive force, as this can create too many tiny shards. The beauty of brittle lies in its imperfect, unique shapes.
Ready for Sharing
With your delightful Christmas candy successfully broken into pieces, it’s ready for immediate enjoyment or sharing. Arrange it artfully on a festive platter for guests, or package it in decorative bags or tins as thoughtful homemade gifts. The satisfying crunch and rich flavor make this hard crack candy a standout treat during the holiday season. Consider pairing it with other festive sweets, perhaps alongside a slice of quick Italian cream cake or some other delightful desserts. Your efforts have culminated in a truly sweet indulgence that will bring joy to everyone who tries it. Don’t forget to savor a few pieces yourself after all your hard work!
Optional Chocolate Drizzle for Candy
Adding a chocolate drizzle is a fantastic way to elevate your delightful Christmas candy, introducing an extra layer of flavor and a touch of visual appeal. This optional step allows for further customization, making your homemade holiday treats even more special. The combination of crisp brittle and smooth, melted chocolate creates a delightful contrast in both texture and taste, transforming simple hard crack candy into a gourmet experience. It’s an easy way to make your candy look professionally made.
Melting Chocolate Chips
To prepare your chocolate drizzle, you’ll first need to melt your chocolate chips. There are a couple of reliable methods for this. The double boiler method involves placing a heatproof bowl over a saucepan of simmering water, ensuring the bowl does not touch the water. Stir the chocolate chips constantly until smooth and fully melted. Alternatively, you can use a microwave: place chips in a microwave-safe bowl and heat in 20-30 second intervals, stirring well after each interval, until melted and smooth. Be careful not to overheat, as chocolate can seize and become unusable. Use good quality chocolate for the best flavor and a smooth consistency.
Drizzling for Extra Flavor
Once your chocolate is perfectly melted and smooth, transfer it to a piping bag, a ziplock bag with a tiny corner snipped off, or simply use a spoon. Arrange your broken candy pieces on a clean sheet of parchment paper or a cooling rack. Drizzle the melted chocolate artistically over the candy pieces. You can go for thin, delicate lines or more generous swirls, depending on your preference. Allow the chocolate to set completely at room temperature or briefly in the refrigerator before handling. The addition of chocolate not only enhances the flavor but also makes your hard crack candy look incredibly festive and appealing. For visual inspiration on presentation, check out Carina Recipes on Pinterest.
Delightful Christmas Candy Serving Ideas
Presenting your delightful Christmas candy creatively can make your homemade holiday treats even more impactful. Whether you’re gifting them, serving them at a party, or simply arranging them for family enjoyment, thoughtful presentation enhances the entire sweet indulgence experience. This section offers ideas on how to showcase your hard crack candy, along with an estimate of servings to help you plan your holiday preparations.
How to Present Candy
When it comes to serving, there are many charming ways to display your delightful Christmas candy. For gifting, place pieces in clear cellophane bags tied with festive ribbons, or layer them in decorative tins or jars. For a holiday party, arrange the candy on a beautiful serving platter, perhaps alongside other festive treats like snickerdoodle cobbler or other dessert items. You can also incorporate them into a dessert charcuterie board, mixing them with nuts, dried fruits, and other small sweets. Adding a sprinkle of edible glitter or crushed peppermint before the chocolate sets (if you opted for a drizzle) can add extra sparkle. Consider small individual portions for a more elegant touch, making them easy for guests to pick up and enjoy.
Servings per Recipe Batch
The number of servings per recipe batch of delightful Christmas candy can vary depending on how large or small you break your pieces. Generally, a standard recipe batch yields a substantial amount of candy, enough for approximately 10-12 servings if broken into average-sized pieces suitable for snacking. If you’re using it for gifting, a single batch could fill 2-4 small gift bags. The beauty of hard crack candy is that it’s rich and flavorful, so a little goes a long way. Adjust your portion sizes based on whether it’s a standalone treat or part of a larger dessert spread. You can always double the recipe if you anticipate a larger crowd or want to make plenty for sharing and gifting throughout the season.
Storing Delightful Christmas Candy Fresh
Proper storage is essential to maintain the crisp texture and fresh flavor of your delightful Christmas candy. As a hard crack candy, it’s susceptible to moisture, which can cause it to become sticky and lose its snap. Following correct storage methods ensures your homemade holiday treats remain in optimal condition, allowing you to enjoy them for longer and keep them perfect for gifting or serving. These tips will help preserve your sweet indulgence.
Using Airtight Containers
The primary rule for storing hard candy is to keep it in an airtight container. Exposure to air, especially humid air, is the enemy of brittle. Place your completely cooled and broken candy pieces in an airtight container, ensuring there’s as little air as possible trapped inside. You can layer pieces with parchment paper if you’re concerned about them sticking together, though well-made hard crack candy should not be overly sticky. Glass jars with tight-fitting lids or plastic containers with secure seals work best. This barrier against moisture is key to preserving the candy’s signature crunch and preventing it from becoming tacky.
Keeping Candy Optimal
Beyond airtight containers, consider the environment where you store your candy. Keep the container in a cool, dry place at room temperature. Avoid storing it in the refrigerator, as the fluctuating temperatures and humidity levels inside can actually draw moisture to the candy, causing it to soften and become sticky. Similarly, avoid very warm places where the candy might become soft or even melt. Stored correctly, your delightful Christmas candy can remain fresh and wonderfully crisp for up to two to three weeks, sometimes even longer. This extended freshness makes it an ideal make-ahead component for your holiday entertaining or a convenient homemade gift that lasts.
Quick Candy Preparation Time
One of the many appeals of making delightful Christmas candy is its relatively quick preparation time. Despite its impressive appearance and taste, this hard crack candy doesn’t demand hours in the kitchen, making it a perfect choice for busy holiday schedules. Understanding the time commitment involved helps in planning your festive baking. This easy candy making process delivers delicious homemade holiday treats without consuming your entire day, providing a quick sweet indulgence.
Fast Prep in 15 Minutes
The hands-on preparation for this delightful Christmas candy is surprisingly fast. Once you have all your ingredients measured and ready, the actual mixing and initial dissolving of the sugar takes only about 10-15 minutes. This includes combining the sweeteners, stirring until dissolved, and getting the mixture ready for boiling. The speed of this initial phase allows you to move quickly to the cooking stage without much fuss. Having everything prepped in advance, also known as “mise en place,” will make this part even faster and smoother, helping you efficiently create your homemade candy base.
Total Time Under an Hour
While the actual “active” cooking time at the stove is relatively short, usually around 15-20 minutes to reach the hard crack stage, the total time from start to finish for making your delightful Christmas candy is still impressively quick. This “total time under an hour” accounts for the prep, cooking, addition of flavors, and the crucial pouring onto the baking sheet. The cooling time, which is passive, might add another 30-60 minutes before the candy is fully set and ready to break. So, from the moment you start until you have beautiful, breakable pieces of hard crack candy, you can expect the entire process to be completed well within an hour and a half, making it an ideal recipe for a quick sweet indulgence.
Candy Nutrition: What You Need
When indulging in delightful Christmas candy, it’s helpful to have an understanding of its nutritional components. As a sweet treat, this hard crack candy is primarily a source of carbohydrates, but depending on additions like nuts and chocolate, it can also offer some fat and protein. This section provides a general breakdown of what you can expect nutritionally, helping you enjoy your homemade holiday treats mindfully. Remember, these are meant to be a sweet indulgence.
Calories and Sugar Content
As expected with any hard candy, delightful Christmas candy is calorie-dense and high in sugar. The primary ingredients – sugar and corn syrup – are simple carbohydrates that provide quick energy. A typical serving size (e.g., one ounce or a few small pieces) can contain anywhere from 100 to 150 calories, with a significant portion of that coming from sugar. While delicious, it’s important to consume these treats in moderation, especially if you are monitoring your sugar intake. The natural sugars provide the sweet indulgence we crave during the holidays, making it a beloved seasonal favorite.
Fat and Protein Breakdown
The fat and protein content in your delightful Christmas candy will largely depend on your choice of additions. If you incorporate nuts like pecans or walnuts, you’ll introduce healthy fats, including monounsaturated and polyunsaturated fats, as well as a small amount of plant-based protein. These additions not only enhance the flavor and texture but also contribute to a slightly more balanced nutritional profile compared to plain sugar candy. If you opt for the chocolate drizzle, this will further increase the fat content, with chocolate providing its own unique mix of fats. Without nuts or chocolate, the fat and protein content would be negligible. Enjoying these homemade holiday treats is about balance and savoring each bite.
More Delightful Christmas Candy Tips
Mastering delightful Christmas candy goes beyond the basic recipe; incorporating a few expert tips can further enhance your candy-making experience and results. From experimenting with flavors to ensuring safety, these additional insights will help you create truly exceptional homemade holiday treats. These suggestions aim to refine your technique and encourage creativity, making your hard crack candy a memorable sweet indulgence for everyone.
Trying Different Nut Varieties
While pecans and walnuts are traditional choices, don’t hesitate to experiment with other nut varieties to personalize your delightful Christmas candy. Almonds offer a firmer crunch and a distinct, slightly sweet flavor. Pistachios can add a beautiful green hue and a unique, earthy taste. Macadamia nuts provide a richer, buttery note. You can even try a mix of different nuts for a complex flavor profile. Remember to lightly toast any nuts before adding them to the hot candy mixture; this simple step significantly deepens their flavor. Be mindful of allergens when serving or gifting your homemade candy, especially if using a variety of nuts.
Adjusting Hardness by Cook Time
The firmness of your hard crack candy can be subtly adjusted by slightly varying the final cooking temperature. For a truly brittle, glass-like snap, aim for the higher end of the hard crack stage, around 305-310°F. If you prefer a candy that’s still firm but has a very slight chew, stopping just below 300°F (e.g., 295-298°F) can achieve this. However, be cautious not to go too low, or you’ll enter the soft crack or firm ball stages, which result in a completely different texture. Always use a reliable candy thermometer for accuracy. This small adjustment allows for a customizable sweet indulgence tailored to your preference, ensuring your hard crack candy meets your expectations.
Safety Notes for Hot Candy
Working with hot sugar syrup requires extreme caution. Molten sugar can reach very high temperatures and cause severe burns if it comes into contact with skin. Always wear oven mitts or heat-resistant gloves when handling the hot pan. Keep children and pets away from the kitchen during the cooking process. Use a large, heavy-bottomed pot to prevent spills. If you get hot sugar on your skin, immediately run it under cold water for an extended period and seek medical attention if necessary. Being mindful of these safety precautions ensures your delightful Christmas candy-making experience is enjoyable and injury-free. For more cooking safety tips, or to cool down after hot candy making, consider a fresh beet salad with feta.
We encourage you to share your beautiful homemade holiday treats with us! Find more inspirations and connect with our community on Instagram at CarinaRecipes20.