
Decadent Vanilla Bean Cheesecake is a superb sweet treat for any occasion. This special occasion dessert recipe combines rich vanilla with nutty brown butter for an unforgettable flavor. Learn to create this homemade cheesecake, ensuring perfect texture and taste, pleasing every guest.
Key Takeaways
- Brown butter adds a unique, nutty depth to classic vanilla bean cheesecake.
- Achieving a smooth cream cheese filling and firm graham cracker crust are crucial.
- Proper baking, cooling, and chilling are key for a perfect, crack-free cheesecake.
- Garnish with fresh fruit or whipped cream for an impressive presentation.
- Understanding ingredient preparation and specific tools ensures baking success.
Making cheesecake is a rewarding experience. It requires precision and patience. The final dessert is truly worth it. Guests will certainly be impressed. Enjoy your sweet, homemade creation.
Decadent Vanilla Bean Cheesecake Overview
A Five-Layer Indulgence Explained
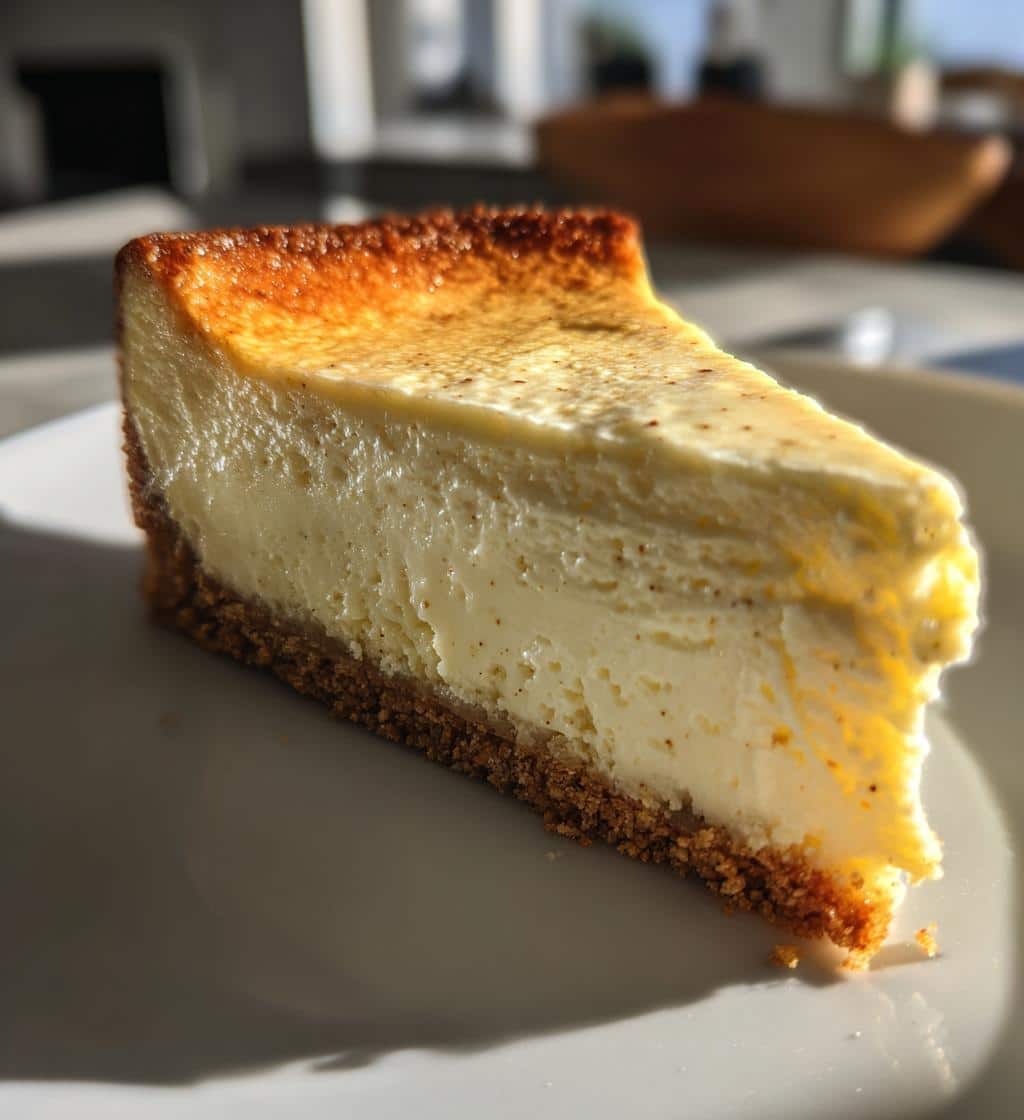
Crafting a truly magnificent vanilla bean cheesecake is more than just baking; it’s an art of layering flavors and textures. Our decadent vanilla bean cheesecake recipe comprises five distinct, yet harmoniously blended, layers that contribute to its extraordinary appeal. Firstly, the buttery graham cracker crust provides a sturdy, slightly sweet foundation. This is followed by a rich, creamy vanilla bean cheesecake filling, infused with the subtle, nutty notes of brown butter – a key element that elevates this sweet treat. Next, a delicate vanilla bean custard layer adds an extra dimension of smooth, aromatic flavor. A generous topping of fresh berries or a luxurious fruit compote introduces a bright, tangy contrast. Finally, a light swirl of homemade whipped cream completes this special occasion dessert, creating a visual and gustatory masterpiece. Each component is designed to complement the others, promising a symphony of tastes with every bite of this homemade cheesecake.
Why This Cheesecake is Special
What makes this brown butter cheesecake recipe stand out in a sea of dessert options? It’s the meticulous attention to detail and the infusion of premium ingredients. The star, naturally, is the genuine vanilla bean, providing a depth of flavor that extract simply cannot replicate. Its aromatic, complex notes permeate the creamy filling, creating an unparalleled taste experience. Beyond the vanilla, the secret weapon is undoubtedly the brown butter. This simple technique transforms ordinary butter into a golden, fragrant elixir with toasted, nutty undertones. When incorporated into the cheesecake batter, it adds an incredible richness and complexity, making this more than just a classic vanilla bean cheesecake; it becomes a truly memorable decadent dessert. This combination of authentic vanilla and nuanced brown butter ensures a rich flavor that will impress even the most discerning palates, solidifying its place as a truly exceptional treat.
The Magic of Brown Butter Cheesecake
Nutty Flavor You’ll Love
The inclusion of brown butter is what truly sets this brown butter cheesecake apart, infusing it with an irresistible nutty flavor that adds remarkable depth and complexity. Brown butter, or beurre noisette, is made by gently cooking unsalted butter until its milk solids caramelize, turning golden brown and releasing a fragrant, toasted aroma. This process develops compounds that impart notes of hazelnut, caramel, and toffee, creating a sophisticated backdrop for the bright vanilla bean. When this rich, aromatic liquid is folded into the cream cheese filling, it transforms the entire flavor profile. It doesn’t overpower the delicate vanilla; instead, it provides a warm, earthy counterpoint that elevates the cheesecake from merely delicious to truly extraordinary. This nutty flavor contributes significantly to the overall rich flavor of our special occasion dessert, making it an anticipated indulgence for guests.
Simple Browning Steps
Creating brown butter is a surprisingly simple process that yields incredible results, making it a valuable skill for any home baker. To start, melt a stick of unsalted butter in a light-colored saucepan over medium heat. The light color of the pan allows you to easily observe the color changes. As the butter melts, it will begin to foam. Continuously stir or swirl the pan to ensure even cooking and prevent the milk solids from sticking to the bottom and burning. After a few minutes, the foam will subside, and you’ll start to see tiny brown bits forming at the bottom of the pan. Listen for a subtle crackling sound. Keep a close eye on it, as the butter can go from perfectly browned to burnt very quickly. Once the butter turns a beautiful amber color and smells wonderfully nutty, immediately remove it from the heat and transfer it to a heatproof bowl to stop the cooking process. This prevents it from burning and preserves that perfect nutty flavor. For other rich and creamy recipes, consider trying a creamy baked mac and cheese which also benefits from butter-based richness.
Gathering Your Cheesecake Ingredients
All You Need to Start
Successful baking, especially for a delicate dessert like cheesecake, begins with having all your cheesecake ingredients ready and at the correct temperature. For the crust, you’ll need graham cracker crumbs and melted unsalted butter. The star of the filling is, of course, high-quality full-fat cream cheese. Ensure it’s block cream cheese, not the spreadable kind, for the best texture. You’ll also need granulated sugar, large eggs, sour cream, and heavy cream for richness and tang. Crucially, don’t forget the true star flavor — one or two vanilla beans, scraped for their precious seeds. A pinch of salt balances the sweetness. Having everything measured out and at room temperature before you begin mixing is a fundamental step to achieving a smooth, lump-free batter. Consider preparing other desserts like snickerdoodle cobbler or quick Italian cream cake by ensuring all ingredients are ready first.
Softening Cream Cheese Tips
The consistency of your cream cheese is paramount for a smooth cheesecake filling. Cold cream cheese will inevitably lead to lumps, no matter how much you beat it, resulting in a grainy texture in your final decadent dessert. The best method is to plan ahead and allow your cream cheese to sit at room temperature for at least 1-2 hours before you start baking. This allows it to soften uniformly, making it incredibly pliable and easy to blend. If you’re short on time, there are a couple of tricks to speed up the process. You can unwrap the cream cheese blocks and place them on a plate, then microwave them on low power (e.g., 50%) for 15-20 second intervals, checking and flipping between each burst, until softened but not melted. Alternatively, you can place the wrapped blocks in a bowl of warm water for about 15-20 minutes. Just be careful not to get any water into the packaging. Properly softened cream cheese will mix beautifully with other ingredients, creating that velvety texture characteristic of a perfect vanilla bean cheesecake.
Essential Tools for Cheesecake Baking
Must-Have Kitchen Equipment
Equipping your kitchen with the right tools is just as important as gathering quality cheesecake ingredients. For an ambitious baking recipe like this brown butter cheesecake, certain pieces of kitchen equipment are non-negotiable. A stand mixer with a paddle attachment is highly recommended, as it ensures thorough and even mixing of the cream cheese filling without over-whipping, which can incorporate too much air. Alternatively, a good quality electric hand mixer will also suffice. You’ll also need large mixing bowls, measuring cups and spoons for precise ingredient portions, and a rubber spatula for scraping down the sides of the bowl. A fine-mesh sieve is useful for sifting graham cracker crumbs if you’re making them from scratch. For the water bath (a common method for crack-free cheesecakes), a large roasting pan is essential. Don’t forget aluminum foil to wrap your springform pan, preventing any water from seeping in during baking. These tools ensure your cheesecake baking process is as smooth as your final product.
Choosing the Right Pan
The type of pan you use significantly impacts the success of your cheesecake. For this decadent vanilla bean cheesecake, a 9-inch springform pan is absolutely crucial. A springform pan features sides that can be unlatched and removed from the base, allowing for easy release of the delicate cheesecake without damaging its pristine edges. This is particularly important for taller cheesecakes. When choosing, opt for a good quality, heavy-gauge metal pan, as it conducts heat more evenly. Before baking, always wrap the bottom of your springform pan tightly with heavy-duty aluminum foil, creating a watertight seal. This is vital if you plan to use a water bath, which helps to ensure even baking and prevents cracks. Some bakers even use two layers of foil or place the springform pan inside a slow cooker liner bag for extra protection. A well-chosen and properly prepared pan is a cornerstone of successful cheesecake baking. Learn more about baking methods on CarinaRecipes’ baking category.
Crafting the Perfect Graham Cracker Crust
Simple Two-Ingredient Base
The foundation of any great homemade cheesecake is its crust, and for our decadent vanilla bean cheesecake, a simple yet sturdy graham cracker crust is ideal. This delightful base requires just two main ingredients: finely crushed graham cracker crumbs and melted unsalted butter. For the best results, aim for a fine, sand-like consistency for your crumbs. You can achieve this by pulsing whole graham crackers in a food processor or by placing them in a Ziploc bag and crushing them with a rolling pin. The melted butter acts as the binding agent, holding the crumbs together to form a firm crust. Some recipes might suggest a touch of sugar or cinnamon in the crust, and while optional, they can add an extra layer of flavor that complements the rich filling. Mixing these two ingredients thoroughly ensures that every crumb is coated, leading to a uniformly crisp and flavorful crust that won’t crumble apart when sliced. This simple two-ingredient base is the secret to a perfect graham cracker crust, providing a pleasant textural contrast to the creamy filling.
Pressing the Crust Firmly
Once your graham cracker and butter mixture is ready, the next critical step is pressing it firmly into your prepared springform pan. This isn’t just about creating a shape; it’s about compaction, which prevents the crust from becoming crumbly or soggy. Pour the mixture into the bottom of the pan. Then, using the back of a spoon, your fingertips, or a flat-bottomed glass, press the crumbs down firmly and evenly across the bottom and slightly up the sides of the pan. Pay particular attention to the edges, ensuring they are well-packed and uniform in height. A truly firm crust will withstand the weight of the cheesecake filling and maintain its integrity when sliced. After pressing, refrigerate the crust for at least 15-20 minutes, or even better, pre-bake it for 8-10 minutes at 350°F (175°C). Pre-baking helps to set the crust, making it crispier and less prone to becoming soggy from the moisture in the cheesecake filling. This step is a small investment of time that pays off immensely in the final texture and stability of your brown butter cheesecake.
How to Make Brown Butter
Step-by-Step Browning Guide
Mastering how to make brown butter is an essential skill for this decadent vanilla bean cheesecake, elevating its flavor profile significantly. Start with good quality unsalted butter. Cut it into uniform pieces to ensure even melting and browning. Place the butter in a light-colored saucepan or skillet over medium heat. The light color helps you monitor the color changes more accurately. As the butter melts, it will begin to foam. This foam is normal; it’s the water evaporating from the butter. Keep stirring constantly, either with a whisk or a heatproof spatula, or swirl the pan gently. This movement prevents the milk solids from settling at the bottom and burning, which can lead to a bitter taste. After a few minutes, the foam will subside, and you’ll notice small, golden-brown specks forming at the bottom of the pan. The aroma will shift from plain butter to a rich, nutty, almost caramel-like scent. Continue to cook until the butter turns a beautiful amber color and the solids are evenly browned. This whole process typically takes 5-8 minutes, but it requires your undivided attention.
Cooling the Browned Butter
Once your butter has reached that perfect golden-brown hue and nutty fragrance, it’s crucial to stop the cooking process immediately. Butter can go from perfectly browned to burnt in a matter of seconds due to residual heat. Carefully pour the hot brown butter, including all the delightful browned bits at the bottom, into a heatproof bowl or measuring cup. Do not leave it in the hot saucepan. Allow the brown butter to cool down to at least room temperature before incorporating it into your vanilla bean cheesecake filling. If you add hot butter to the cream cheese and egg mixture, it could curdle the eggs or melt the cream cheese, resulting in a less-than-smooth filling. For faster cooling, you can place the bowl of brown butter in an ice bath, stirring occasionally, until it reaches room temperature. Ensure it’s still liquid enough to pour and mix smoothly, but not warm. This perfectly cooled brown butter will impart its incredible nutty flavor seamlessly into your cheesecake, contributing to a rich flavor that will impress.
Mixing Your Vanilla Bean Filling
Beating Cream Cheese Smooth
The heart of your decadent vanilla bean cheesecake is its exquisitely smooth filling. This journey begins with properly beating the cream cheese. As mentioned, ensure your full-fat block cream cheese is at true room temperature. In a stand mixer bowl with a paddle attachment, or using an electric hand mixer, beat the softened cream cheese on medium-low speed. Start slow to prevent splattering. Continue beating for several minutes, scraping down the sides of the bowl frequently with a rubber spatula, until the cream cheese is completely smooth and lump-free. It should appear light and fluffy. This initial step is critical; any lumps here will remain in your finished cheesecake. Once smooth, gradually add the granulated sugar, continuing to beat until fully incorporated and the mixture is light and creamy. This meticulous process builds the foundational texture of your cheesecake filling. For another creamy delight, try this ground turkey and peppers recipe.
Adding Eggs One by One
After incorporating the sugar, it’s time to add the eggs. This step requires gentle handling to prevent over-mixing, which can introduce too much air, leading to cracks. Add large eggs one by one, beating on the lowest speed possible just until each egg is incorporated. Over-beating eggs develops their protein structure, making the cheesecake light and airy instead of dense and creamy. After the eggs, gently mix in the sour cream and heavy cream, along with the scraped vanilla bean seeds. These ingredients contribute to the cheesecake’s rich flavor and smooth consistency. Ensure all additions are just combined, avoiding vigorous beating. This careful approach ensures a perfectly dense and creamy texture for your brown butter cheesecake.
Incorporating Brown Butter Flavor
The final, crucial step is to gently fold in the cooled brown butter. Ensure it’s at room temperature but still liquid. Slowly pour the cooled brown butter into the cheesecake batter while mixing on the absolute lowest speed, or fold it in by hand. The goal is to evenly distribute the incredible nutty flavor without deflating the batter. The brown butter should seamlessly meld with the creamy vanilla bean mixture, adding a depth of flavor unique to this special occasion dessert. After incorporation, give the batter one final scrape down of the bowl to ensure perfect blending. Your vanilla bean cheesecake filling is now ready for the pan, promising a rich flavor with every bite.
Baking Your Decadent Cheesecake
Oven Temperature Settings
Baking your decadent vanilla bean cheesecake correctly is pivotal for achieving that desirable creamy texture without cracks. Precision with oven temperature settings is key. Many cheesecakes, including this brown butter cheesecake, benefit from a two-stage baking process. Start by preheating your oven to a higher temperature, typically 350-375°F (175-190°C), for the first 10-15 minutes. This initial burst of heat helps to set the crust and the outer edges of the cheesecake. After this initial period, reduce the oven temperature significantly, often to 250-300°F (120-150°C), for the remainder of the baking time. This lower, slower bake allows the cheesecake to cook gently and evenly, preventing the center from rising too quickly and cracking. Always place your foil-wrapped springform pan in a large roasting pan filled with about an inch of hot water to create a water bath. This humid environment is crucial for preventing cracks and ensuring a silky-smooth texture, making your homemade cheesecake truly special.
Knowing When It’s Done
Determining when your brown butter cheesecake is perfectly baked requires a keen eye and a bit of intuition, as over-baking is a common cause of dry texture and cracks. Generally, a 9-inch cheesecake will bake for approximately 60-90 minutes in total, depending on your oven and the specific recipe. The most reliable indicator of doneness is a slight jiggle in the center. Gently tap the side of the pan with a wooden spoon. The edges of the cheesecake should appear set, while the very center (a circle about 2-3 inches in diameter) should still have a slight wobble, similar to a firm Jell-O. It should not look wet or liquid. The cheesecake will continue to cook and firm up as it cools, so it’s better to slightly under-bake than over-bake. If you’re unsure, an internal temperature of 150°F (65°C) in the center is a good guideline. Once you believe it’s done, turn off the oven and leave the cheesecake inside with the oven door propped open slightly for an hour. This gradual cooling further minimizes cracking. For another carefully baked dessert, consider vanilla bean creme brulee cheesecake cupcakes.
Cooling and Chilling Your Cheesecake
Patience for Best Texture
Once your decadent vanilla bean cheesecake is out of the oven, the journey to perfection is far from over. The cooling process is just as critical as baking itself, requiring patience to achieve the best texture and prevent cracking. After turning off the oven, leave the cheesecake inside with the door slightly ajar for about an hour. This gradual reduction in temperature helps the cheesecake to slowly contract without sudden changes that can cause cracks. After this initial cooling period, remove the cheesecake from the oven and carefully remove it from the water bath (if used). Place it on a wire rack to cool completely at room temperature. This can take anywhere from 2 to 4 hours, depending on your kitchen’s ambient temperature. Resist the urge to rush this step or move the cheesecake too much. The delicate structure is still setting, and any jostling can lead to imperfections. Proper cooling is crucial for a smooth, creamy, and visually appealing homemade cheesecake.
Overnight Chill for Perfection
While cooling at room temperature is important, the true magic for achieving the perfect texture happens during the overnight chill. Once the cheesecake has fully cooled to room temperature, cover it loosely with plastic wrap. Avoid pressing the plastic wrap directly onto the surface to prevent condensation from forming and creating a soggy top. Transfer the covered cheesecake to the refrigerator and allow it to chill for a minimum of 6-8 hours, but ideally overnight. This extended chilling period allows the cheesecake’s internal structure to fully set, the flavors to meld and deepen, and the texture to become wonderfully dense, firm, and creamy. Cutting into a warm or insufficiently chilled cheesecake will result in a messy, soft slice that lacks the characteristic firm yet yielding texture. An overnight chill ensures clean slices and a truly satisfying mouthfeel, making every bite of this brown butter cheesecake a luxurious experience. This patient chilling is a hallmark of a truly well-executed cheesecake.
Serving Your Cheesecake to Wow Guests
Fresh Fruit Topping Ideas
Once your decadent vanilla bean cheesecake has properly chilled and is ready for its grand reveal, thoughtful presentation can truly wow your guests. While the brown butter cheesecake is a star on its own, a vibrant fresh fruit topping adds a burst of color, freshness, and complementary tang. Berries are always a classic choice; consider a medley of sliced strawberries, blueberries, raspberries, and blackberries for a stunning visual. The slight tartness of berries cuts through the richness of the cheesecake beautifully. Other delightful options include thinly sliced kiwi, mandarins, or even a simple compote made from peaches or cherries. For an extra shine, you can lightly brush the fruit with a warmed apricot jam glaze. Arrange the fruit artfully over the top just before serving. This not only enhances the visual appeal but also introduces new textures and flavors that complement the vanilla bean cheesecake filling perfectly, making it an even more irresistible sweet treat.
Whipped Cream Garnish
No special occasion dessert feels quite complete without a luxurious dollop of homemade whipped cream. A light, airy whipped cream garnish provides a delightful contrast to the dense, creamy texture of the vanilla bean cheesecake. To make it, simply beat cold heavy cream with a touch of powdered sugar and a splash of vanilla extract (or even a few vanilla bean seeds for extra elegance) until soft peaks form. Avoid over-beating, which can turn it grainy. You can pipe the whipped cream decoratively around the edges or place a generous dollop beside each slice. The cool, cloud-like cream adds another layer of indulgence, enhancing the overall sensory experience. For a truly elegant touch, you might also consider a sprinkle of finely grated dark chocolate or a dusting of cocoa powder. This simple garnish can transform your already impressive brown butter cheesecake into an unforgettable centerpiece, ready to be enjoyed by all your guests. For more dessert inspiration, visit us on Pinterest and Instagram.
Tips for Best Cheesecake Results
Stronger Vanilla Flavor
To ensure your decadent vanilla bean cheesecake truly shines with an authentic, rich vanilla flavor, there are a few tips you can employ. Firstly, always opt for real vanilla beans over vanilla extract. The tiny black seeds scraped from a high-quality vanilla bean pod offer a more complex, nuanced, and potent flavor that extract simply cannot replicate. If you want to intensify the vanilla even further, consider infusing your heavy cream with a vanilla bean pod beforehand. Simply split a vanilla bean lengthwise, scrape the seeds into the cream, and add the pod itself. Heat gently until just simmering, then let it steep for at least 30 minutes (or even overnight in the fridge). Remove the pod before using the cream in your recipe. Another trick is to add a small amount of vanilla bean paste alongside the scraped seeds. This concentrated form of vanilla provides a robust flavor boost and beautiful visual specks, guaranteeing a homemade cheesecake with an unforgettable aroma and taste. For other vanilla-infused desserts, look at our category.
Storing Leftover Slices
While it’s hard to imagine having leftovers of such a delicious sweet treat, proper storage is essential to maintain the freshness and quality of your brown butter cheesecake. For short-term storage, cover the entire cheesecake or individual slices tightly with plastic wrap. This prevents the cheesecake from absorbing odors from other foods in the refrigerator and keeps it from drying out. Store it in an airtight container in the refrigerator for up to 5-7 days. For longer storage, cheesecake freezes remarkably well. To freeze, first place the cheesecake (whole or in slices) on a baking sheet and freeze until firm, about 2-3 hours. Then, wrap individual slices or the entire cheesecake tightly in plastic wrap, followed by a layer of aluminum foil. This double-layer protection guards against freezer burn. Frozen cheesecake can be stored for up to 1-2 months. Thaw frozen cheesecake overnight in the refrigerator before serving to ensure the best texture and rich flavor. Learn more about food storage on Wikipedia’s food preservation page.
Decadent Cheesecake Nutrition Facts
Per Slice Information
Enjoying a decadent vanilla bean cheesecake is truly a sweet indulgence, and for those who like to keep track of their dietary intake, understanding the per slice information can be helpful. While homemade cheesecake nutrition facts can vary significantly based on specific ingredients, portion size, and any toppings added, a typical slice of a rich brown butter cheesecake made with full-fat cream cheese, sugar, and butter is generally quite calorie-dense. A standard 1/12th slice of a 9-inch cheesecake could contain approximately 350-500 calories. It will also be rich in saturated fat due to the cream cheese and butter, and contain a fair amount of carbohydrates primarily from sugar and the graham cracker crust. Protein content will be moderate due to the eggs and dairy. While specific figures require precise ingredient measurements and calculation, this information provides a general idea for managing intake. Remember, this special occasion dessert is meant to be savored.
Understanding Serving Size
When considering cheesecake nutrition facts, understanding serving size is paramount. A single slice of this rich and creamy homemade cheesecake is often quite substantial, making portion control important, especially given its decadent nature. Traditionally, a 9-inch round cheesecake is cut into 12 slices, making each slice approximately 1/12th of the whole. However, depending on personal preference or the formality of the occasion, slices can be cut larger or smaller. A smaller slice (e.g., 1/16th) would naturally reduce the per-slice calorie and fat content, making it a more modest sweet treat. For entertaining, especially when offering a variety of desserts, smaller servings can be a considerate option. Always consider the overall meal and your daily intake when enjoying this delicious brown butter cheesecake. This rich flavor dessert is designed for enjoyment, so portion mindfully and savor every bite.