
Homemade tortillas bring unmatched freshness to any meal. This soft tortilla recipe guides you through each step, ensuring perfect, pliable results. Using masa harina, you can create delicious gluten-free tortillas right in your kitchen. Say goodbye to store-bought and enjoy authentic, warm tortillas today.
Key Takeaways
- Making homemade tortillas is simple with masa harina and warm water.
- Achieve the best texture by carefully mixing and kneading the dough.
- Pressing or rolling dough thinly is crucial for even cooking.
- Cook tortillas on a hot skillet until golden spots appear and they puff slightly.
- Keep cooked tortillas warm to maintain their softness.
- Homemade tortillas are naturally gluten-free and versatile for many dishes.
Fresh tortillas are a kitchen joy. They are simple to create at home. Just a few steps make real difference. Warm tortillas enhance any dish. Taste the authentic flavor.
Get Started: Your Soft Tortilla Recipe
Creating your own soft tortilla recipe at home is a rewarding experience that transforms ordinary meals into something special. The foundation of truly delicious tortillas lies in understanding the process and using the right ingredients. This guide will walk you through every step, ensuring you achieve that perfect balance of chewiness and pliability. Forget the store-bought versions; once you taste your own freshly made ones, there’s no turning back. This method is incredibly satisfying and yields a product far superior in taste and texture. We’ll focus on techniques that make the process straightforward, even for beginners, promising a successful batch every time.
Gather simple ingredients needed
The beauty of this homemade tortillas recipe is its simplicity, requiring just a few basic ingredients you likely already have or can easily find. You’ll need masa harina, which is a special type of flour made from dried corn kernels treated with lime water (nixtamalization) and then ground. This process gives tortillas their distinctive flavor and texture, and also makes them naturally gluten-free. Additionally, you’ll need warm water, a pinch of salt to enhance the flavor, and optionally a tiny bit of oil or lard for extra softness, though many purists prefer just masa, water, and salt. Make sure your water is warm, not hot or cold, as this helps activate the masa harina properly and allows for a more cohesive dough. Having all your ingredients measured and ready before you begin will streamline the entire tortilla-making process.
Mix Masa Harina and Warm Water
The initial mixing of masa harina and warm water is perhaps the most critical step in achieving the desired texture for your homemade tortillas. Start by combining the masa harina and salt in a large mixing bowl. Gradually add the warm water, mixing with your hands or a sturdy spoon until a shaggy dough forms. The key here is not to rush. The masa harina will absorb the water slowly, and you’ll need to feel the consistency develop. As you add water, the dough will start to come together. If it feels too dry and crumbly, add a tiny bit more water, about a teaspoon at a time. If it feels too wet and sticky, add a little more masa harina.
Achieve soft, pliable dough texture
Once the ingredients are combined, it’s time to knead the dough. Turn the dough out onto a clean surface and knead it gently for about 2-5 minutes. You’re looking for a soft, pliable dough that is smooth and doesn’t stick to your hands. The texture should resemble play-doh. It should be firm enough to hold its shape but soft enough to be easily pressed or rolled. A well-kneaded dough is essential for tortillas that puff up beautifully during cooking and remain soft and flexible when eaten. To test if your dough is ready, press a finger into it; if the indentation remains without the dough cracking, you’ve achieved the perfect consistency. Remember, keep the dough covered with a damp cloth or plastic wrap while you work to prevent it from drying out, which can lead to cracked tortillas. This attention to detail will ensure your spinach feta quesadillas or any other dish using your fresh tortillas will be outstanding.
Form Dough Balls for Tortillas
Once your dough has reached that ideal soft, pliable texture, the next step is to divide it into uniform dough balls. This ensures that each tortilla will be roughly the same size and thickness, leading to consistent cooking results. Begin by rolling the entire dough into a log shape on your work surface. Then, using a knife or dough scraper, divide the log into equal portions. For standard tacos or small tortillas, aim for golf-ball sized portions, usually about 1.5 to 2 ounces each. If you prefer larger tortillas for burritos or quesadillas, you can make them slightly bigger, but be mindful that larger tortillas can be trickier to handle and cook evenly.
Ensure even cooking size
After dividing the dough, take each portion and roll it between your palms to form a smooth, spherical ball. The goal here is to eliminate any cracks or rough edges, as these can affect how the tortilla presses and cooks. A smooth ball will press into a rounder, more uniform tortilla. As you form the balls, place them on a plate and keep them covered with a damp towel or plastic wrap. This is crucial to prevent them from drying out, which can make them difficult to press and prone to cracking. Working with consistently sized dough balls is a secret to achieving evenly cooked, beautiful tortillas every time. This foundational step is often overlooked but significantly impacts the final quality of your cooking tortillas, making sure they are perfect for fillings like ground turkey and peppers.
Press or Roll Dough Thinly
With your dough balls perfectly formed, it’s time to transform them into flat tortillas. You have two main options: using a tortilla press or rolling them out with a rolling pin. A tortilla press is highly recommended for ease and consistency, especially if you plan on making tortillas frequently. If using a press, place one dough ball between two pieces of plastic (cut from a resealable bag or plastic wrap works well) in the center of the press. Close the press firmly and evenly to flatten the dough into a thin circle. If using a rolling pin, place the dough ball between plastic or on a lightly floured surface and roll it out from the center outwards, rotating frequently to maintain a circular shape.
Use plastic for easy handling
Using plastic wrap or a cut-open plastic bag is a game-changer when pressing or rolling tortillas. It serves multiple purposes: it prevents the dough from sticking to the press or rolling pin, eliminates the need for excess flour (which can dry out the tortillas), and makes transferring the delicate raw tortillas to the skillet incredibly easy. Simply peel one side of the plastic off, gently lift the tortilla with the other piece of plastic still attached, and then flip it onto the hot skillet, carefully peeling off the second piece. Aim for a thickness similar to a thin crepe or a little thicker than a dollar bill. Don’t make them too thin, or they’ll be hard to handle and prone to tearing; too thick, and they’ll be gummy and won’t puff properly. The right thickness is vital for achieving that desirable soft, pliable texture in your homemade tortillas.
Heat Skillet for Cooking Tortillas
The cooking surface you choose and how you heat it are crucial for achieving perfectly cooked tortillas that puff and brown beautifully. A cast iron skillet or a traditional comal is ideal, but any heavy-bottomed non-stick pan can work well. The goal is even heat distribution. Place your skillet over medium-high heat. Allow it to preheat for at least 5-8 minutes before placing your first tortilla on it. You want the surface to be hot enough to cook the tortilla quickly, creating those desirable golden-brown spots, but not so hot that it burns before it’s cooked through.
Pan must be hot enough
Knowing when your pan is adequately heated is key to successful cooking tortillas. A simple test is to flick a tiny drop of water onto the surface; if it sizzles and evaporates immediately, your pan is ready. If the water just sits there or slowly evaporates, it needs more time. If it instantly smokes and burns, it’s too hot, and you should reduce the heat slightly. Cooking tortillas on a skillet that isn’t hot enough will result in dry, stiff tortillas that don’t puff. Conversely, a pan that is too hot will burn the outside before the inside can cook and develop steam, preventing the puff. Patience during this preheating phase will pay off with perfectly cooked, soft, and pliable tortillas.
Cook Each Tortilla to Perfection
Once your skillet is perfectly heated, it’s time to cook your tortillas. Carefully place one tortilla onto the dry, hot surface. Do not add any oil or butter to the pan; tortillas are traditionally cooked dry. Allow it to cook for about 30-60 seconds on the first side. You’ll notice the edges starting to look dry, and perhaps a few bubbles forming on the surface. This is your cue to flip. Use a thin spatula to gently turn the tortilla over. Cook for another 30-60 seconds on the second side. During this time, you should start to see the tortilla puffing up, which is a wonderful sign of success.
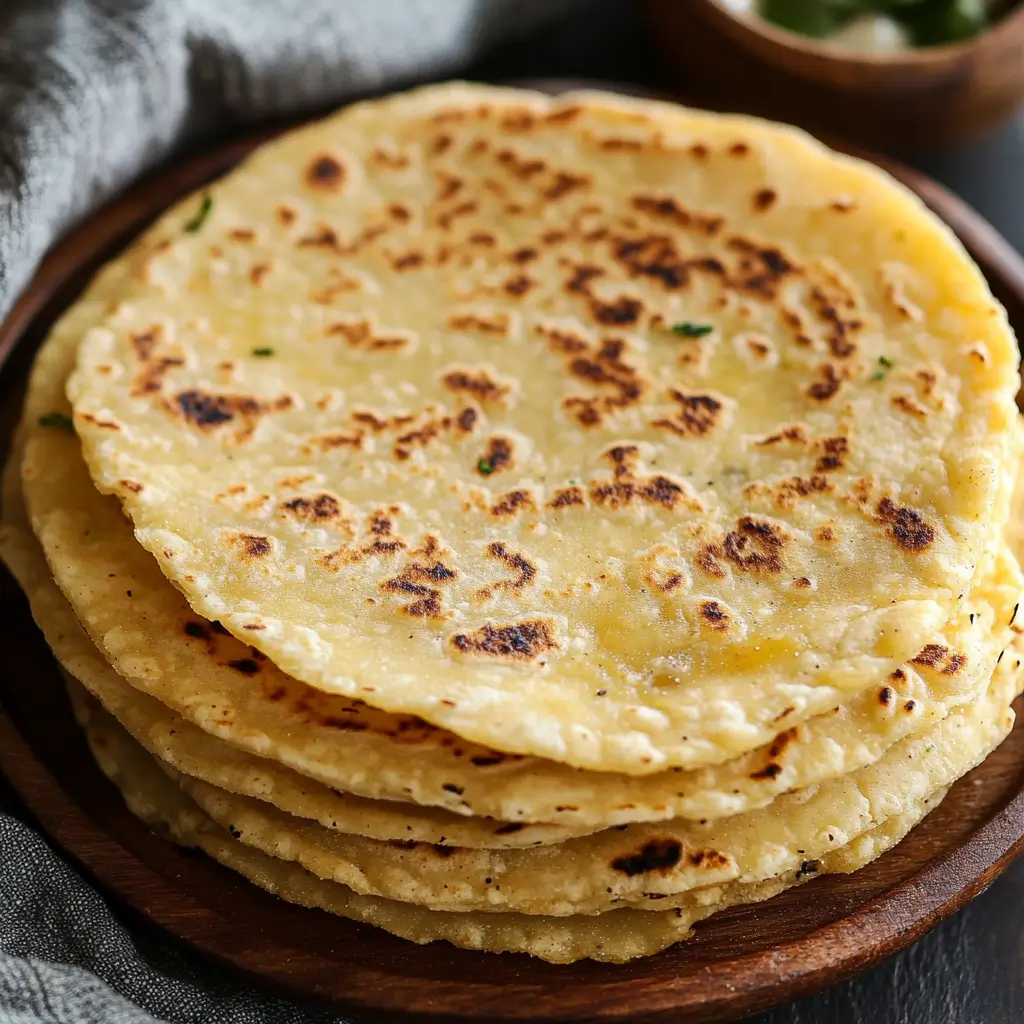
Look for golden spots
As the tortilla cooks, keep an eye out for tell-tale signs of doneness. The first side cooked should show some beautiful golden-brown spots, not dark brown or burnt. These spots contribute to the flavor and visual appeal. The second side will also develop some spotting. If your tortillas aren’t developing these spots, your pan might not be hot enough. If they are burning quickly, reduce the heat.
Aim for a slight puff
The coveted “puff” is a hallmark of a well-made tortilla. It indicates that the moisture inside the dough has turned to steam, creating pockets that separate the layers of the tortilla, resulting in a light, airy, and pliable texture. After flipping, if the tortilla doesn’t puff on its own, you can gently press down on the edges with your spatula for a few seconds. This helps redirect the steam inside. If it still doesn’t puff, don’t worry too much; it will still be delicious. The puff is a sign of good dough consistency and proper cooking temperature. After the second side cooks and ideally puffs, flip it back to the first side for a very brief 10-15 seconds to ensure it’s cooked through. Transfer the cooked tortilla immediately to a towel-lined basket to keep warm. Cooking each tortilla quickly and efficiently ensures a consistent outcome, making your easy honey garlic chicken taste even better with fresh wraps.
Keep Your Homemade Tortillas Warm
Serving warm tortillas is key to enjoying their best texture and flavor. Freshly cooked tortillas are at their peak when they’re still warm and pliable. If you let them cool exposed to the air, they will quickly stiffen and become less enjoyable. Proper warming techniques ensure that each tortilla remains soft, steamy, and ready to be filled with your favorite ingredients. This step is just as important as the cooking itself, especially if you’re making a large batch and serving them over time. A simple method involves using a kitchen towel or a specialized tortilla warmer.
Stack in a clean towel
As soon as each tortilla finishes cooking, immediately transfer it to a clean kitchen towel. Fold the towel over the tortilla to create a little packet. Continue stacking subsequent cooked tortillas on top of the previous one, always keeping them snugly wrapped. The towel traps the steam, which not only keeps the tortillas warm but also helps them soften further, making them even more pliable. For larger gatherings, you can place the towel-wrapped stack inside a tortilla warmer or even a warm oven (turned off, just residual heat) to maintain temperature for a longer period. This simple trick ensures that every single one of your soft tortillas is ready to impress, whether for a quick snack or a full dinner.
Enjoy Your Perfect Tortillas at Home
The moment you’ve been waiting for has arrived! With your stack of perfectly cooked, warm, and soft tortillas, you’re ready to create an unforgettable meal. There’s nothing quite like the taste and aroma of fresh, homemade tortillas. They elevate any dish they accompany, turning simple fillings into culinary delights. The texture, the subtle corn flavor, and the warmth directly from your kitchen all contribute to an authentic dining experience that store-bought versions simply cannot replicate. This is where your efforts truly pay off, as you savor the fruits of your labor with friends and family.
Delicious serving ideas
Your homemade tortillas are incredibly versatile and can be used in countless ways. For a classic approach, fill them with shredded chicken, beef, or pork, topped with salsa, cheese, and fresh cilantro for tacos. They also make excellent quesadillas; simply add cheese and your favorite fillings, then pan-fry until golden. Try them as a base for breakfast burritos with scrambled eggs, beans, and avocado, or use them to mop up flavorful sauces from dishes like chili or stew. For a lighter option, tear them into pieces and serve with guacamole and salsa. Don’t forget their potential as an accompaniment to a bowl of soup or a hearty salad. The possibilities are endless when you have these delightful gluten-free tortillas ready to go. Share your creations and find more inspiration by visiting Carina Recipes on Pinterest or Carina Recipes on Instagram.
Tips for Best Homemade Tortillas
While the basic process for making homemade tortillas is straightforward, a few key tips can elevate your results from good to truly exceptional. Paying attention to these details can make a significant difference in the final texture, flavor, and overall success of your batch. These are the nuances that experienced tortilla makers understand and apply, ensuring consistent quality every time. Mastering these small adjustments will give you confidence and help you troubleshoot common issues, making your tortilla-making journey even more enjoyable and rewarding.
Don’t overcook for softness
One of the most common mistakes is overcooking. An overcooked tortilla will be dry, stiff, and brittle, losing that desirable soft and pliable texture. Aim for minimal golden spots and a good puff. The total cooking time for each tortilla should be relatively quick, typically no more than 1.5 to 2 minutes combined. If your tortillas are coming out crispy, chances are your pan is too hot, or you’re leaving them on for too long. Adjust your heat and timing accordingly. Remember, the steam trapped by keeping them wrapped in a towel after cooking also contributes to their softness, so don’t skip that step.
Keep dough covered always
Masa harina dough can dry out quickly when exposed to air, leading to cracked edges and a less workable consistency. This is why it’s imperative to keep your dough covered at all times. Whether it’s the main batch of dough or the individual dough balls you’ve portioned out, always cover them with a damp kitchen towel or plastic wrap. This maintains the moisture content, ensuring the dough remains pliable and easy to press or roll. A properly hydrated dough is key to achieving that perfect soft, flexible texture in your masa harina tortillas. Consistency in moisture means consistency in quality.
Store and Freeze Cooked Tortillas
One of the great advantages of making your own tortillas is the ability to prepare a larger batch and store them for later use. This makes weeknight meals a breeze, as you’ll always have fresh-tasting tortillas on hand without the immediate effort of making them from scratch. Proper storage ensures they retain their softness and flavor, ready to be reheated whenever you need them. Whether you plan to use them in a few days or a few weeks, there are effective methods to keep them at their best. This convenience factor makes homemade tortillas even more appealing for busy households.
Keep fresh for days
To keep cooked tortillas fresh for several days, allow them to cool completely after cooking. Once cool, stack them neatly and place them in an airtight container or a resealable plastic bag. Store them in the refrigerator. When properly stored, they will remain fresh and soft for up to 3-5 days. To reheat, simply warm them on a dry skillet over medium heat for about 15-20 seconds per side, or microwave them briefly wrapped in a damp paper towel. For longer storage, cooked tortillas freeze exceptionally well. Stack the cooled tortillas with small pieces of parchment paper between each one to prevent sticking, then wrap the stack tightly in plastic wrap, followed by aluminum foil, or place them in a freezer-safe bag. They can be frozen for up to 2-3 months. Thaw them in the refrigerator overnight or directly reheat from frozen on a skillet or in the microwave. Learn more about Masa dough and its uses.
Make Ahead and Fix Issues
Making tortillas can easily fit into a busy schedule if you know how to prep them in advance. This flexibility is a huge bonus, allowing you to enjoy fresh tortillas even when time is short. Furthermore, understanding how to troubleshoot common problems, such as tortillas that refuse to puff, can save a batch and improve your technique for future attempts. Addressing these aspects upfront makes the entire process less daunting and more rewarding, ensuring you consistently produce high-quality, easy tortilla recipe results without unnecessary stress.
Dough can be prepped
Yes, you can absolutely prep your tortilla dough in advance! Once you’ve mixed and kneaded the masa harina dough to the correct soft, pliable consistency, form it into a ball, lightly grease it with a tiny bit of oil (if desired, to prevent drying), and wrap it tightly in plastic wrap. You can store this prepped dough in the refrigerator for up to 2-3 days. When you’re ready to make tortillas, simply remove the dough from the fridge about 30 minutes to an hour beforehand to allow it to come closer to room temperature. You might need to give it a quick knead with a tiny bit more warm water if it feels too stiff. This make-ahead strategy is perfect for busy weeknights or when entertaining, letting you focus on the cooking rather than the mixing.
What if tortillas don’t puff?
If your tortillas aren’t puffing, don’t despair! It’s a common issue and usually indicates one of a few things:
- Dough Consistency: The dough might be too dry or too wet. If too dry, it won’t steam properly. If too wet, it might be gummy. Adjust by adding a tiny bit of water or masa harina.
- Thickness: If the tortilla is too thick, the steam can’t build up enough pressure to separate the layers. If too thin, it might tear or dry out before puffing. Aim for an even, thin consistency.
- Skillet Temperature: This is often the culprit. If the skillet isn’t hot enough, the water won’t turn to steam quickly enough. If it’s too hot, the outside burns before the inside gets a chance to steam. Ensure your skillet is at medium-high heat and consistently hot.
- Cooking Time: Not cooking long enough on the first side can prevent puffing. Allow those initial bubbles to form before flipping. Gently pressing on the edges of the tortilla with a spatula after the second flip can also encourage a puff by directing the steam. Even if they don’t puff, they will still be delicious and perfect for any meal, perhaps alongside a street corn chicken rice bowl.
Naturally Gluten-Free Tortilla Recipe
One of the fantastic benefits of using masa harina for your homemade tortillas is that they are naturally gluten-free. Masa harina is derived from corn, which does not contain gluten, making these tortillas an excellent choice for individuals with gluten sensitivities, celiac disease, or those simply looking to reduce their gluten intake. This allows everyone to enjoy the authentic taste and texture of traditional tortillas without worrying about dietary restrictions. It also opens up a world of culinary possibilities for creating delicious and inclusive meals.
Unlike wheat-based tortillas, which rely on gluten for their elasticity, masa harina tortillas achieve their pliable texture through proper hydration and kneading. The nixtamalization process of the corn not only imparts a unique flavor but also enhances the corn’s nutritional value and makes it more digestible. This means you’re not just getting a tasty alternative; you’re getting a genuinely wholesome and traditional food item. When following this soft tortilla recipe, you’re not just making a meal component; you’re crafting a staple that aligns with a naturally gluten-free lifestyle, offering a delicious and authentic experience every time. Embrace the simplicity and health benefits of these wonderful flourless tortillas.