
Baking authentic rustic German bread at home is a rewarding experience. This simple guide will walk you through each step, from waking the yeast to cooling your fresh baked loaf. You’ll create delicious homemade bread with a perfect crust, ready to enjoy with family and friends.
Key Takeaways
- Proper yeast activation is crucial for dough rise.
- Kneading and two distinct rises build ideal texture.
- Scoring improves crust and loaf appearance.
- Cooling bread fully prevents a gummy interior.
Creating homemade bread brings real joy. The aroma fills your kitchen. Fresh baked goodness awaits you. It’s simpler than you imagine. Enjoy every delicious slice.
Get Ready to Bake German Bread
Making rustic German bread at home brings an incredible aroma and satisfying result to your kitchen. This particular recipe focuses on achieving a beautiful, chewy crumb with a delightfully crispy crust, reminiscent of traditional loaves found in German bakeries. It’s an easy homemade bread recipe that provides a wonderful alternative to more complex sourdough methods, utilizing yeast for a straightforward baking process. Prepare to create a centerpiece for any meal, perfect for dipping into soups or serving alongside hearty main courses like Easy Butter Chicken. For more culinary inspiration, check out our boards on Pinterest.
Total Time and Servings
The total preparation and baking time for this rustic German bread will take approximately 3 to 4 hours, though most of this is inactive waiting time for the dough to rise. Active hands-on time is surprisingly minimal, making it a perfect weekend project. This recipe typically yields one large loaf, suitable for sharing among 6-8 people, or enjoyed over several days if stored correctly. The satisfaction of a fresh baked loaf makes every minute worthwhile, offering a wholesome addition to your table.
What to Expect
Expect a deeply flavorful bread with a slight tang, even without a sourdough starter. The interior will be soft and airy, while the crust will develop a wonderful chewiness and deep golden-brown color. You’ll achieve a rustic appearance, which is part of its charm. This homemade bread is excellent plain, toasted, or as a base for sandwiches. It’s a truly versatile bread that will impress both novice and experienced bakers alike, showcasing simple ingredients transformed into something extraordinary.
Gather Ingredients for Rustic German Bread
The quality of your ingredients directly impacts the flavor and texture of your rustic German bread. While this is an easy bread recipe, selecting the right components ensures the best outcome. Make sure all your ingredients are at room temperature, especially the water for the yeast, which should be lukewarm. Having everything pre-measured and ready before you begin will streamline the entire process, making your baking experience even more enjoyable.
All Your Basic Supplies
For this delicious homemade bread, you will need a few key items:
- Active Dry Yeast: Fresh yeast is crucial for a good rise. Check its expiration date.
- Warm Water: Not hot, not cold. Around 105-115°F (40-46°C) is ideal for activating the yeast.
- Flour: A blend of bread flour and rye flour gives the characteristic German texture.
- Salt: Essential for flavor and controlling yeast activity.
- Sugar (optional, but recommended): A small amount helps activate the yeast and adds subtle sweetness.
- Vegetable Oil or Melted Butter: Adds tenderness and keeps the crumb soft.
- Baking Equipment: A large mixing bowl, a clean kitchen towel, and a baking sheet or Dutch oven are necessary.
Important Flour Notes
Flour choice is vital for authentic German bread. We recommend using a combination of strong bread flour and whole rye flour. Bread flour provides the necessary gluten structure for a good rise and chewy texture, while rye flour contributes the distinctive flavor, denser crumb, and darker color often associated with traditional German cuisine. If you can find dark rye flour, it will further enhance the rustic quality. Avoid using all-purpose flour alone, as it typically lacks the protein content needed for this style of loaf. Measuring your flour by weight (grams) rather than volume (cups) is always more accurate for consistent baking results, one of the best baking tips for homemade bread.
Start Your Amazing German Bread Dough
The journey to your fresh baked bread begins with preparing the dough, a foundational step for any good homemade bread recipe. This stage involves carefully combining the ingredients to form a cohesive, pliable mass that will later become your delicious rustic loaf. Patience and attention to detail here will pay off greatly in the final product. Understanding the basics of yeast activation is a core component of successful bread making.
Waking Up the Yeast
Properly activating your yeast is perhaps the most critical first step. In a large mixing bowl, combine the warm water (ensure it’s not too hot, which can kill the yeast, or too cold, which inhibits its activity) with a pinch of sugar. Sprinkle your active dry yeast over the water. Stir gently and let it sit for 5-10 minutes. You should see a foamy, bubbly layer forming on the surface, indicating the yeast is alive and active. This process, often called “proofing” the yeast, ensures your dough will rise correctly. If no foam appears, your yeast may be old or the water temperature was incorrect, and you should start over with fresh yeast.
Mixing Oil and Flour
Once your yeast is frothy, add the oil or melted butter to the yeast mixture. Then, gradually add the flours and salt to the bowl. Start by mixing with a spoon or spatula until a shaggy dough forms. Turn the dough out onto a lightly floured surface and begin kneading. Knead for 8-10 minutes, or until the dough is smooth and elastic. It might feel sticky at first, but resist the urge to add too much extra flour, as this can make your bread dense. The goal is to develop the gluten, which creates the bread’s structure and chewiness. This diligent kneading is a key part of creating a great rustic German bread.
First Rise for Your Homemade Bread
The first rise, or bulk fermentation, is a crucial period where the yeast truly gets to work, fermenting the sugars in the flour and producing carbon dioxide. This gas creates the air pockets that give your rustic German bread its light and airy texture. Allowing sufficient time for this rise is vital for flavor development and ensuring a proper crumb. Don’t rush this stage; good bread takes time.
Finding a Warm Spot
After kneading, lightly oil your mixing bowl to prevent sticking. Place the dough in the bowl, turning it once to coat the entire surface with oil. Cover the bowl tightly with plastic wrap or a clean kitchen towel. Now, find a warm, draft-free spot for the dough to rise. Ideal temperatures are typically between 75-85°F (24-29°C). A slightly warmed oven (turned off, with just the light on), a sunny spot, or even on top of a warm appliance can work. Avoid extremely hot places, as this can over-proof the dough too quickly, leading to a less flavorful bread. This environment allows the yeast to thrive and develop the characteristic flavor of your fresh baked bread.
How to Know it’s Ready
The first rise usually takes 1 to 1.5 hours, but timing can vary depending on your kitchen’s temperature and the yeast’s activity. The dough is ready when it has approximately doubled in size. To check, gently poke the dough with a floured finger. If the indentation remains, the dough is sufficiently risen. If it springs back immediately, it needs more time. If it collapses, it might be slightly over-proofed, but it can often still be salvaged. This doubling in size is a visual cue that your homemade bread dough is developing well and getting ready for the next step.
Punch Down and Rest Dough
After the first rise, the dough is full of gas and needs to be handled. Punching down the dough serves several important purposes, resetting the gluten structure and distributing the yeast more evenly throughout. This step is essential for achieving a fine, even crumb in your rustic German bread. It’s part of the rhythm of traditional bread making and helps ensure a successful bake. This process isn’t about being aggressive; it’s a gentle deflation that preps the dough for shaping.
Releasing Air Pockets
Once your dough has doubled in size, gently punch it down. This doesn’t mean slamming it, but rather deflating it with your fist or the heel of your hand. The goal is to release the large pockets of carbon dioxide gas that have accumulated during the first rise. This redistributes the yeast, sugars, and moisture, ensuring a more uniform texture in the final loaf. It also helps to strengthen the gluten network, leading to a better rise in the oven and a more satisfying chew. After punching, gently fold the edges towards the center a few times, forming a rough ball.
Why the Second Rest
After punching down, many bread recipes, including this easy bread recipe for a German loaf, call for a second, shorter rest. This period, often 15-20 minutes, is called the “bench rest” or “intermediate proof.” Its purpose is to allow the gluten to relax after being handled. When gluten is relaxed, the dough becomes much easier to shape without tearing. It also allows the yeast to begin producing a small amount of gas again, preparing the dough for its final shaping and subsequent proofing. This brief rest is a simple but effective baking tip that contributes significantly to a well-formed, beautiful homemade bread, setting the stage for the final rustic German bread. For more inspiration on crafting delightful main courses to pair with your fresh bread, feel free to visit our Main Course Recipes section.
Shape Your Rustic German Bread Loaf
Shaping is where your rustic German bread truly begins to take its final form. This step requires a gentle touch and a little practice, but even a slightly imperfect shape will yield a delicious homemade bread. The goal is to create tension on the dough’s surface, which helps it hold its shape during the final rise and baking, resulting in a beautiful, fresh baked loaf. Don’t be intimidated; the rustic look is part of its charm.
Counter Prep for Shaping
Before you begin shaping, ensure your countertop is clean and lightly floured. Avoid using too much flour, as this can dry out the dough and make it tougher. A bench scraper can be a very useful tool for managing the dough and cleaning your workspace. Gently turn the rested dough out onto the floured surface. You want to work efficiently but without rushing, allowing the dough’s natural elasticity to guide your movements. Having a clean, organized workspace makes the shaping process much smoother and more enjoyable, reducing any potential stickiness.
Easy Loaf or Boule
There are many ways to shape bread, but for a rustic German bread, a simple round boule or an elongated oval loaf (batard) are ideal. For a boule, gently gather the edges of the dough towards the center, pinching them together to create a seam at the bottom. Then, flip the dough seam-side down and cup your hands around it, rotating it to create surface tension. For an oval loaf, gently flatten the dough into a rectangle, fold one-third of the dough over lengthwise, then fold the opposite third over the first. Pinch the seam closed, then roll the loaf back and forth to taper the ends slightly. This creates the classic shape and allows for effective scoring later. Place your shaped loaf seam-side down on parchment paper or in a floured proofing basket for the final rise. You can find excellent savory pairings for your loaf, such as a hearty Ground Turkey and Peppers recipe, on our site.
Bake Your Amazing German Bread
The moment of truth arrives when your rustic German bread enters the oven. Baking is not just about heat; it’s about controlling temperature and moisture to achieve that perfect golden crust and tender interior. Proper technique here will ensure your homemade bread comes out looking and tasting professional. Getting the timing and heat right is one of the most satisfying baking tips to master, leading to a truly impressive fresh baked loaf.
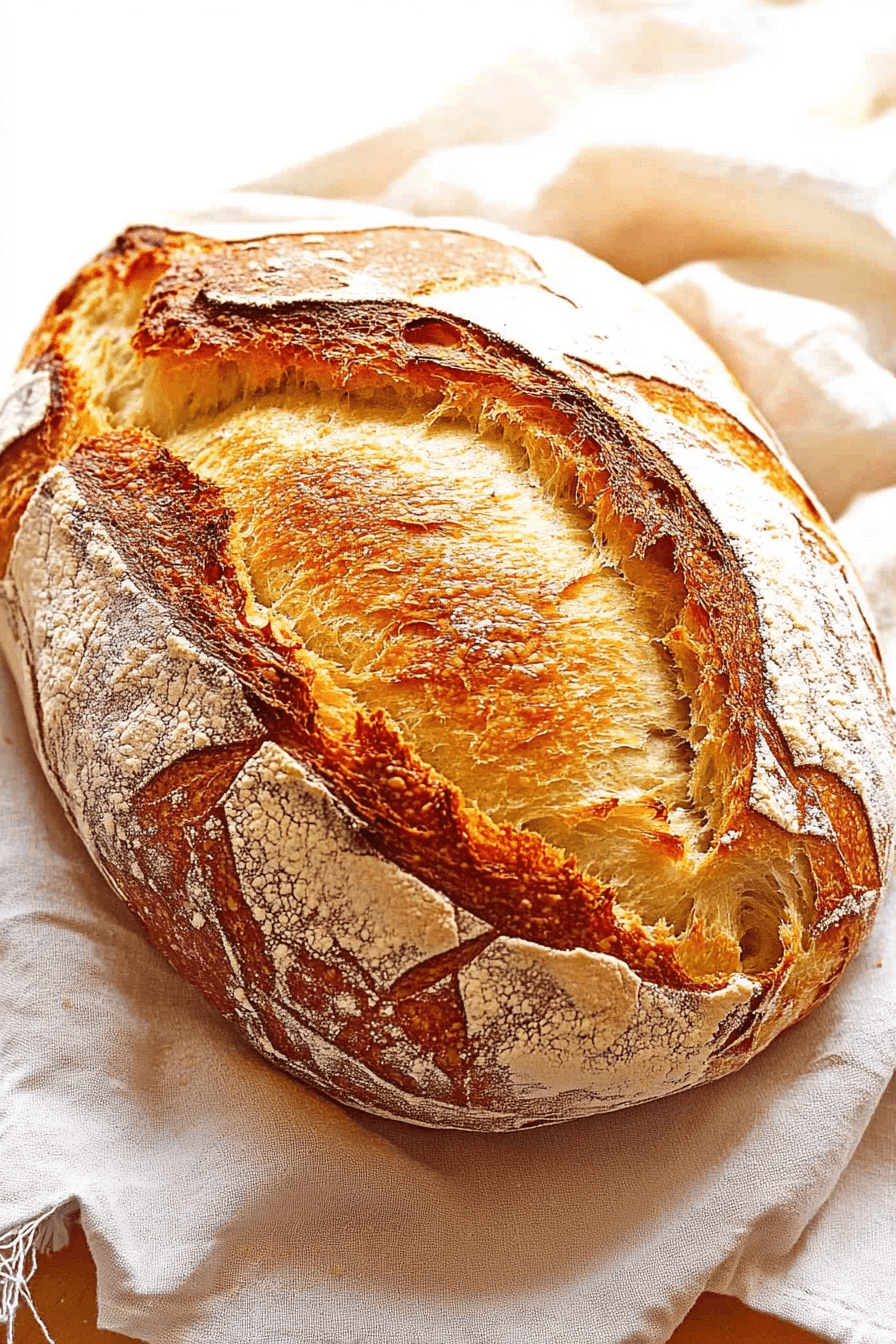
Scoring for a Great Crust
Just before placing your loaf in the oven, you’ll want to score it. Scoring involves making shallow cuts on the surface of the dough with a sharp knife or a bread lame. These cuts serve several purposes: they allow the dough to expand in a controlled manner during baking (preventing uncontrolled tearing), they create steam vents, and they add a beautiful, artistic touch to your fresh baked bread. Classic German bread often features one or two long, parallel slashes, or a simple cross. Don’t cut too deep, or the loaf may flatten. A depth of about ¼ to ½ inch is usually sufficient to guide the oven spring effectively.
Perfect Baking Temperature
Preheat your oven to a high temperature, typically 450°F (232°C), with a baking stone or Dutch oven inside, for at least 30-60 minutes. This ensures everything is thoroughly heated, which is crucial for a good “oven spring”—the rapid expansion of the dough during the initial baking phase. If baking in a Dutch oven, place the scored loaf directly into the hot pot, cover it, and bake for 20-25 minutes. Then, remove the lid and continue baking for another 20-30 minutes, or until the crust is deep golden brown and the internal temperature reaches 200-210°F (93-99°C). If baking on a stone, you can create steam by adding a cup of hot water to a pan at the bottom of the oven for the first 10-15 minutes, which helps the crust develop beautifully. This method delivers a truly rustic German bread experience, especially when served with a rich dish like Crispy Parmesan Chicken with Garlic Sauce.
Cool and Enjoy Your Fresh Bread
While the aroma of freshly baked rustic German bread is almost irresistible, patience at this final stage is key. Properly cooling your homemade bread is just as important as the baking itself for achieving the ideal texture and flavor. Rushing this step can lead to disappointment, even after all your careful efforts. Trust the process, and you’ll be rewarded with a perfect fresh baked loaf.
Why Cooling is Key
Once your German bread comes out of the oven, it’s still cooking! The internal temperature remains high, and moisture is redistributing throughout the loaf. If you slice into it too soon, the steam will escape too quickly, resulting in a gummy, dense crumb that can taste doughy. The crust, which was once crispy, might also become soft and lose its integrity. Cooling on a wire rack allows air to circulate around the entire loaf, letting steam escape gradually and preventing the bottom from becoming soggy. This process helps the crumb set properly and concentrates the flavors, giving you that perfect slice of rustic homemade bread.
Resisting the First Slice
We know, it’s incredibly tempting to cut into a warm loaf straight from the oven. The smell of fresh baked bread is one of life’s simple pleasures! However, try to resist for at least 1-2 hours, or until the loaf is completely cooled to room temperature. For very dense rye breads, some bakers even recommend waiting 24 hours. This patience will be amply rewarded with superior texture and flavor. Once cooled, slice and enjoy your delicious rustic German bread with butter, cheese, or your favorite spread. Don’t forget to capture your beautiful creation and share it with us on Instagram!
Helpful Tips for Better German Bread
Even experienced bakers benefit from a few clever baking tips to ensure consistently excellent results. Making homemade bread, especially a rustic German bread, can be incredibly rewarding, and these suggestions will help you overcome common challenges and achieve an even better fresh baked loaf every time. These tips are especially useful for anyone looking to refine their easy bread recipe skills.
Yeast Warmth Secrets
The temperature of your water for activating yeast is critical. Too cold, and the yeast won’t activate; too hot, and you’ll kill it. The ideal range is 105-115°F (40-46°C). A kitchen thermometer is your best friend here. If you don’t have one, the water should feel comfortably warm to the touch, like a baby’s bath. Also, ensure your yeast is fresh. Old yeast is a common culprit for a loaf that doesn’t rise. Storing yeast in the refrigerator or freezer extends its shelf life significantly. Understanding yeast’s role in fermentation is fundamental for successful baking.
Sticky Dough Benefits
Don’t be afraid of sticky dough! A slightly sticky dough often indicates a well-hydrated dough, which ultimately leads to a more open, airy crumb and a softer interior in your homemade bread. Resist the urge to add excessive amounts of extra flour during kneading. Instead, use a light dusting of flour on your hands and work surface, or lightly oil your hands. A bench scraper can also be invaluable for managing sticky dough on the counter. Over-flouring can make your rustic German bread dry and dense. Embrace the stickiness; it’s often a sign of good things to come for your fresh baked loaf.
Creative Variations for Your Bread
Once you’ve mastered the basic rustic German bread recipe, feel free to experiment with creative variations. Homemade bread is incredibly versatile, and adding different ingredients can transform its flavor and texture. These easy bread recipe modifications allow you to personalize your fresh baked bread to suit your taste preferences, making each loaf a unique creation.
Heartier Loaf Options
To make a heartier loaf, consider incorporating more whole grain flours. Increase the proportion of whole wheat flour or dark rye flour, keeping in mind that these flours absorb more liquid, so you might need to adjust the water content slightly. You could also add cooked grains like oats, cracked wheat, or even cooked quinoa to the dough during the mixing stage. These additions not only boost the nutritional value but also add a wonderful texture and depth of flavor, making your rustic German bread even more substantial and satisfying.
Adding Seeds or Herbs
Infuse your homemade bread with additional flavors by mixing in seeds or herbs. Caraway seeds are a classic addition to German bread, offering a distinct aromatic note. Poppy seeds, sesame seeds, or sunflower seeds can be added to the dough for extra crunch and nuttiness, or sprinkled on top before baking. Fresh or dried herbs like rosemary, thyme, or oregano can also be kneaded into the dough for an herbaceous twist. Experiment with different combinations to find your favorite. Just be sure to incorporate them evenly during the final stages of kneading to ensure they are well distributed throughout your fresh baked bread.
Storing Your Rustic Bread Safely
Proper storage is essential to keep your homemade bread fresh and flavorful for as long as possible. A beautifully fresh baked rustic German bread deserves to be enjoyed fully, and with the right techniques, you can extend its shelf life. These easy bread recipe storage tips will help maintain its texture and prevent it from going stale too quickly, ensuring you get the most out of every loaf.
Countertop Storage Guide
For short-term storage (1-3 days), keeping your rustic German bread at room temperature on the countertop is ideal. Once completely cooled, store the bread in a clean paper bag, a bread box, or wrapped loosely in a clean kitchen towel. Avoid airtight plastic bags at room temperature, as they can trap moisture and cause the crust to soften and the bread to mold more quickly. If your kitchen is very humid, a bread box is particularly helpful. For optimal freshness, consider slicing the bread as you need it, rather than all at once, to minimize exposure to air. This method helps maintain the crust’s integrity while keeping the interior soft.
Freezing for Later
If you won’t finish your fresh baked bread within a few days, freezing is an excellent option for long-term storage (up to 3 months). Once the homemade bread is completely cooled, slice it or keep it whole. Wrap the loaf tightly in plastic wrap, then an additional layer of aluminum foil, or place it in a freezer-safe bag, removing as much air as possible. To enjoy, simply thaw the bread at room temperature, or for a refresh, you can lightly toast individual slices from frozen. A whole loaf can be reheated in a preheated oven (350°F/175°C) for about 15-20 minutes, until warmed through and the crust is crisp again. This is a great way to always have delicious rustic German bread on hand, ready for any meal or occasion.
Simple Answers to Bread Questions
Even with an easy bread recipe, questions can arise during the baking process. Understanding common issues and their solutions can make your experience of baking rustic German bread much smoother and more enjoyable. These simple answers aim to troubleshoot some frequently asked questions, helping you confidently create a perfect fresh baked loaf every time you bake homemade bread.
Using Instant Yeast
If your recipe calls for active dry yeast and you only have instant yeast, you can usually substitute it directly. Instant yeast does not require proofing in warm water first; you can typically mix it directly with the flour and other dry ingredients. However, it’s still a good idea to use lukewarm liquid in your recipe to encourage optimal yeast activity. Use the same quantity of instant yeast as active dry yeast, or slightly less (about 25% less) if you want a slower rise. Instant yeast is very efficient, making it a favorite for many bakers seeking a reliable and straightforward process for their homemade bread.
Dealing with Sticky Dough
Sticky dough is a common concern, especially with high-hydration or rye-based rustic German bread. Remember, a certain level of stickiness is desirable for a tender crumb. If the dough is excessively sticky and unmanageable, try these tips: lightly oil your hands and work surface instead of flouring; use a bench scraper to help scrape and fold the dough during kneading; or if you’re truly struggling, add a very small amount of flour (a tablespoon at a time) until it’s workable, but be conservative. Developing gluten through sufficient kneading will also make the dough less sticky over time. Don’t let sticky dough deter you from making a wonderful fresh baked loaf.